My last post showed pictures of me having a fun time dressed as Vice Admiral Amilyn Holdo from Star Wars the Last Jedi, at Silicon Valley Comic Con. As promised, here’s a compilation of my research and some tips and tricks to help you with your own costume. This is a long post; it covers fabric and colors, pattern, shoes, wig, jewelry, makeup, and more. (Please note, this is how I personally made my own Admiral Holdo cosplay; I can’t guarantee yours will be Rebel-Legion approvable).

There are a lot of reference photos online, especially now that the DVD of the movie is out. I have a few important ones here in this post, but Google is your friend! The Official Rebel Legion has an excellent list of Holdo’s costume elements, so even if you are not going for RL approval, take a look at the list and the descriptions. To summarize:
- Dress made of puce jersey or stretch fabric that drapes well
- Fitted neck with draped front and exposed collarbones
- Dramatic draped hood
- Long, floor-length fabric on left shoulder
- Long, fitted sleeves
- Round-toe boots with chunky heel
- Purple curly hair
- Silver tiara
- 2 silver cuff bracelets
- Earrings with purple stones
- Cluster ring
- Ring with marbled stone
Yes, it looks like a lot, but is doable and I’ll tell you in this post where to buy all the materials you need.
FABRIC AND COLORS
Keep in mind, the Vanity Fair photo of Holdo’s costume released before the movie does a wonderful job of showing the draping, but this was styled for a photo shoot and it does not show screen accurate color or hair.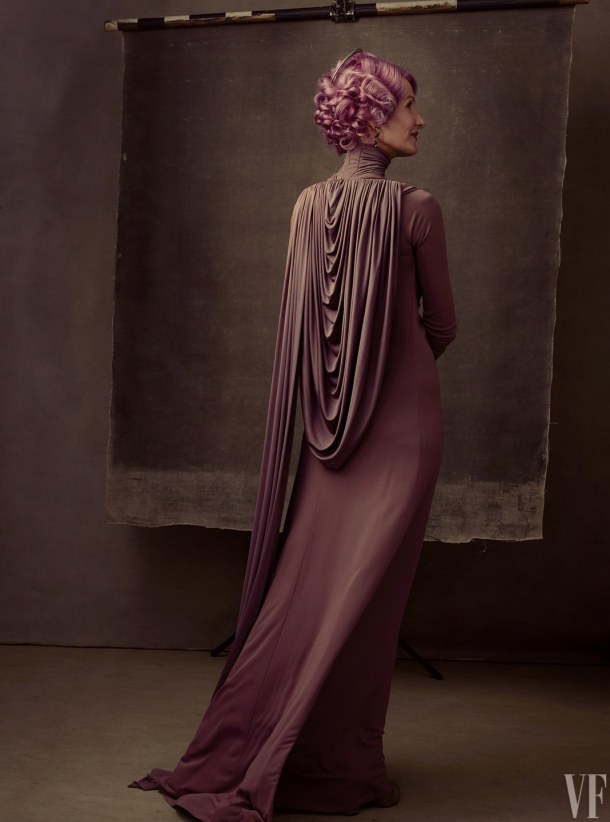
On screen, you can see that her hair has much looser waves in the front, and the color of the dress is much less purple. Depending on the scene and lighting, it appears to change color, ranging from brown to mauve. The director has said that the dress is puce, and you’ll see on the Admirals in Purple Facebook group a lot of discussion on what the color actually is and what fabrics would work. I recommend checking out that FB group regardless; it’s got a lot of great posts and advice, including a pinned post with shopping links.
My advice is to get some fabric swatches and see what looks good on your skin. If you want to be screen accurate, go puce, but not everyone can carry it off. This is my swatch card from Stylish Fabrics. 
My personal opinion is that “mauve pale” looks the most like the dress on screen, “mauve DK” looks most like the Vanity Fair photo, and “mauve 2017” is a compromise between the two. I looked like death in mauve pale so I used mauve 2017 for my own costume, and you can see that depending on the light it looks very different.
The fabric I bought is a rayon jersey, which is soft and stretchy, and has a nice drape. You do not need to buy rayon jersey, but your fabric cannot be stiff. It must be soft enough to give the waterfall effect on the back of the dress. The Stylish Fabrics rayon comes in several weights. I got swatches of the #406 (200 GSM), #409 (180 GSM), and #13390 (160 GSM). I purchased the 200 GSM, which is the thickest, for my entire dress and lining. Some other cosplayers have bought a thicker fabric for the main dress, and a thinner one for the hood to keep it lighter.
How much fabric to buy? I bought 11 yards, and had 2 full yards and some huge scraps left over, so 9 yards is plenty. I also self-lined the body of the dress, so if you skip that you can save a few yards. I am 5’6″ and if you are shorter than me you can also use the width, instead of the length of the fabric and save even more. So depending on your height and whether you want a lining, you will use 6-10 yards of a 55″ fabric.
DRESS PATTERN
Given the nature of the construction of this dress, you will have to drape it, either on yourself or a dress form. This is not a project I recommend for a beginner because there’s no ready made pattern, and knits sometimes stretch and sag in unexpected ways. I having enough sewing experience to drape mine on a dress form, but if you need help getting started, Simplicity 1716 is a cowl-neck dress pattern that you can adapt by lengthening. (I haven’t used it so I can’t vouch for it, but it appears to me to be a decent base).
The hood is one giant trapezoid with pleated edges. These are the dimensions I used; if you are taller than me you will want to increase the width of the base. You can figure this out by having a friend hold a tape measure in a U shape on your back, with the ends on each shoulder and the bottom of the U just below your butt. I am 5’6″ and a 60″ trapezoid base is perfect for me. (There’s no need to change the 12″ measurement; that creates the smallest U in the series of drapes on the hood).

The easiest way to cut a large trapezoid is to fold your fabric in half like this and cut at the diagonal.
Please note, this makes for a REALLY FULL and heavy hood, and A LOT OF PLEATING. I think if I remade the dress I would not use the full width of the fabric, and have shorter diagonals. The hood would still look fine. If you are shorter than 5’6″, definitely use smaller smaller measurements than what I have diagrammed above.
I cartridge-pleated my hood. I think this makes it look neater and more even than gathering. It is time-consuming, but a good way to get a lot of fabric into a small space.
Have I mentioned this hood is heavy? It will want to drag and dip in weird ways, so be sure to put a strip of boning across the top to keep a nice straight line. I used a plastic cable-tie, cut to size.
The other thing you’ll want to consider to keep the hood where it should be is to have some type of internal harness. I’ve seen a few options:
- Backpack-style straps. Run a thick piece of elastic across the top of the hood (where you have your boning), and then make loops that will go across your armpits like a backpack (but is hidden inside the dress). This is the approach used by Anachronism in Action. (You can pad the straps to make them more comfortable).
- A front harness that is hidden below the neck drape. I haven’t tried this myself, but this is explained on Jen Eyre’s blog.
- My own approach was to build a harness based on a T-back racerback bra. That way the weight was not only around my arms, but distributed across my chest. I got a bra with a front closure, and reinforced the elastic with a thicker kind. I also had another strip of elastic with its own closure running along the bottom of the bra for extra security. Now you’ll have support from the elastic running along the top of the hood, the elastic straps that come over your shoulders, the elastic T strap that goes down your back, and the elastic that goes around your ribcage below your bust. (Don’t pick a sports bra or a bra with wide straps; they will show because of the exposed shoulder blades on the dress).
The floor-length drape on the left shoulder is just a long rectangle, also pleated with the hood. The length will depend on your height and how much of a train you want. My width was 24.”
The sleeves are long and fitted, with a seam down the inside of the arm. If you look at this photo you will see they are actually gathered on the lower halves. 
I constructed mine by cutting extra long sleeves and putting elastic on the inside seam of the sleeves. Stretch the elastic as you stitch it onto the lower sleeves, and when you release the elastic the sleeves will be gathered. 
For the neck of Holdo’s gown you have a gathered high-necked collar with a long draped portion in the front. The back of the neck has 2 flat areas that are not gathered. I used a long invisible zipper down the back of the collar. The zipper was extra long so that I could pull the collar over my head after I put the dress on, and the extra length is tucked into the dress. The bottom of the front drape is attached to the dress, but the bottom of the back collar is attached to the hood using heavy-duty hooks and eyes, which are the last thing you attach when putting on the dress. (The jersey of the dress is stretchy enough that you don’t need a zipper all the way down the back of the dress, although you should still have a center back seam if you want screen accuracy). Use more hooks than you think you need! I’m going to add more for the next time I wear it so it doesn’t shift off-center again.
I highly recommend looking at how Anachronism In Action did her collar so you can see what the pattern shapes are. You will need to bone and/or interface the collar so that it is stiff enough to stay up.
Some other tips:
- When you sew together the long side seams of the dress, add some twill tape, ribbon, or other similar materials to help control the fabric from stretching too much. I used 6mm Mobilon tape, a semi-transparent elastic, because I wanted a bit of stretch to remain.
- Jersey fabric stretches enough on the straight grain; don’t cut your dress on the bias.
- Your jersey may have a subtle direction to the weave that looks like parallel lines. If you care about having everything in the same direction, that will use more fabric than if you don’t care. (My 9 yards did include keeping everything in the same direction).
SHOES
Holdo wears boots with a chunky heel and a round toe that are a similar color to her dress. This style is not hard to find, and can be painted or dyed to match. I used the “Refresh Footwear Women’s Closed Toe Chunky Stacked Block Heel Ankle Bootie” in mauve from Amazon (affiliate link), however, there are other similar boots you can find that will work just as well.
I found the toes tight, and was able to stretch them out by putting in a shoe stretcher while using a hair dryer to warm up and soften the synthetic material. (If you get real leather shoes you don’t need to use the dryer trick to soften them before stretching).
I painted my shoes with a transparent spray paint called Tint It in plum (Amazon affiliate link). You can also get this at Michael’s, but my local store was sold out. It dries very quickly and a couple coats was good enough to turn my shoes from a pinky mauve color to a nice purple matching my fabric.
Use the Tint It in a well-ventilated area. Lay down newspaper and wear disposable gloves. Tape off the sole of your shoe using painter’s tape, and use a bristle brush or old toothbrush to brush the suede to distribute the color after spraying. Do this immediately, because Tint It dries fast!
WIG
I used the Arda Wigs Josephine in Dusty Rose. I’ve also seen other cosplayers use the Lavender color. Personally, I think Holdo’s hair is in between the two, and on my next wearing I might darken my wig. One way to do this is with “the Sharpie trick.” Put a purple Sharpie marker into some alcohol, let the ink dissolve, and spray it on.
The Josephine wig is finger-waved with tighter curls than you need. I relaxed the hair (especially in the front) by using a garment steamer and combing through while the wig was hot. (If you are coloring your wig, do it on a cool wig after you’re done with the steaming!) 
If you prefer a lacefront wig, I’ve also seen the Arda Wigs Bucky Classic used with a Holdo cosplay, but it is $68 vs. $30 for the Josephine. However, you won’t have to steam out the curls.
JEWELRY
Admiral Holdo wears a lot of space jewelry. This page from the Star Wars Visual Dictionary shows her tiara, cuffs, earrings, and rings. 
SILVER CUFFS
Holdo’s silver cuffs can be purchased from various vendors on eBay and Aliexpress for a few dollars each. I bought a pair each from these 2 vendors and they were exactly the same. I would recommend sanding them a bit, or lining them with some extra dress material. At the end of the day, my dress sleeves looked fuzzy from all the rubbing of the sharp edges.
HALO
You have several options for a halo: buy a 3D printed one from Etsy, bribe a friend with metalworking skills, solder your own, or make a decent-looking one with $3, thirty minutes, some pliers, and wire! I picked the last option. I may upgrade to a soldered one later, to be a little more screen-accurate, but the wired ends of my halo are hidden inside my wig so it doesn’t matter much.
I originally planned to use 1/4 inch armature wire for a thicker halo, but my local store didn’t have any, so these are the materials I ended up using: 12 gauge floral wire, 26 gauge paddle wire, and a metal hair comb. I bought the wire at Michael’s and I used one of these combs from Amazon (affiliate link), cut in half with tin snips.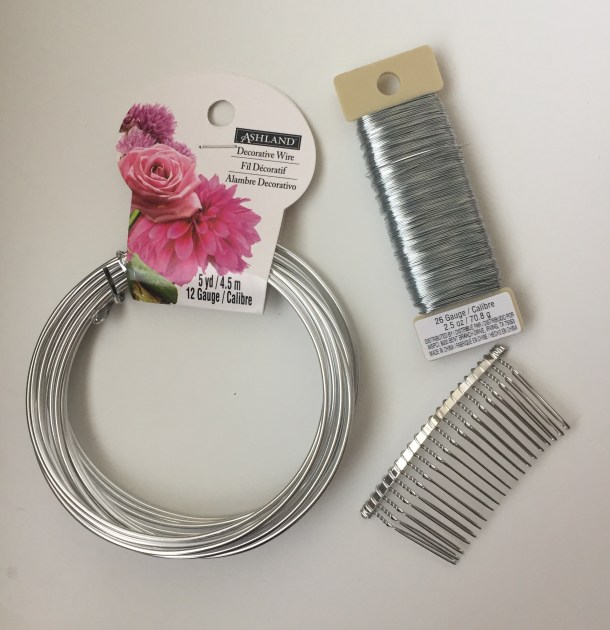
I can’t draw, so please don’t laugh too hard, but here’s a diagram of how it was done:
RINGS AND EARRINGS
Holdo has a silver ring with a cluster of stones, and a gold oval ring with a marbled stone. (I don’t know why one ring is gold when all of her other accessories are silver. If the non-matching bothers your OCD self, go silver for both like I did). I haven’t found anyone selling exact reproductions, but this Google Doc from the Admirals in Purple FB page has links to a number of Amazon and eBay rings that could work.
For the oval ring you can either purchase a cats’ eye stone ring, or paint a plain stone with nail polish. Mine is painted. A tip if your rings are too big: you can put some hot glue on the inside bottom. It’s not obvious when it’s worn and it keeps your ring from slipping off.
The earrings are a bit trickier to find. The Rebel Legion standard is a semi-circular silver earring with dangling purple stones. I haven’t found a super close match and people seem to be modding their own earrings by adding stones to silver findings. I am using these lever back earrings (custom ordered in silver) from Etsy, because they work for both Holdo and my 18th century costumes.
BLASTER
Holdo favors a classic blaster, the DDC Defender-5. There are some nice replicas for sale, but if you are on a budget, I would get a plastic replica of Princess Leia’s blaster, Dremel off the extra length in the barrel (the skinniest part), glue the ends back together, and paint it yourself. You can get one on Amazon for about $10 (affiliate link). It’s not exactly the same, but close enough.


MAKEUP AND MISC
Holdo wears lipstick, eyeliner, mascara, shaped brows, and nail polish. The exact products will depend on your skin tone, but here’s a few tips.
- She has dark purple polish. I used Essie’s Smokin’ hot (Amazon affiliate link).

- I can’t tell what color Holdo’s eyebrows are, so I’m not sure they match her hair. However, Laura Dern is a blonde with brown eyebrowns. My eyebrows are black, and I found them too stark compared to my purple wig, so I colored my brows purple. This is optional, but may be helpful to you if you are in the same situation. I covered my eyebrows with eyelid primer, filled in some spots with purple eye liner pencil, and covered the rest with purple eyeshadow. It’s subtle, but made a difference.

In the future, people don’t have to carry out money or keys, but in real life sometimes you need a way to carry your phone! I couldn’t add pockets to this clingy dress so I made a little drawstring bag to use at the convention. (Line yours with a non-stretchy material). I haven’t tried it myself, but I’ve also heard of others using a ladies’ stretchy lace thigh holster to hold your stuff.
Let’s talk storage! There are a lot of pieces associated with this costume, and I didn’t want to go hunting for all of them right before a con. I’ve found that a 23″ long (28 quart Sterilite bin) is just the right size to hold the dress, boots, wig, bag, cuffs, backup cuffs, halo, earrings, and rings. The bins are about $5 at Target and absolutely worth it to keep your stuff together. 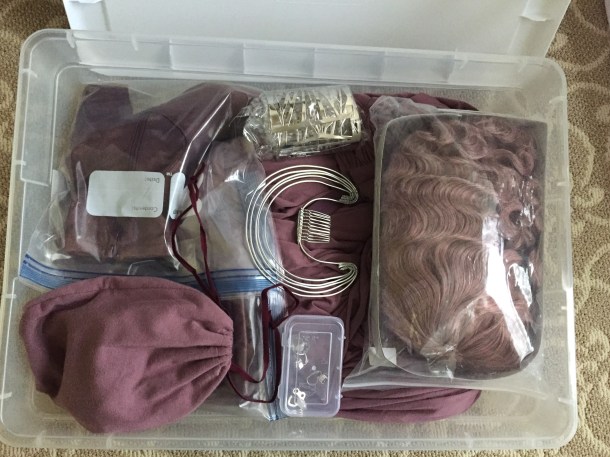
HOW MUCH WILL THIS COST?
Depending on what you buy, where you get it from, and what you already have in your stash, your costs are going to vary. However, here is what I spent to give you a general idea. (I like coupons and bargains).
- 11 yards rayon jersey + tax + shipping, with a coupon: $63.44 from Stylish Fabrics
- Swatch card + tax + shipping: $8.32 from Stylish Fabrics
- Purple thread + tax, with a coupon: $3.26 from Joann Fabrics
- Invisible zipper + shipping: $5.50 from eBay (since I couldn’t find a color match at Joann)
- 20 yards Mobilon tape: $6 from eBay (I have a lot left over!)
- Elastic: ~$2, from stash
- Racerback bra: ~$15 from Target
- Wig + tax + shipping: $35.50 from Arda Wigs
- Silver cluster ring + shipping: $13.29 from eBay
- Metal oval ring + shipping: $1.99 from eBay
- Earrings + shipping: $16.94 from Etsy
- Bracers + shipping: $5.56 from eBay
- Shoes: $14.46 from Amazon
- Tint-It spray: $12.08 from Amazon
- Aluminum floral wire + tax, with coupon: $3.92 from Michael’s (I have plenty left)
- Silver paddle wire + tax, with coupon: $2.19 from Michael’s (this will last me forever)
- Metal comb: $1.40 from Amazon ($6.99 for a 5-pack)
- Purple nail polish, with coupon: $3.99 from Amazon
TOTAL COST: $214.84
The fabric is relatively inexpensive, but all the extra accessories do add up! The jewelry was a chunk of my cost (~$40) because I did get some better quality items I could wear with other outfits. If you are on a budget, you may be able to get some costume pieces for less money, or find things in your stash.
If you’ve managed to read all the way to the end, thank you and congratulations! This was a long post, but I hope it will be useful to you when making your own Admiral Holdo costume. Good luck and Godspeed Rebels!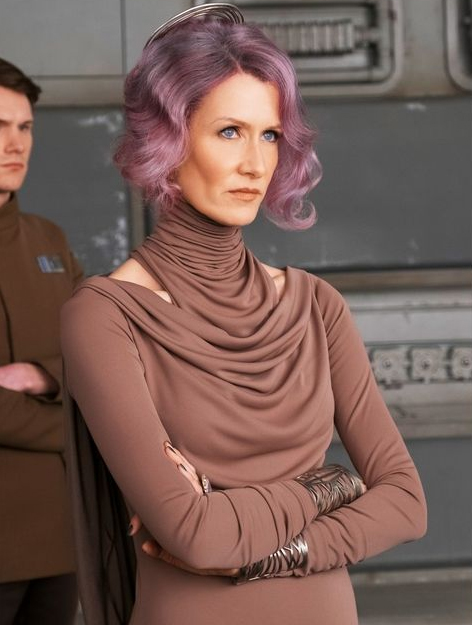
(If you’re wondering what are these affiliate links, it means I get a small percentage of any purchase you make from Amazon through these links, which I have to disclose. I don’t get any of the money from the ads WordPress runs on this site, and I’m happy to provide all my tutorials for free. The affiliate fees go towards my domain registration and hosting. Thanks!)


 12-14-19")
