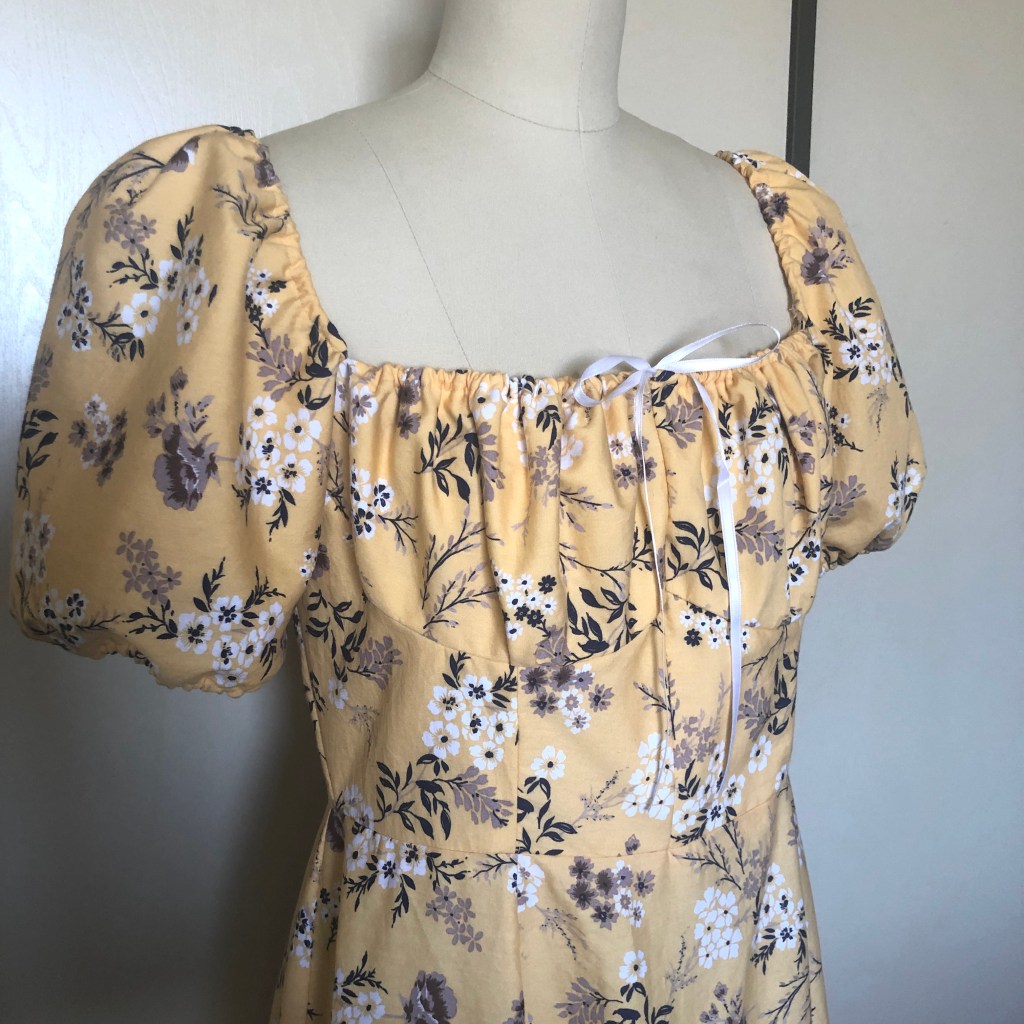
Warm weather means pretty cotton frocks to me so I just recently completed this yellow floral dress, inspired by the cute “milkmaid” style dresses. A lot of cotton prints are a bit thin and require some lining, and I have a special trick to save time by using my serger instead of cutting out the lining twice (later in this post).
Note: I am a member of the Janome Maker program and this skirt is sewn on a Janome Skyline S9 and a Janome FA4 serger. (This post is sponsored by Janome but all content and opinions are mine).
The dress is made of 100% cotton and the yellow print has white and gray flowers and foliage. (I bought 3 yards of a 58″ wide fabric and had some left over). I did not want the top to be see-through so I needed to line it. For this particular dress I decided to flat-line it, which means each individual lining piece is attached to the fashion fabric before the garment is assembled. (This is different from the approach of constructing the fashion and lining layers separately, then putting them together).
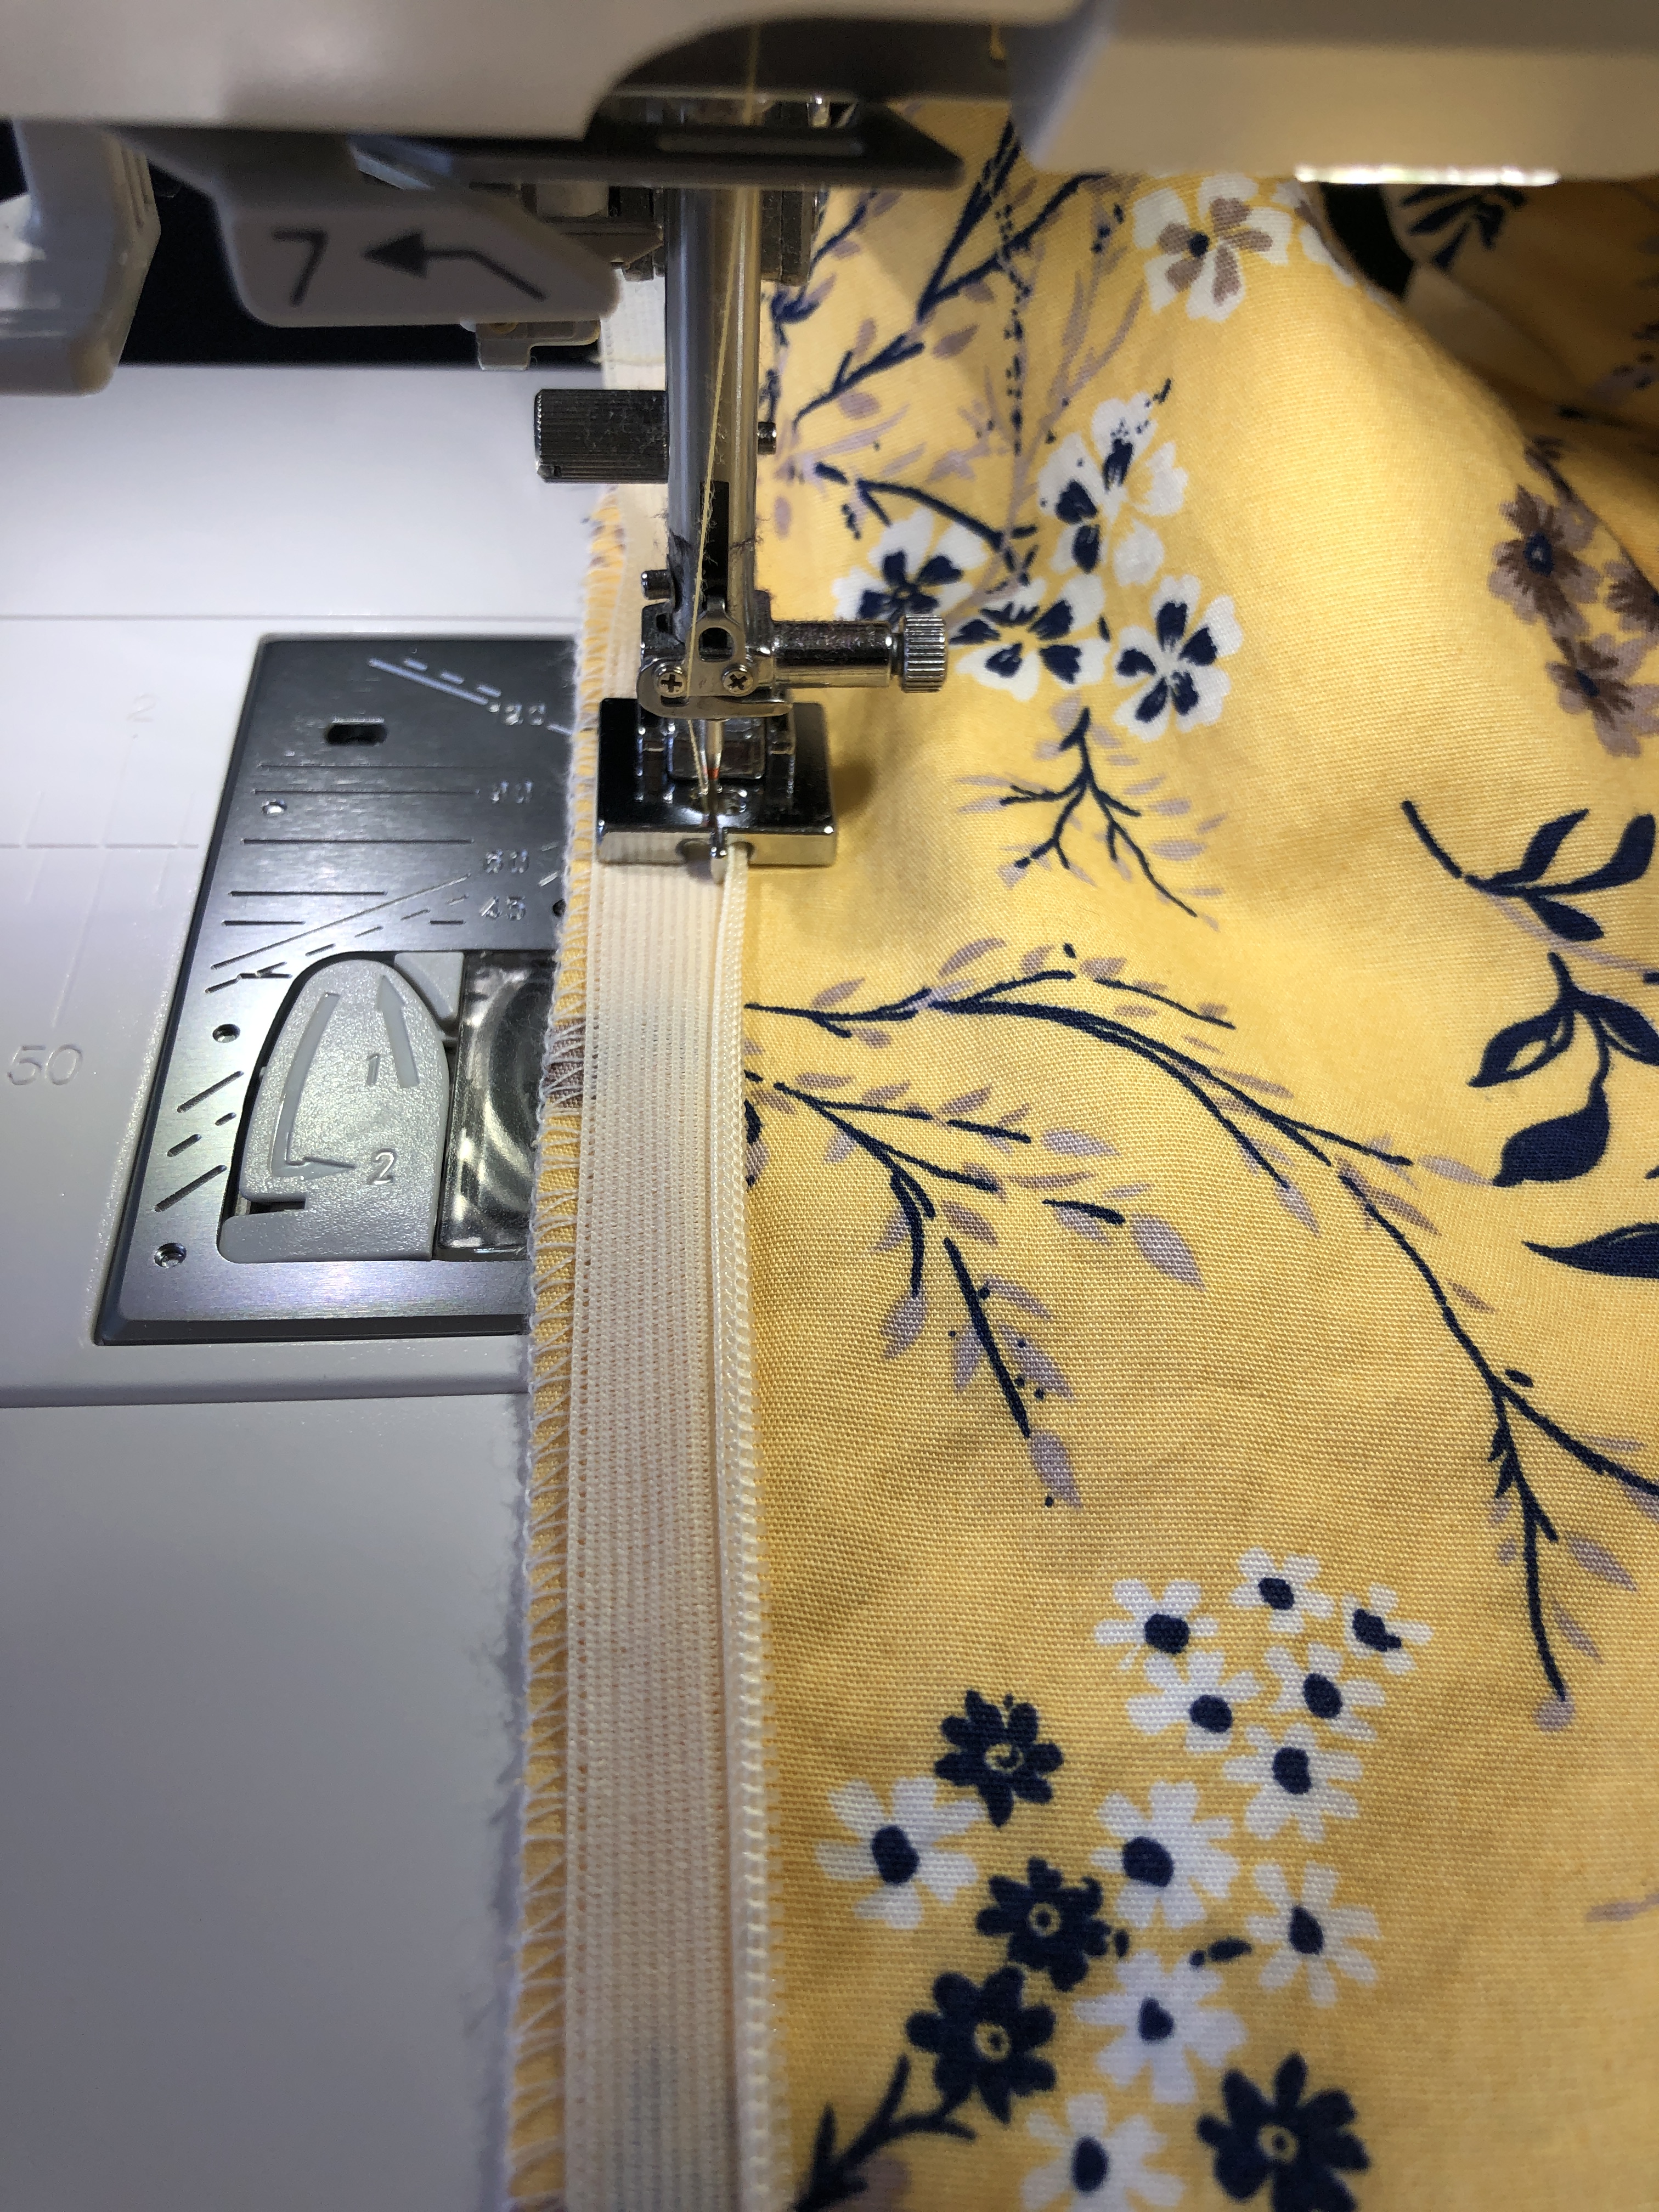
The classic method of flat-lining is to cut out the lining and fashion pieces and stitch them together, but I have a time-saving hack using my Janome FA4 serger! First, I put the fashion layer on top of the lining fabric, put in a few pins to keep it from shifting, and cut it out roughly with my rotary cutter.
Then I serge the edges of the fashion fabric, while using the built-in blade of my serger to trim away the excess lining. This saves me the trouble of carefully cutting out the lining and making sure all the edges line up perfectly before sewing!
After serging/flat-lining all the pieces I sewed the seams together normally. This is the bodice without the bust cups:
The bust cups are oval pieces of fabric that are gathered at the top and bottom to fit into the U shapes of the bodice. (The top is folded down to make a drawstring channel for the ribbons, which meet in the middle to make the top adjustable).
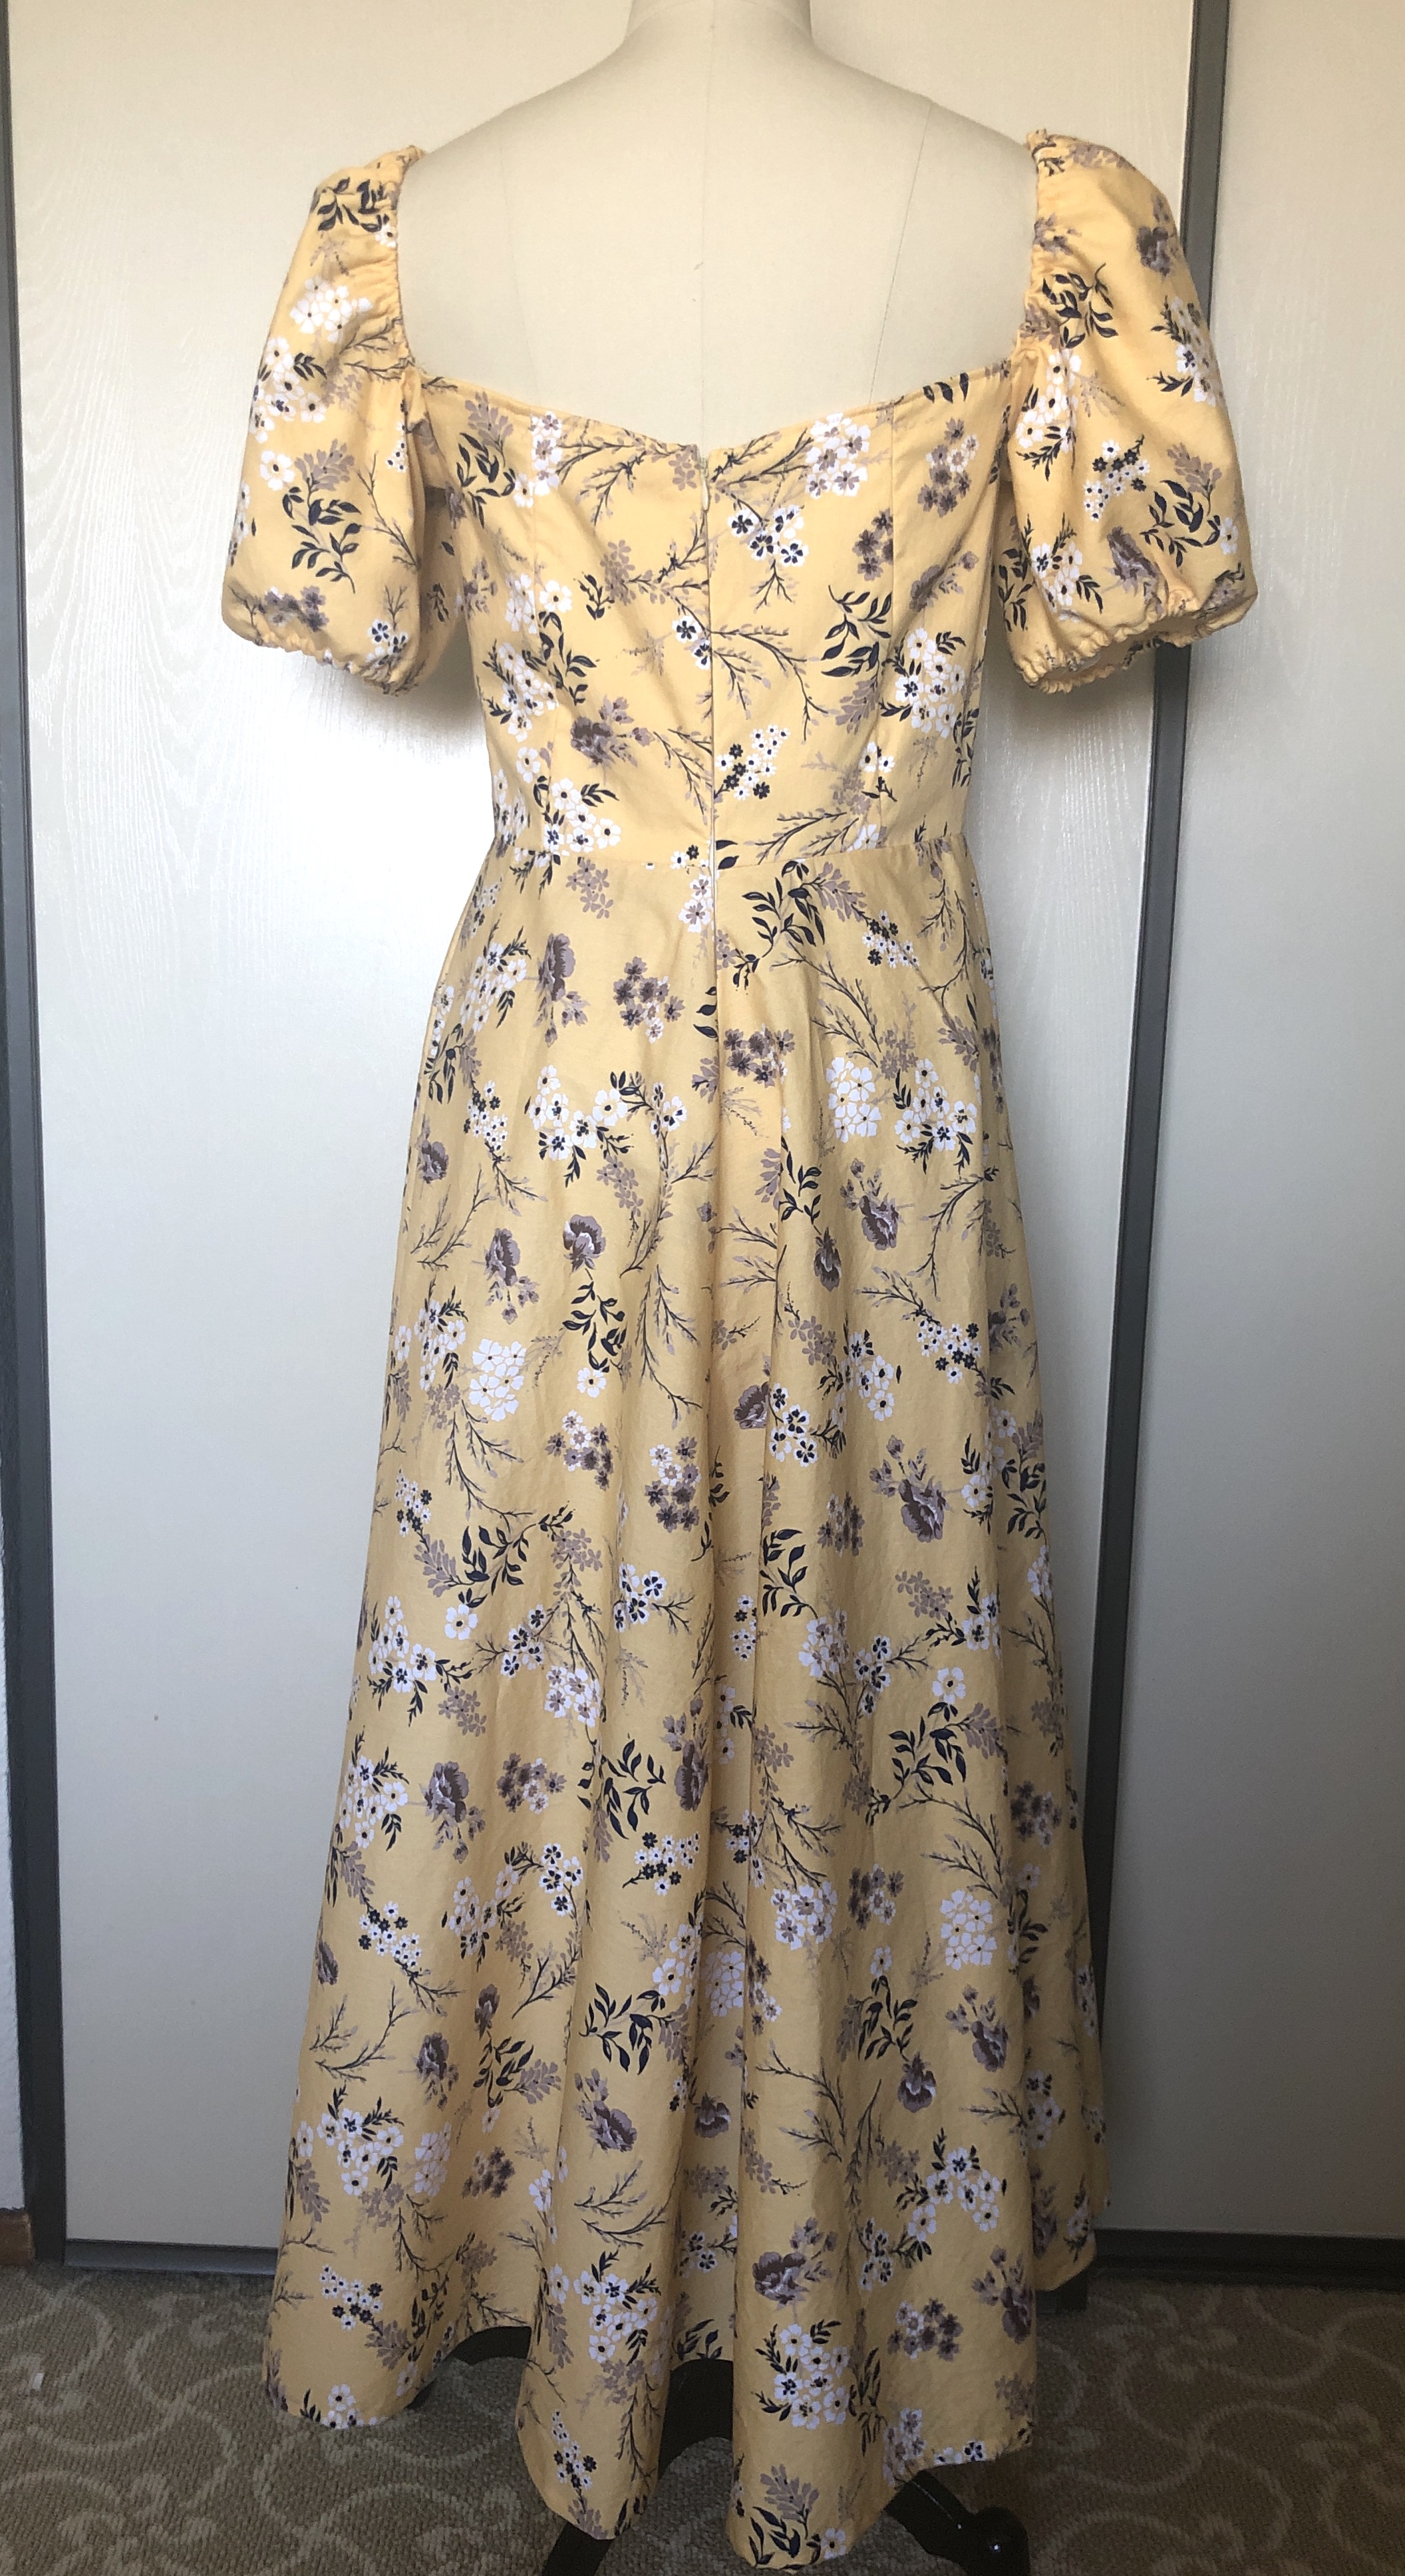
The sleeves have channels on both the top and bottom for elastic to gather it into a puffed sleeve. The underarm of the sleeve is sewn directly to the underarm of the dress while the top of the elasticated sleeve turns into the shoulder of the dress. A few tips I have for sewing this kind of style sleeve: (1) Finish off the top of the back bodice by folding down the serged edges before you attach the sleeve, otherwise you will end up with an odd corner in the back where some serging is visible. (2) Anchor one end of the elastic by sewing it down in the channel where the sleeve attaches to the back of the dress. Use a safety pin to keep the other end of the elastic from sliding back in the channel. Try on the dress, unpin the elastic and pull it tight until the sleeve fits you over the shoulders, then pin it back until you sew it down permanently. Tip #2 is especially important if you don’t have a helper; you can fit the sleeves yourself in a mirror because the loose elastic is in front!
The dress closes in the center back with an invisible zipper. Janome makes a concealed zipper foot (Z) that makes it easy to install one!
I am looking forward to wearing this dress this summer!
Last year I had the wonderful privilege of being one of the finalists selected to be in the Her Universe Fashion Show (HUFS), and then ultimately one of the winners! The show is normally held yearly at San Diego Comic Con during the summer but the applications open up in the spring. Since this year’s show announcement is coming up, I thought this would be a good time for me to write up a post about my experience and the many questions I’ve been asked since last summer. (If you want to see the FAQ that includes what the show is, how the contest is run, any advice, etc. please see the second half of this post after my design photos). In 2021 Her Universe held a virtual show, which meant that instead of walking the stage in front of a live audience in San Diego, we submitted a lot of footage that was edited for judging purposes and streaming as part of Comic-Con at Home. My experience is a little different from the in-person show, but a lot of the information is still applicable!
(Most of the photos in this post were taken by lovely friend Natalie while assisted by my other equally lovely friend Kelsey).
For those of you that don’t know, Her Universe and the HUFS was founded by Ashley Eckstein to promote geek fashion. The HUFS is a runway show where designers submit a “geek couture” design which is high fashion inspired by a fandom. The idea is to make something that wouldn’t be out of place on a Hollywood red carpet, rather than a direct cosplay of a character. Although Star Wars, Marvel, etc. are popular inspirations each year, ideas from books, TV shows, and obscure fandoms are accepted as well.
I was selected as the audience’s choice winner, and Teighlor Johnson and Skyler Barrett and were tied for the judges’ pick in Pokemon and Queen’s Gambit-inspired designs, respectively.
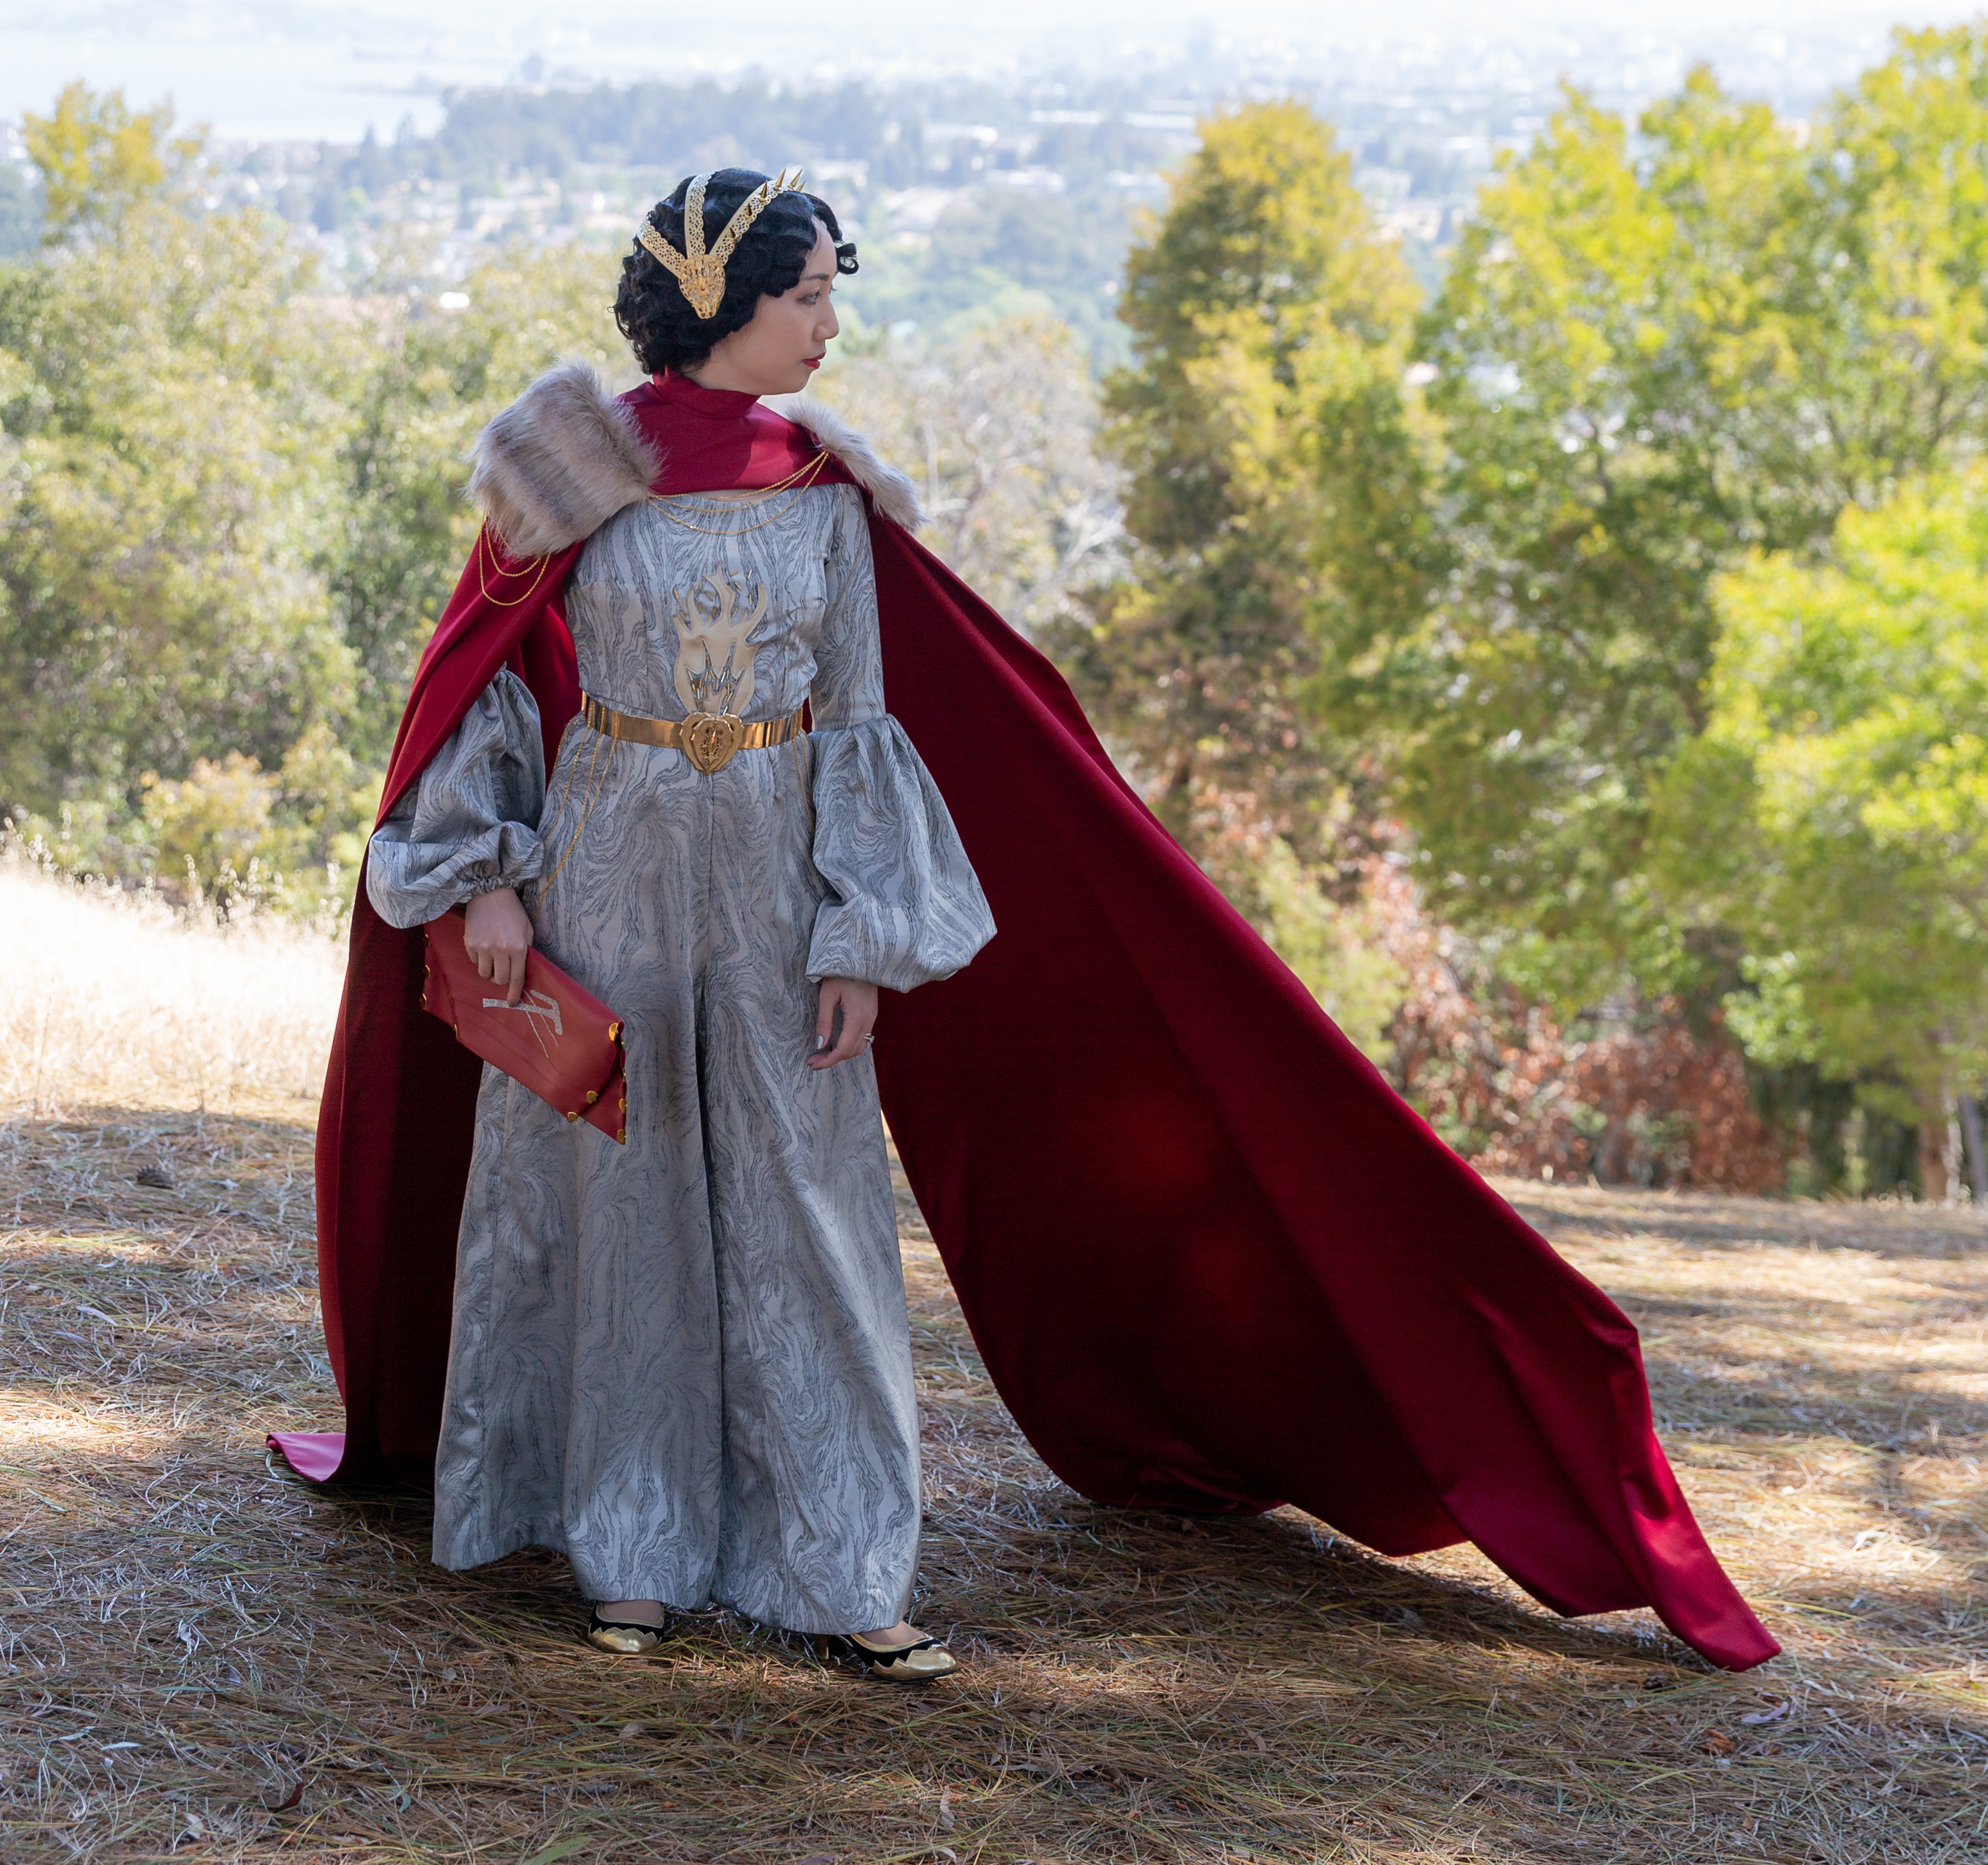
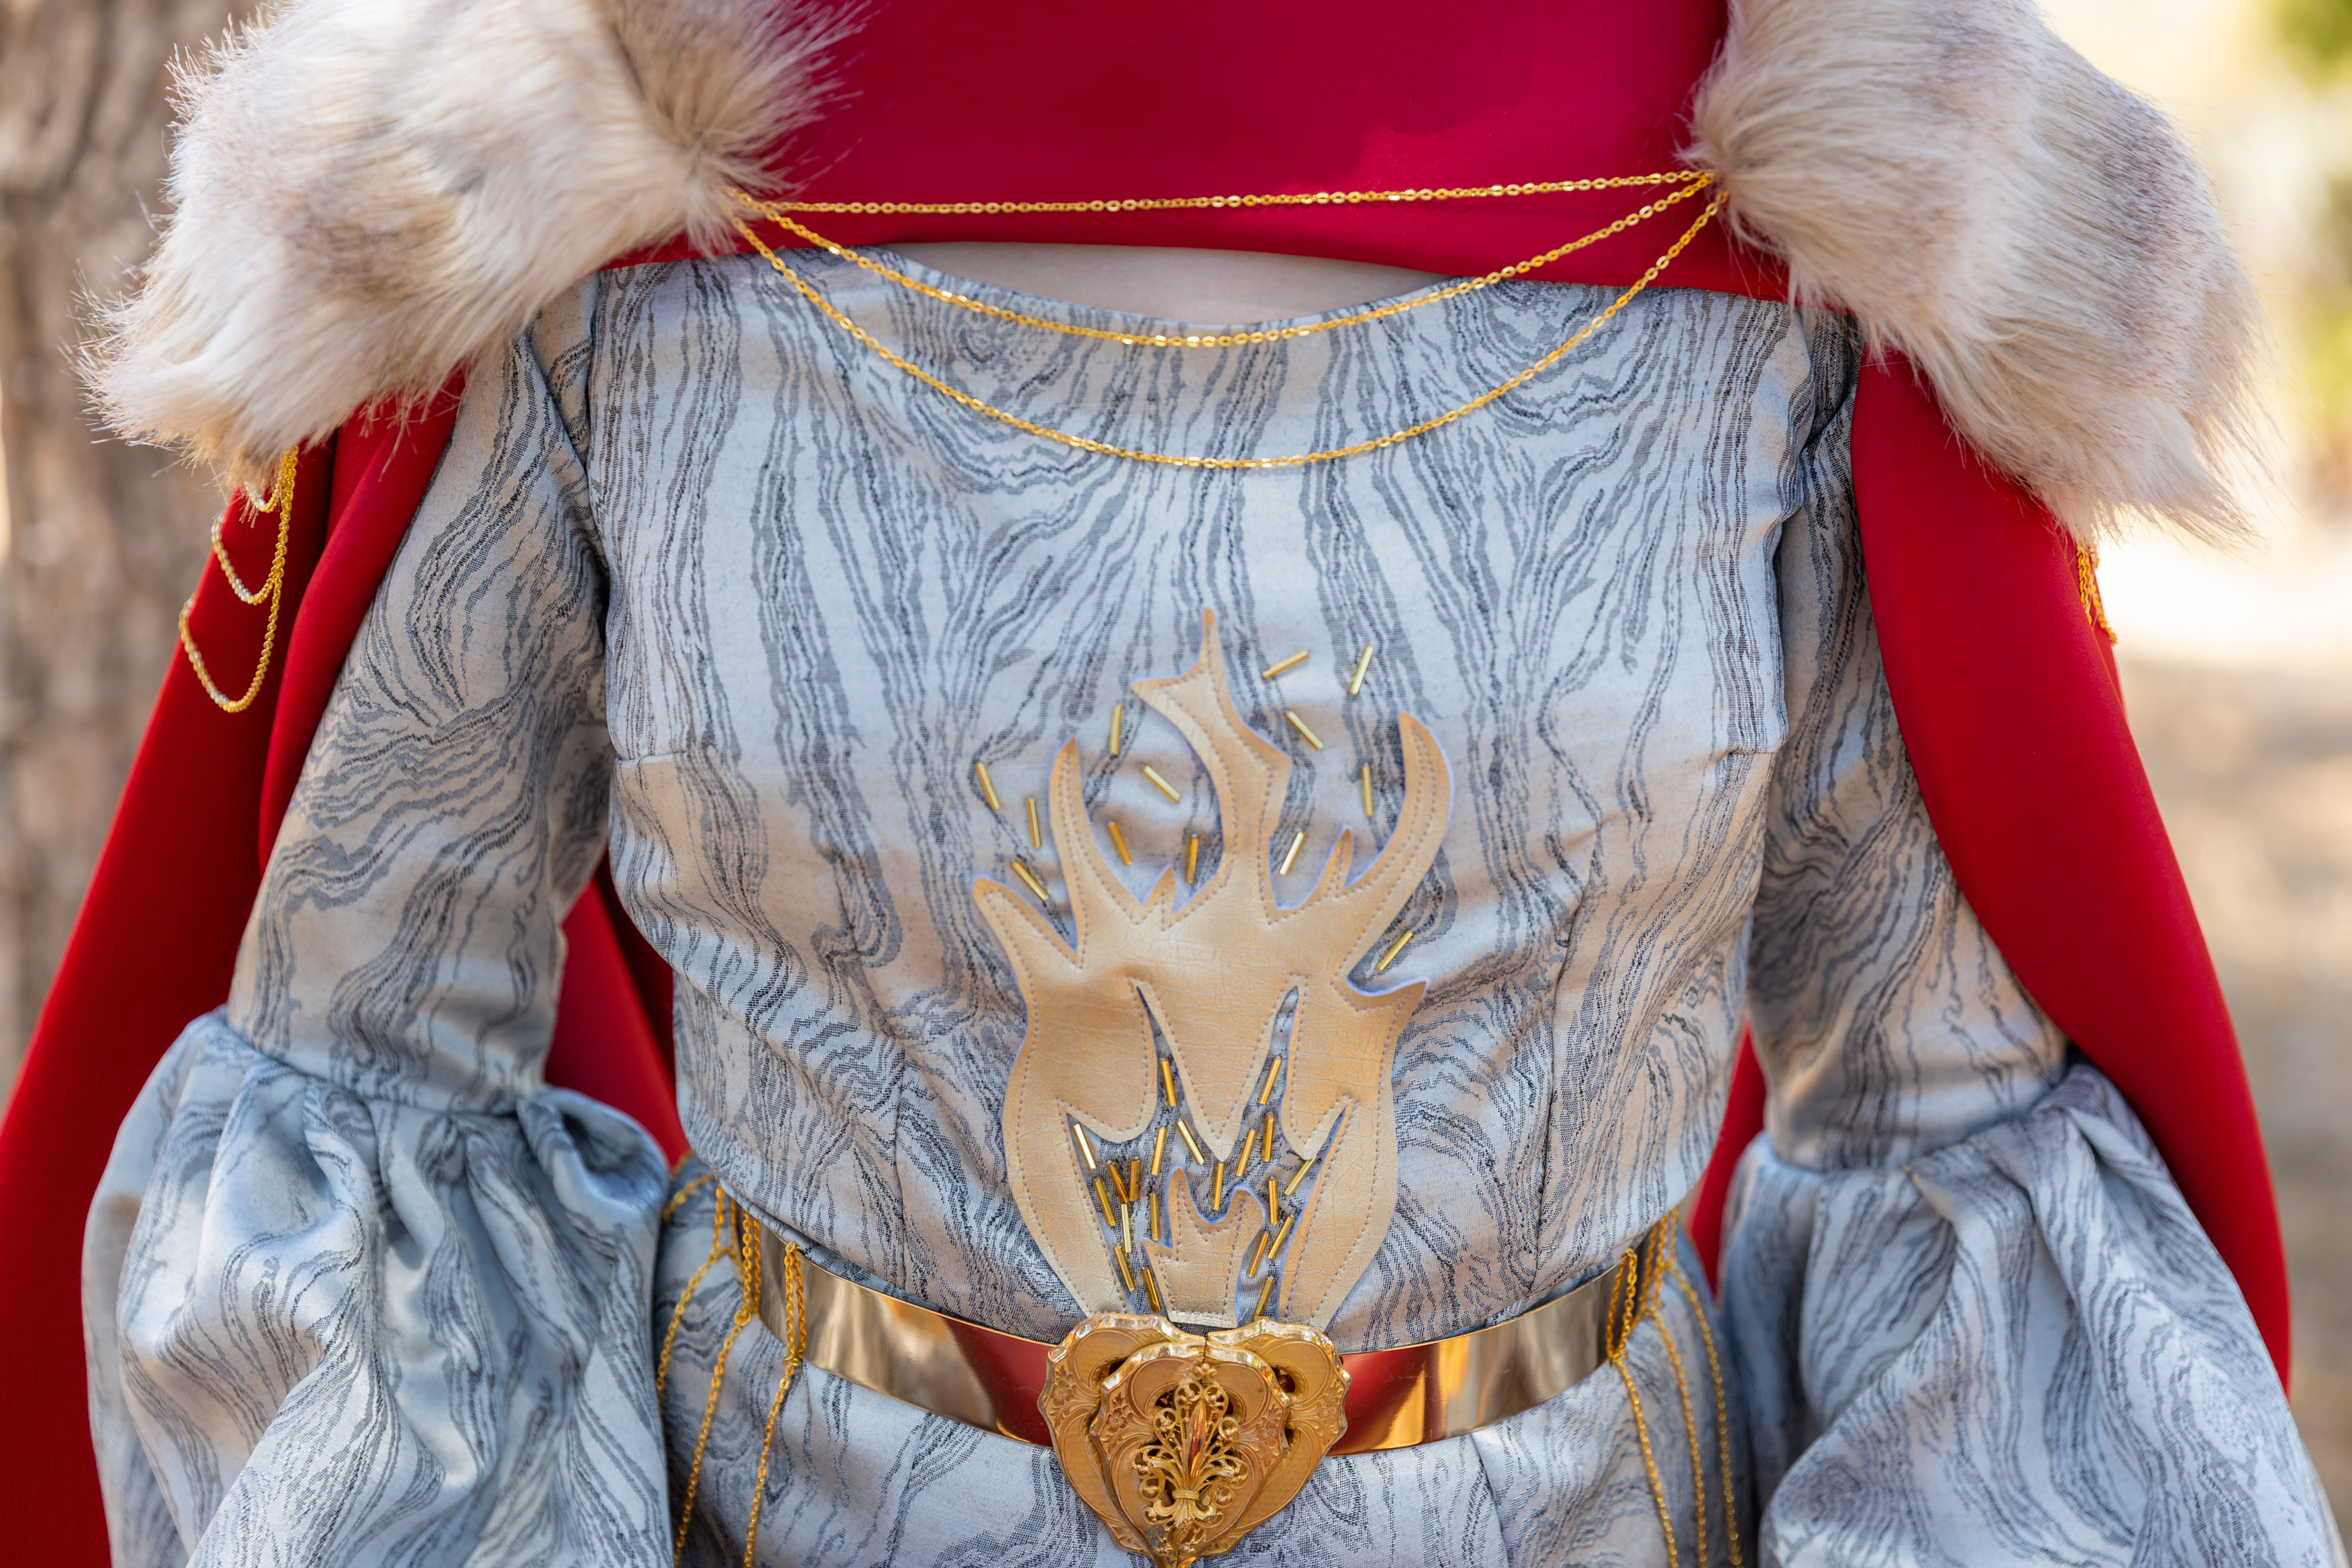
My design is called “This is the Way” and was inspired by the Armorer from Star Wars: The Mandalorian. This outfit consists of 5 pieces (a jumpsuit, a cape, a headpiece, a belt, and a purse). I have nods to her helmet in my headpiece, her fur cape in my epaulets, her tools in my appliqués, and the Beskar steel she works with in the fabric of my jumpsuit.
The jumpsuit is made of a silver and black silk and wool challis fabric woven to look like Beskar steel. The jumpsuit has super wide leg palazzo pants (with hidden pockets!) that are full enough to look like a skirt when standing still. The upper sleeves are fitted with a balloon shape in the lower sleeve, gathered into a cuff.
I love this fabric! Below from left to right is a dart, then an invisible zipper, then another dart. Running horizontally is a seam.
I used gold pleather to make a flame appliqué on the bodice to reference the forge where the Armorer works, and accented the appliqués with gold glass beads. The belt is a gold metal band that closes with an art nouveau clasp in the front. Gold chains hang from the belt on each hip.
The bodice has a wide boat neck that creates a peekaboo effect combined with the high-necked red pleather backless “cape.” The brick red cape (lined in the same color) consists of a neck piece that covers the collarbone and extends to the shoulders, and long open “sleeves” that are long enough to trail on the floor, creating a train effect despite having no gown. The cape is open in the front and back so the jumpsuit is fully visible except for the shoulders, which has light brown fur epaulets on the cape. More gold chains hang from the shoulders and across the chest and back.
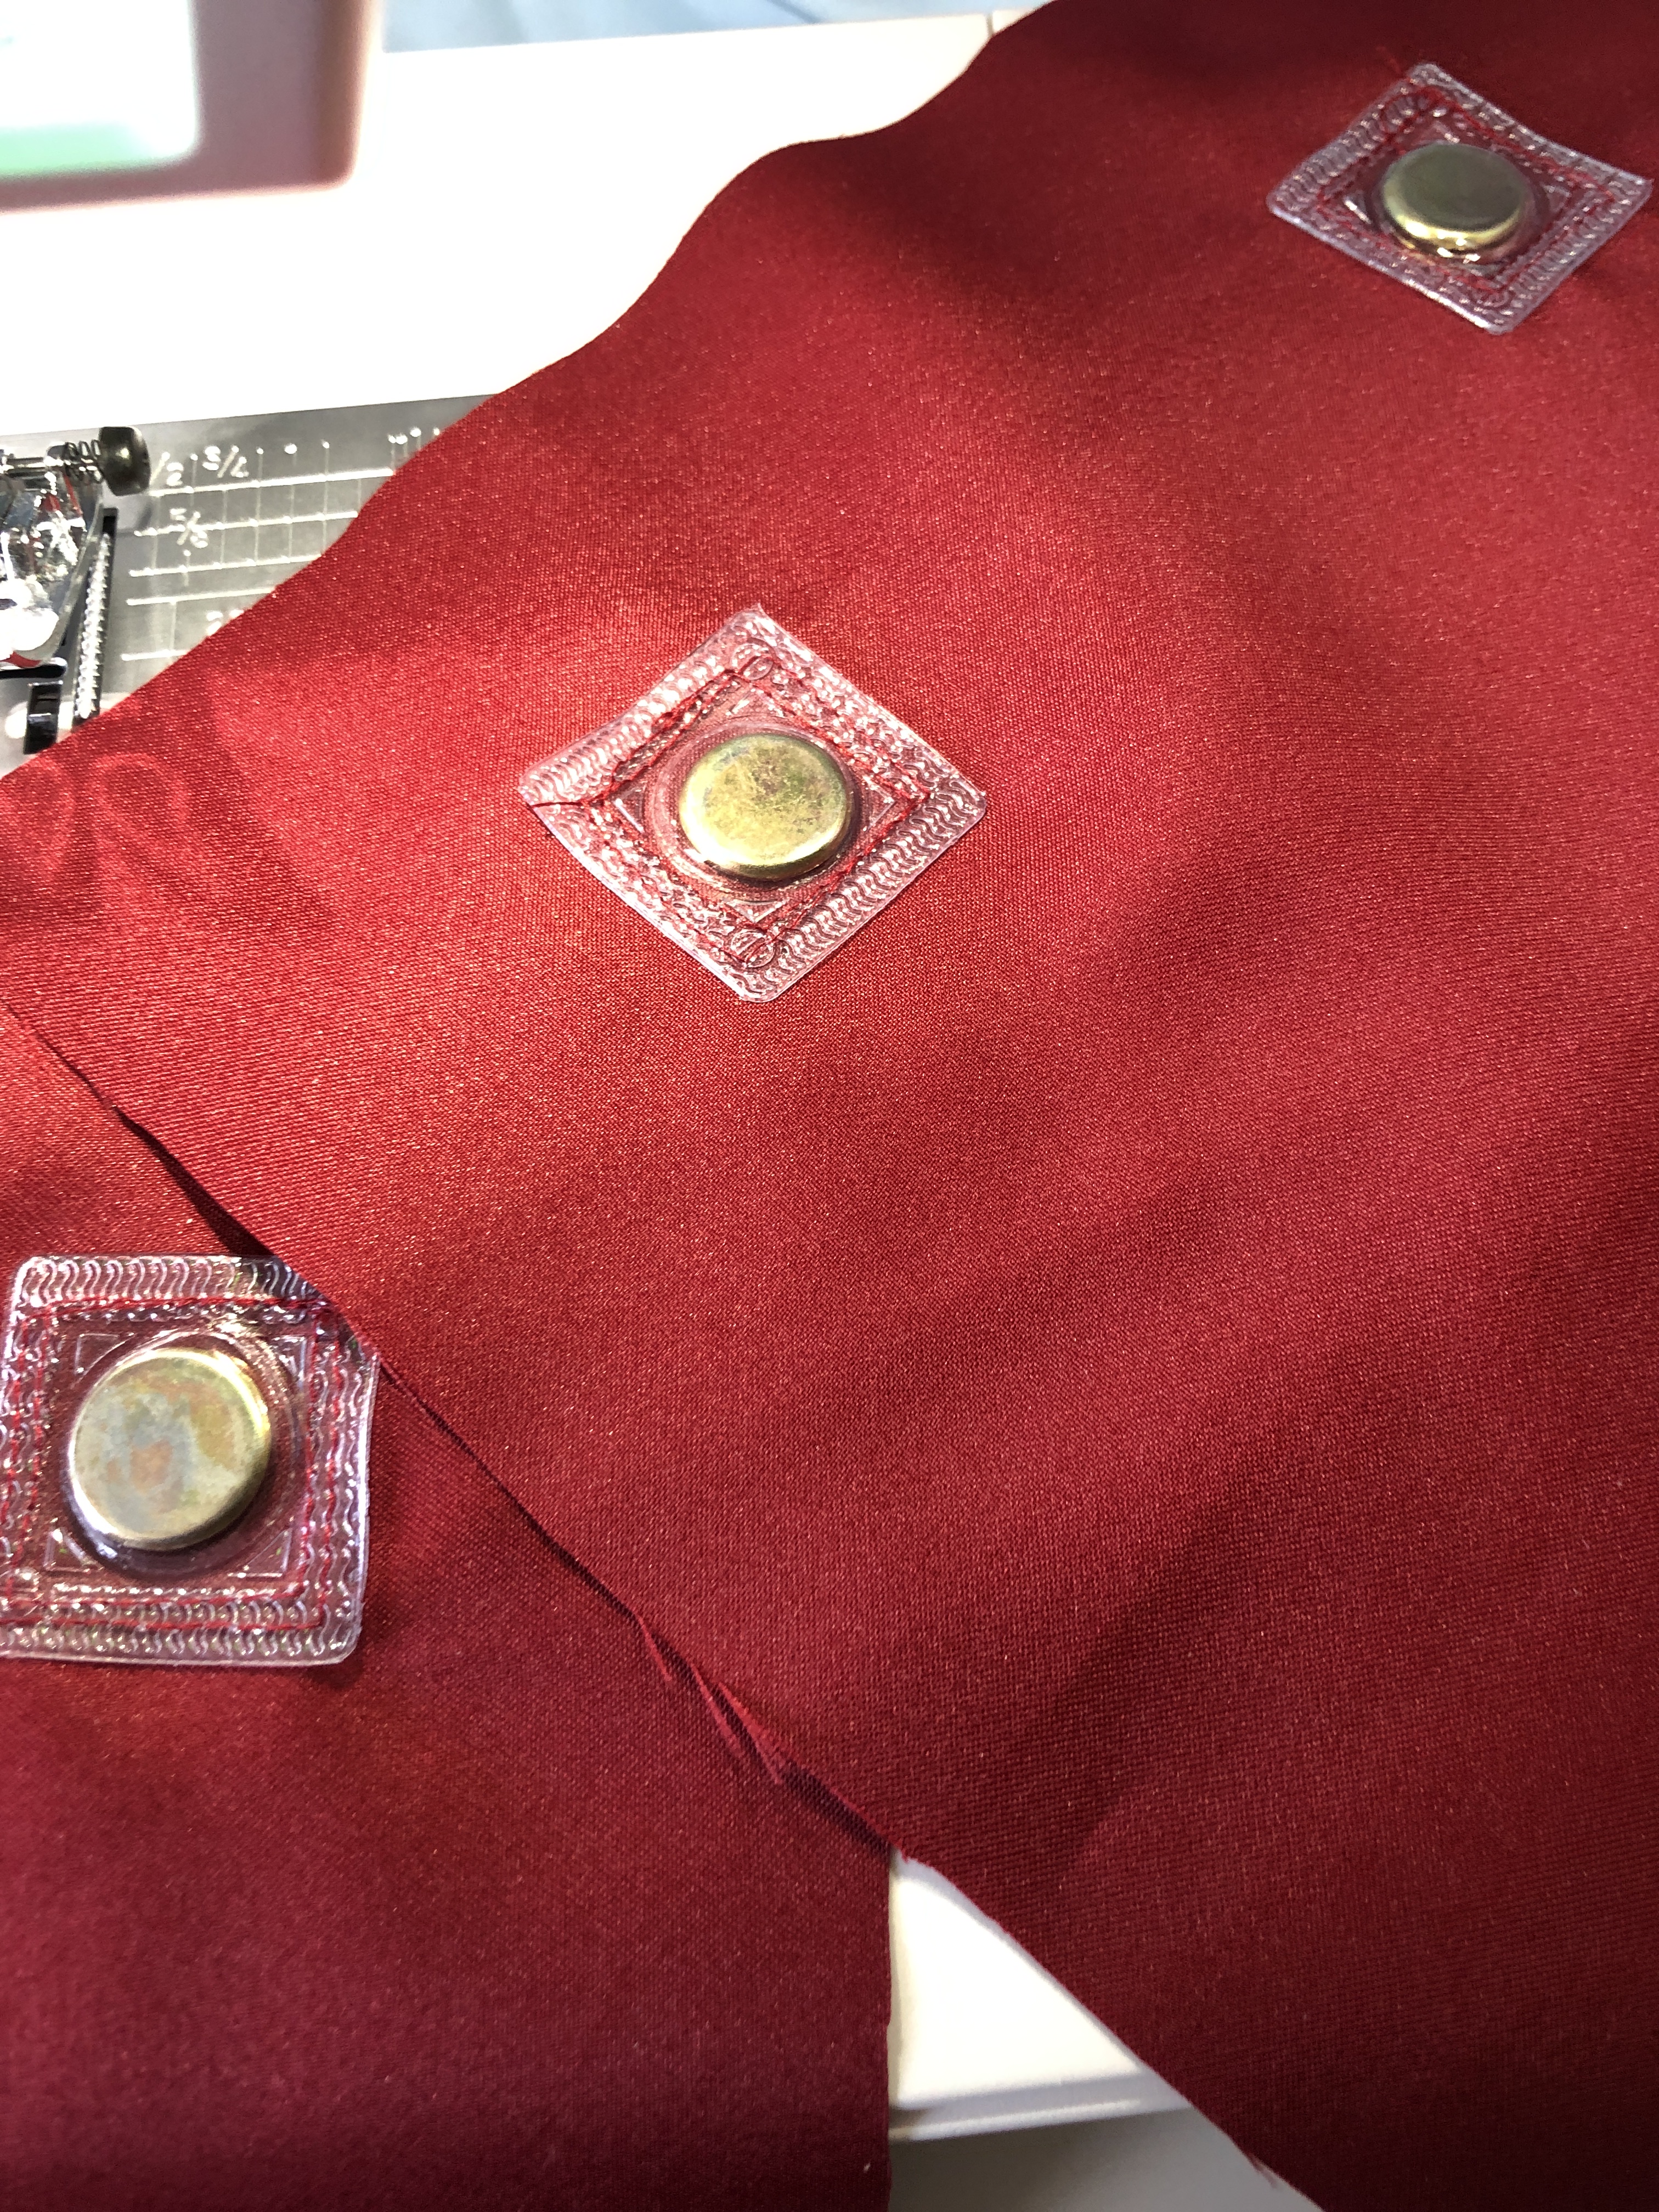
The cape closes at the neck with hidden hooks and bars. Then the epaulets and chains go on top, and I have hidden magnets sewn into the shoulders of the cape and the underside of the epaulets. The magnets I used are encased in plastic so I can sew them on. Here are some test pieces I did so you can see what they look like:
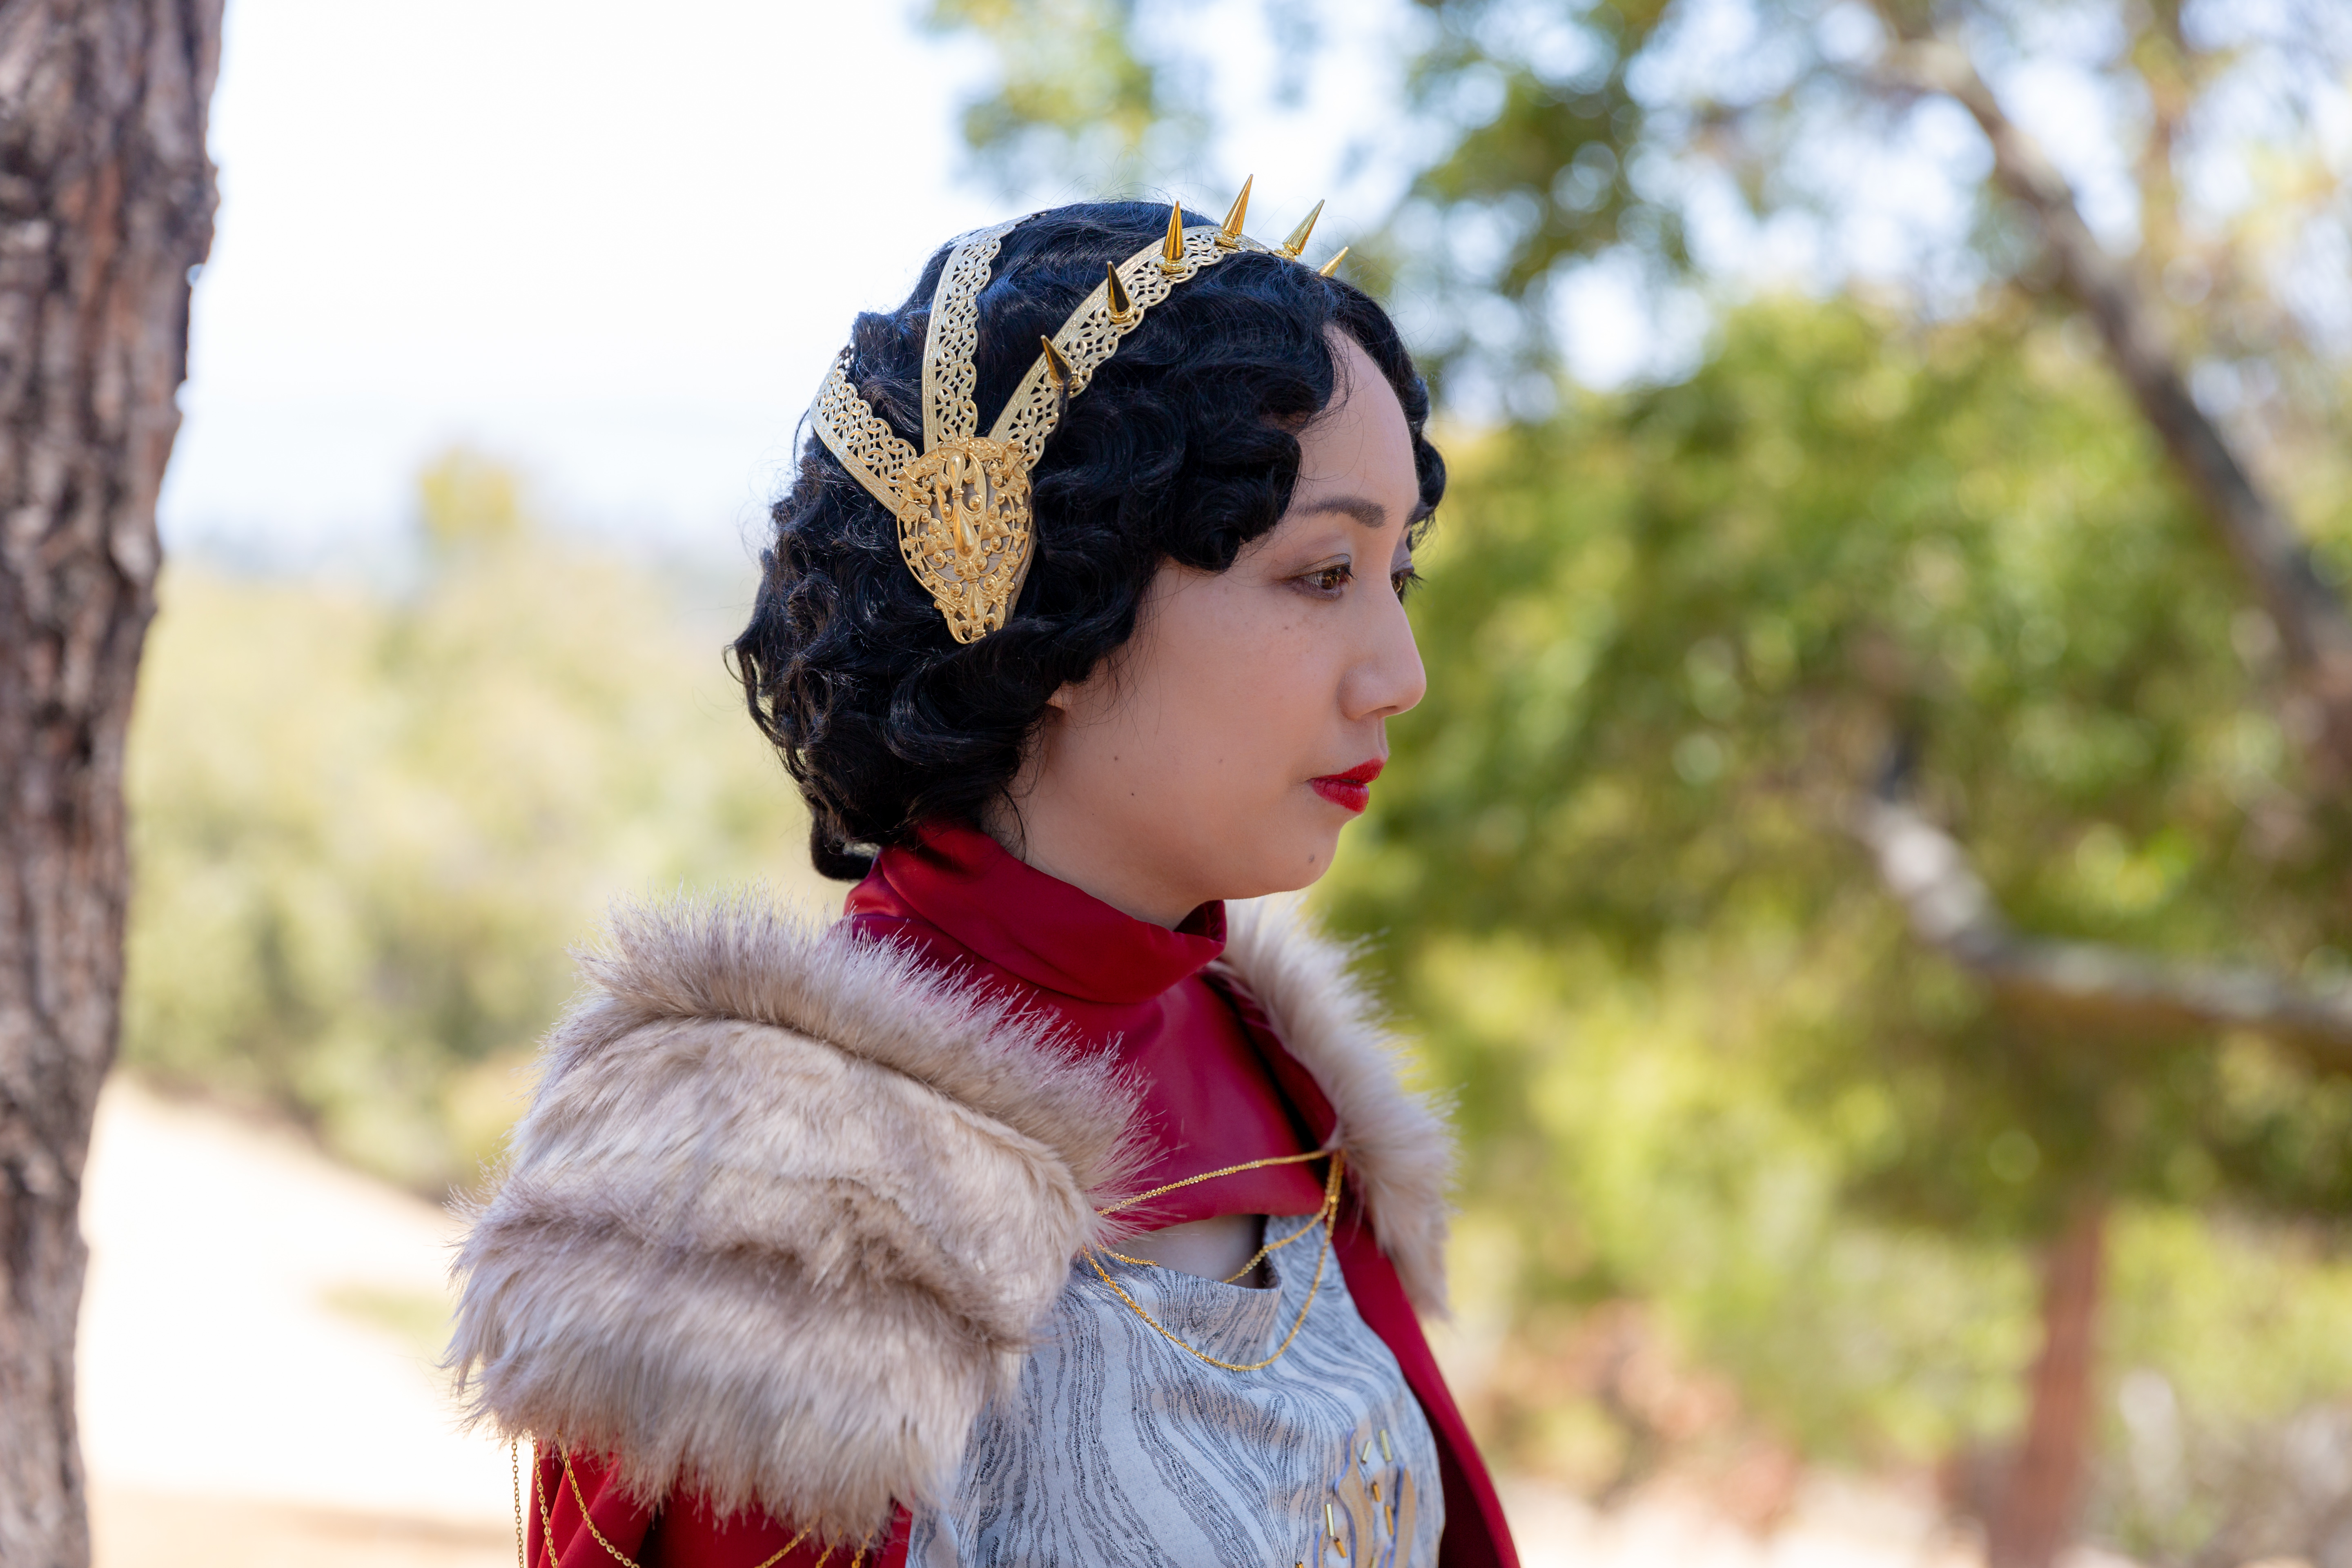
The headpiece is inspired by 1920s/1930s flapper headdresses and consists of 3 brass bands across the top of the head, attached to art nouveau style large decorative brass pieces over the ears. The front band has small golden spikes like a crown. The bands and ear pieces are wired together but the spikes are attached by drilling holes in the bands and screwing them in. I also added some gold pleather padding inside the ear pieces for comfort.
The purse is a clutch made of brick red pleather and lined in the same fabric as the cape. The purse flap is pleated like the Armorer’s apron and has her tools appliqued in silver. I created the design using my Silhouette Design Software and used glitter heat transfer vinyl.
The purse opens with a magnetic clasp and is decorated with gold metal half moons. As usual, I hand-sew in my labels.
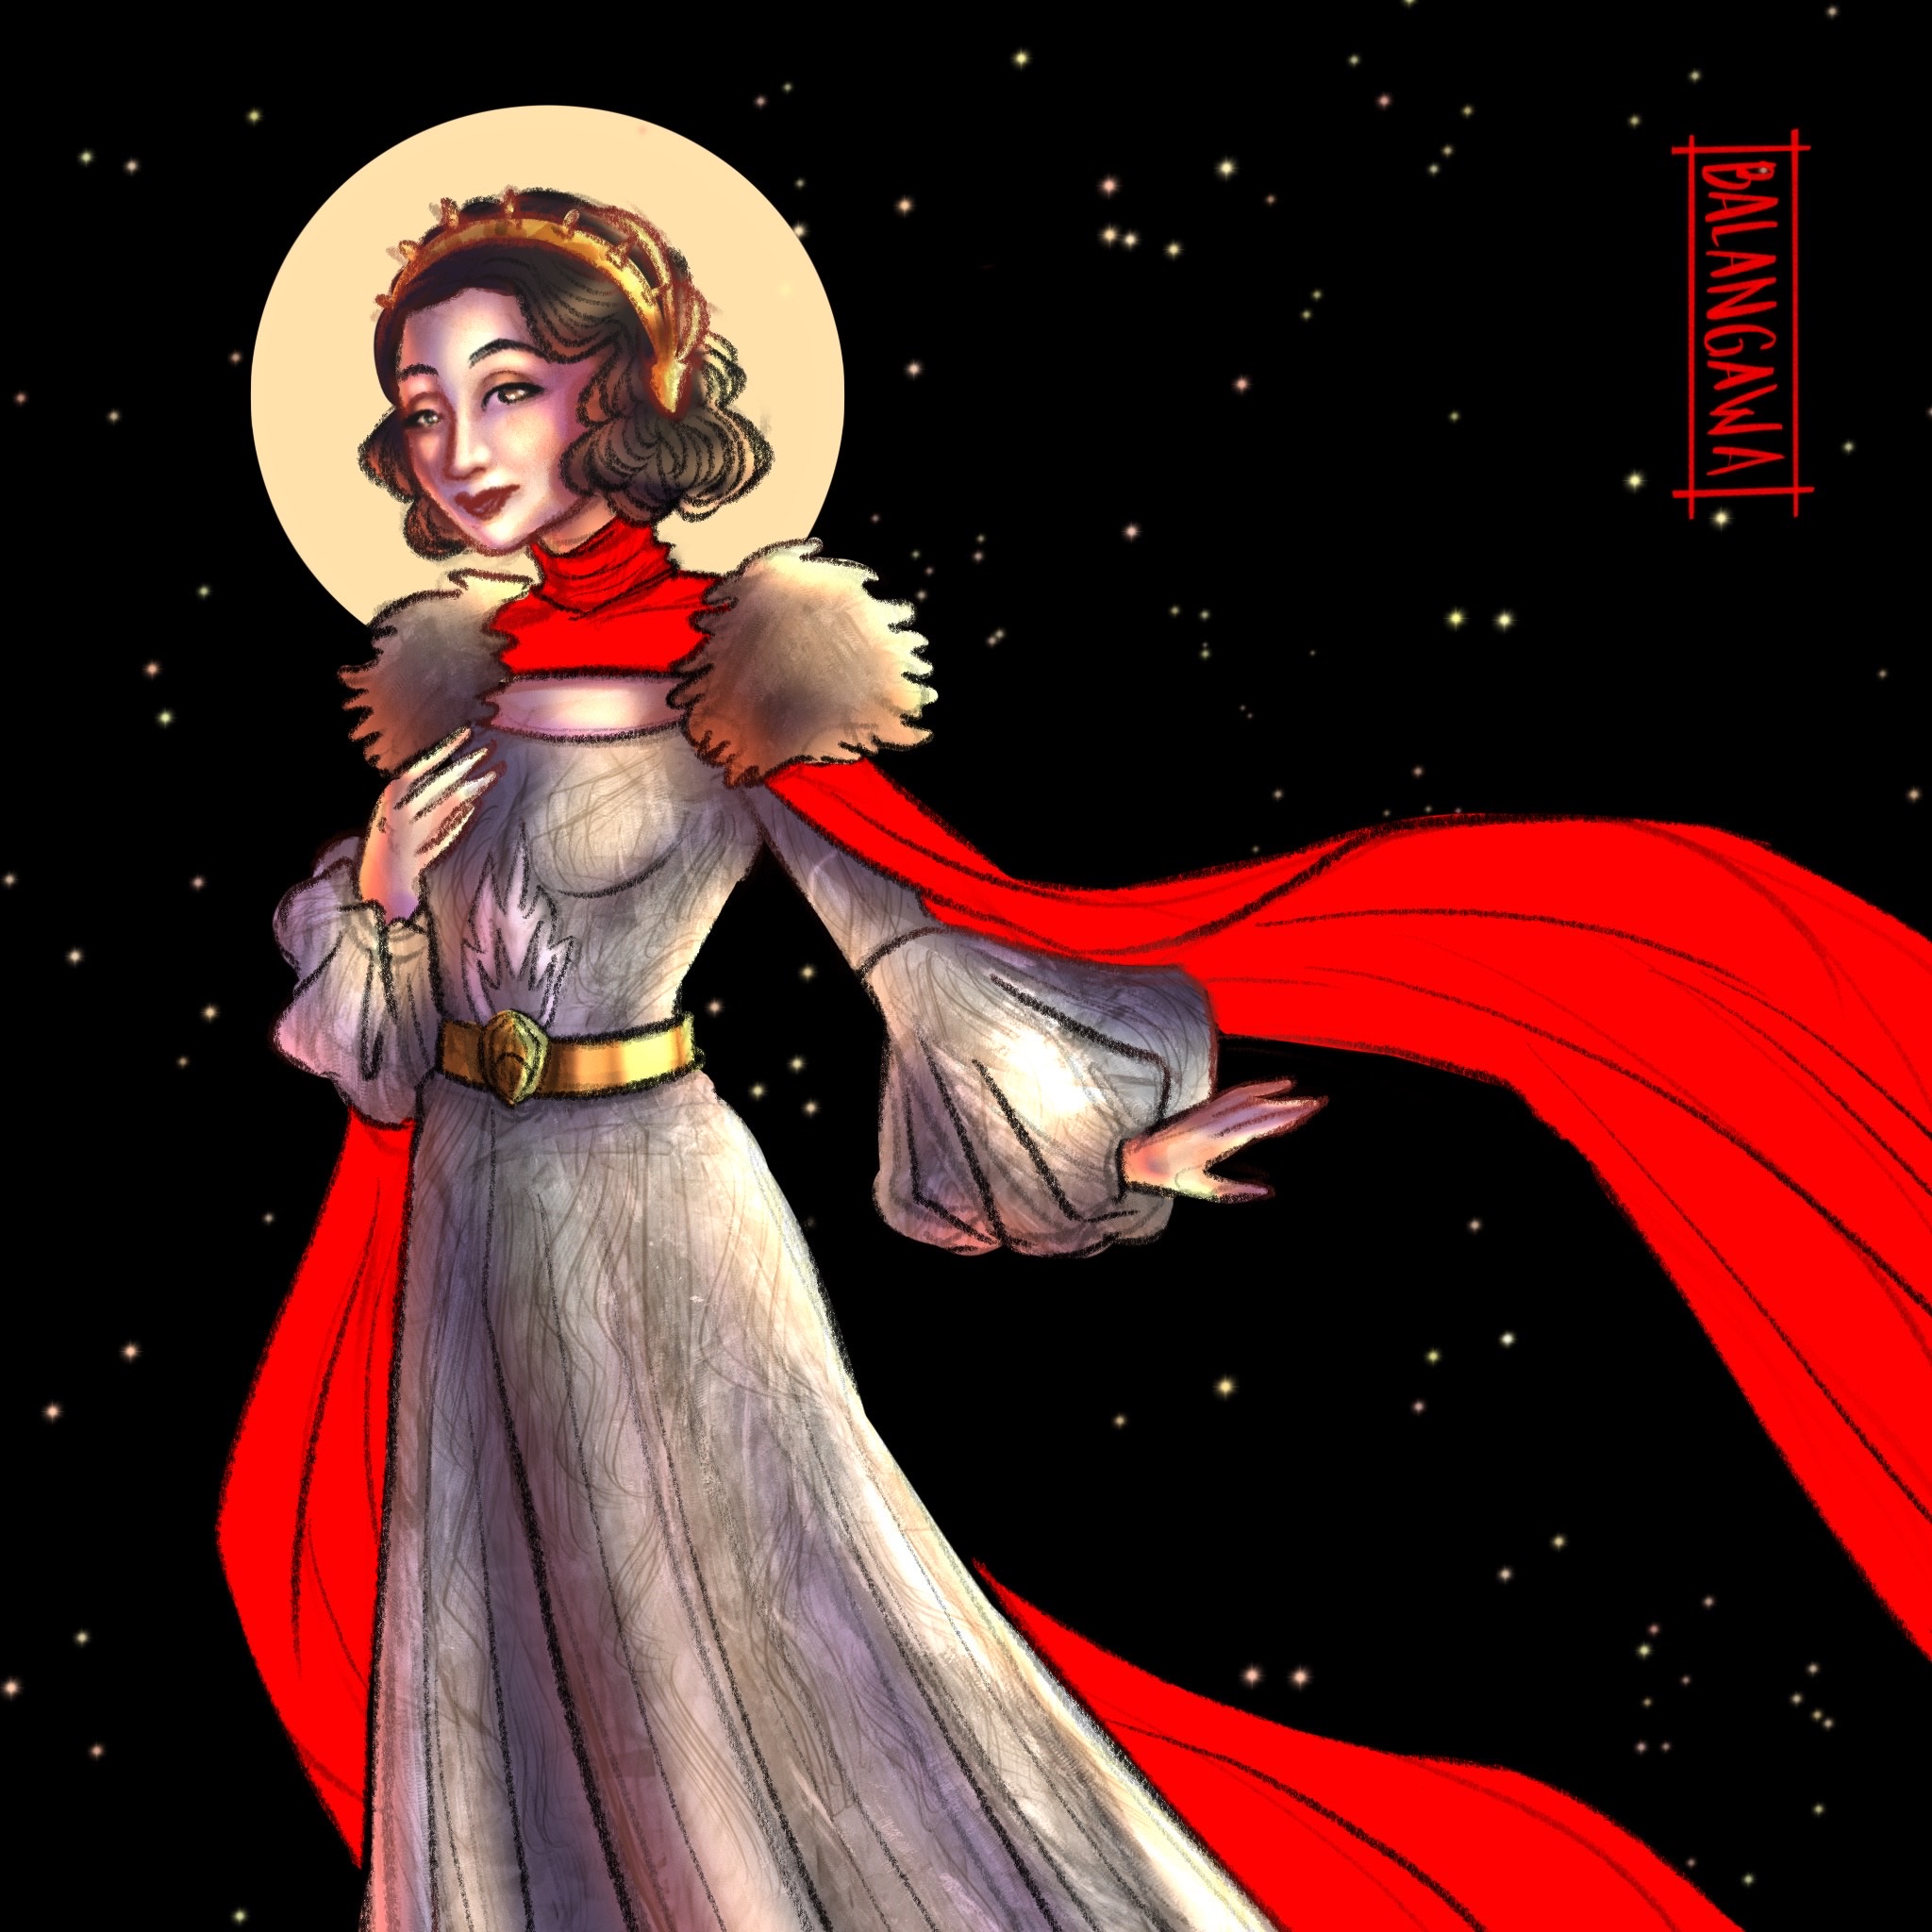
The talented artist Dani Balangawa drew this lovely portrait of my winning design and sent it to me as a surprise!
Materials sourced:
I was short on time and worldwide shipping was a little dicey at the time I was getting my materials so I bought a lot of things that I knew could get to me quickly. A lot of the items, especially the metal findings, may also be found through my usual sources of Aliexpress, eBay, and craft stores.
Where can I see examples of past Her Universe Fashion Show entries?
You can watch last year’s show on the HUFS blog, which also has links to photos from earlier shows. The site also has archives of footage from previous shows. I highly recommend you review those so you don’t inadvertently submit any similar designs.
What is the selection process like?
There is an online application where you can submit up to 3 original designs plus a written description. You will also be asked for a personal bio, info about your design/sewing experience, and some portfolio images. There may be additional questions about how you heard about the show, if you have any previous press, what you think about geek fashion, etc. You can also include links to your social media and personal website and an optional video about your designs.
Up to 25 finalists are chosen by a selection committee that consists of Ashley Eckstein and employees of Her Universe/Hot Topic. Those finalists are the ones that will appear in the HUFS during SDCC. There is one winner picked by judges at the show, and a second winner picked by audience voting. There can be more than two winners in case of a tie.
What should be in your portfolio/video?
The portfolio is a chance for you to show that you can complete your design. HU does not want to select a person who has a great sketch but doesn’t know how to sew. Your portfolio should demonstrate your skill and experience and prove you can deliver a finished item on show day. Personally I recommend submitting a collage for each image so that you can show some close-up shots of your details and accessories made, plus make sure that some of the skills and materials in your submitted designs show up in your portfolio. For example, if you submit embroidery or leatherwork you should show you have experience with embroidery or leatherwork.
The video is optional. There is a time limit of 5 minutes but it is a chance for you to talk about your designs and show off your personality or inspiration. You can hold up sketches, show off fabric swatches if you have any, etc. Not everyone submits a video with their application but I feel like it’s a great way to explain difficult concepts and convince them you should be in the show.
What is the general time line?
Generally, applications open in spring after WonderCon and the show is in July during San Diego Comic Con. In 2019 (live show) applications opened April 1 and closed April 19, notifications went to finalists on April 26, and the show was July 17. In 2021 (virtual show) applications opened March 18 and closed April 2, finalists were announced April 16, and the show aired July 23 but we had to be finished with our designs and submit photographs/videos by June 4 in order to give them time to edit the footage.
What prizes do the winners get?
The judges’ pick and the audience winner get equal prizes. Winners are invited back the following year to judge the next contest at SDCC and their travel is covered. There is also a cash prize (I’m not sure if the amount varies each year), a chance to design a collection for Her Universe/Hot Topic, and royalties from that collection.
What is the HU/HT collection? Do you get your designs reproduced or get to choose the theme?
The collection is determined by HU/HT based on their licensing agreement with an upcoming movie. The 2021 winners designed items to come out in time for the 2022 Jurassic World movie. Some past winners have designed Star Wars, Marvel, and Wonder Woman items. The collection is mean to be casual/streetwear garments and are sold online at HU and in HT shops.
Do you have to have a ticket to San Diego Comic Con to apply?
No, you do not need a SDCC ticket to participate in the show or come watch as an audience member. The HUFS is held at a hotel during SDCC, but is a separate event. Finalists in the show are also often gifted a pass to SDCC.
Do finalists have their costs covered?
No, you are responsible for buying your own materials for your design, and covering your own travel to San Diego. As stated above, you do not need to pay for a SDCC ticket. If you win and are invited back as a judge, then your travel is comped for your subsequent trip.
Is there an age limit?
You need to be at least 18 for HUFS. (One year there was an affiliated junior design contest for minors, but that was different from the main runway show). There is no upper age limit and you don’t have to be fresh out of design school. There are people in the show in their 30s and 40s, with established careers and/or kids doing this for fun.
The contest is called the HER Universe Fashion Show. Are men allowed?
Yes, male designers are allowed to participate. In past runway shows male designers submitted womenswear, but during the 2021 virtual show the finalists could also present menswear designs.
Do you have to model the clothing yourself?
No, you can have a friend model the clothing if you don’t want to wear it yourself and many designers prefer to hire a model for various reasons (runway experience, having a particular look in mind, ease of fitting, honoring a particular culture, etc.) However, many people also love modeling the clothing themselves! It is up to you.
Do you need to be a great fashion illustrator or submit professional drawings?
No, the design sketches just need to be able to convey your vision clearly to the selection committee. You are also allowed to include written descriptions and your sketch can be a collage that includes pics of fabric swatches, etc. You can also use your optional video to describe your design.
You are allowed to hire a pro artist or friend to polish up your designs, as long as all the ideas are your own. For example, maybe you’re not confident about rendering fabric or comfortable about your illustration skills, you can have someone do your final sketches, as long as they are not helping you design.
For myself, I have submitted before using my own drawings, and have also applied by having my drawings translated by costume illustrator Emily Hasty. You can see below my original sketches and notes and the professional rendering by Emily.
Here is the sketch from Emily I submitted as part of my HUFS application.
What is the “portfolio review” at WonderCon?
At WonderCon, a few months before SDCC, and before the HUFS application officially opens, the Her Universe/Hot Topic team will usually host a portfolio review at WonderCon. (This is separate from the HU panel that consists of the past year’s winners that will be judges for the year). This is a chance for aspiring applicants to have a few minutes with some HU/HT reps to get some quick feedback about their designs. This is completely optional, and is a nice bonus for anyone who’s already attending WonderCon who wants a second opinion, but is not a requirement to enter. (The HU/HT reps may or may not be the same people on the final selection committee).
Is there another place to get feedback?
There is an unofficial Facebook group called “The Workshop” that is a support group consisting of many past finalists and people who are interested in applying. It’s a friendly place to ask questions or talk about your designs.
What is the HU panel you referred to at WonderCon?
The panel consists of the previous year’s winners and gives info on the upcoming show plus a sneak peak at the HU/Hot Topic collection that is being released.
Would you recommend participating?
Absolutely! I had a wonderful experience and the people involved in the show (both organizing and participating) were lovely. The HU/HT staff provided lots of guidance, were available for questions, and were really responsive. Prior to applying for the first time I had talked to previous finalists about the general vibe to see if HUFS was something I wanted to join. Everyone I asked said that it was the type of show where people hyped each other up and helped each other backstage so please keep that atmosphere going if you participate! Since the 2021 show was virtual, we had weekly Zoom meetings hosted by HU and a private Facebook group. People were offering to help each other shop for materials in the LA Fabric District or mail spare supplies. When online voting opened the participants were encouraging their followers to check out the other finalists as well. It definitely felt more like a bunch of theatre kids banding together to put on a show rather than competitors in a pageant. I am very grateful to have been part of this experience and am looking forward to being a judge this year and cheering all of you on!
Winter is here and I wanted a cute and cozy accessory that was a nice shawl, but also a surprise hood and scarf! I made this out of a wool knit jersey but other soft fabrics with a bit of drape would work as well. I added some pompom trim for whimsy but that is optional; this surprise hood would work well untrimmed, or finished with decorative stitching or other touches. This was inspired by Victorian mantelets with front lappets, knit sontags, chic old Hollywood head scarves, and modern cozy.
Note: I am a member of the Janome Maker program and this project was sewn on a Janome Skyline S9. (This post is sponsored by Janome but all content and opinions are mine).
WHAT YOU WILL NEED
Soft fabric with drape (wool jersey, lightweight cable knit, rayon challis, lightweight wool suiting, etc.)
The yardage depends on how wide your fabric is. (I used 1.5 yards of a 58″ wide fabric by alternating the wide and narrow ends of the pattern pieces while cutting).
Thread, scissors, chalk, pins.
Optional: 5 yards pompom/ball fringe trim, lace, rickrack, etc.
DRAFTING THE PATTERN
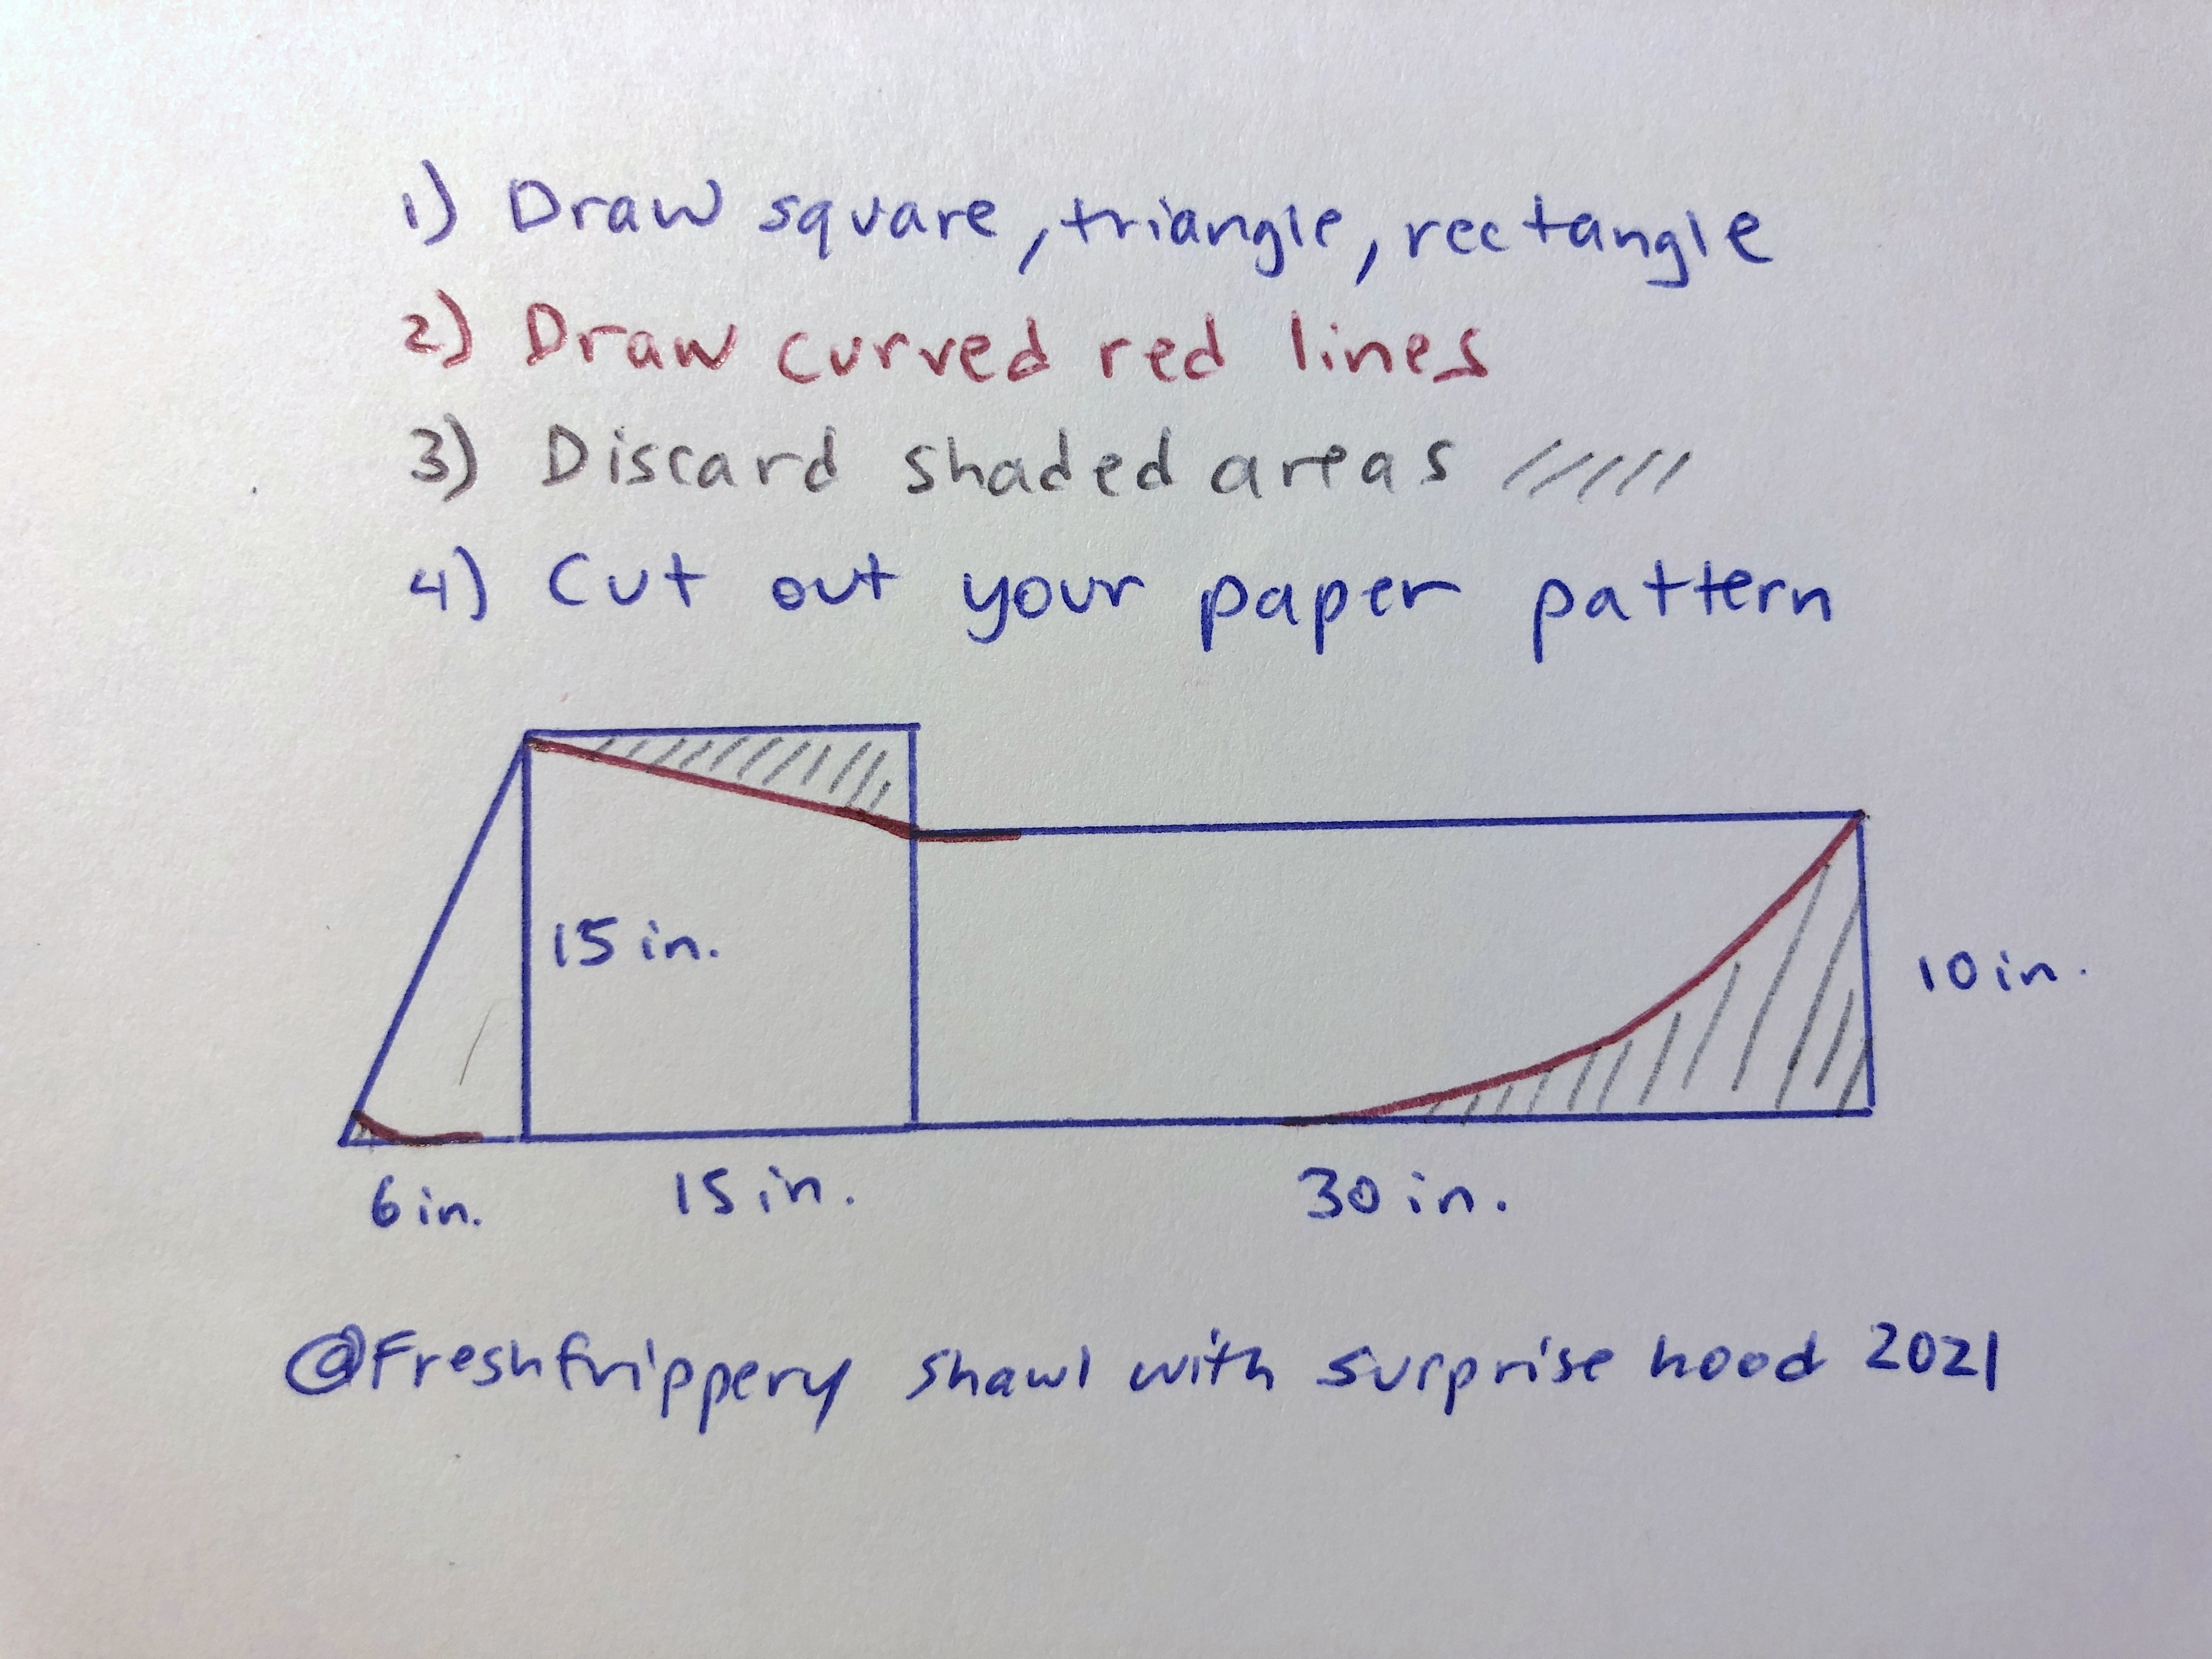
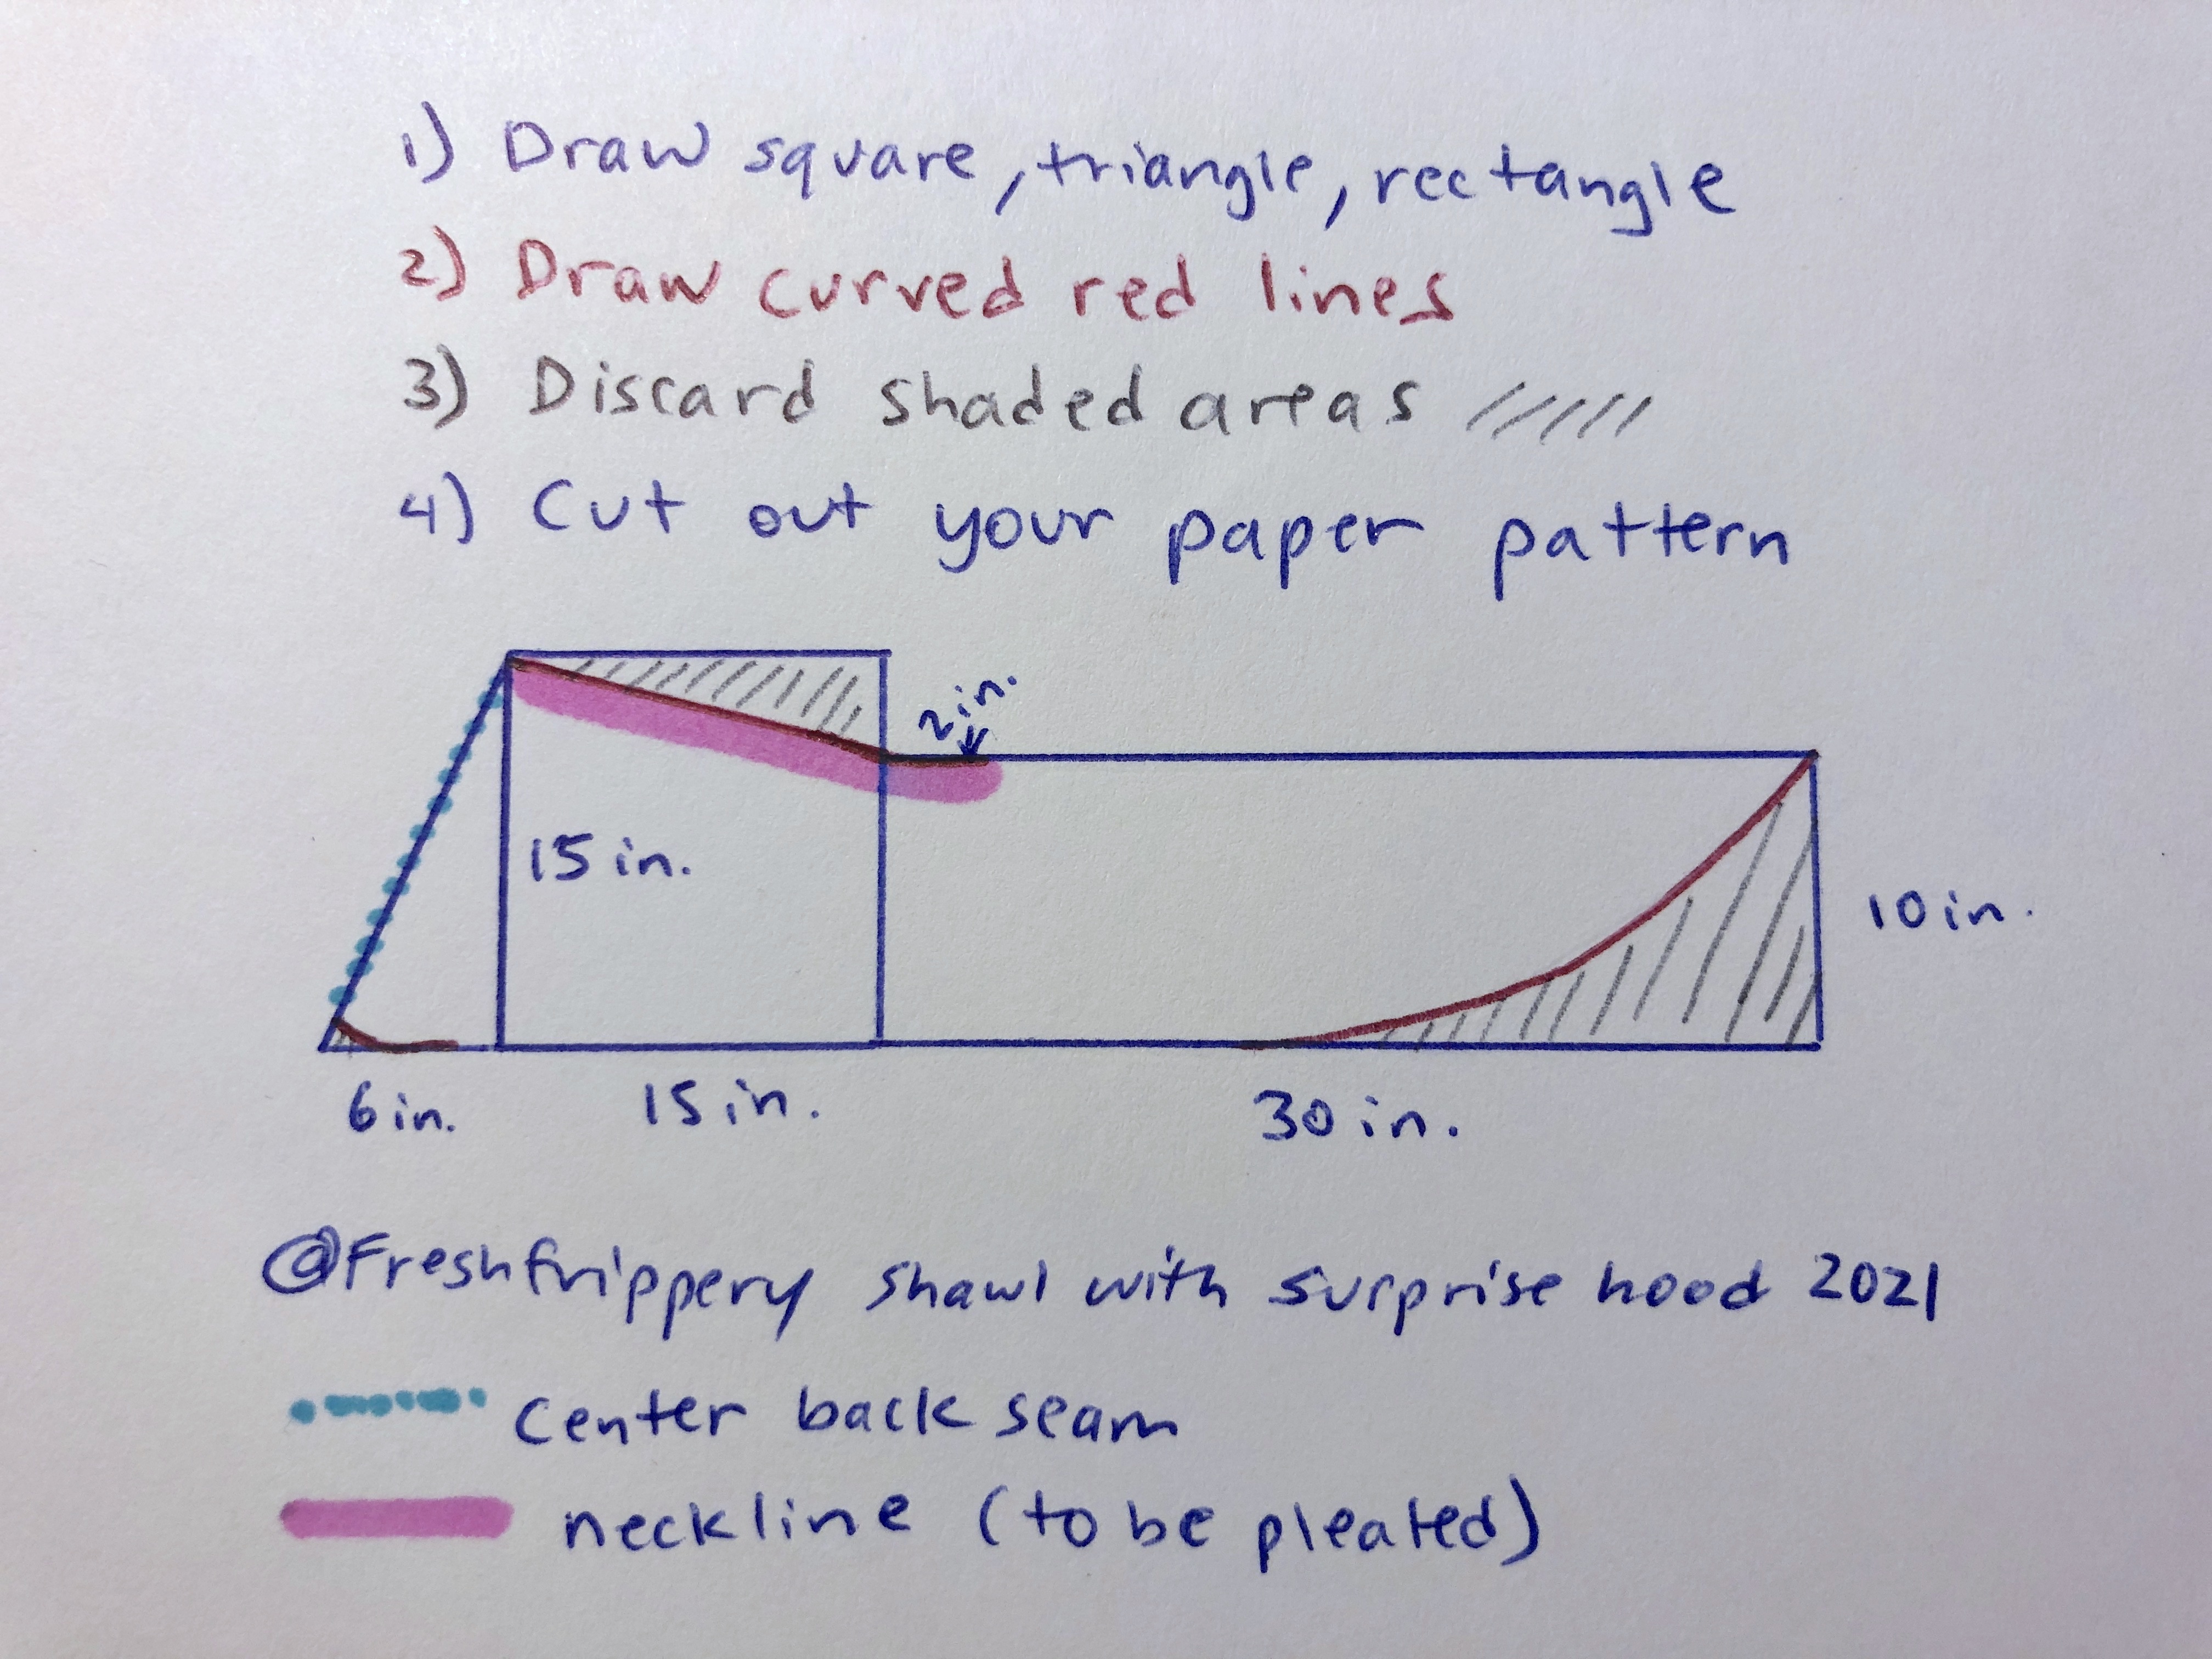
Don’t worry if you don’t have any pattern drafting experience! I’ve broken it down into squares/rectangles/triangles so if you have a ruler you can draw these shapes. Start with these basic geometric shapes; I find it is easiest to draw the square first, then the rectangle, then the triangle on a large piece of paper. (It doesn’t have to be fancy or special drafting paper; a roll of gift wrap works great).
Next, draw the curves indicated in red on the diagram. Then, discard the shaded areas.
Now you have your pattern that you can cut out of paper and use to trace onto your fabric! (This includes 1/2 inch seam allowance. You can add more when cutting out your fabric if you want your shawl a little wider or are skipping any trim).
CONSTRUCTION
Cut out 4 identical pieces of fabric. 2 will be the fashion layer and 2 will be the lining. (If you want, you can use a different fabric for the lining but then the hood will be a different fabric when flipped up).
Sew the center back seam of the 2 fashion pieces together. Repeat for the lining layer. Press the seams flat.
Put the fashion and lining layers right sides together. If you plan to use pompom trim or lace, this is the time to sandwich your trim in between the two layers as shown, with the edges flush. (This is so that the pompom balls are “inside” when sewing the edges but will be on the “outside” when the shawl is flipped right side out). You will have trim everywhere except the neckline. (If you are using rickrack, instead of sandwiching it in the layers you should sew it to the fashion layer before it is attached to the lining).
Sew all along the outer edges of the shawl, except for the neckline, as shown in the earlier image.
Turn the right sides out through the opening in the neckline, exposing the pompom trim. Fold in the raw edges of the neckline and topstitch closed.
Right now you will have a long flat piece as shown below. (The ends are folded in so I could fit everything in the photo).
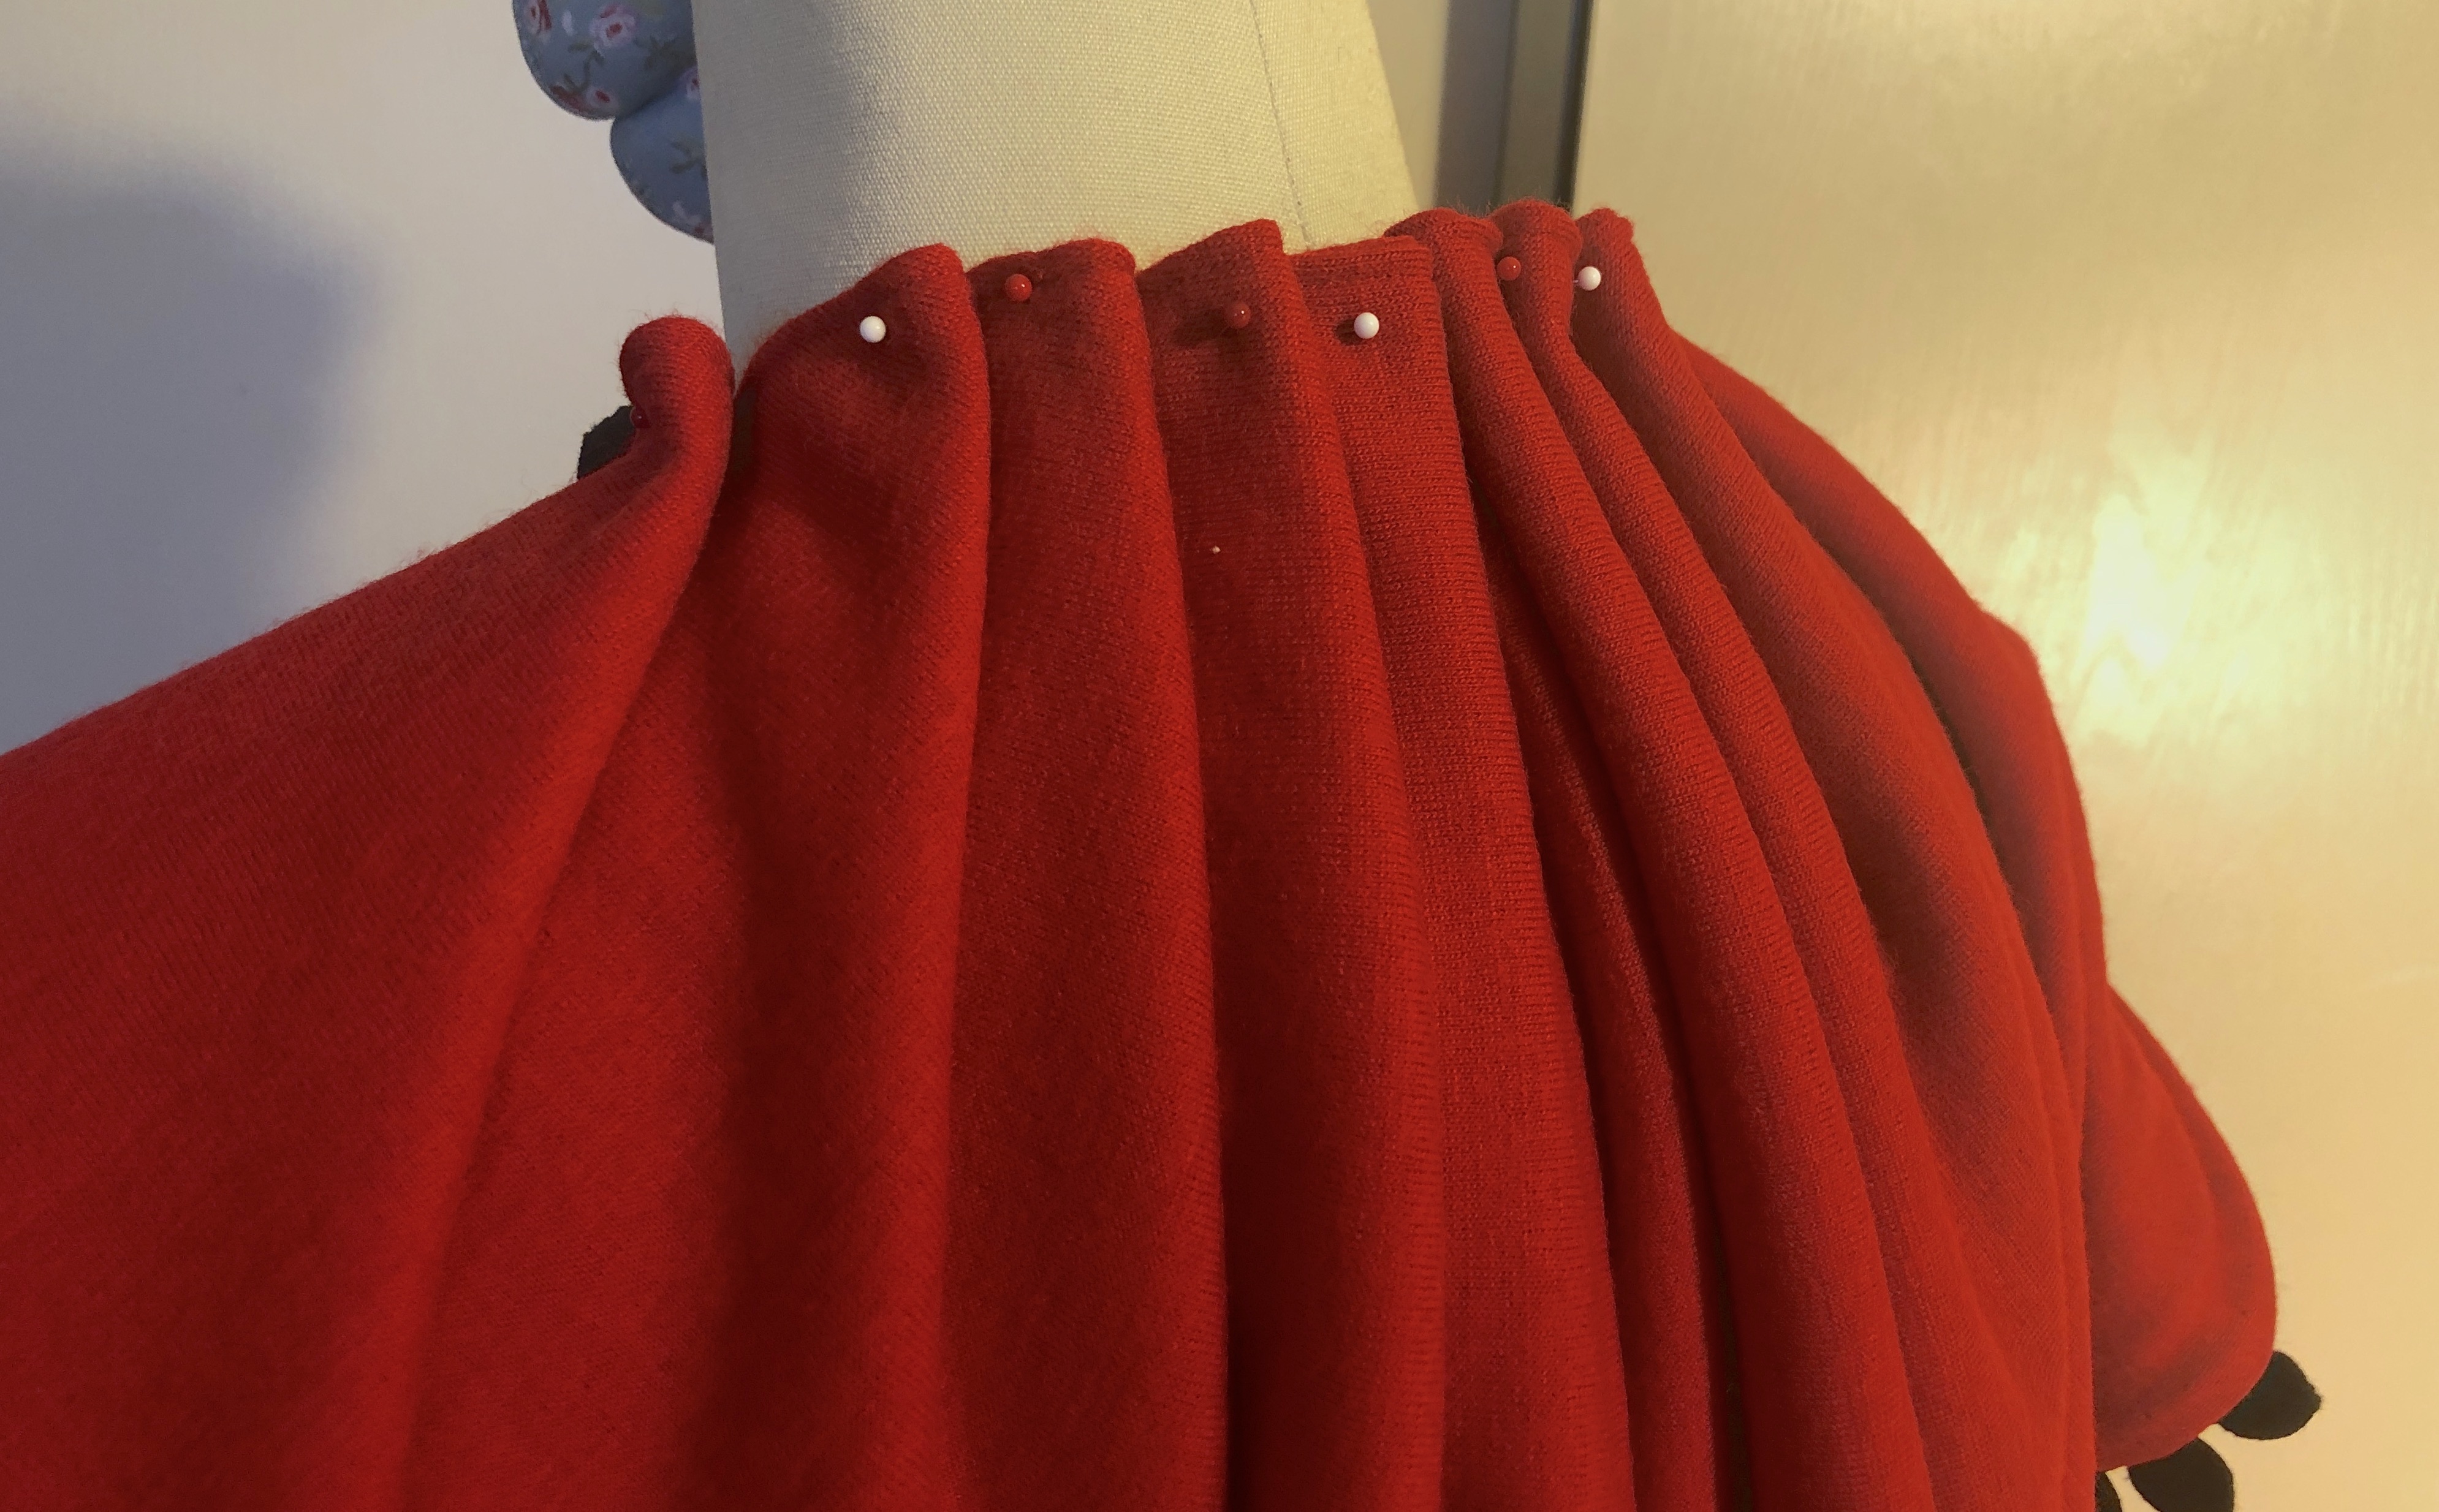
Pleat the neckline area (up to where the pompoms start) to fit the curve of your neck. The finished curved area should cover the back half of your neck. (If you have a dress form handy, an easy way to determine how to do the pleats is to pin the center back seam to the center back of the form, pin where the pompom trim starts to the shoulder point on the form, then pleat using the neck of the form as a guide). To keep the pleats in place, stitch down the pleats over the previous topstitch line either by machine or by hand.
Optional: Use one of the embroidery stitches to add some extra decorative details to your shawl. Some ideas include using a continuous stitch along the edges of the shawl, or putting a monogram on the tails. You can also do a decorative stitch along the edge after the shawl is sewn, rather than using pompom trim. (These examples are under the Decorative stitch menu on my Janome Skyline S9).
HOW TO WEAR
This can be worn multiple ways!
Wear the draped back and front tails down as a shawl.
Pull up the draped back over your head as a hood (with the tails in front or pushed behind your shoulders).
Wrap one or two front tails around your neck like a scarf.
Combine 2 and 3 for a chic hooded scarf look.
Which one is your favorite?
Thank you for reading! Be sure to follow me on Instagram @freshfrippery for the first peek at any new projects!
I am happy to provide all patterns and tutorials for for free on my blog. It is absolutely optional, but if you would like to donate towards my domain registration and the data costs of hosting the many photos on my site, consider buying me a “coffee”: https://ko-fi.com/freshfrippery. Thank you!
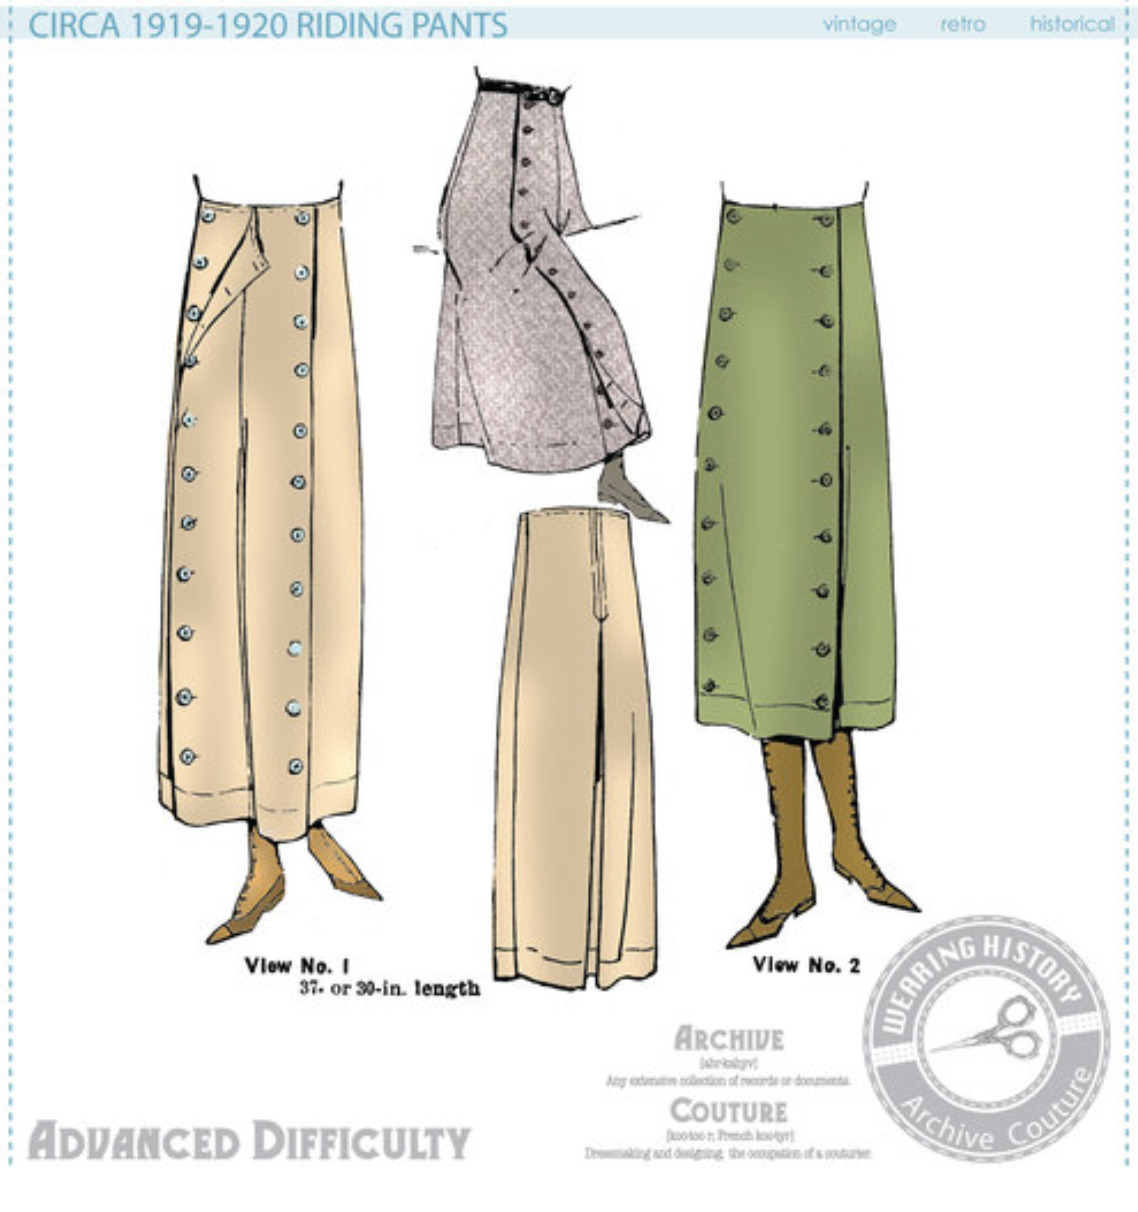
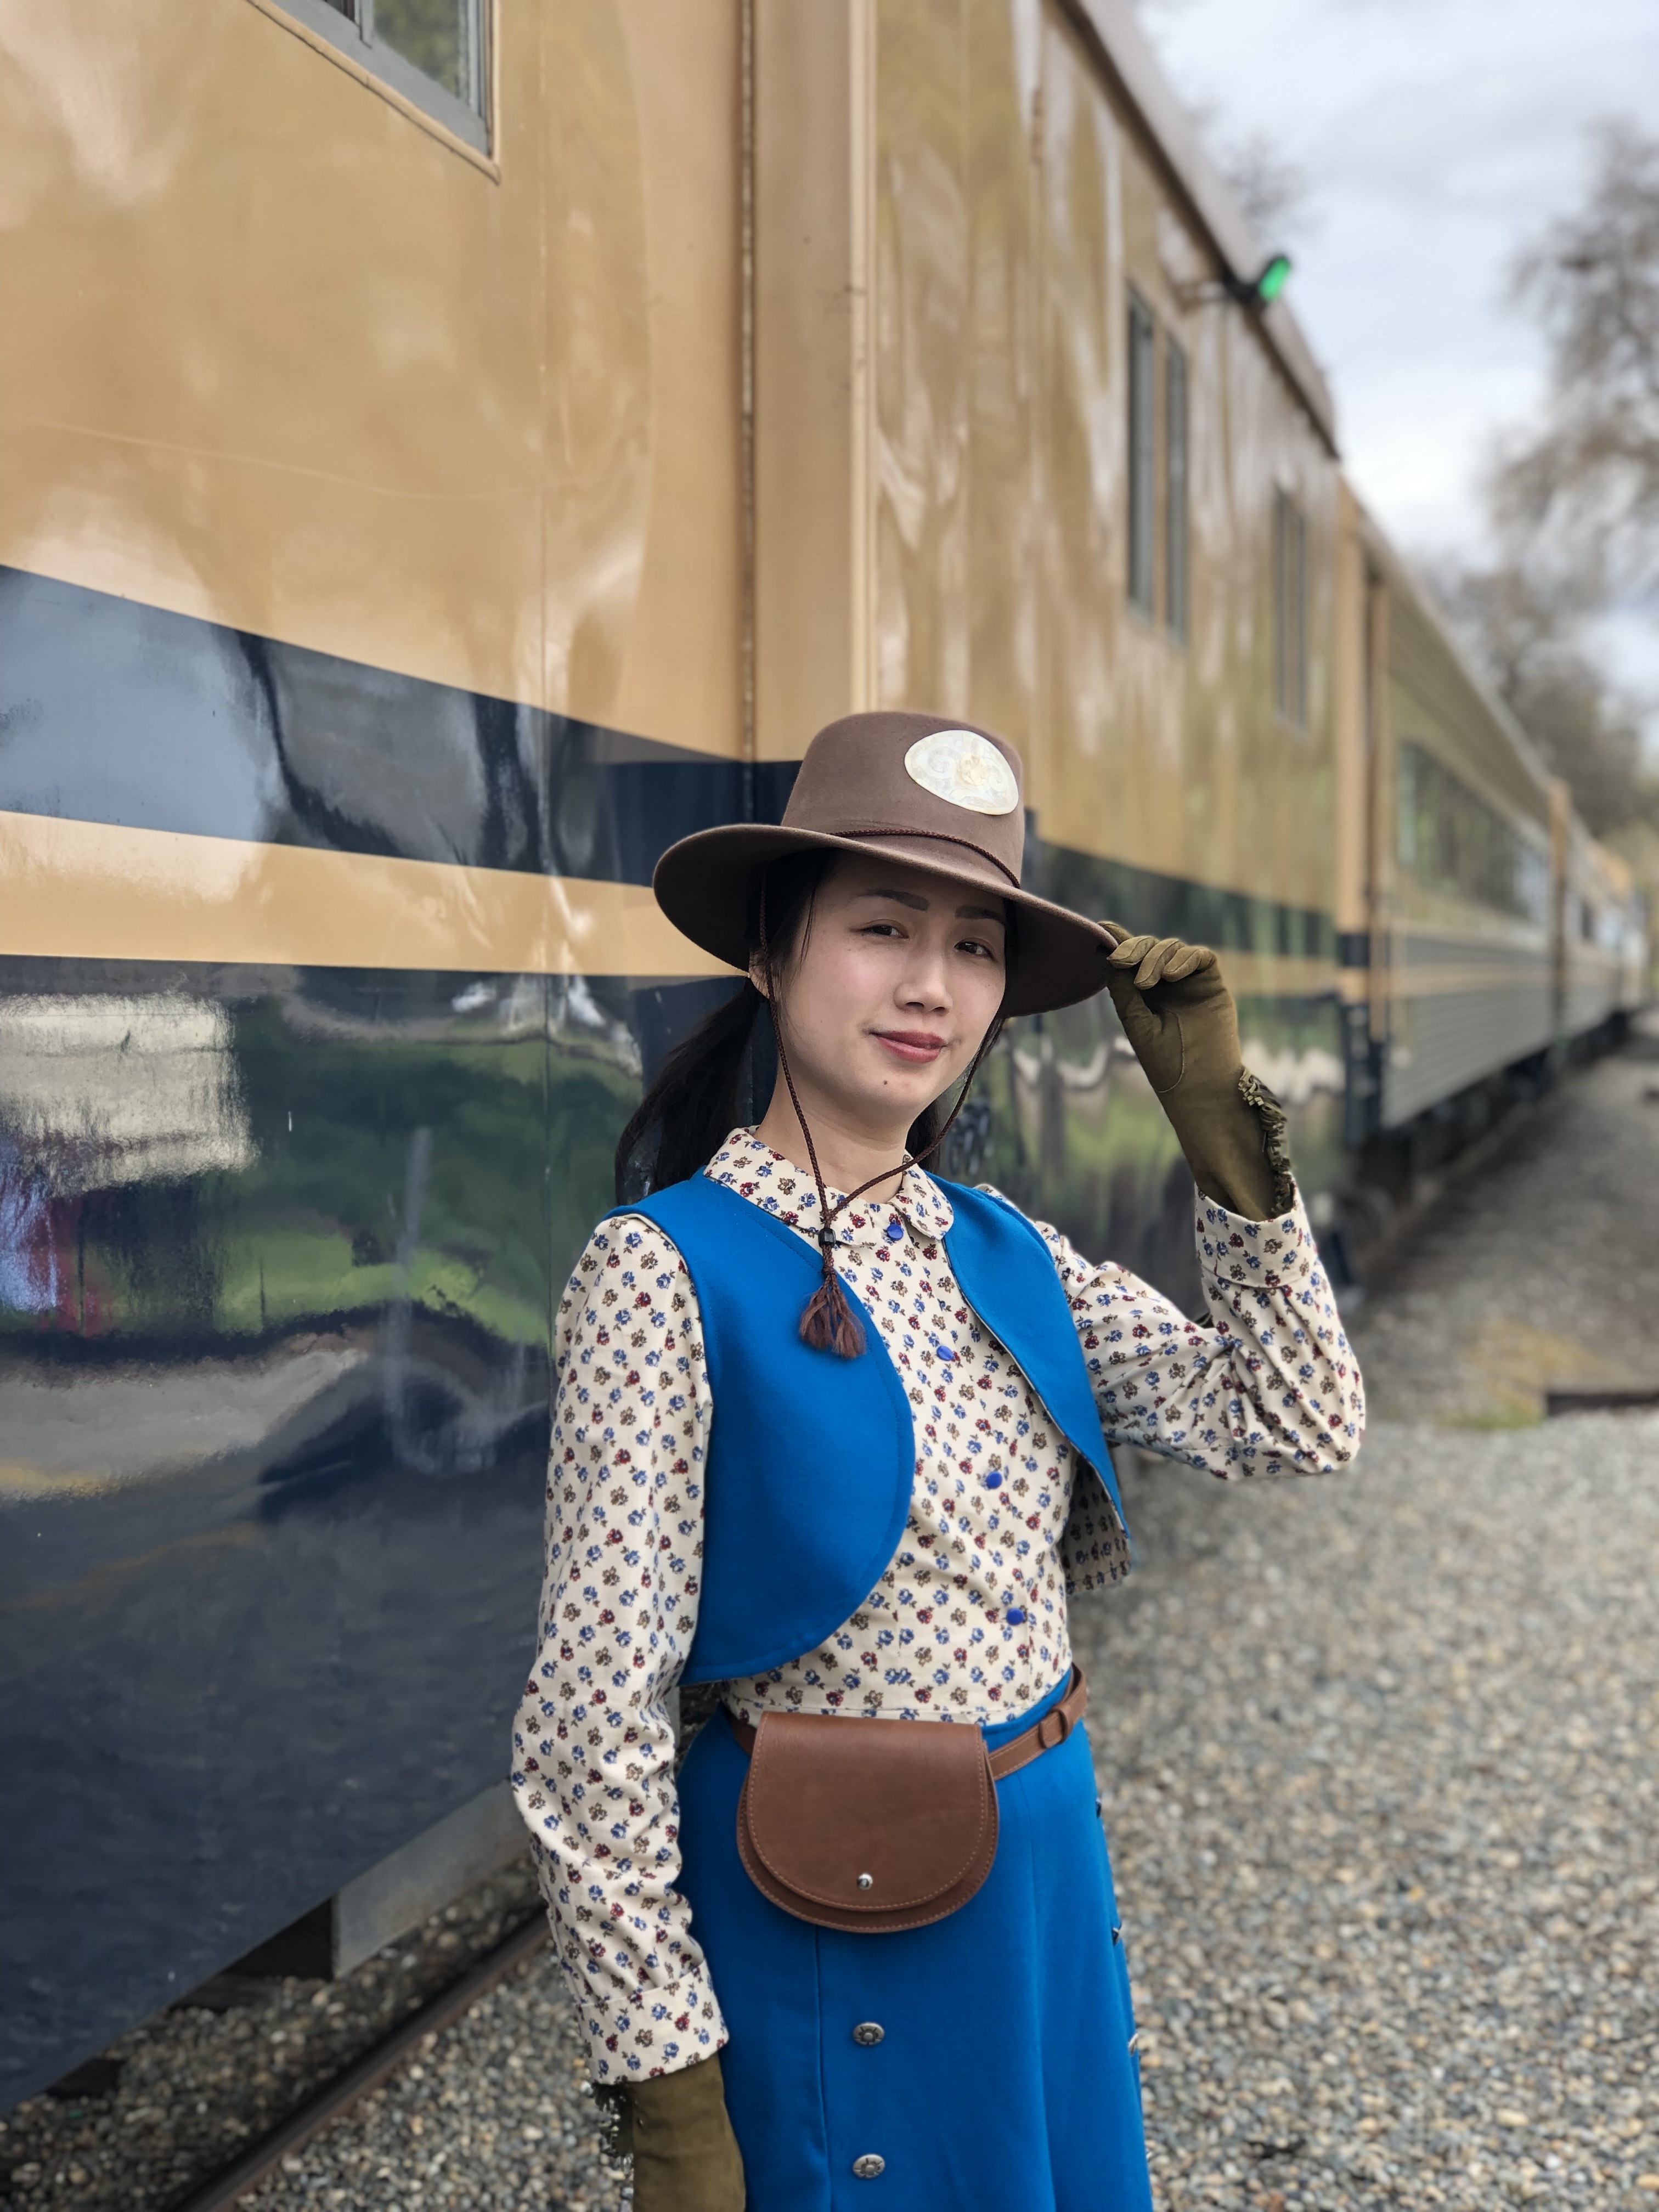
Last month I made myself a cowgirl ensemble with a pair of split riding pants (with a button on panel to turn it into a skirt) using some cheerful blue wool and the 1919-1920 riding pants pattern by Wearing History.
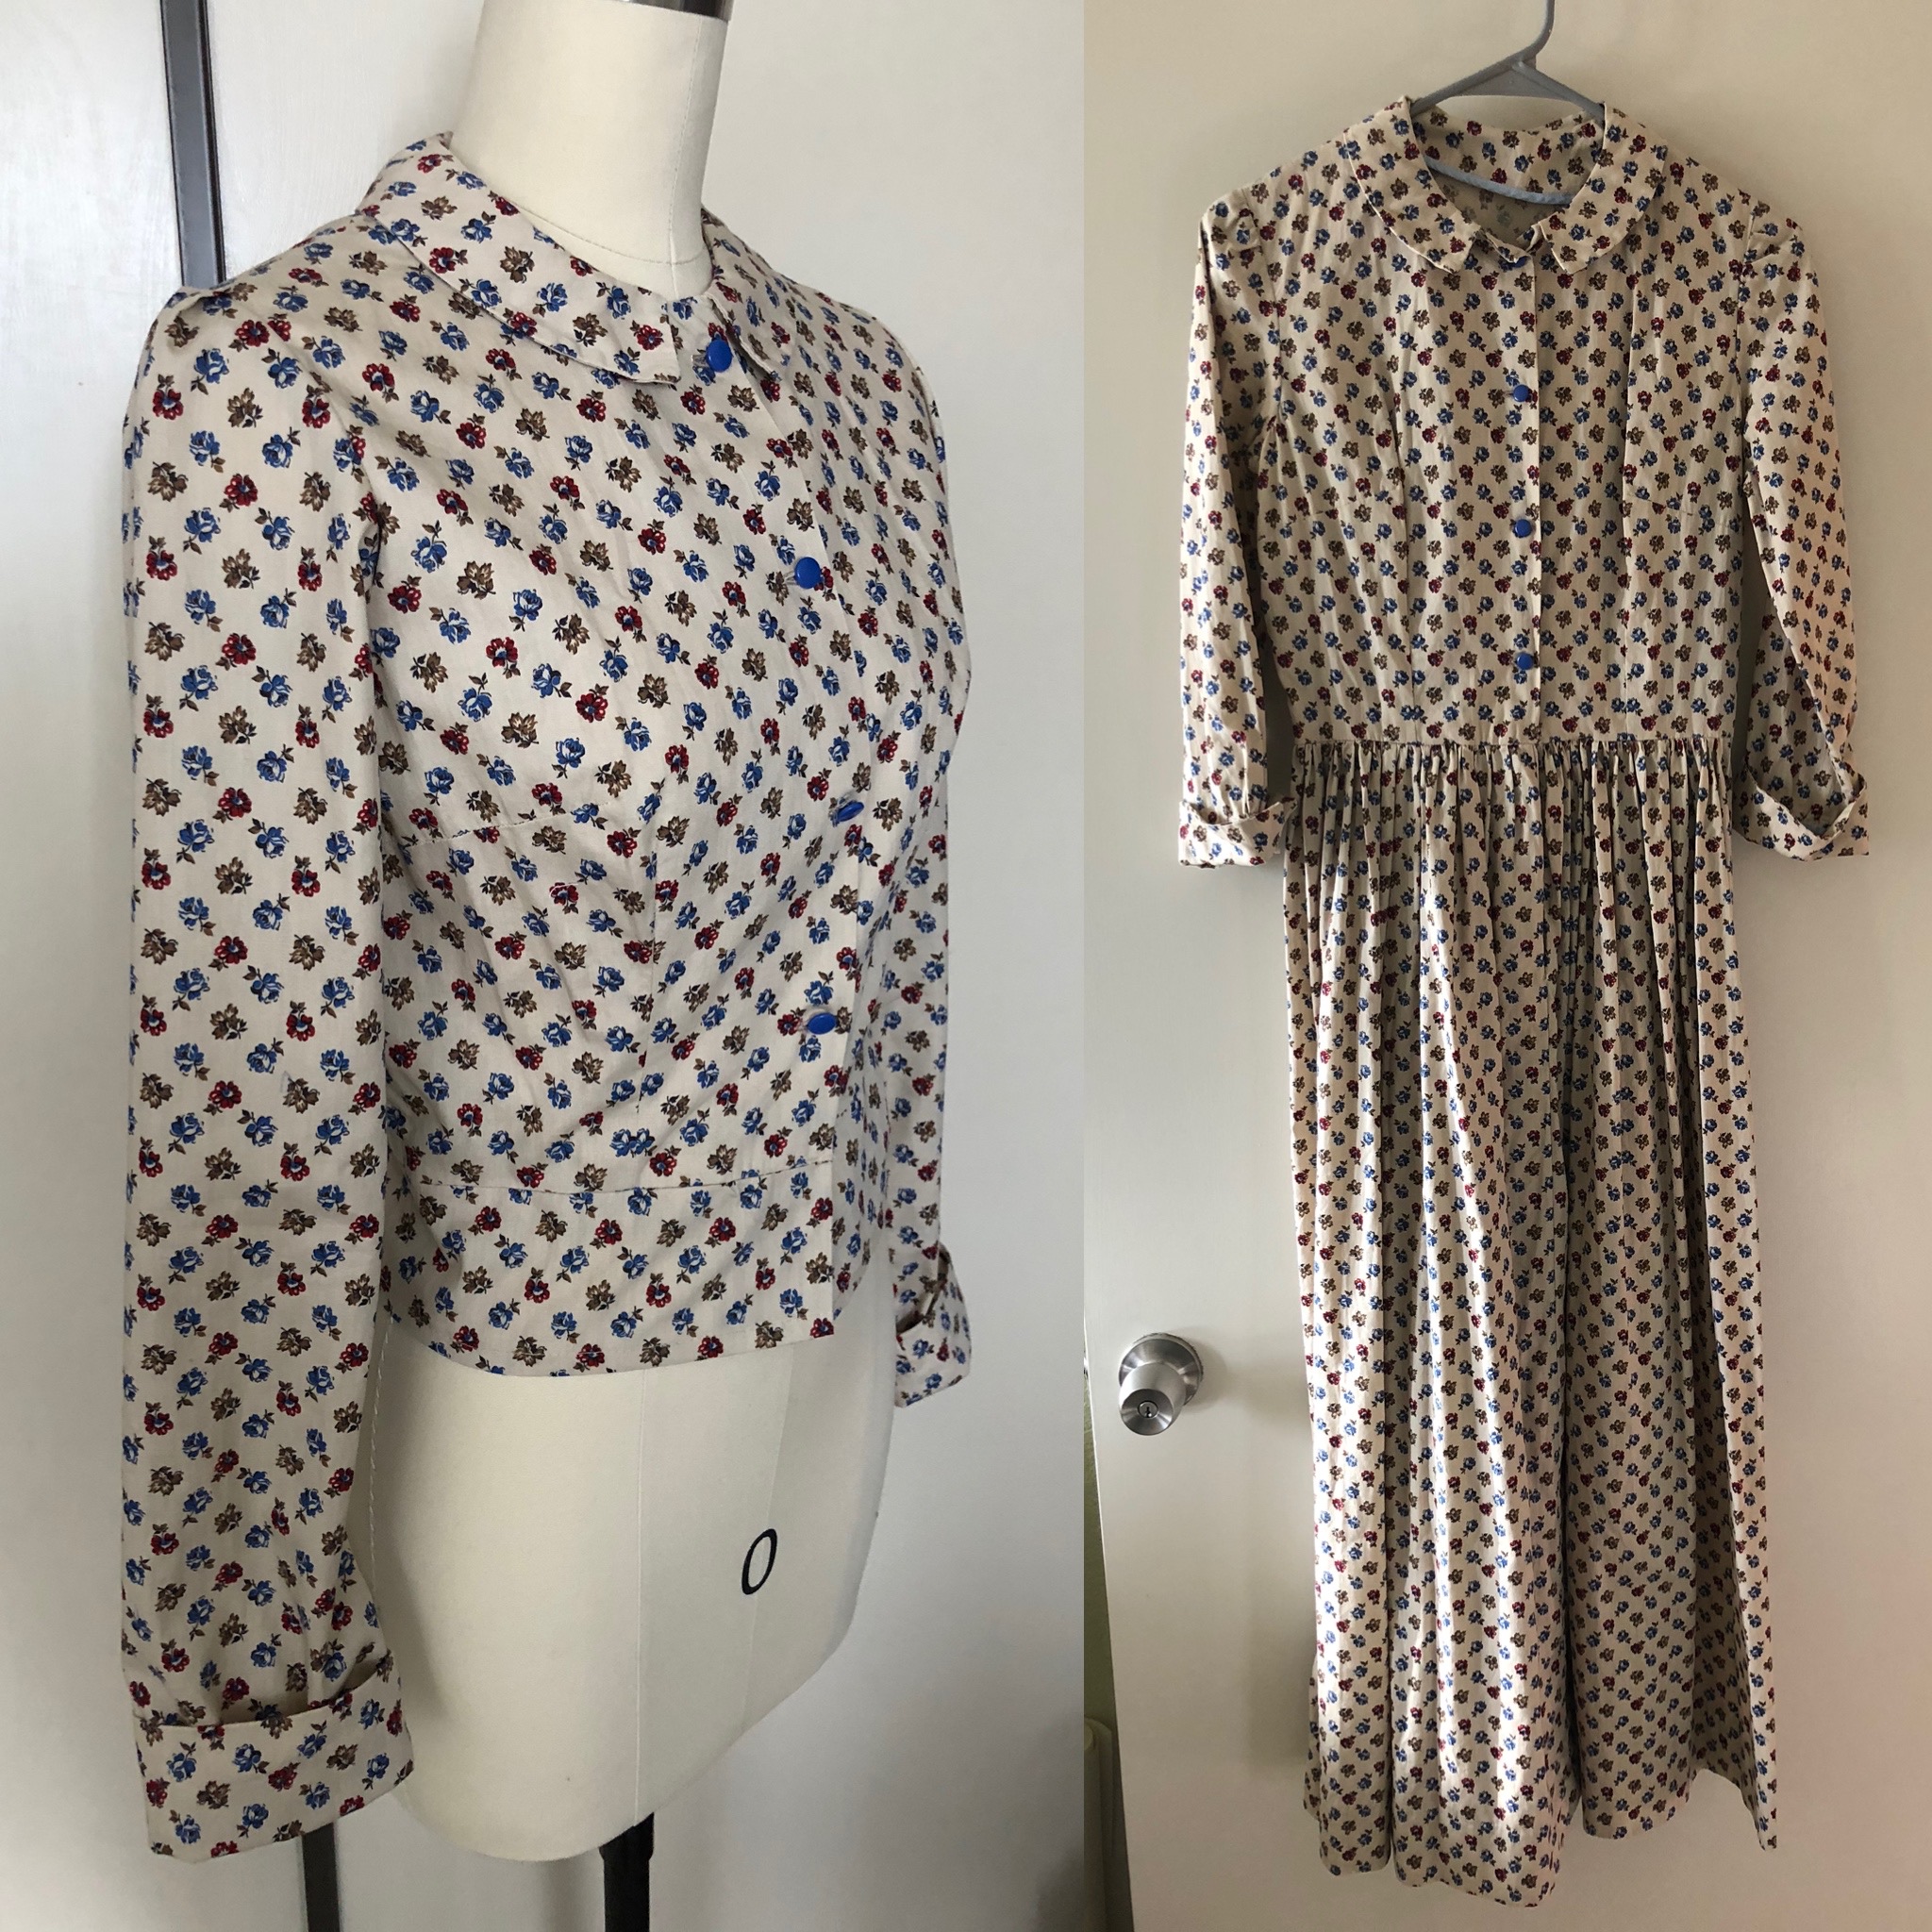
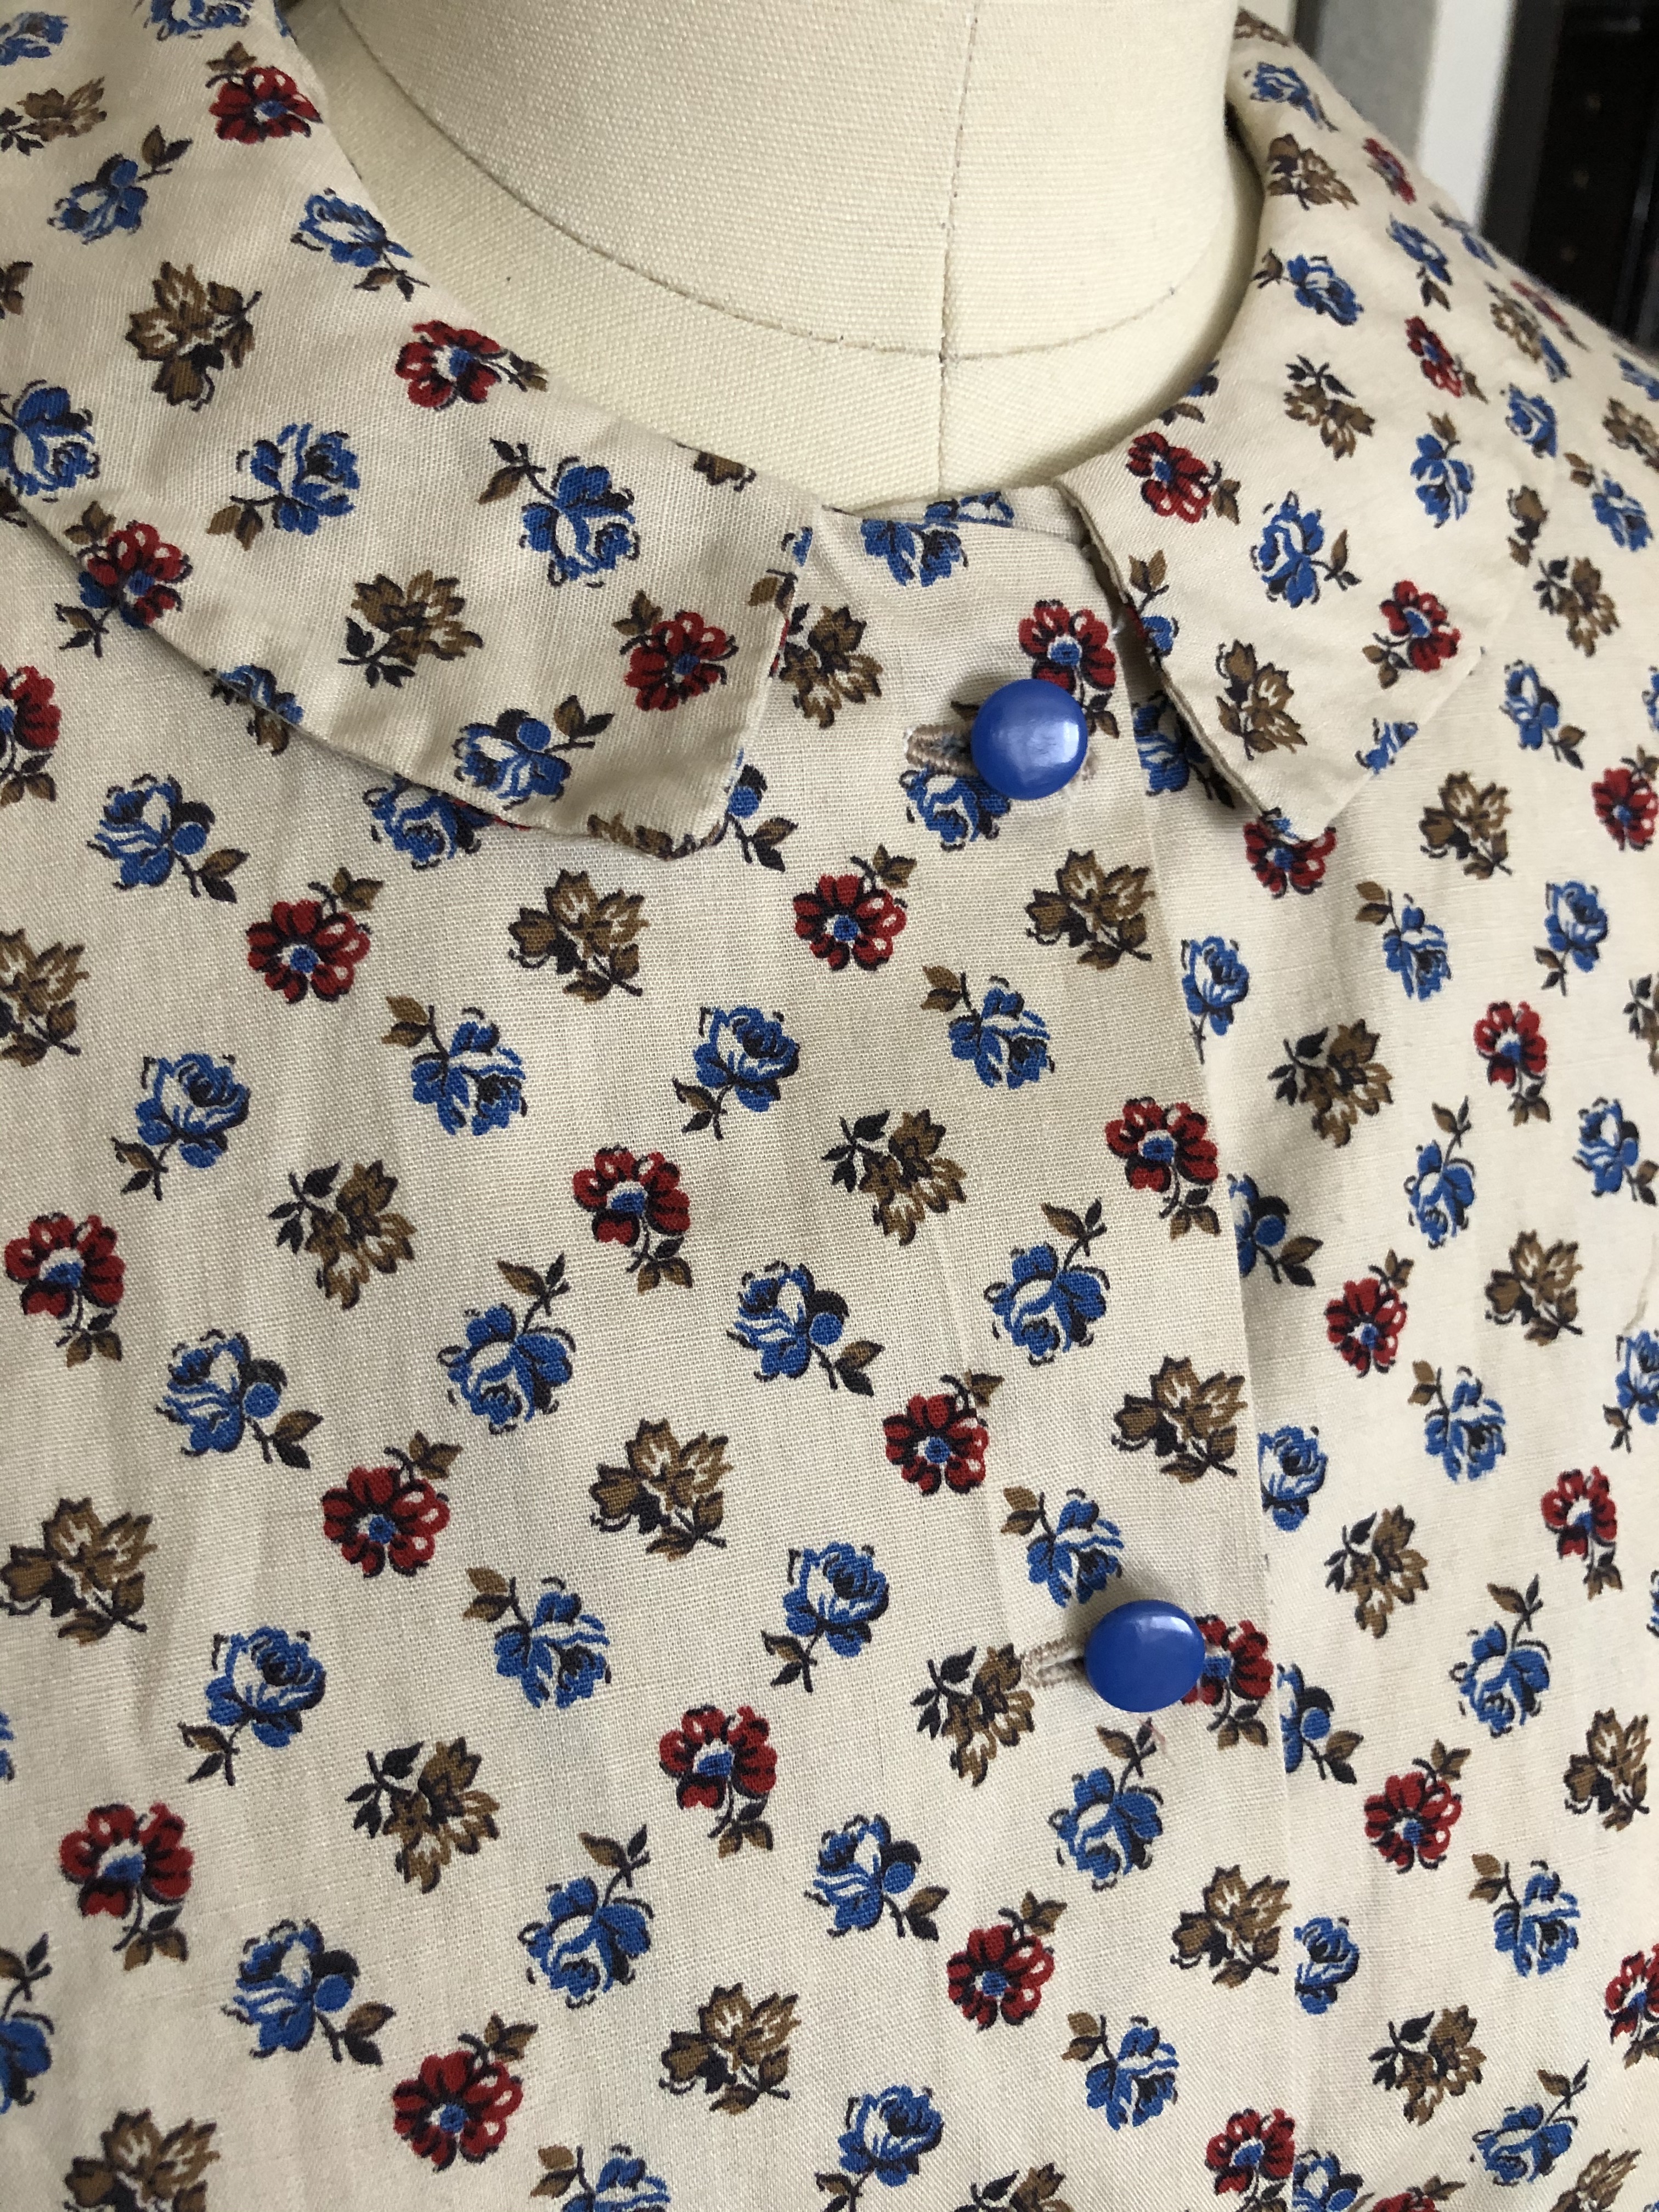
The leftover wool was used for a self-drafted matching vest, lined with the same floral cotton as my blouse.
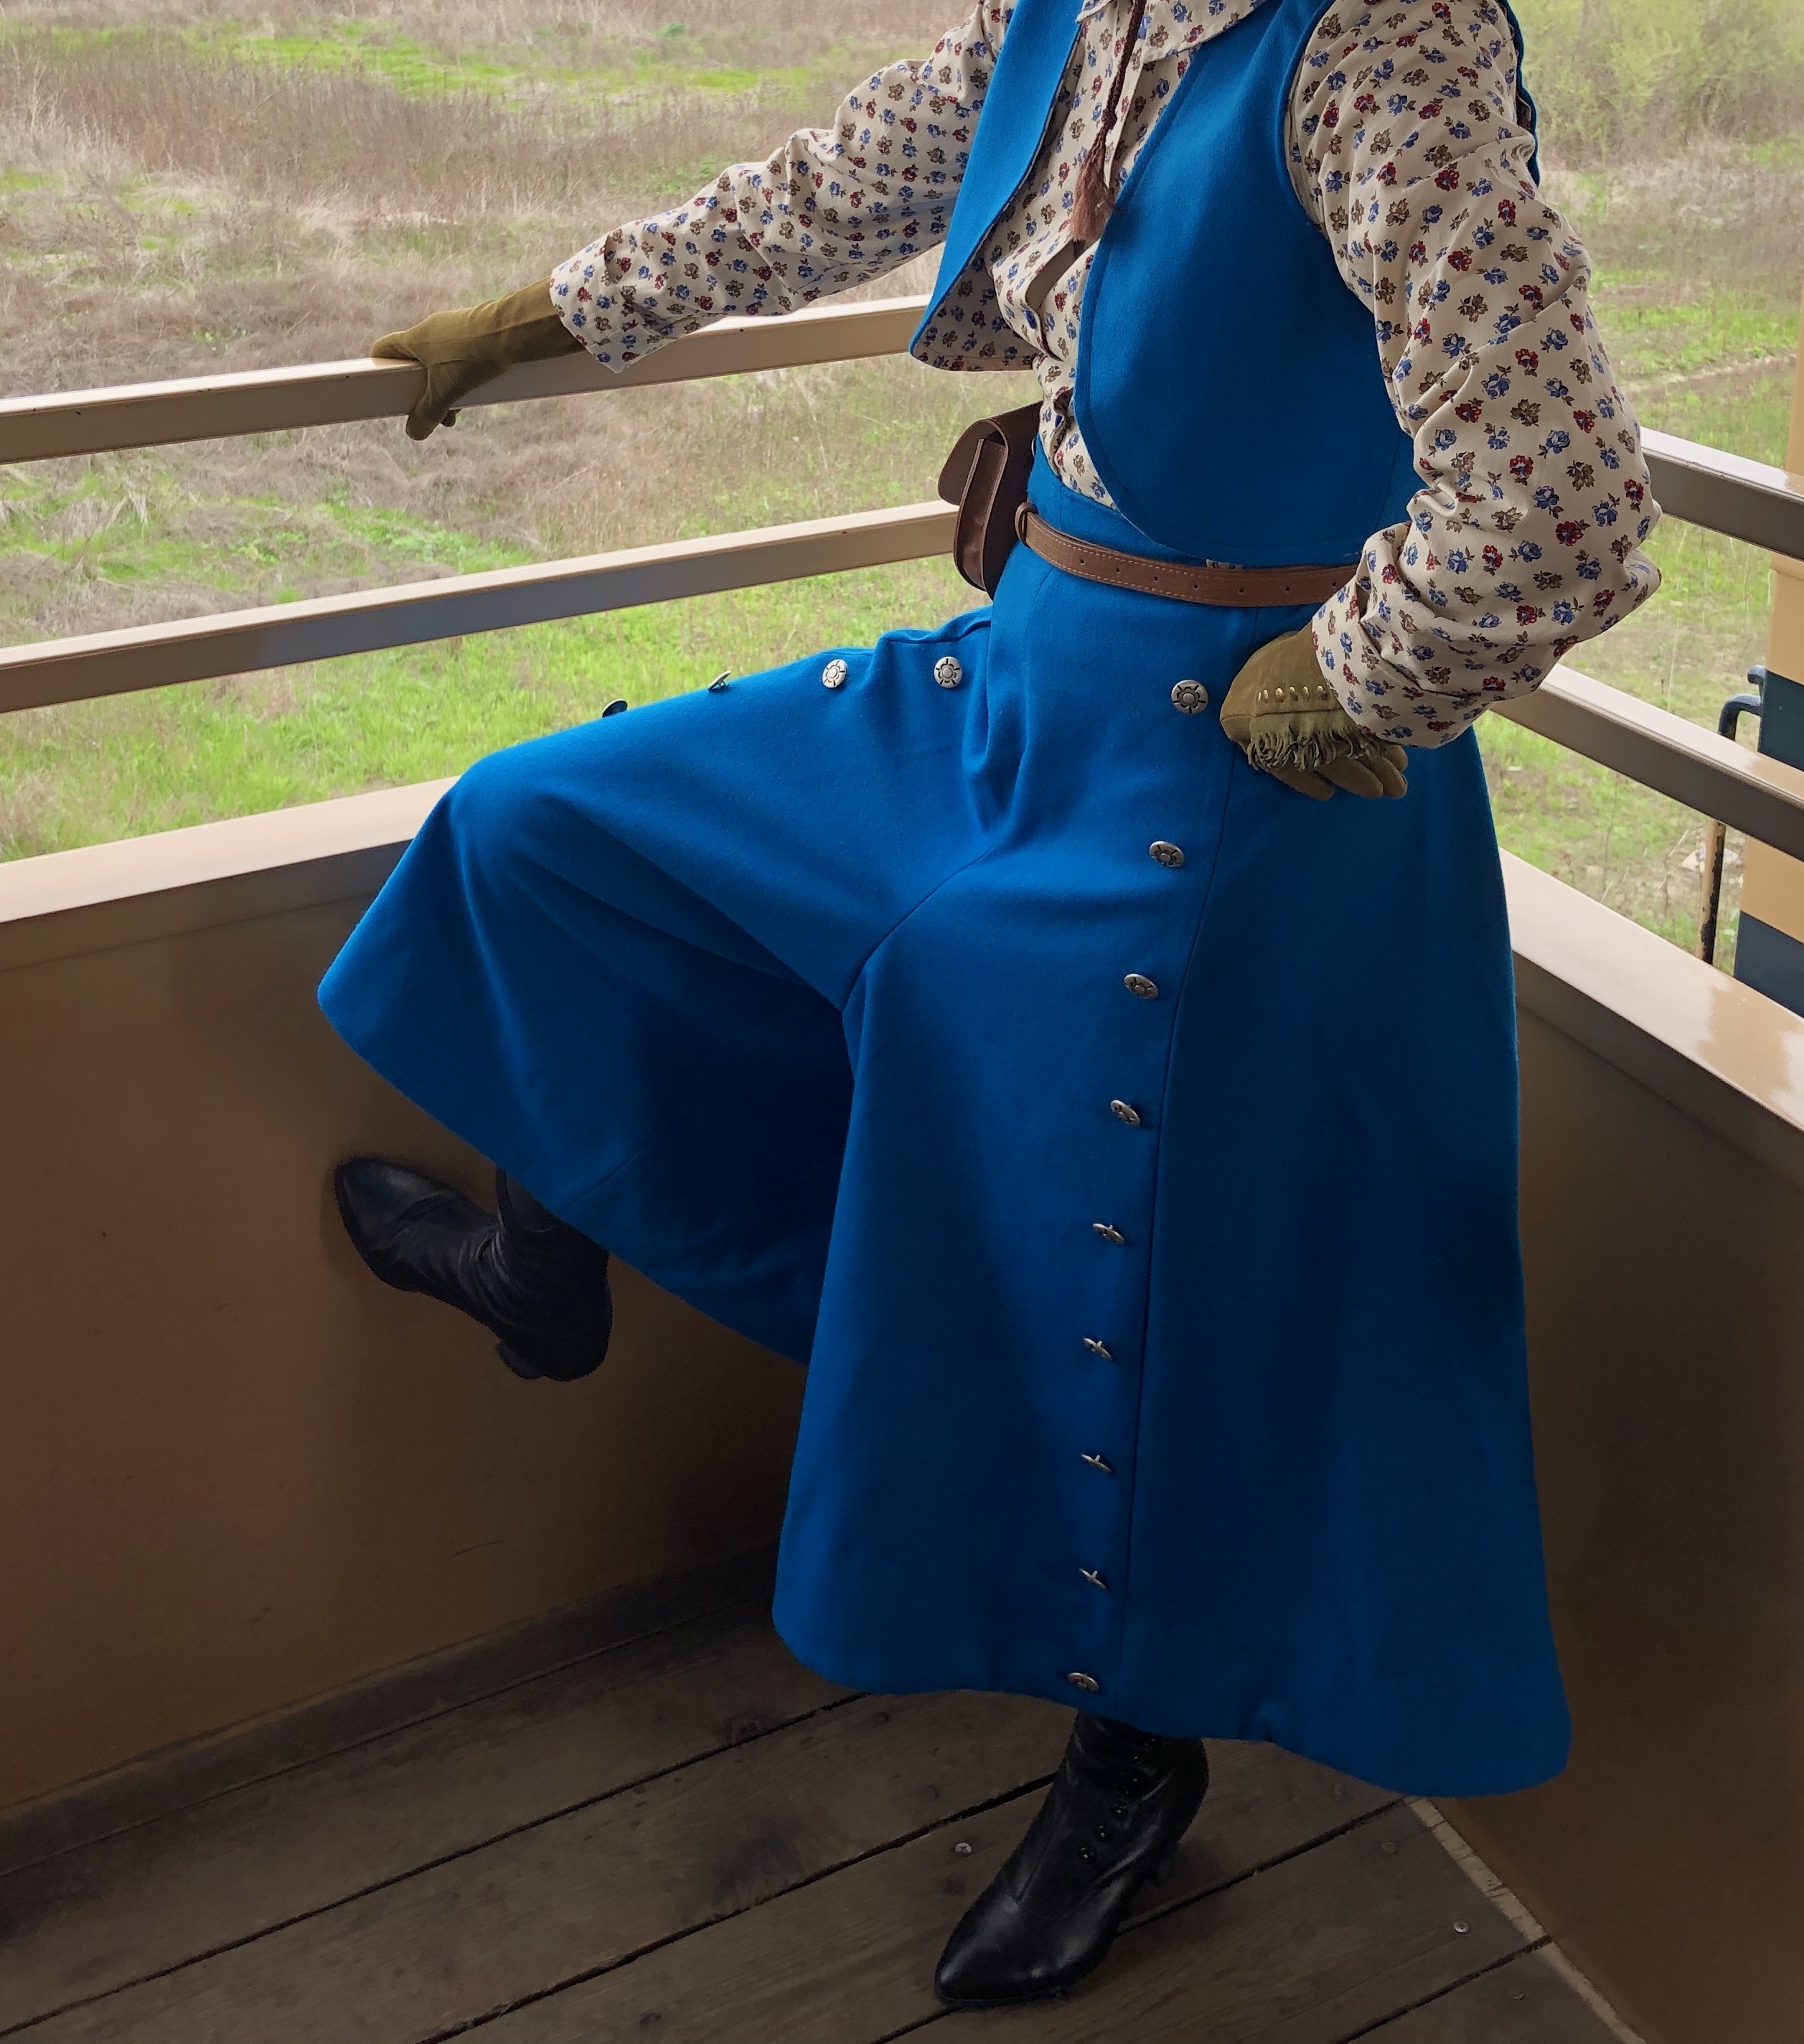
I wore the ensemble during a ride on the Sacramento River Train with my local costume guild.
At the event I wore the pants without the extra skirt panel, but for a future wearing I plan to use this versatile garment with the skirt panel buttoned in (which makes them surprise pants!)
I used 20 silver-colored metal shank buttons that have been in my stash for years. I think I paid 25 cents a button a long time ago and have been saving them for a project that needed 20 buttons! I got the wool for a great bargain too ($20!)
The blouse was up-cycled from a second-hand cotton dress! I removed the skirt and used the extra fabric to make new sleeves and cuffs (replacing the 3/4 sleeves), extend the hem of the blouse, and also line my vest. (It would have been even less work to just cut the skirt off a few inches below the waist seam, but it had a lot of gathered material that would have created bulk below the split riding pants).
For my other accessories I wore American Duchess Tavistock boots, vintage fringed sueded gloves with studs, a wool hat with a silver emblem I got from Poshmark, and a pleather pouch from Amazon.
The pouch (Amazon affiliate link) had slits in the back for threading the belt through to wear as a hip pouch, plus internal loops to wear as a purse. It’s “old-time” enough that I think it’ll end up in other costume ensembles!
Some notes about the Wearing History pattern: It comes with a short and long version of the skirt. Since I had limited fabric I cut the shorter version and was able to get a vest out of the scraps. (I used 3 yards of 54″ wool). The pants are unlined.The skirt panel is faced with self-fabric and contains all the buttonholes while the buttons are sewn onto the pants. There are two options to attach the skirt panel. You can have one side sewn into the seam of the pants (which means you won’t lose the panel and you can make half as many buttonholes) or you can have the panel completely removable. If you have the panel attached you fold it over to one side and button it down. I opted to have the panel completely removable because my self-faced fabric folded over would have meant 4 layers of medium-weight wool and more bulk than I wanted. (If you use a lightweight wool or other fabric you don’t have to be concerned about that).
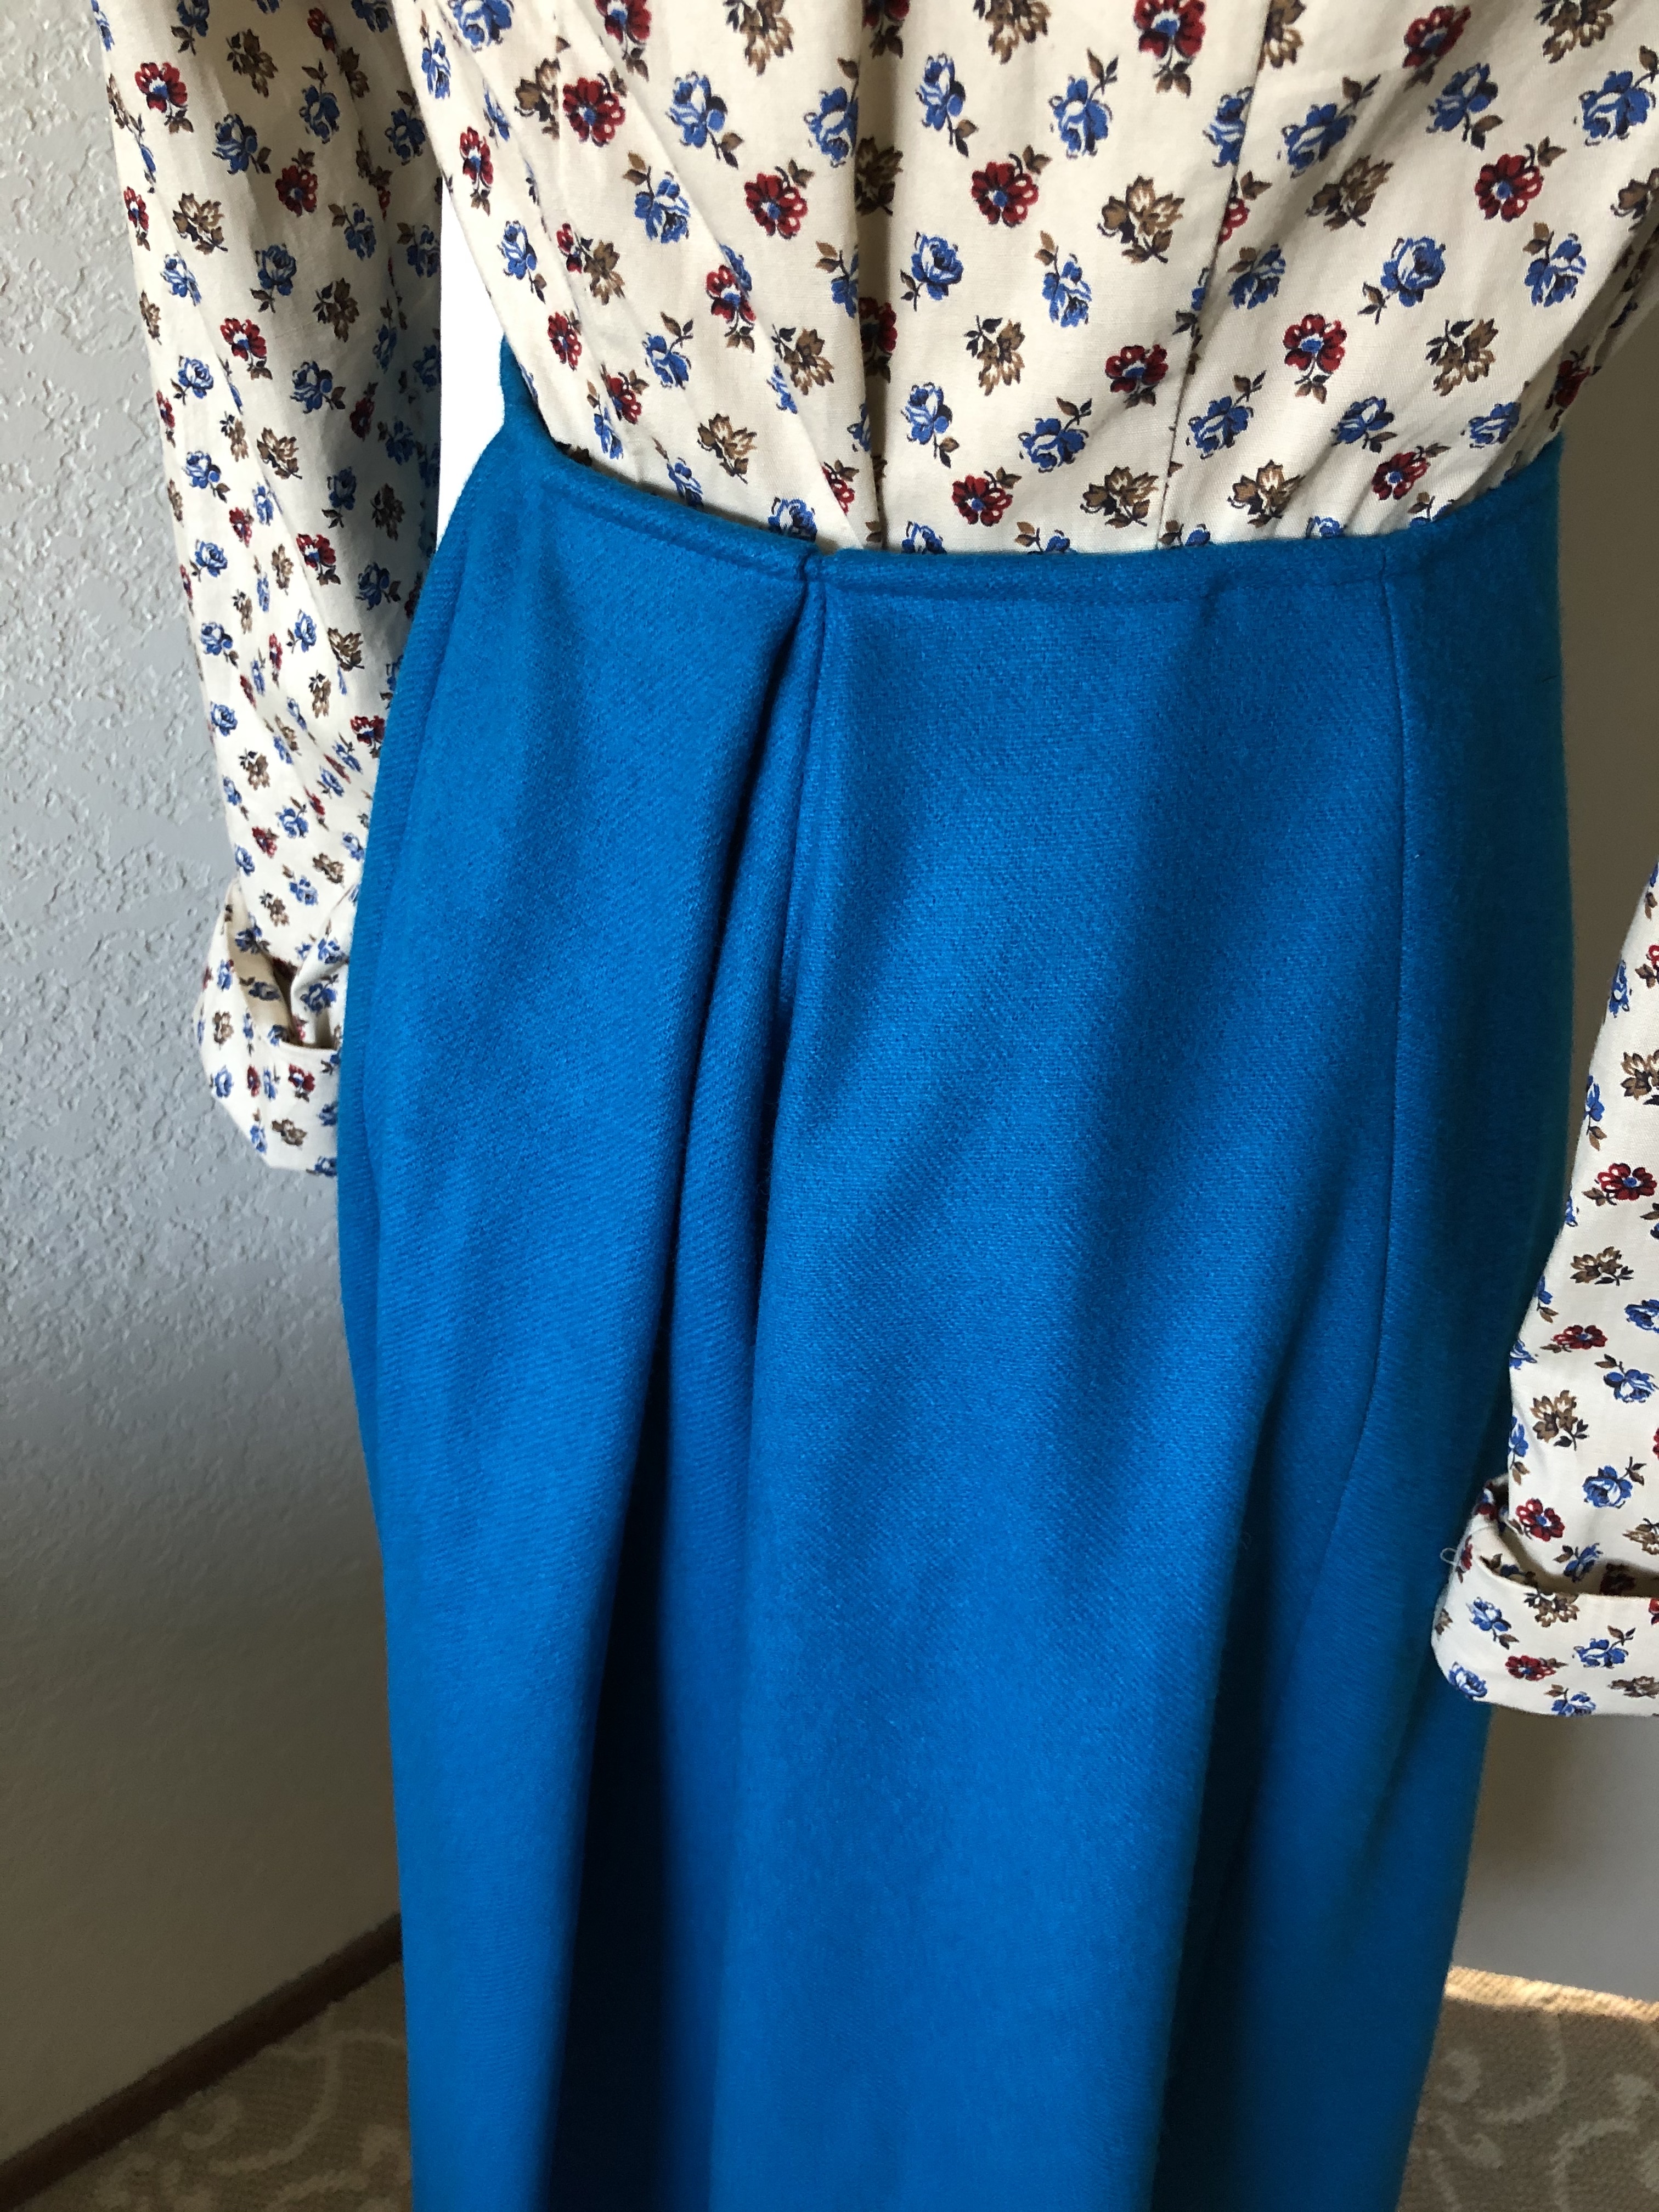
The back of the skirt has an inverted box pleat that you can stitch down the center back seam. I did not do the stitching, in order to make the back more skirt-like.
The pants are very full so even if the skirt is buttoned in place in the front there should be plenty of range of motion due to the extra fabric in the sides and back.
Pattern difficulty is “advanced” according to Wearing History. This is because this is a reproduction of an antique pattern from 1919-1920 and assumes certain basic knowledge. Wearing History has added some really helpful notes, but this is not the kind of modern pattern that has step-by-step illustrations. You should know how to make and attach a placket for the opening and the facings on the bottom hem. (These are rectangular pieces you make yourself from scraps, and are not included in the pattern).
I am an experienced costumer maker and have made pants before, so I did not find this pattern particularly difficult, but it is not a beginner pattern for sure. I highly recommend this pattern if you are experienced or an ambitious intermediate seamstress. It was definitely fun to wear with the rest of my guild!
The last 3 photos are by Lauren Moyer, one of our wonderful GBACG board members.
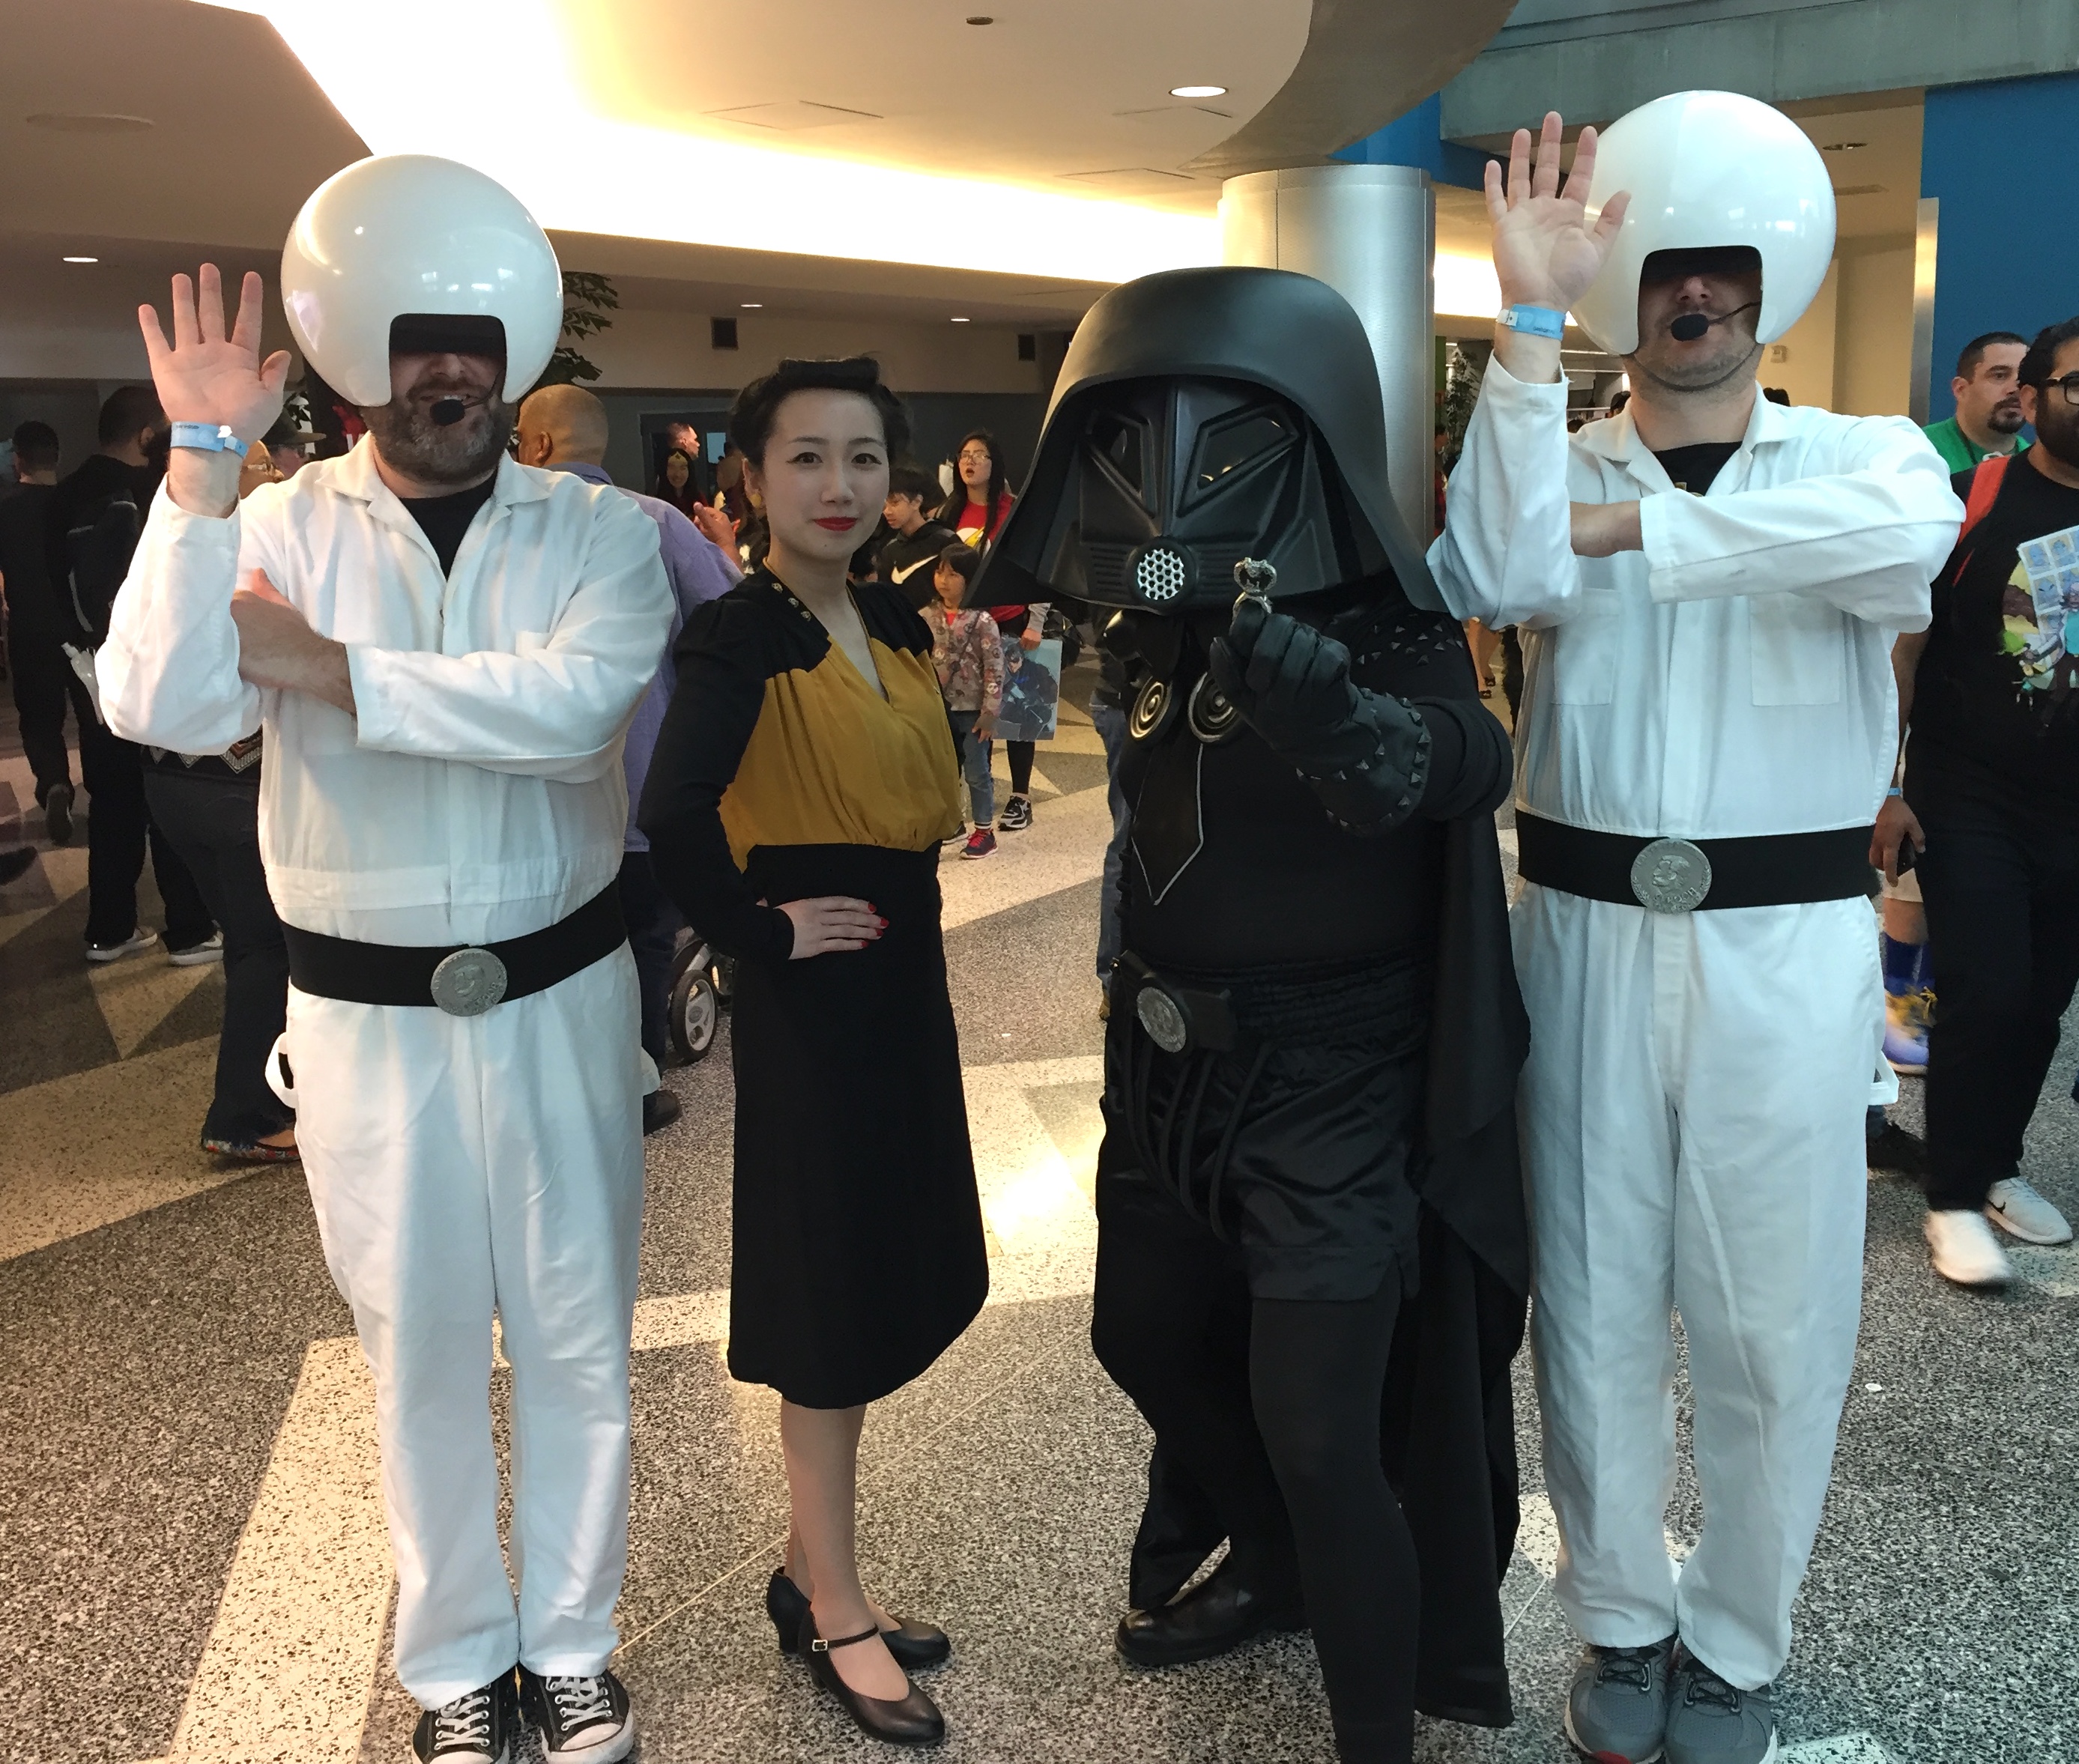
Yesterday I went to Silicon Valley Comic Con with two other members of my vintage-style 1940s Star Trek mashup crew. We got a few “Star Trek pin-up girls” comments, but were pleasantly surprised at how many people called us the Andrews Sisters! That wasn’t our intention but still neat how many people got the vintage reference.
The highlight of our day was meeting Jonathan Frakes aka Commander Riker!
He was super nice! It was really exciting to meet and take a photo of him, but the experience was even better than we expected because he seemed excited to see us too! When he spotted us his jaw dropped and he said, “Look at you guys!” He complimented our outfits and style. We would have liked to talk more but after a quick photo the staff herded us away and we were left with some really great memories!
The other fun part of the day was geeking out with other fans. We took literally hundreds of photos for and with other people that were excited to see our handmade Star Trek costumes. We took so many photos our cheeks hurt at the end of the day and we quickly settled into our “standard” pose for the day.
I wish I hadn’t forgotten my shoulder pads though! My dress is made of rayon (which is so wrinkle-prone). The front is supposed to be blousy and fall into soft gathers, but without the pads it looks too wrinkly.
We also ran into some storm troopers! At first one pointed to his or her chest to indicate our comm badges and then made disapproving gestures, but eventually we achieved detente.
We also had an encounter with the Borg when we went outside to the food truck area.
And I got to meet Dark Helmet!
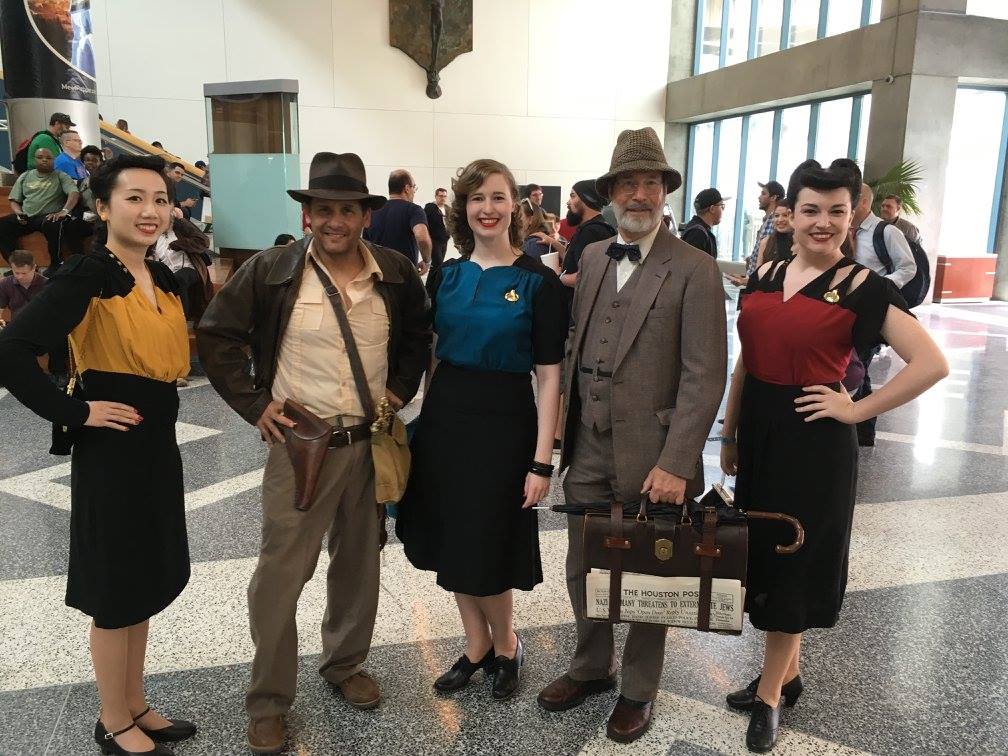
These two Mr. Jones were great. They portrayed the characters well, teasing each other with lines from the Indiana Jones movies. The elder Dr. Jones was really convincing with an impeccable costume and props, and passed out tickets to his upcoming lecture. We had fun with these guys.
There were a lot of really fantastic costumes that I weren’t able to photograph, either because they walked past too fast, or I was busy taking photos with someone else.
By the way, I am on Instagram now. I just opened my account so there is much yet but you can follow me as @freshfrippery.
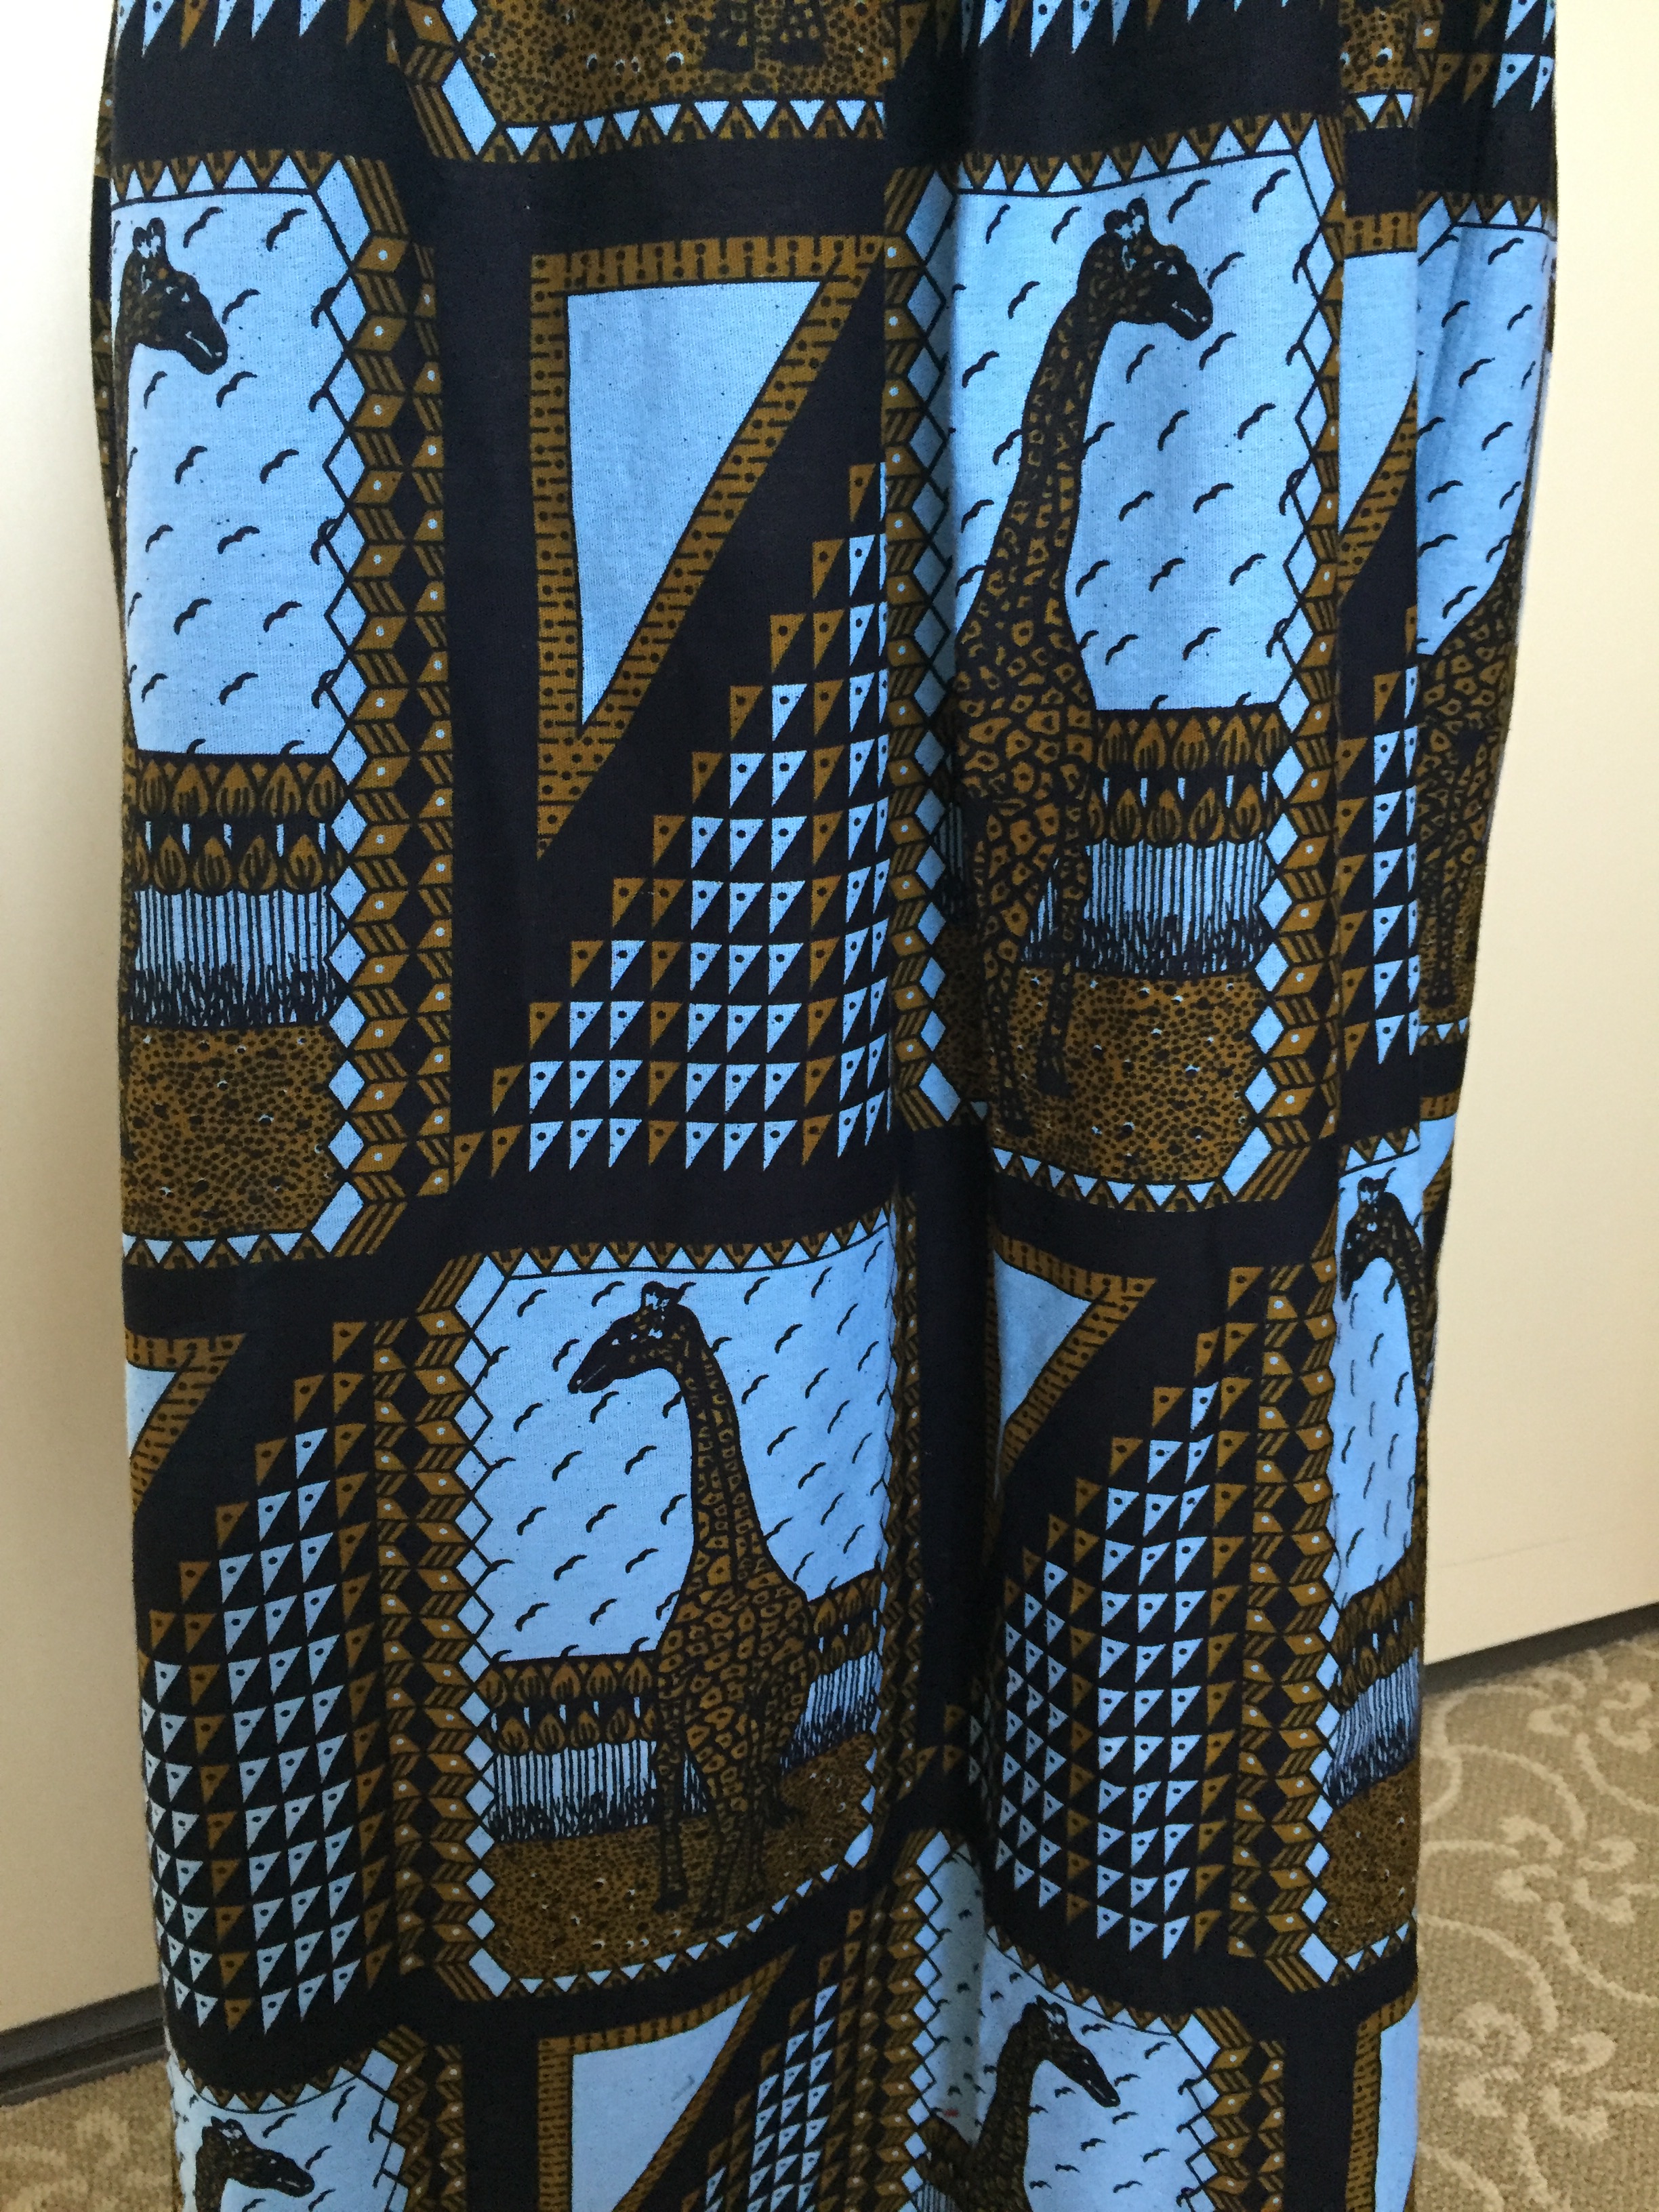
Earlier this year my friend Kim visited Tanzania and brought me back some great African fabric as a special gift.
I used this vibrant giraffe print to make myself a long dress for summer. It’s opaque enough that I was able to skip a lining, making it a perfect cotton dress for warmer weather.
I cut it out a few months ago but only recently finished because I got distracted by the Tudor kirtle.
I think it looks like the giraffes are having a chat and perhaps giving a little side-eye.
I used Vogue 8789 for the pattern, and just extended the length of the skirt to use up the width of the fabric. (You may recognize the bodice as being the same shape as my Black Swan 1950s Ball Gown). The dress used 3 meters of fabric.
The other fabric I received from Kim was a kanga. (You can read about them and how they are used on KangaUSA). This elephant kanga is printed with the phrase “Wanyama ndiyo urithi wetu tuwatunza,” which is Swahili for “Animals are our inheritance, we should protect them.”
Because of the shape of the fabric and the way the print is formatted I had to think about how to cut the fabric, but realized that pajama bottoms are a great way to use a rectangular print.
The pattern is Butterick 6837, which I’ve used a number of times in the past to make PJs for myself and my family. If you have a serger and put in an elastic waistband you can make PJ pants in about an hour with enough practice.
I was able to use up the kanga with very little fabric wasted. Because of my height I had to piece a little fabric at the top to make it long enough, but a shorter person could skip this step. This project was so quick it was my first sewing project right after attending Costume College in August, when I wanted something easy.
I’m still working on my last project of 2016, but Happy New Year!
Last week I went to the 2nd annual O-T-Tea Party in San Francisco. (The name is a reference to OTT, meaning over-the-top). The attendees were instructed to build opulent, imaginative, and or themed outfits using Japanese lolita fashion as a base.
I didn’t have time to make a new outfit from scratch, so I recycled an old dress I made years ago and jazzed up my coordinate with accessories and new embellishments. I wore the dress over a satin blouse with balloon sleeves and put on satin gloves with pearls and cutouts in the fabric. I carried a black velvet clutch purse with gold embroidery and had a golden rhinestone brooch at my waist.
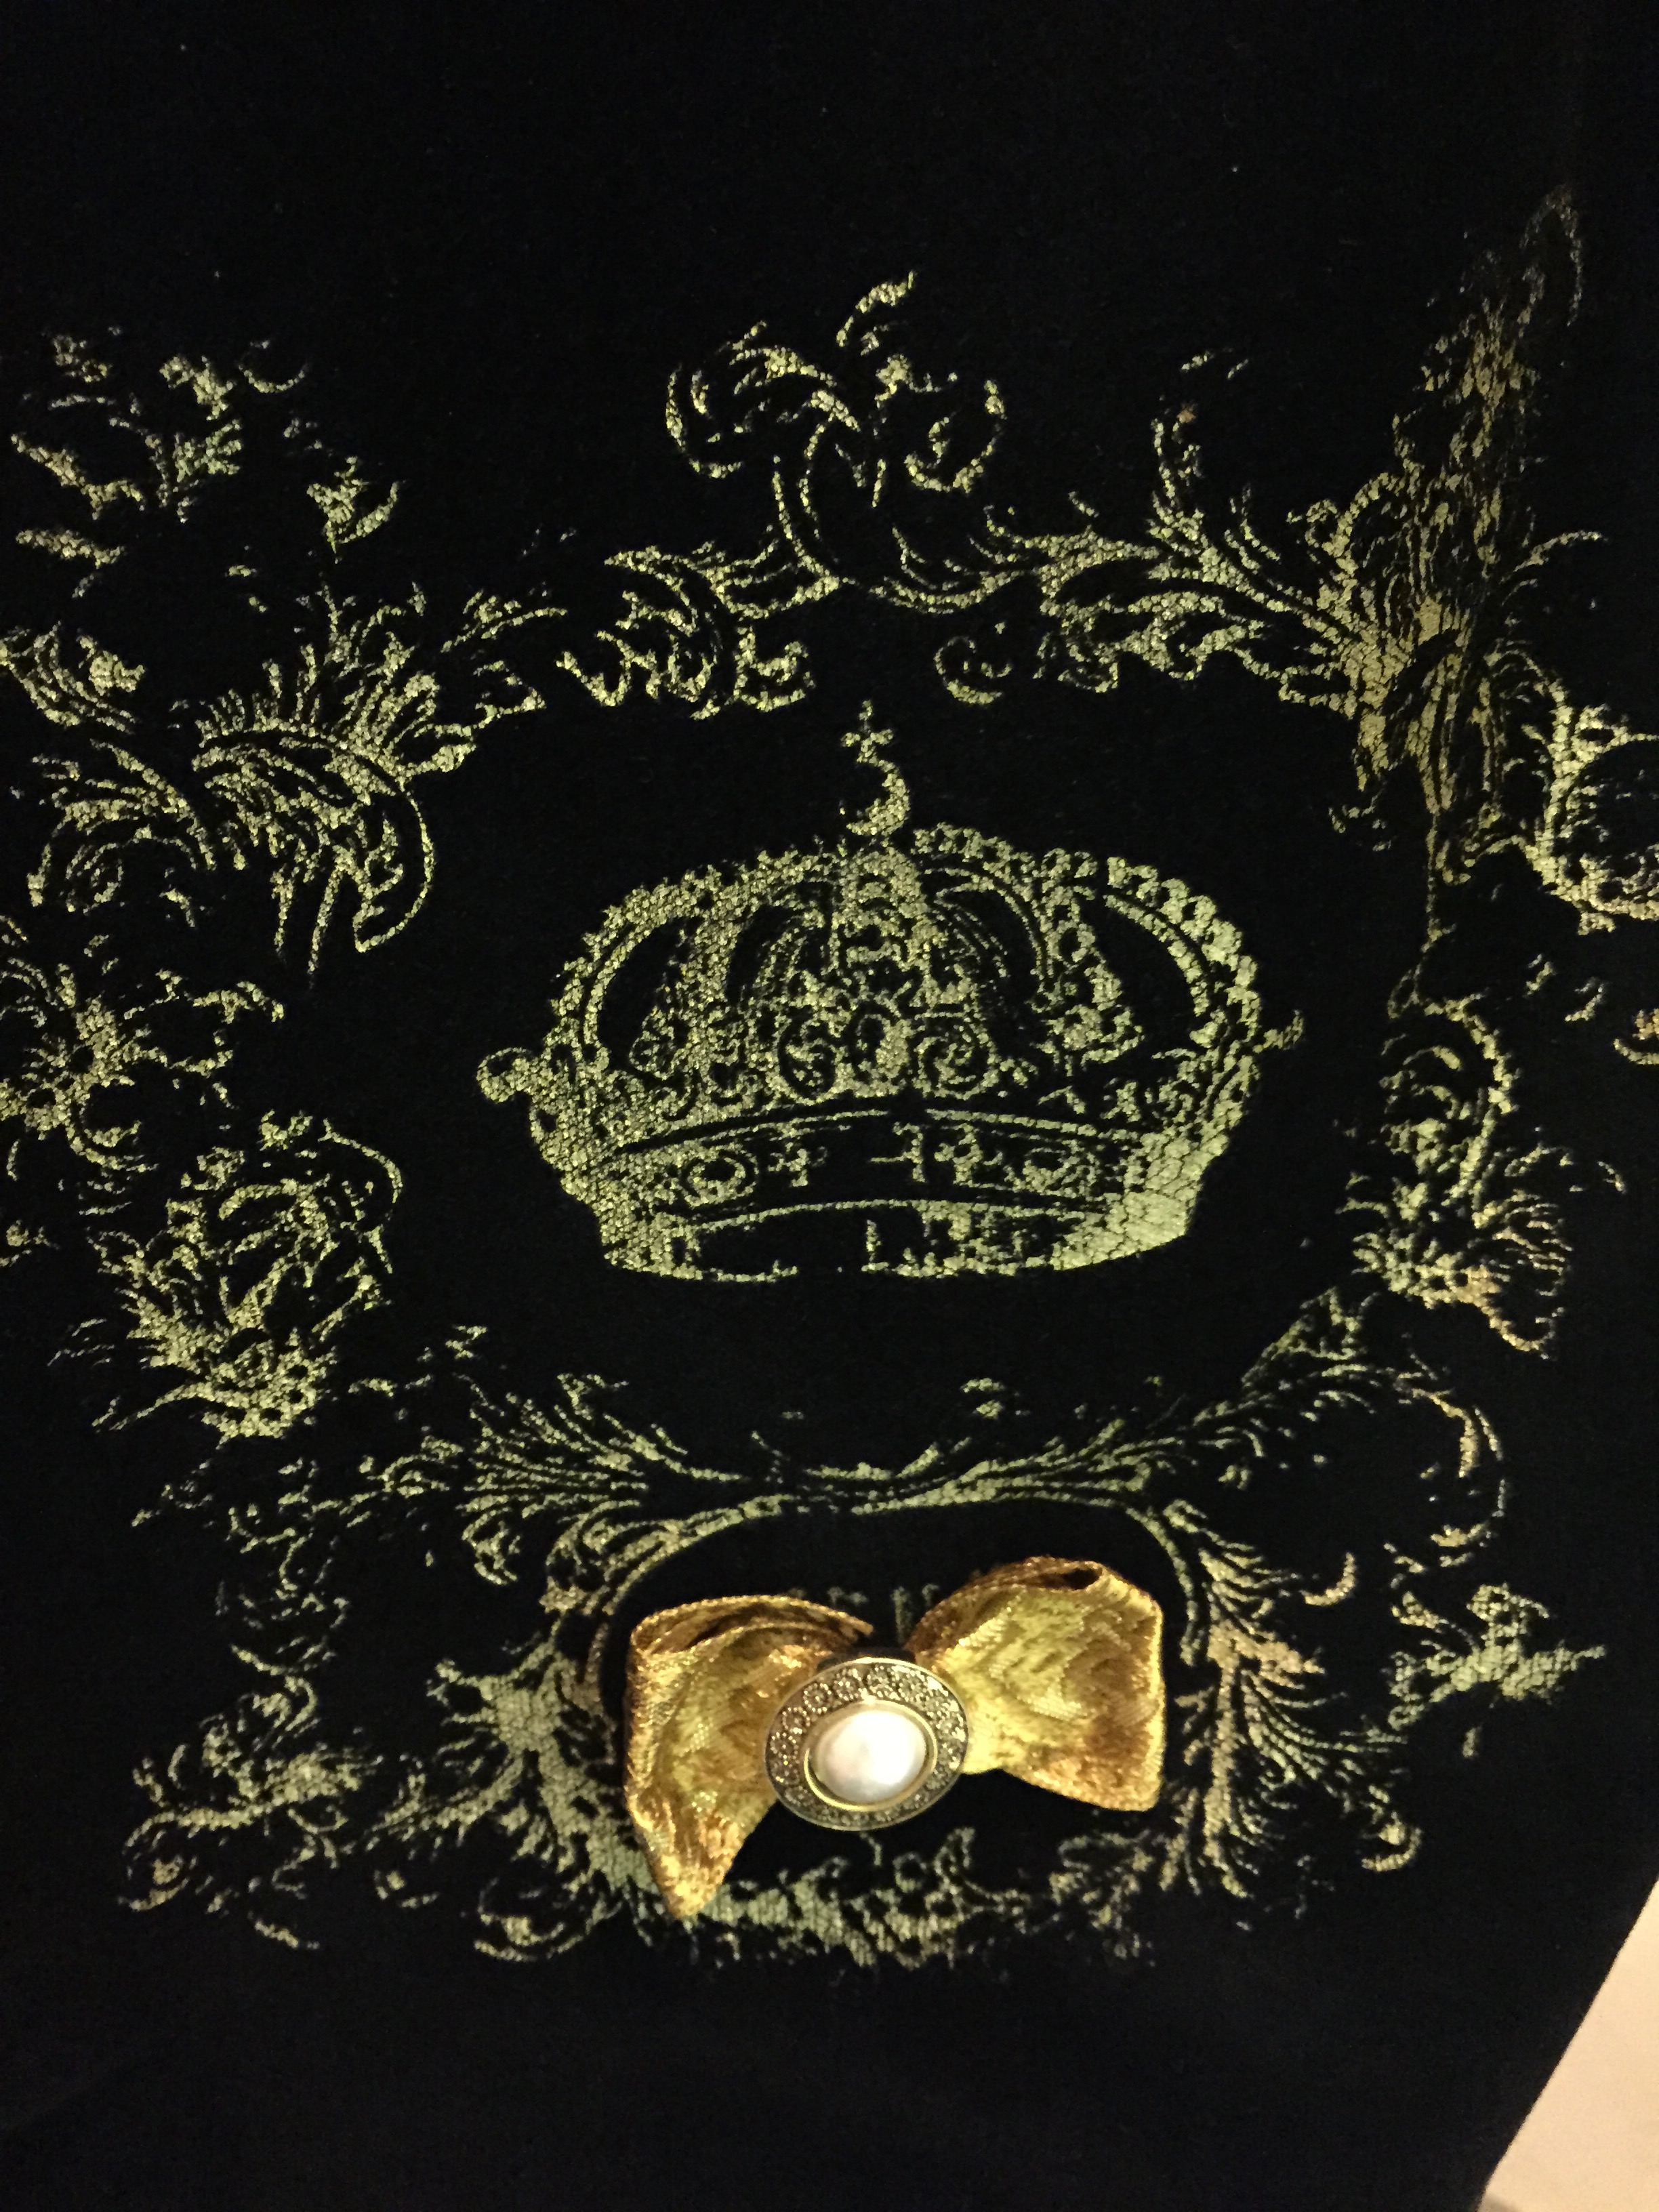
I made my dress using a very soft and plushy black cotton velvet, screenprinted with gold. The crown motifs are accented with golden bows made of vintage jacquard ribbon and faux pearl and golden buttons I had in my stash.
I also wore a golden tiara with faux pearls (from Amazon) and a gold and black lace neck ruff from Aliexpress. These items were purchased new, but otherwise I already had a lot of things in my closet to complete my outfit!
I finished my outfit with Miss L Fire Vistas, which I previously wore with my 1920s outfit.
The event took place at the Sir Francis Drake Hotel, where we had delicious food, a vendor room, and many generous raffle prizes.
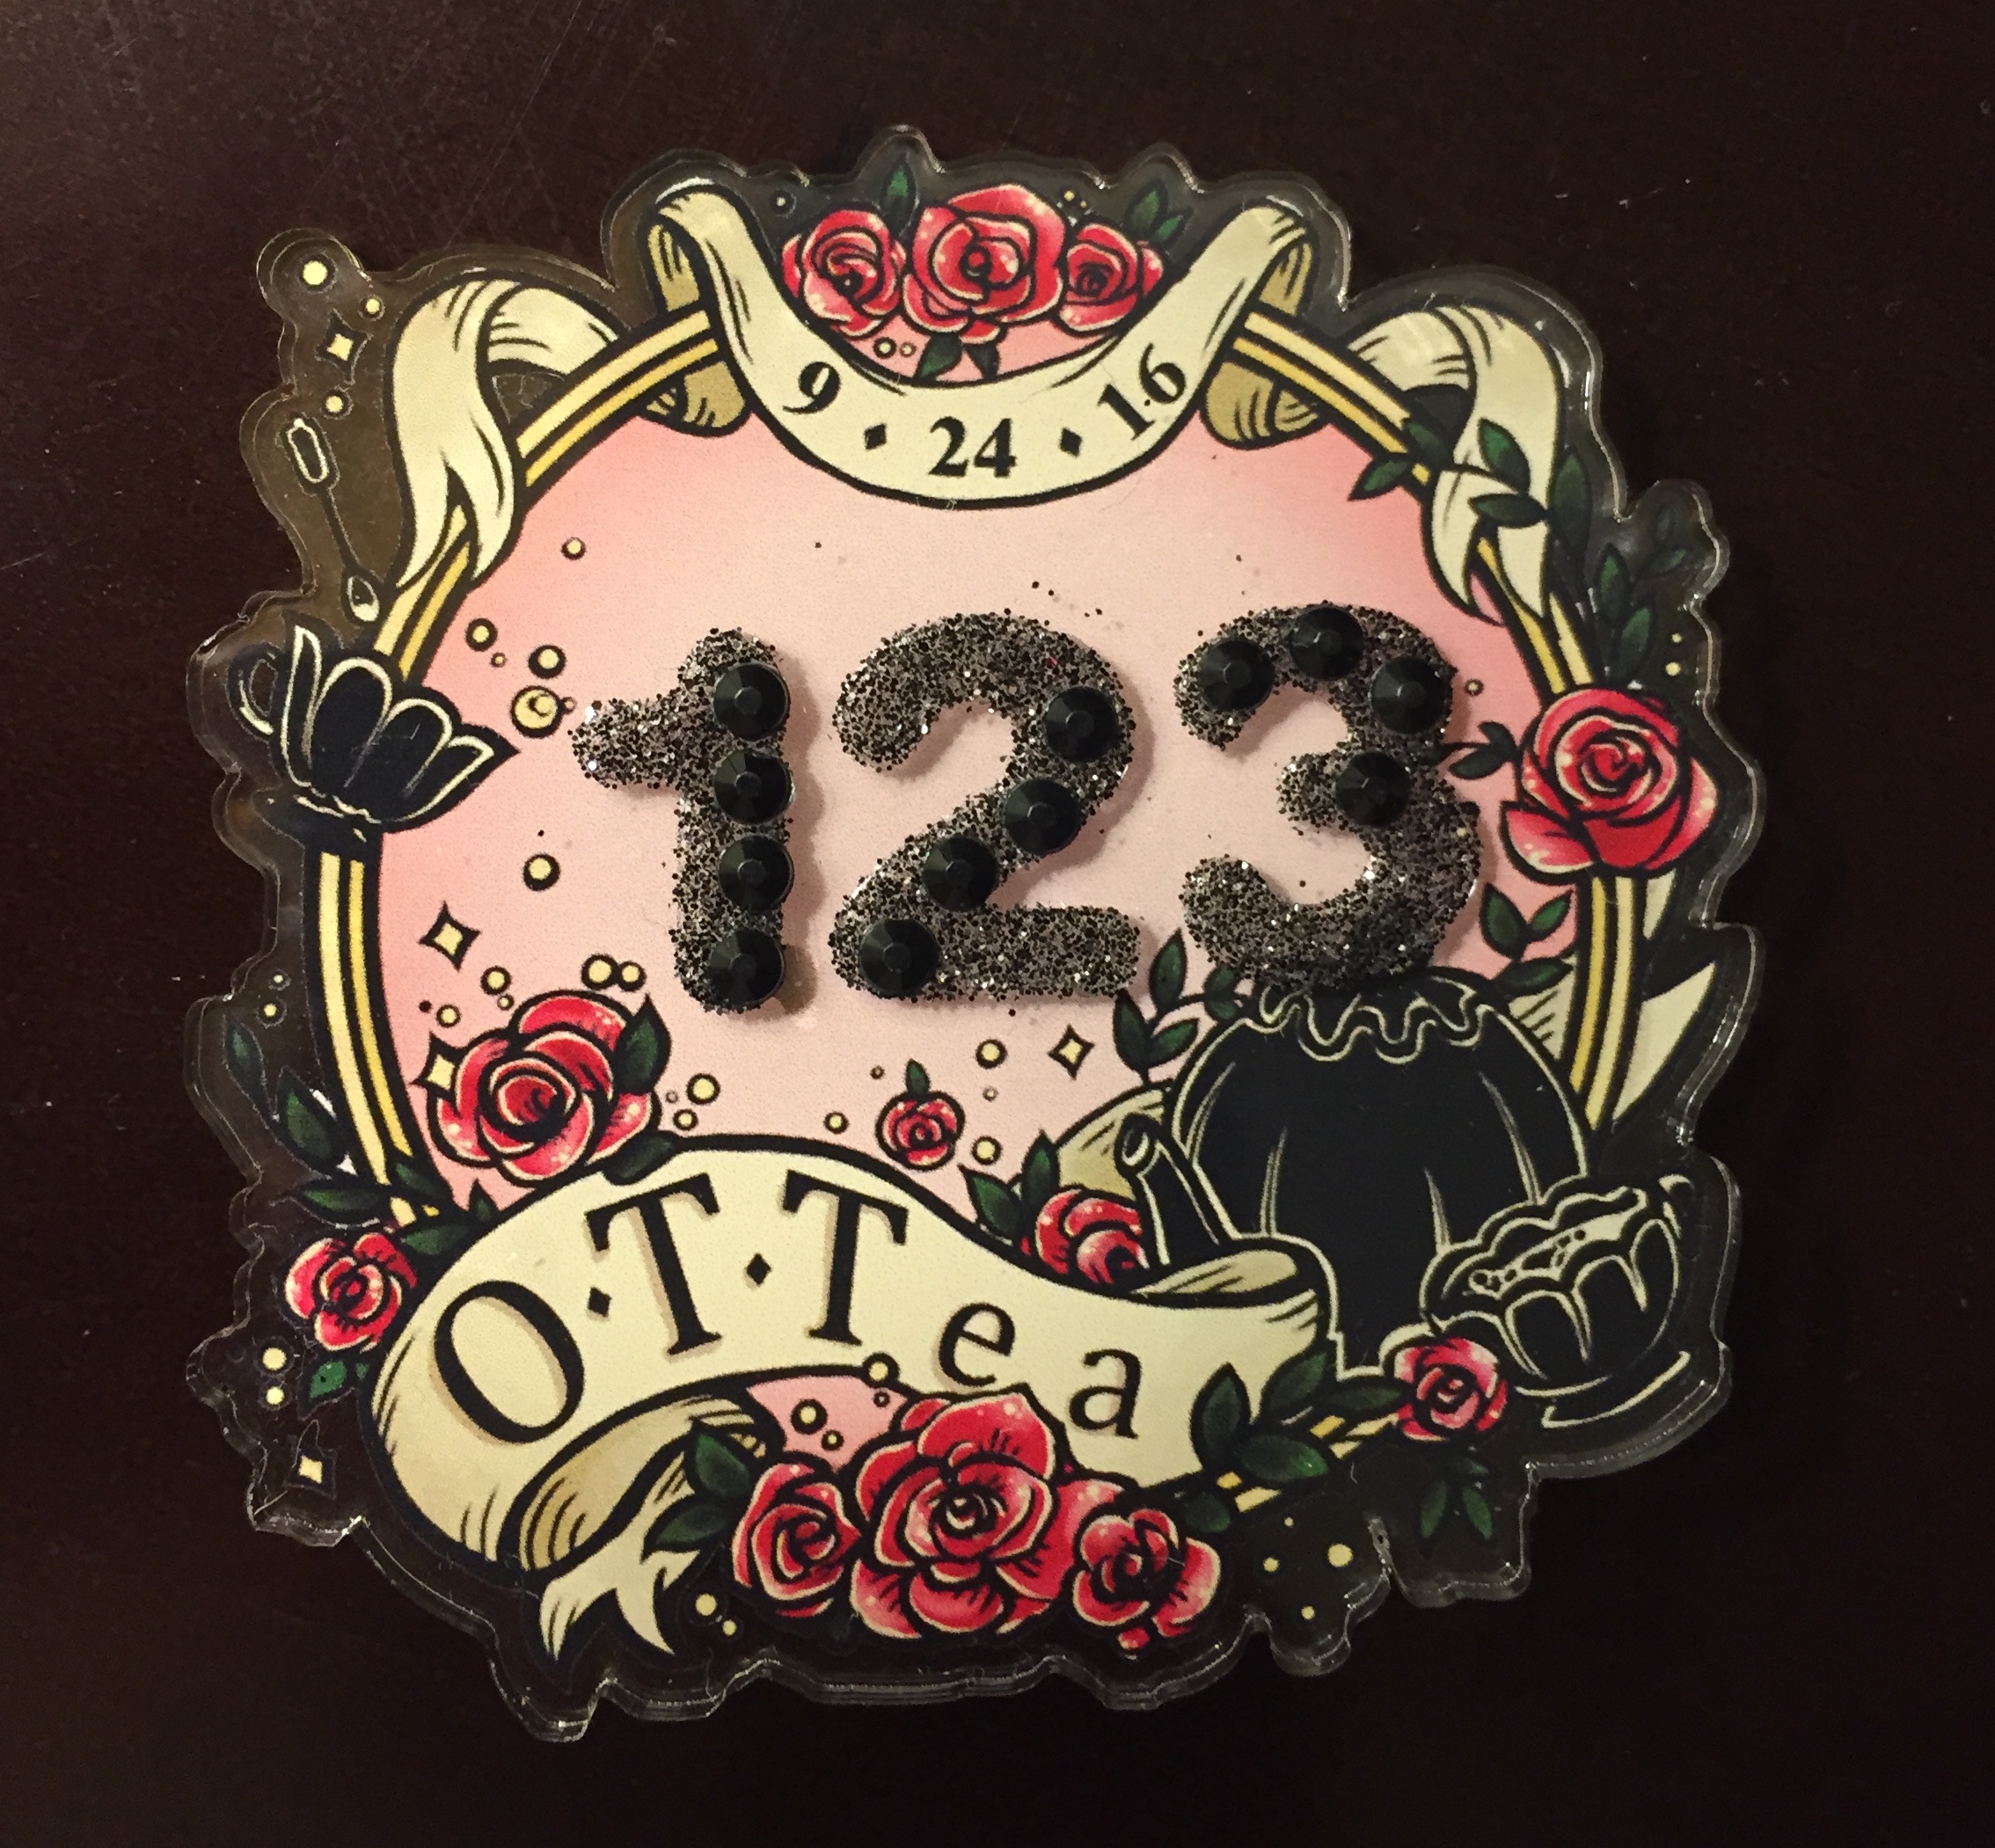
We were all given these pretty acrylic brooches with a number that was used for voting in the outfit contest.
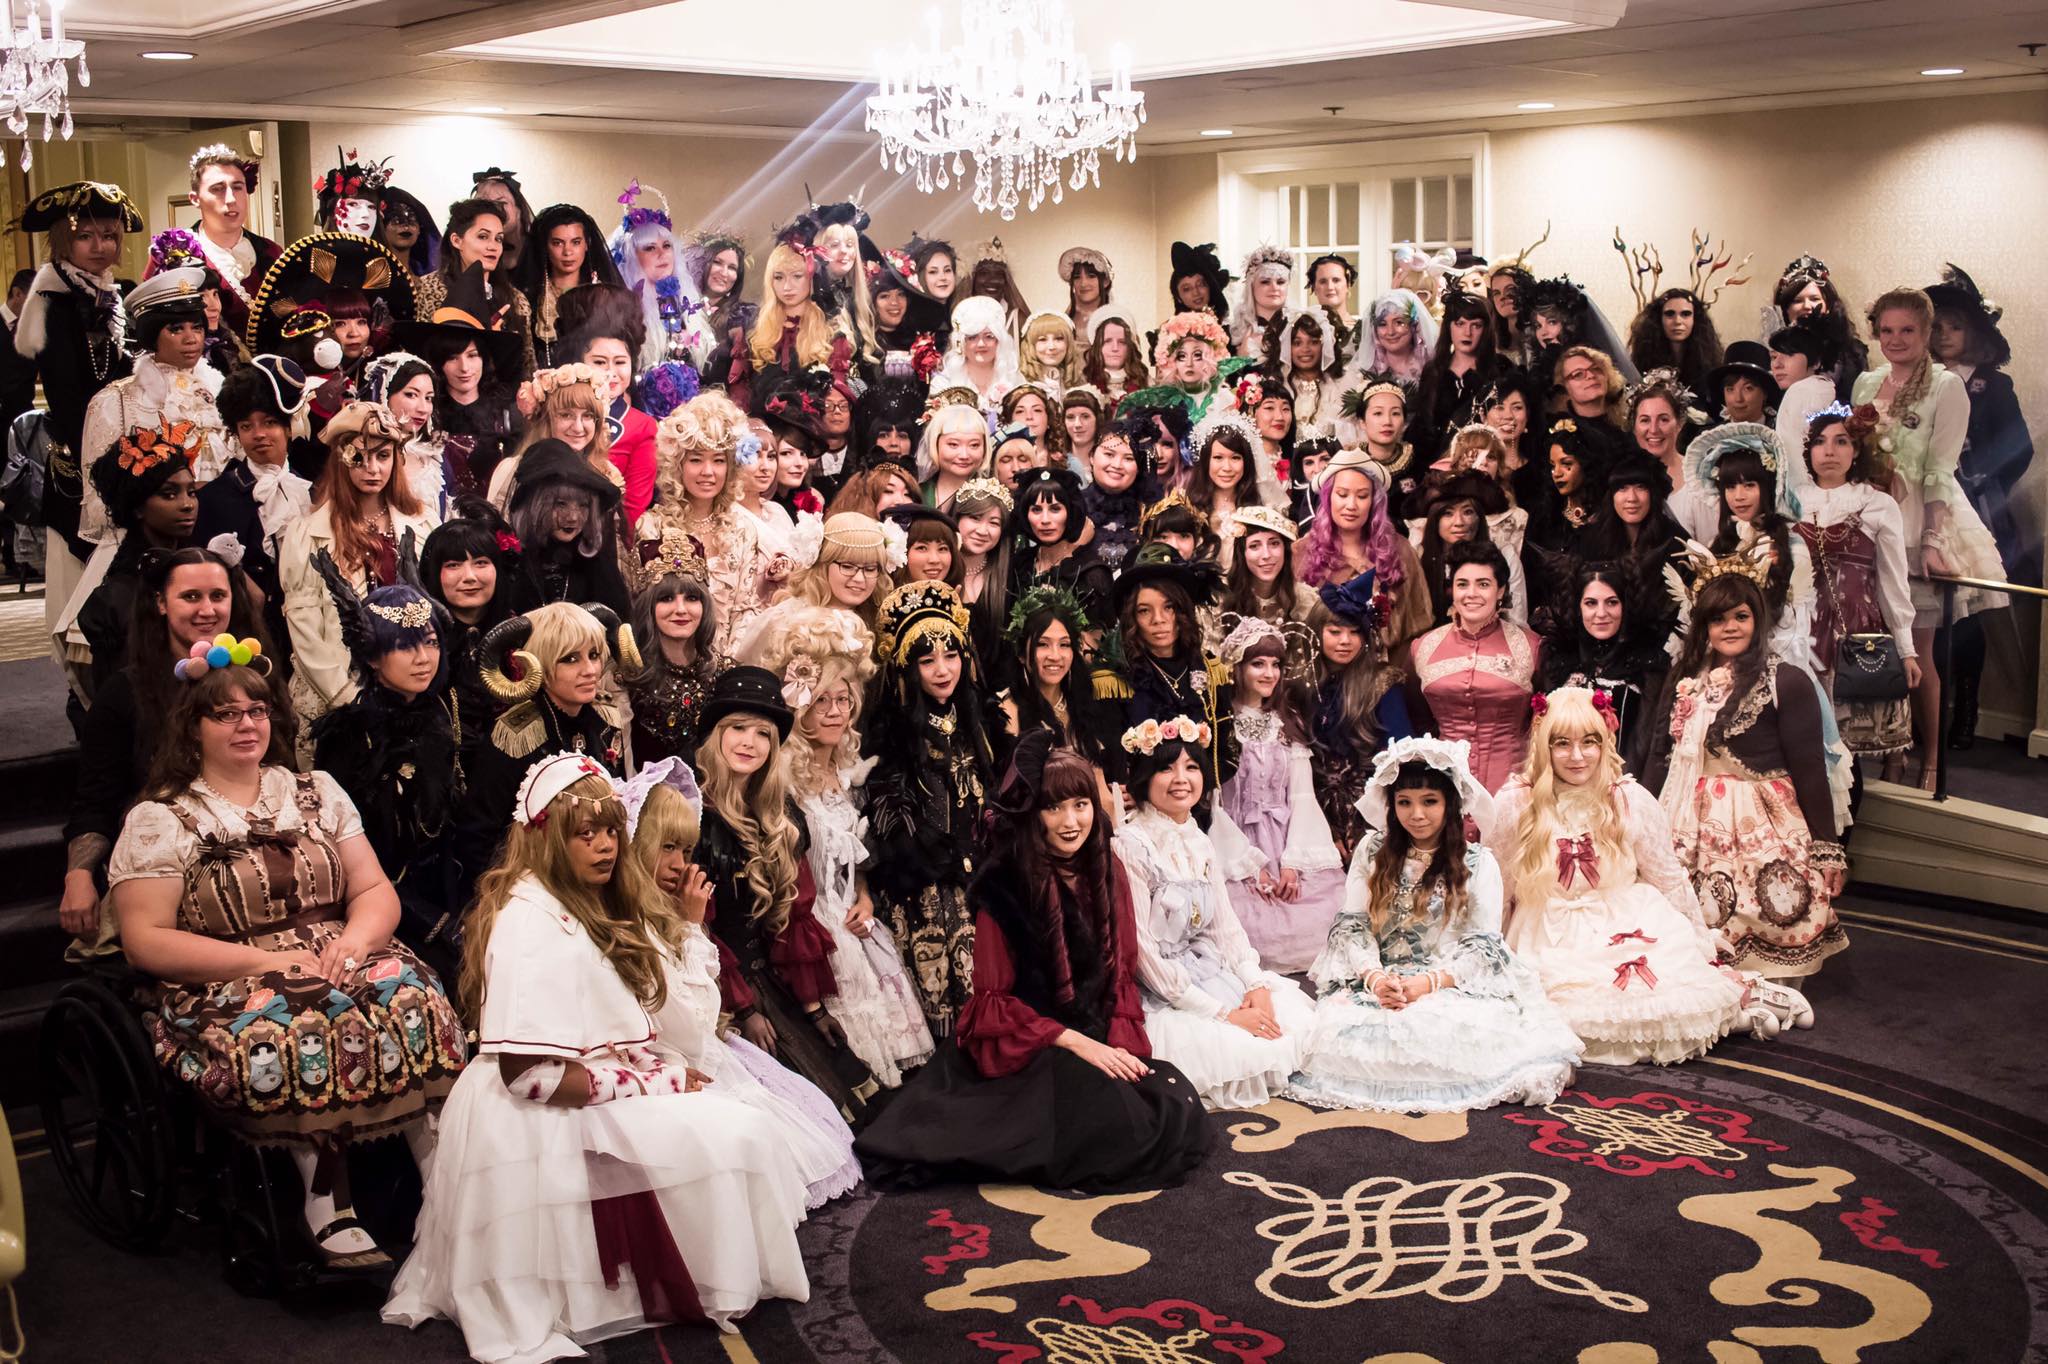
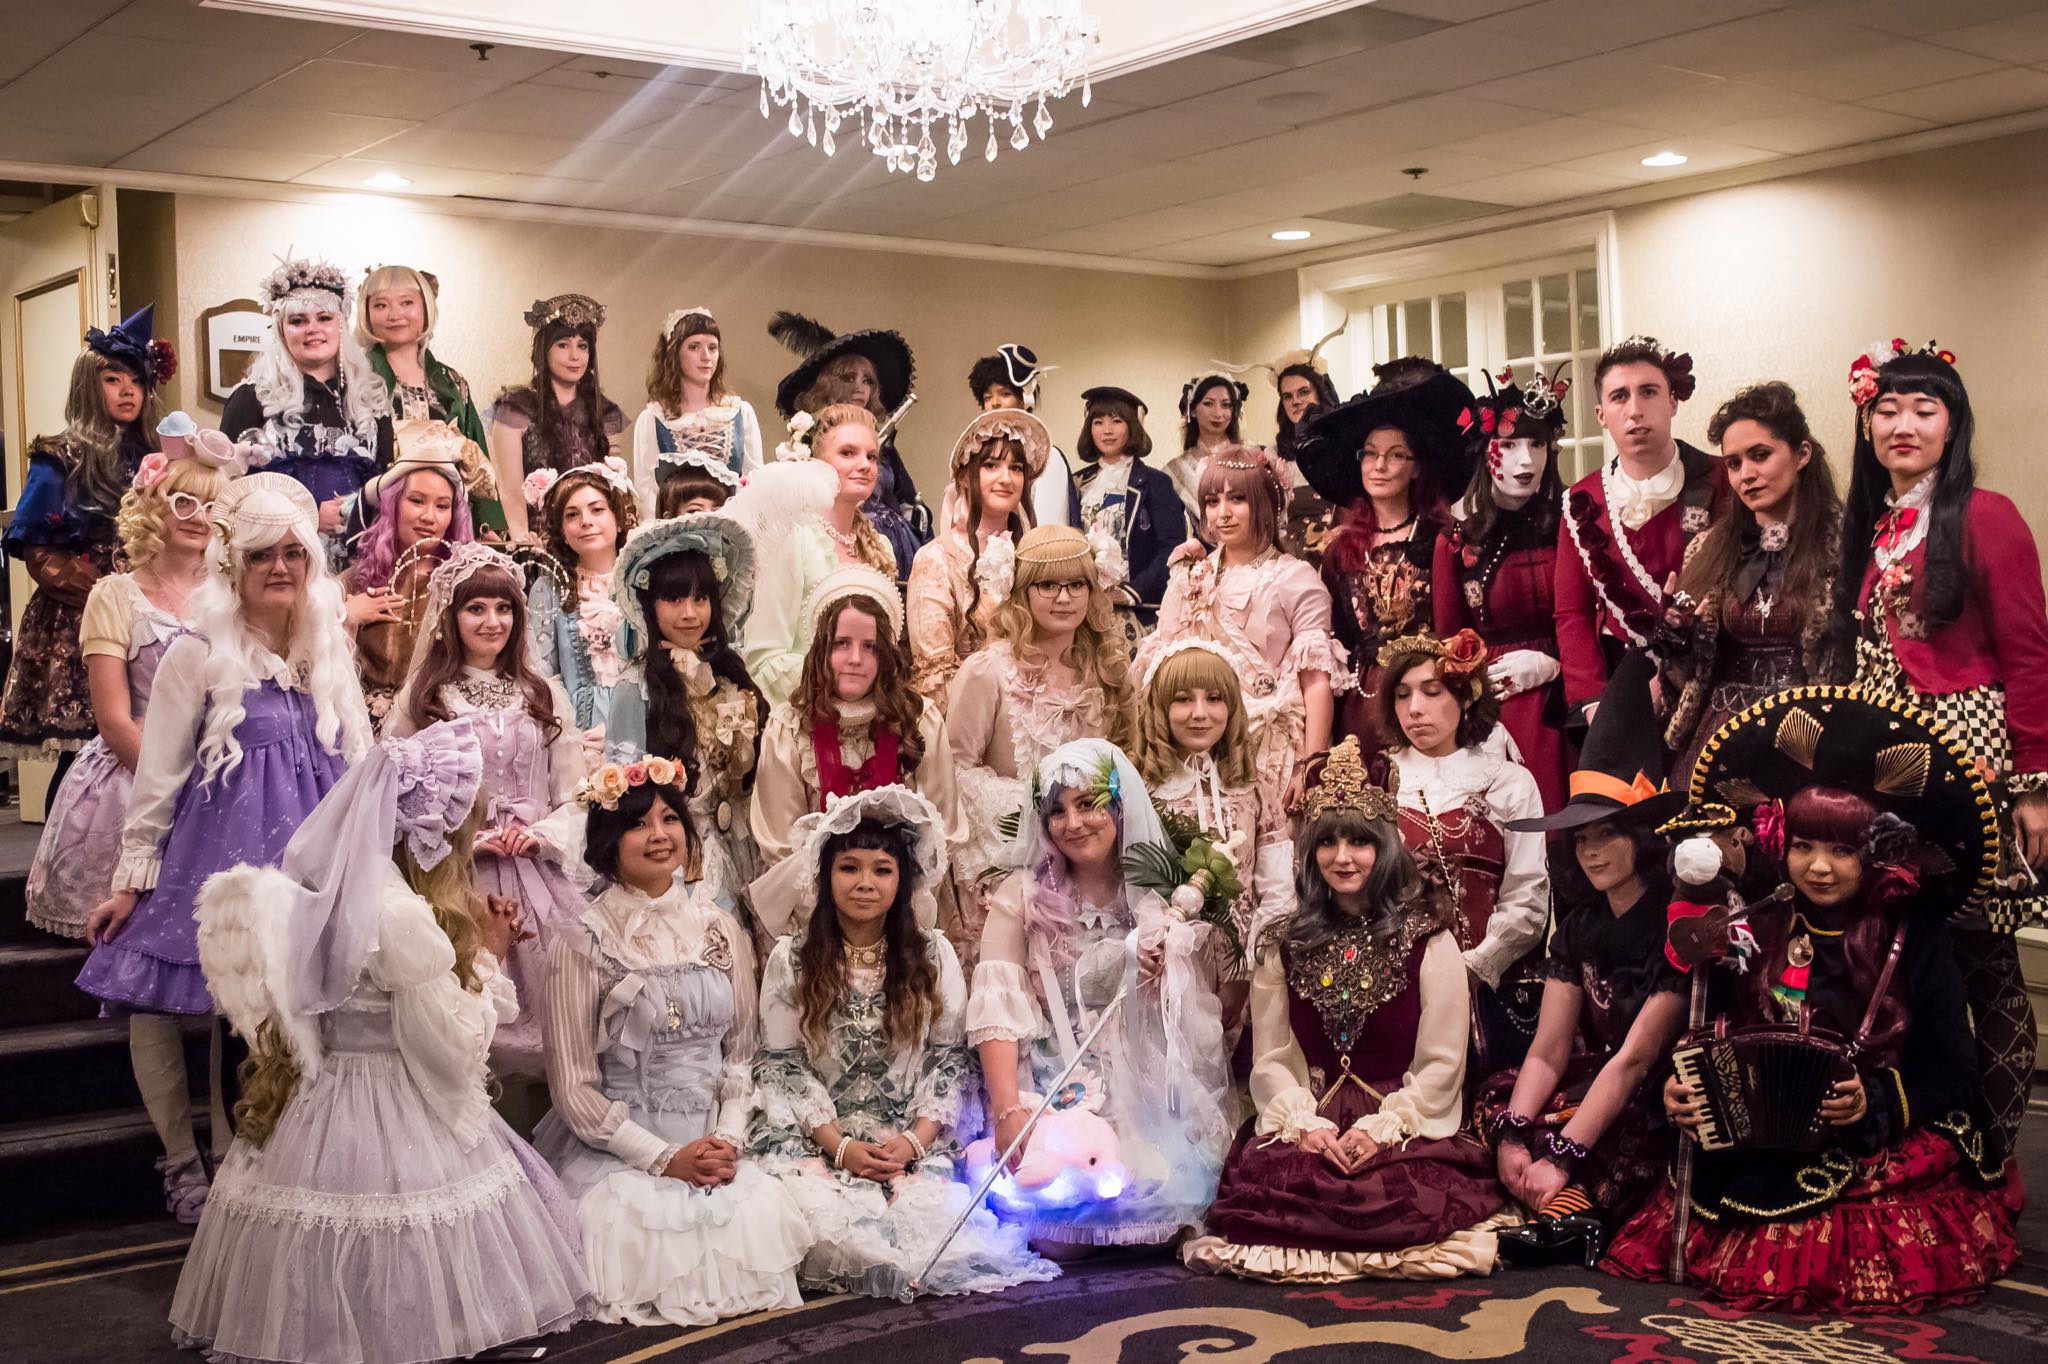
Here are some group photos taken by the Lens Collective!
Happy first day of autumn! It’s the perfect time to build up a collection of wool skirts.
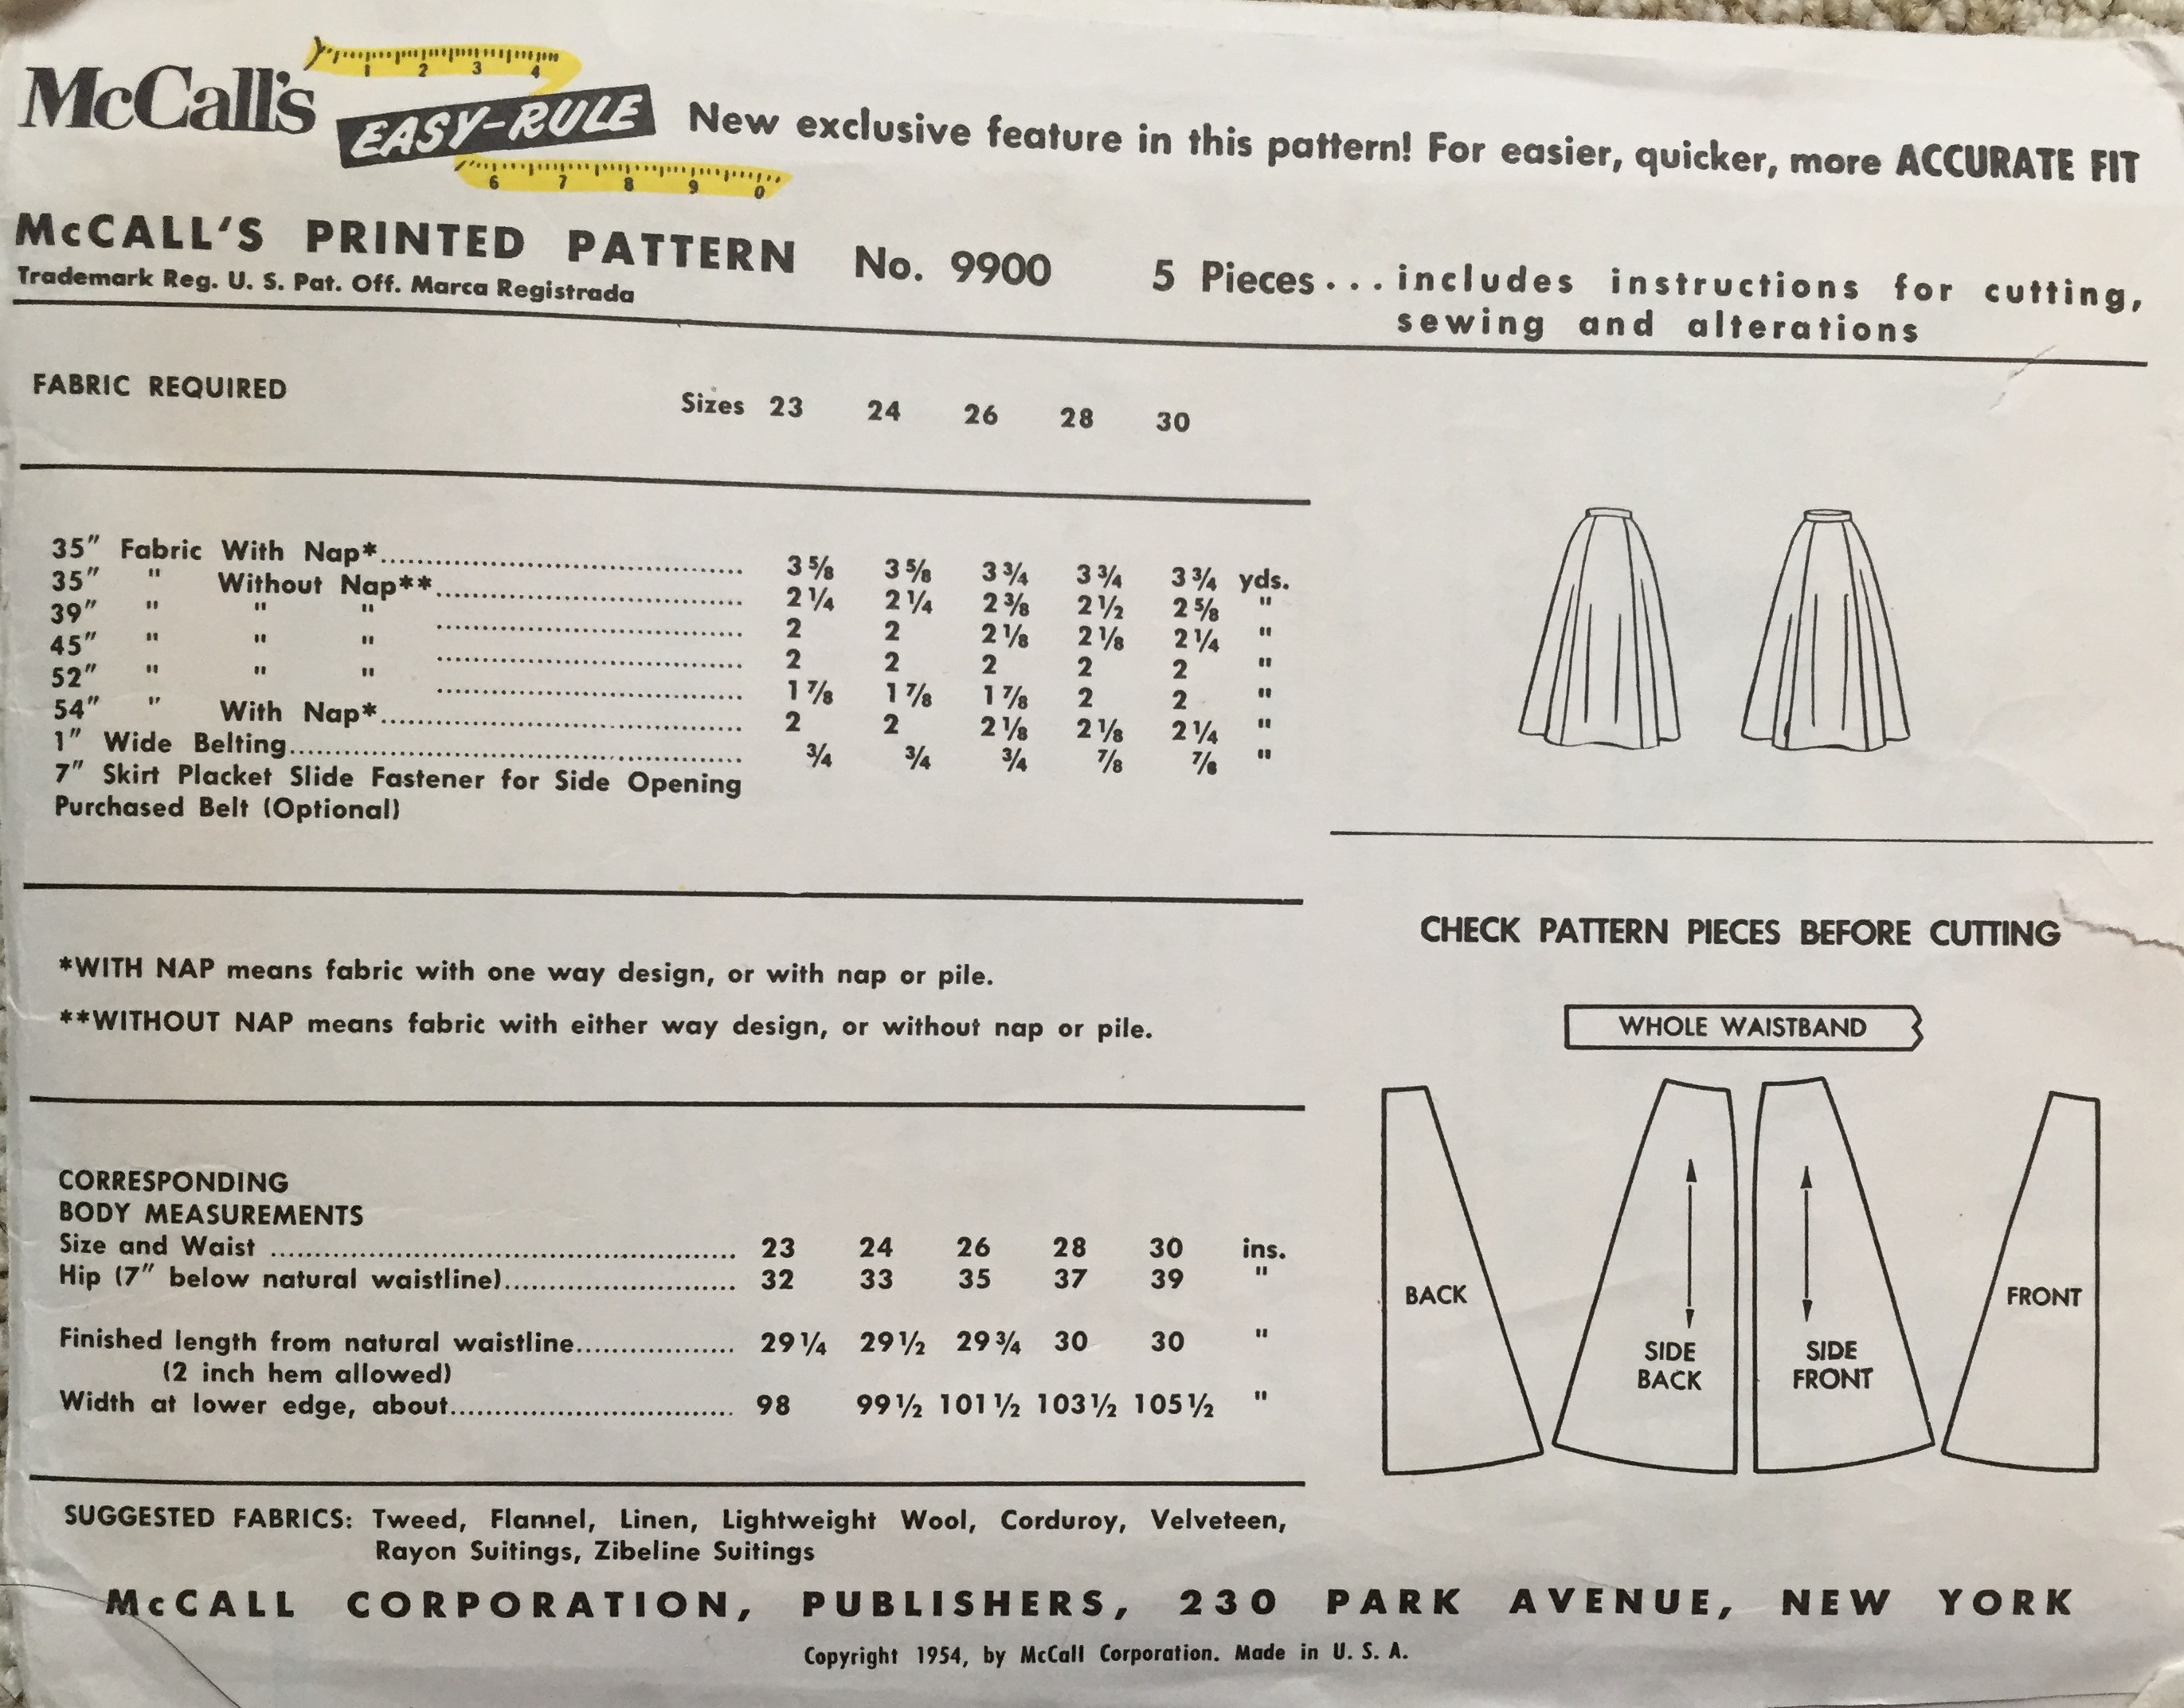
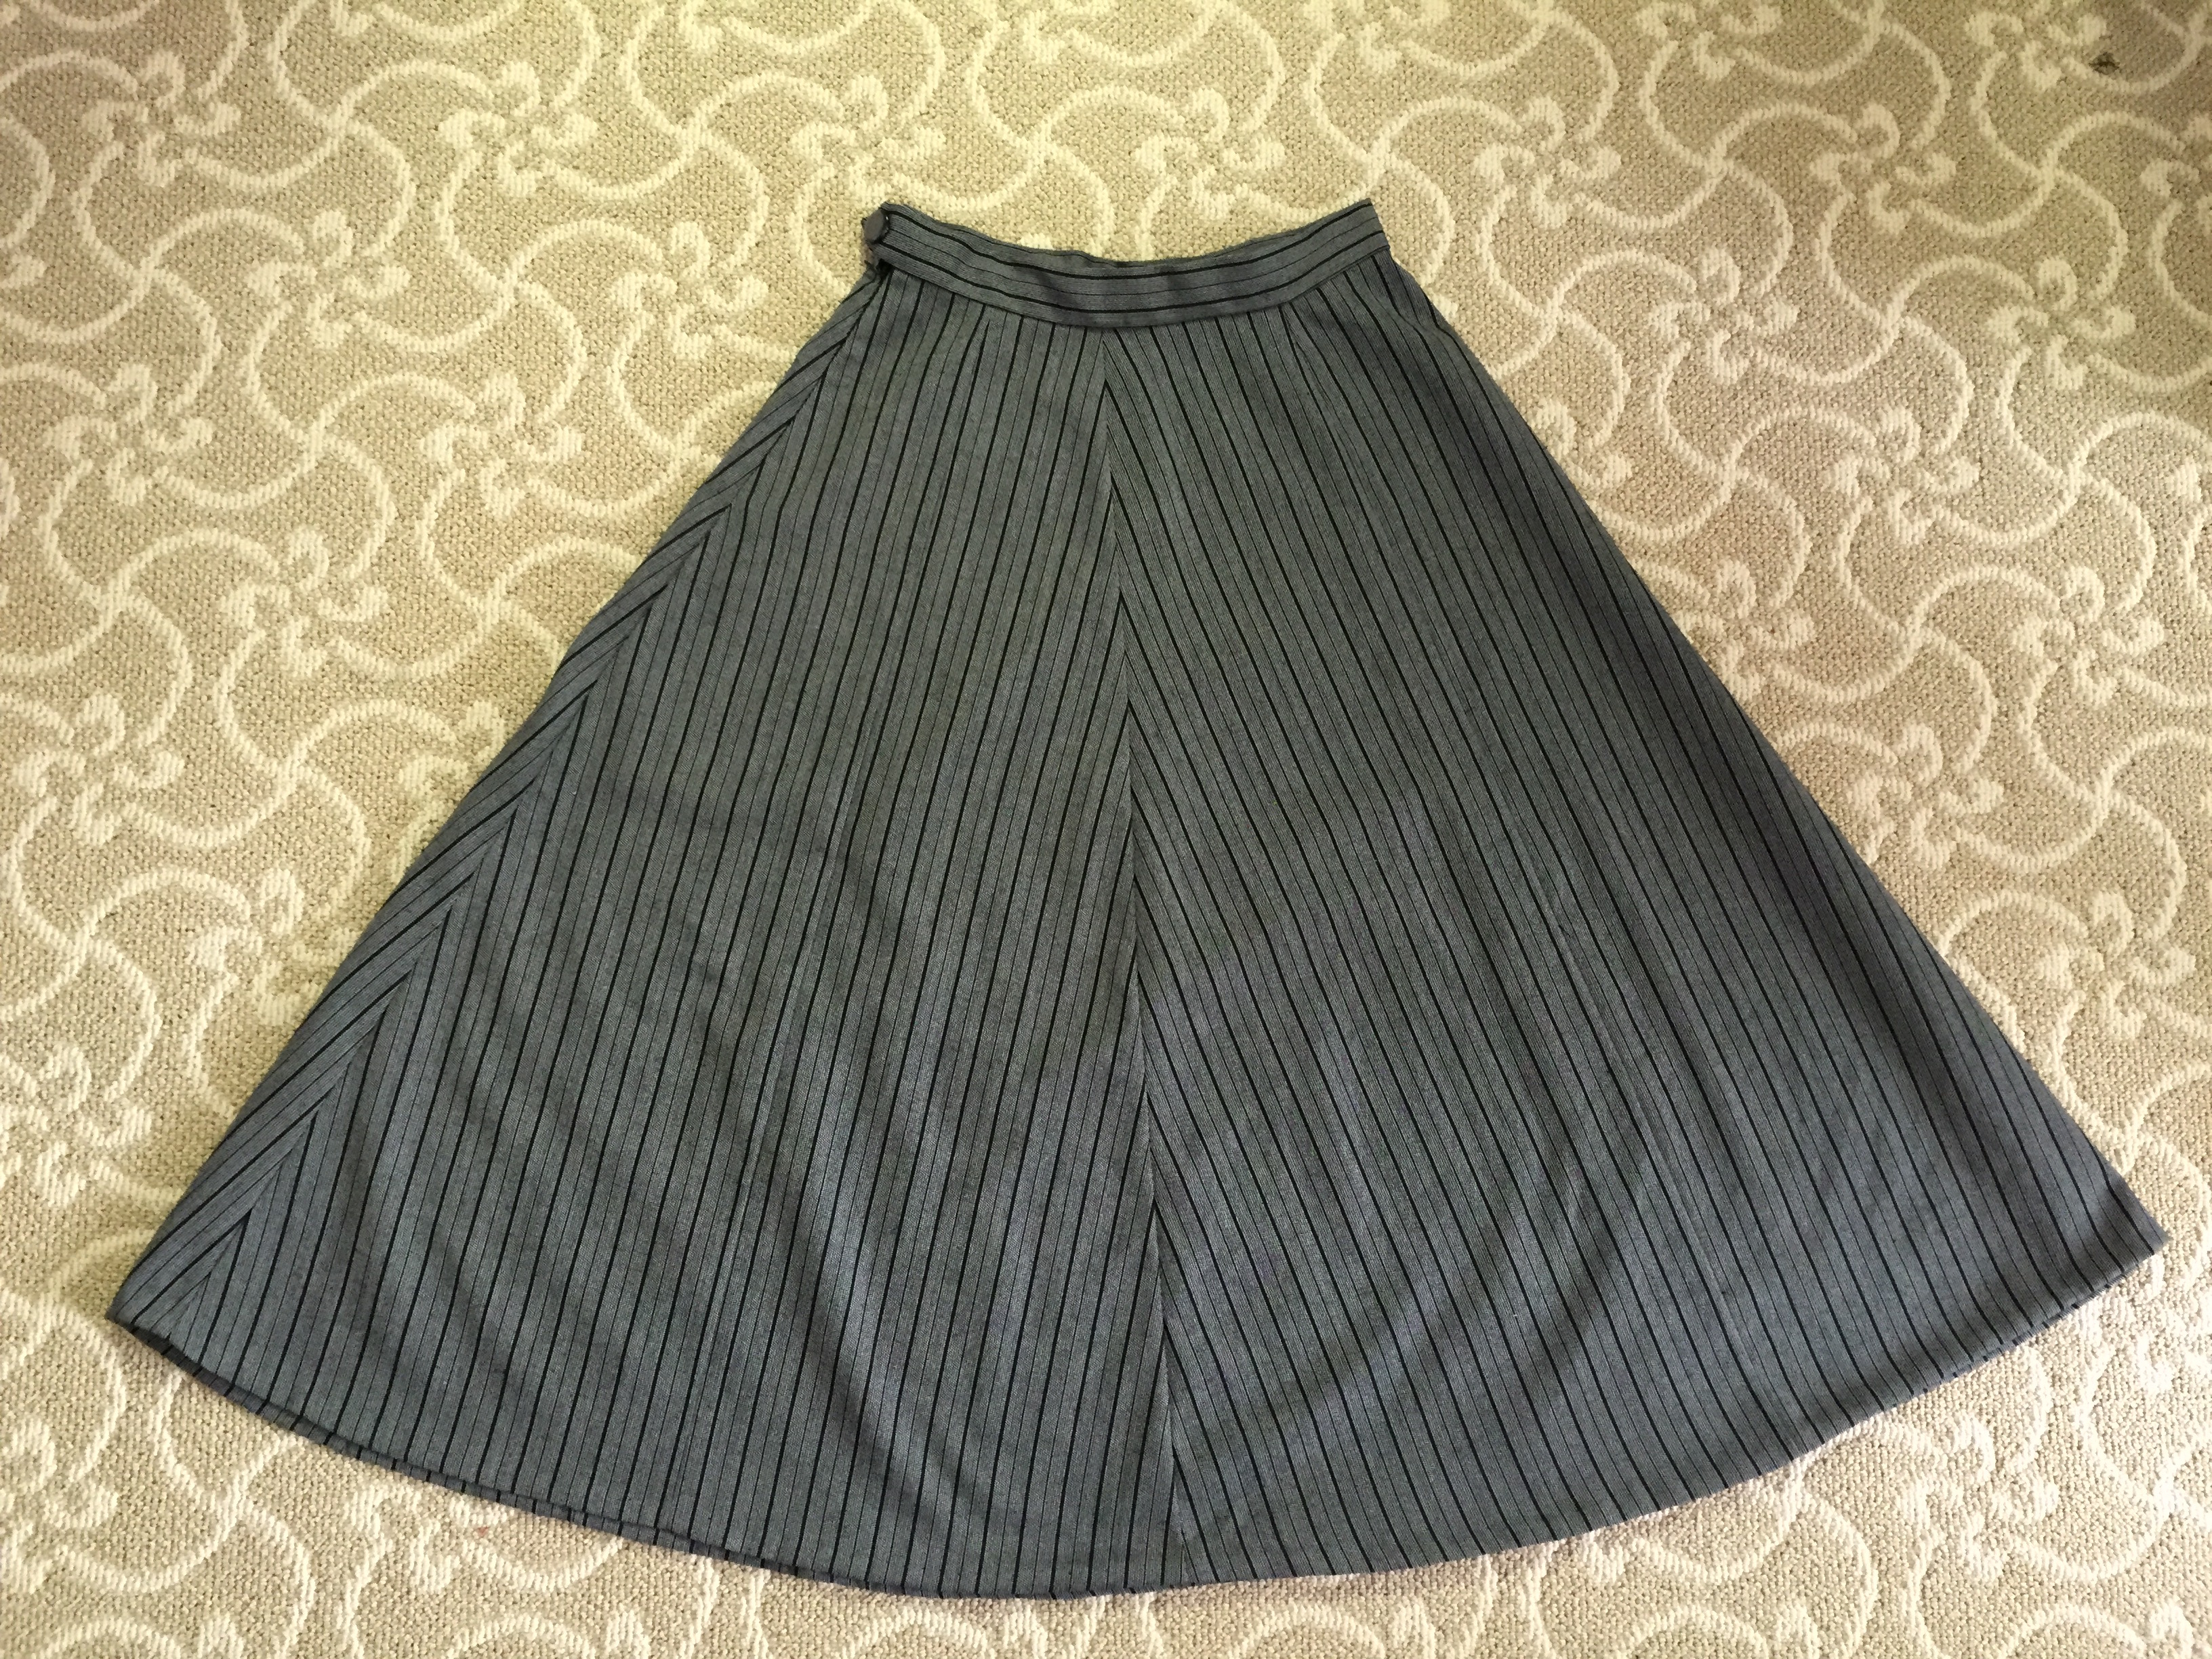
I used the last bit of fabric left over from my Victorian bathing suit to make a simple A-line skirt using McCall’s 9900, a vintage 1954 pattern.
The cutting took longer than the sewing because I only had about 1.5 yards instead of the recommended 2, and I had to very carefully line up the pieces and introduce some additional seams in order to match the stripes. To give it a bit more flare when wearing it I’ll probably use a petticoat or maybe add some horsehair to the hem later.
It’s not quite perfect, but was still satisfying!
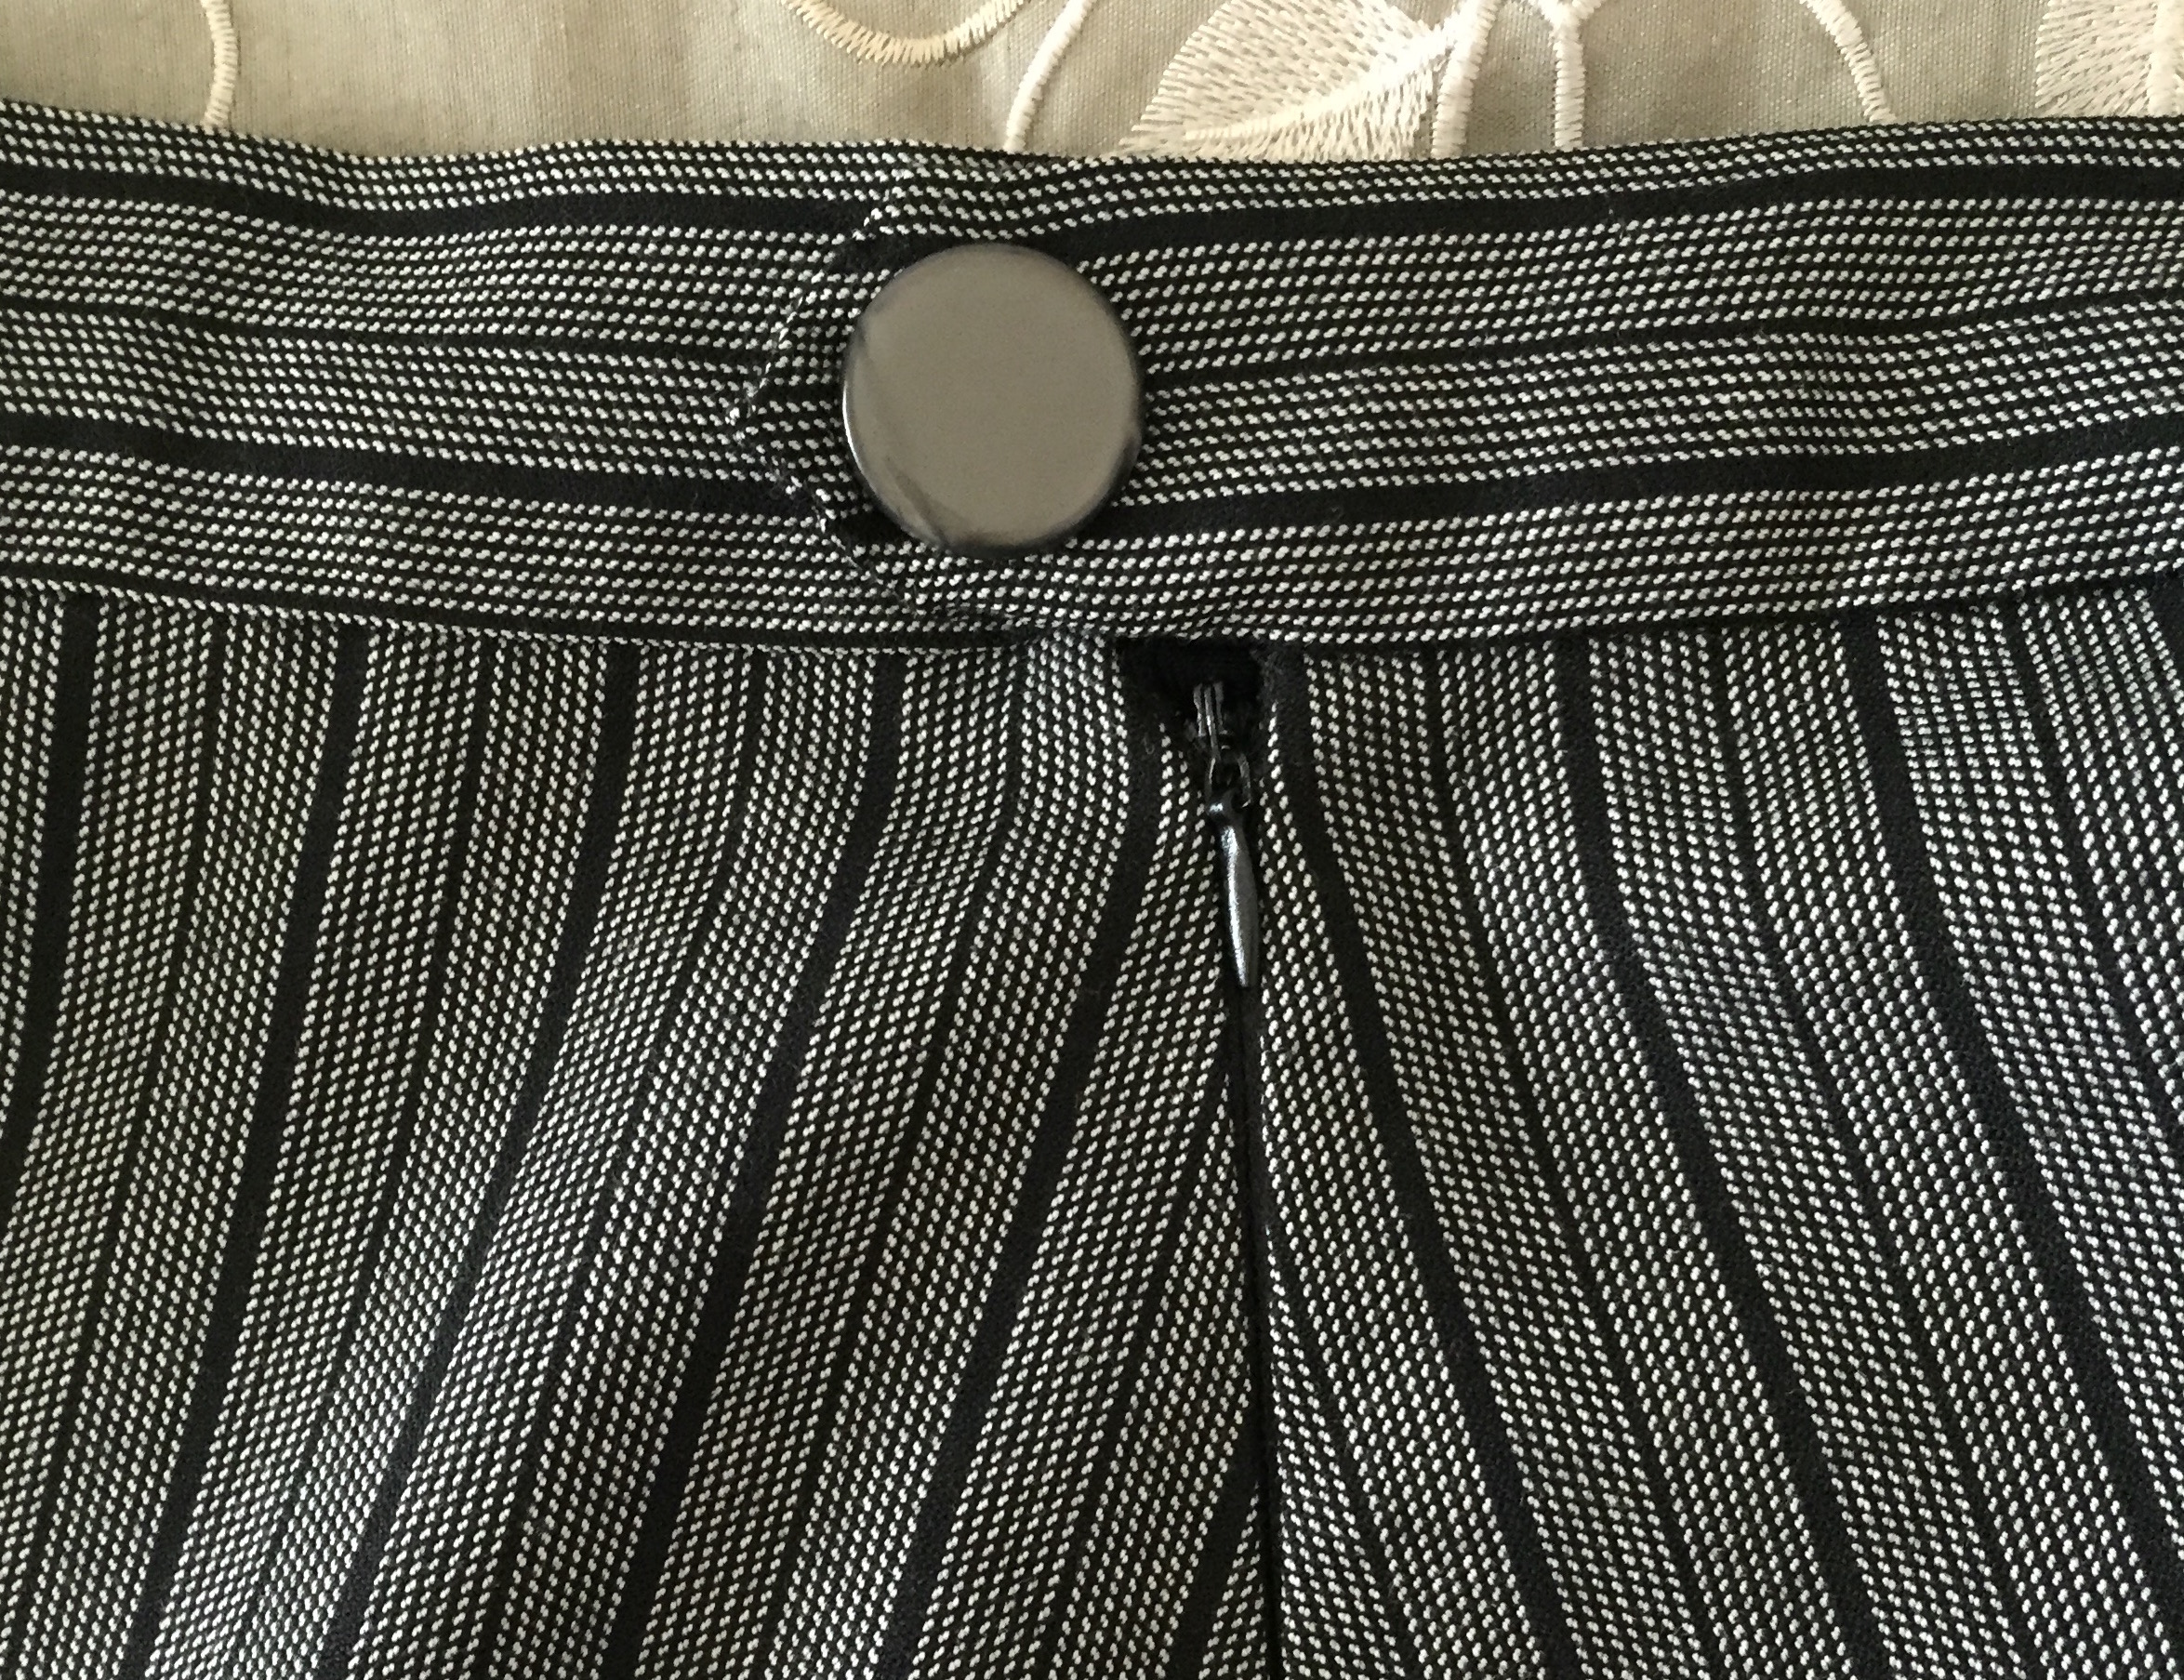
The skirt closure has a side zipper and a button.
It was a nice easy pattern and I will definitely use this again!
This past week I started the mockup process for making Lady Tremaine’s bodice. Since the sequined fabric is very precious and I won’t have time to make another special order for it before Costume College I definitely wanted to take my time with the patterning.
I am using the Vintage Pattern Lending Library Ladies’ Basque pattern. I picked it because it had the shape I wanted, but cutting out the pattern pieces made me realize it had many more seams than I wanted. (Less seams = less trouble when dealing with sequins, and more screen-accurate).
My goal was to eliminate the center front seam, the two side back seams, and change the four front darts into two. I can do this because I’m not very curvy, I don’t plan to wear this with a corset, and it is a fantasy costume. If this was meant to be a properly fitted historical costume bodice worn over a corset, I would not recommend removing seams.
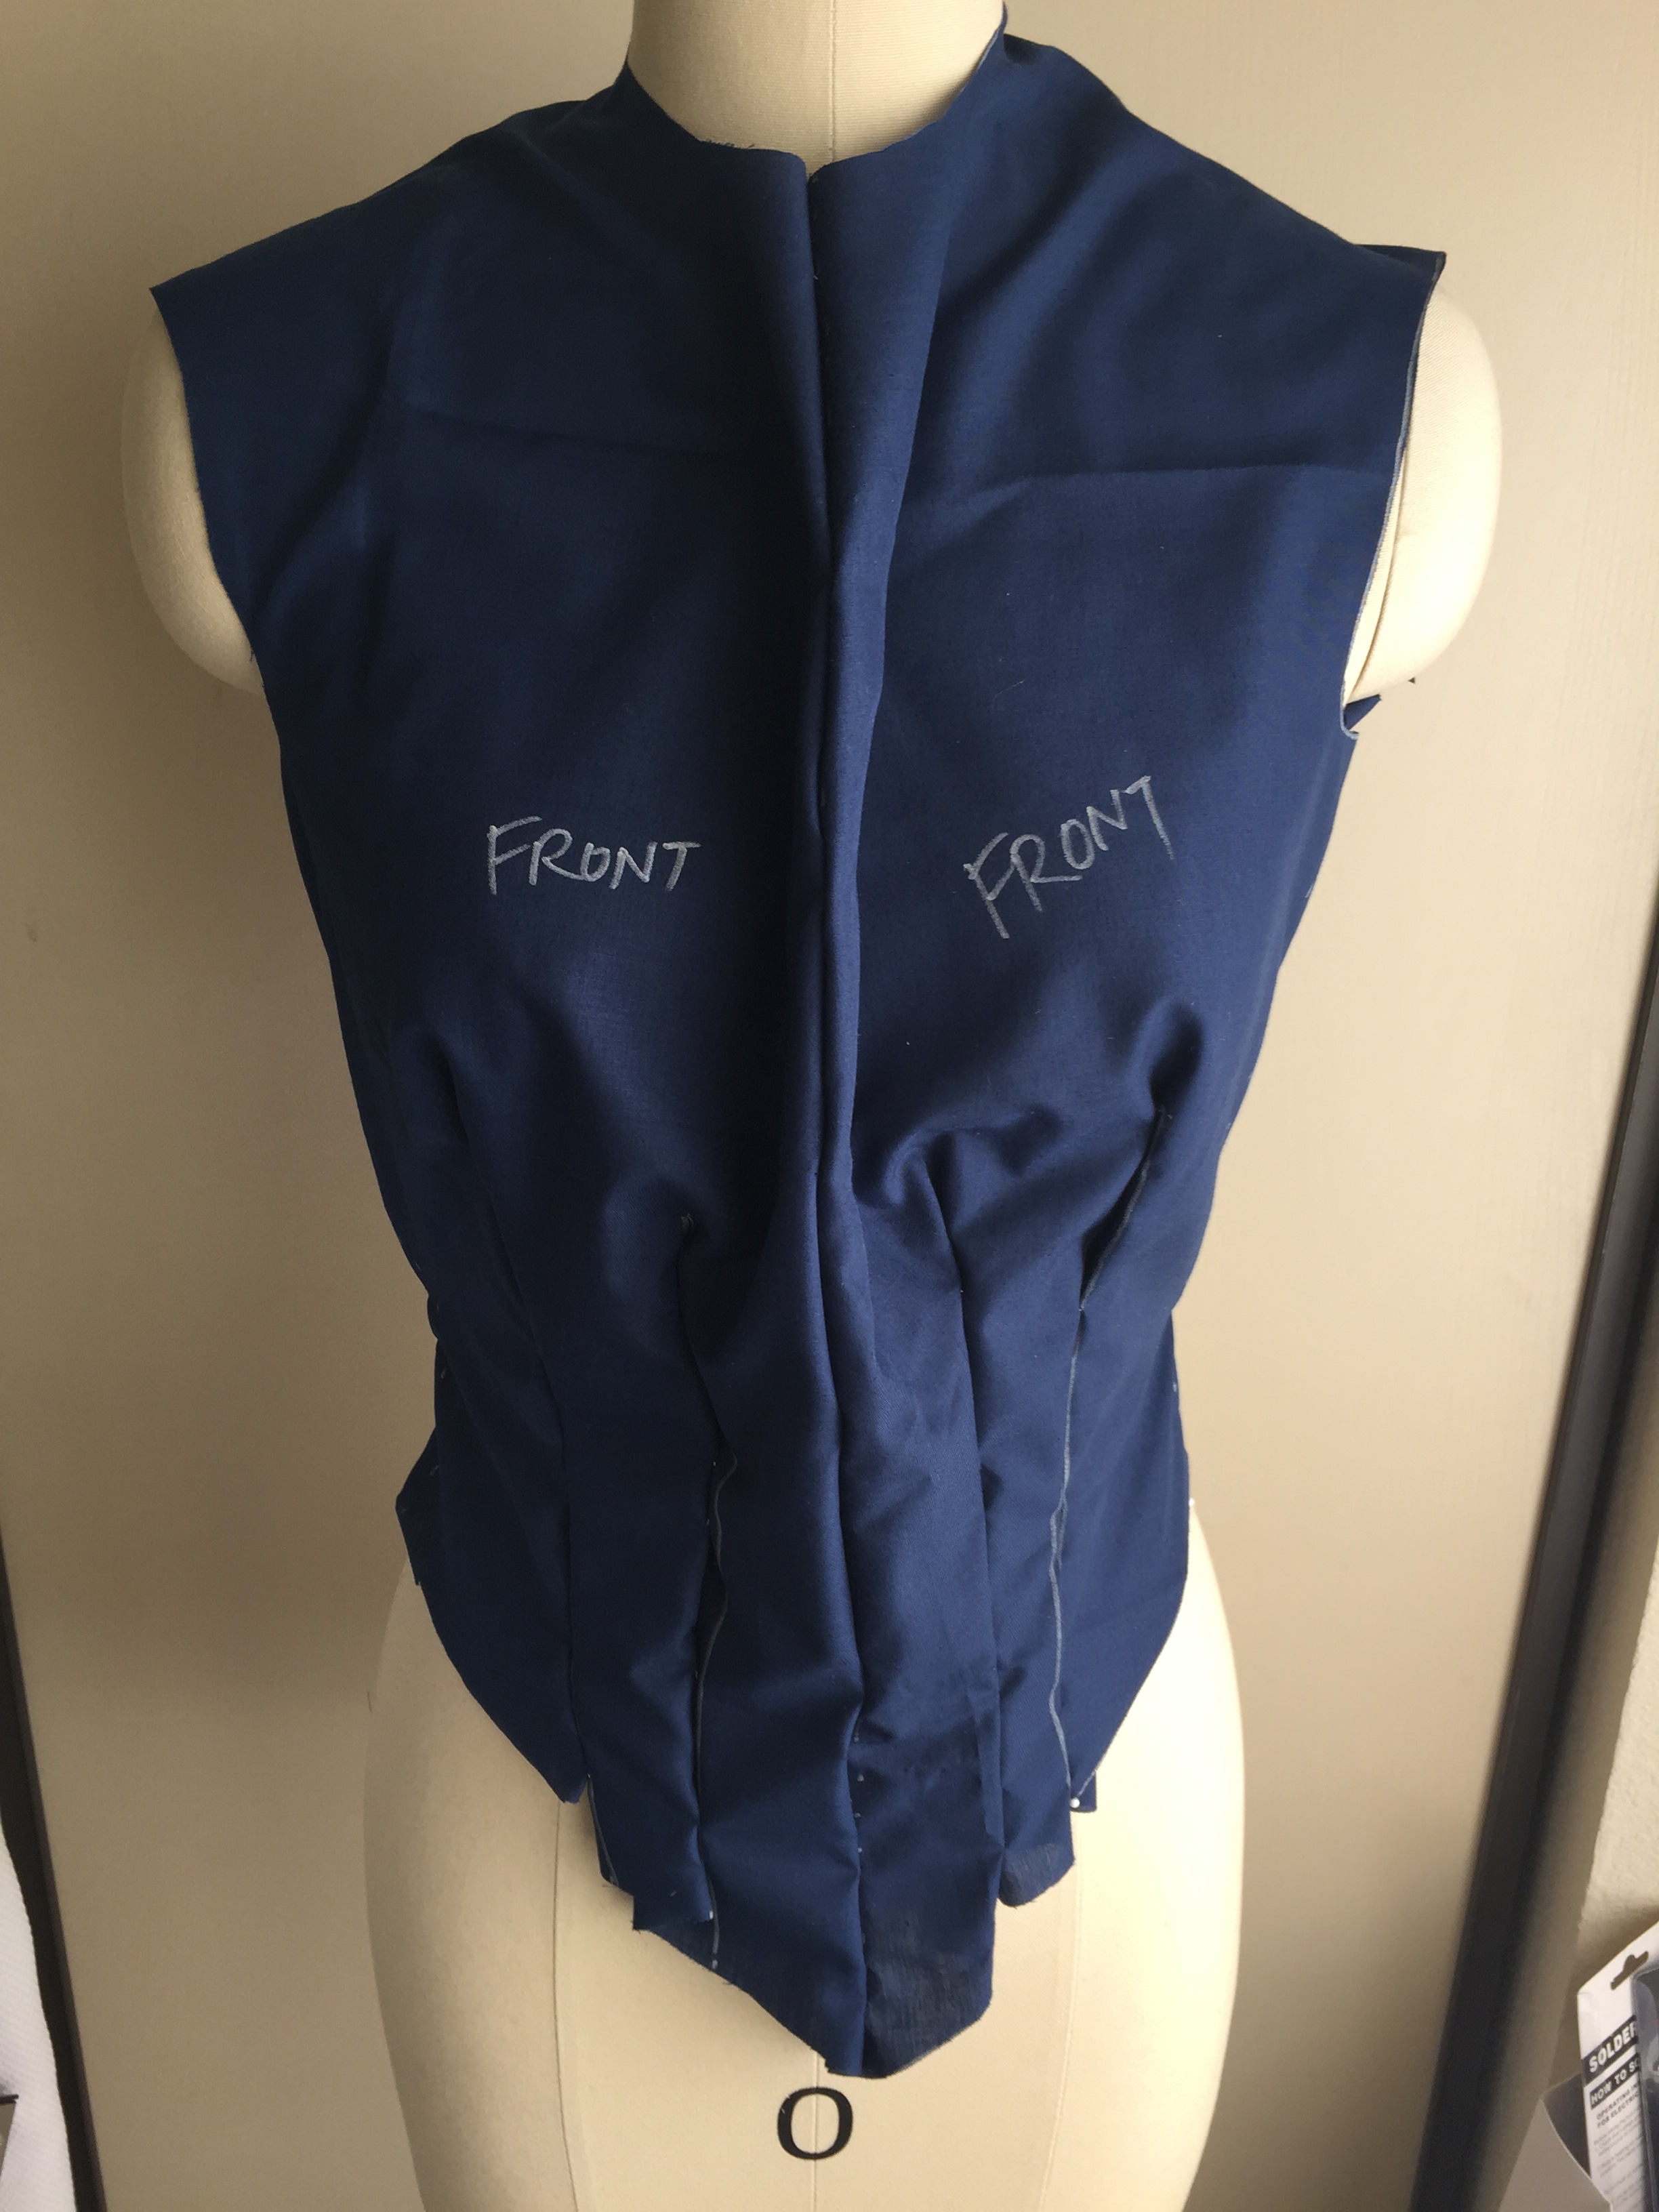
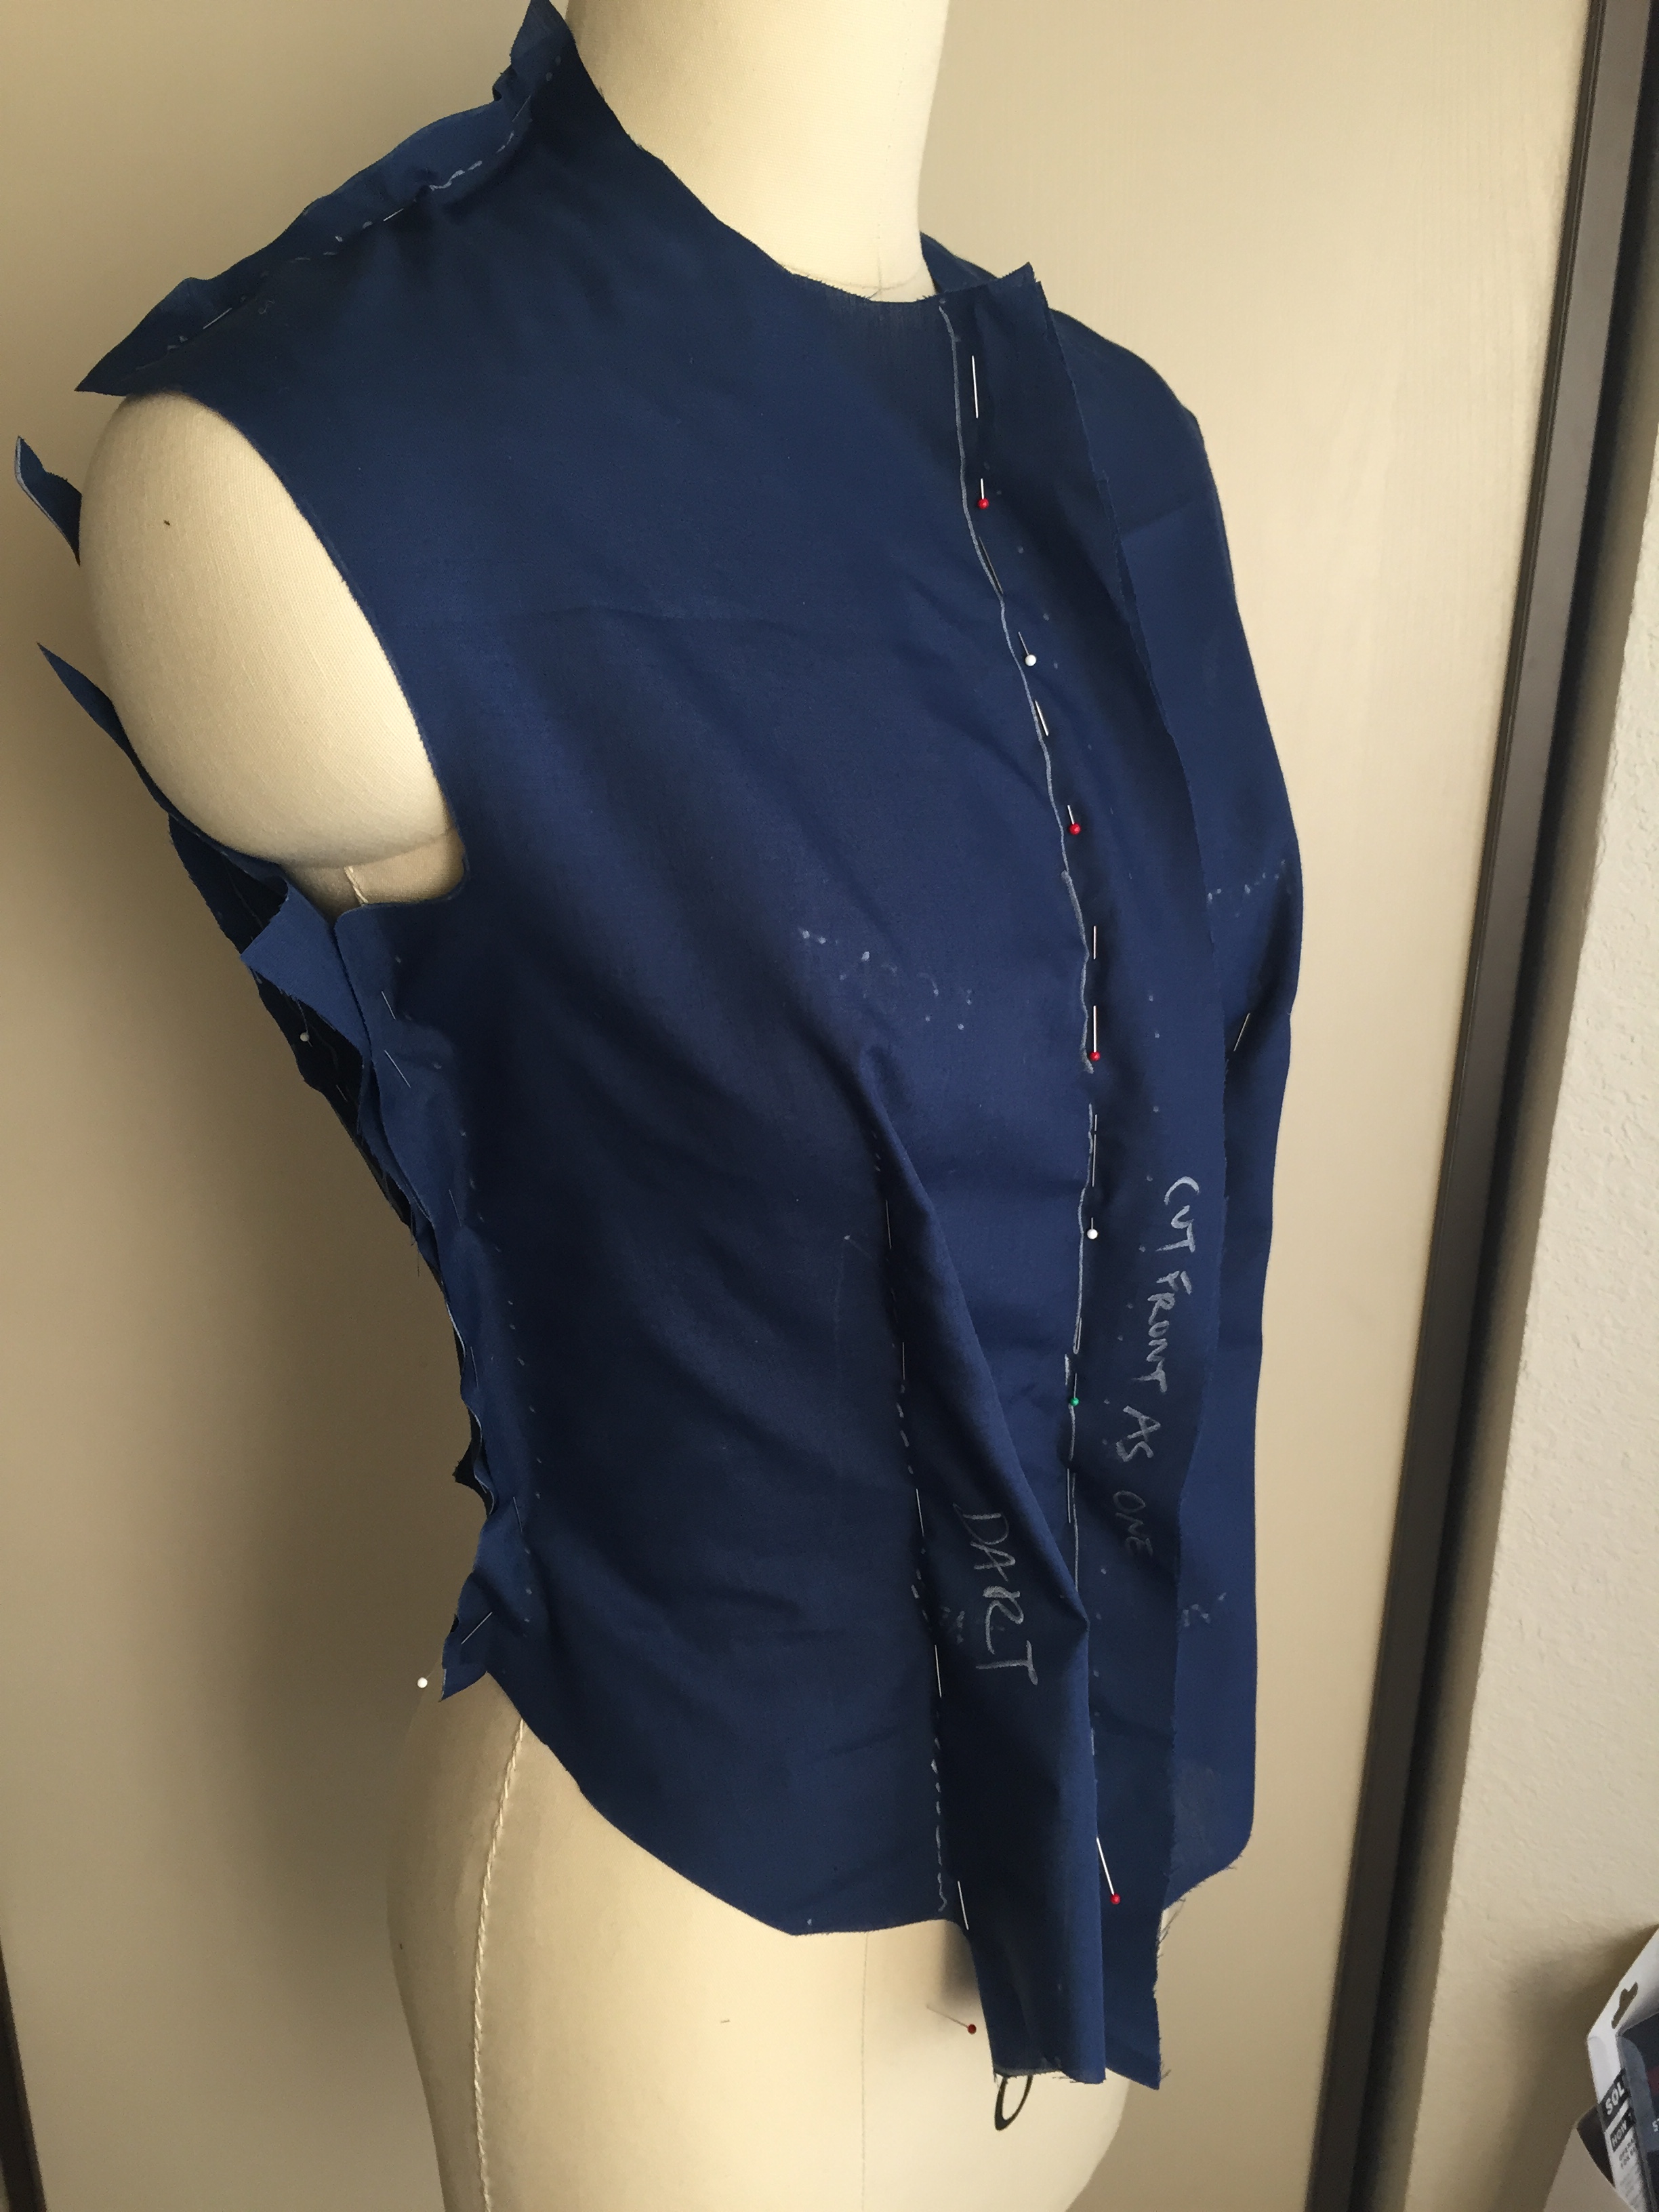
I started by tracing the paper pattern pieces without modification onto some fabric leftover with another fabric. It was navy blue and I used a silver pen so it ended up looking like architectural plans.
Mockup #1 was not sewn together; it was placed on the dress form to determine general fit, and I was able to see that there was too much fabric in the front.
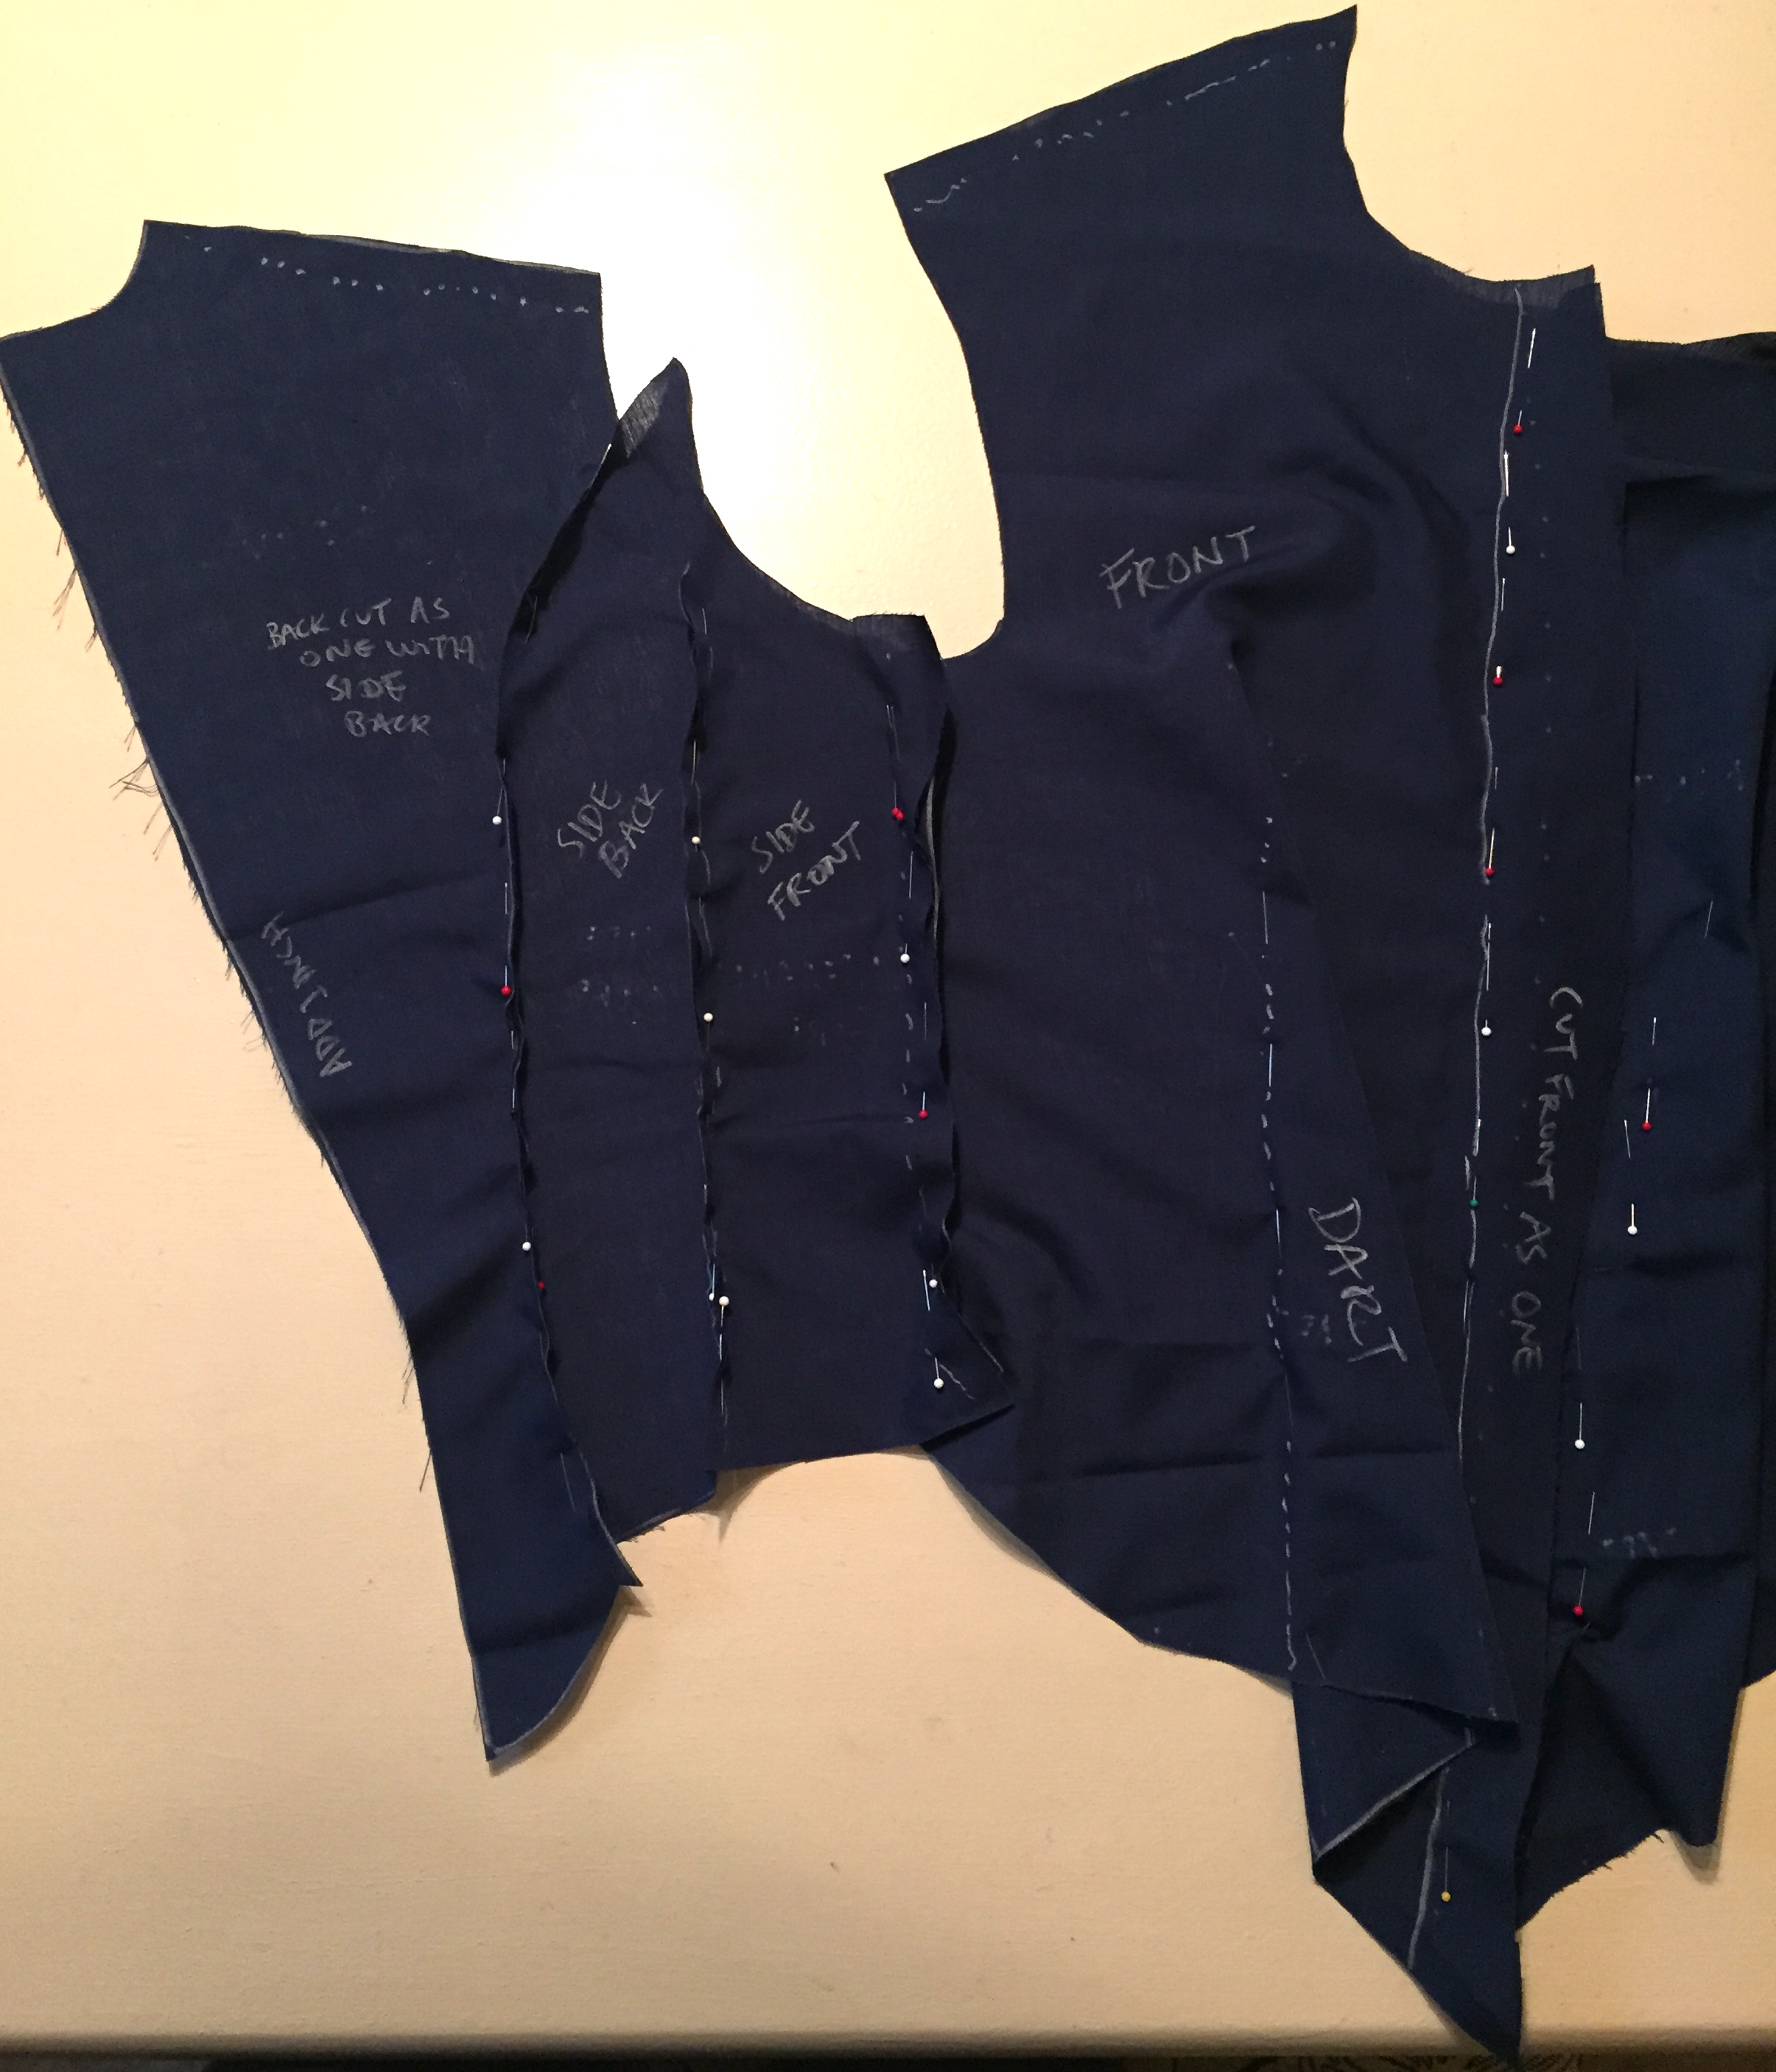
To make adjustments I turned the mockup inside out, and then started pinching out extra fabric and pinning. I also made one giant dart out of the two darts on each side. When satisfied with the general fit I made more notes directly on the fabric with the pen, then disassembled the pieces for my pattern.
The final pattern pieces:
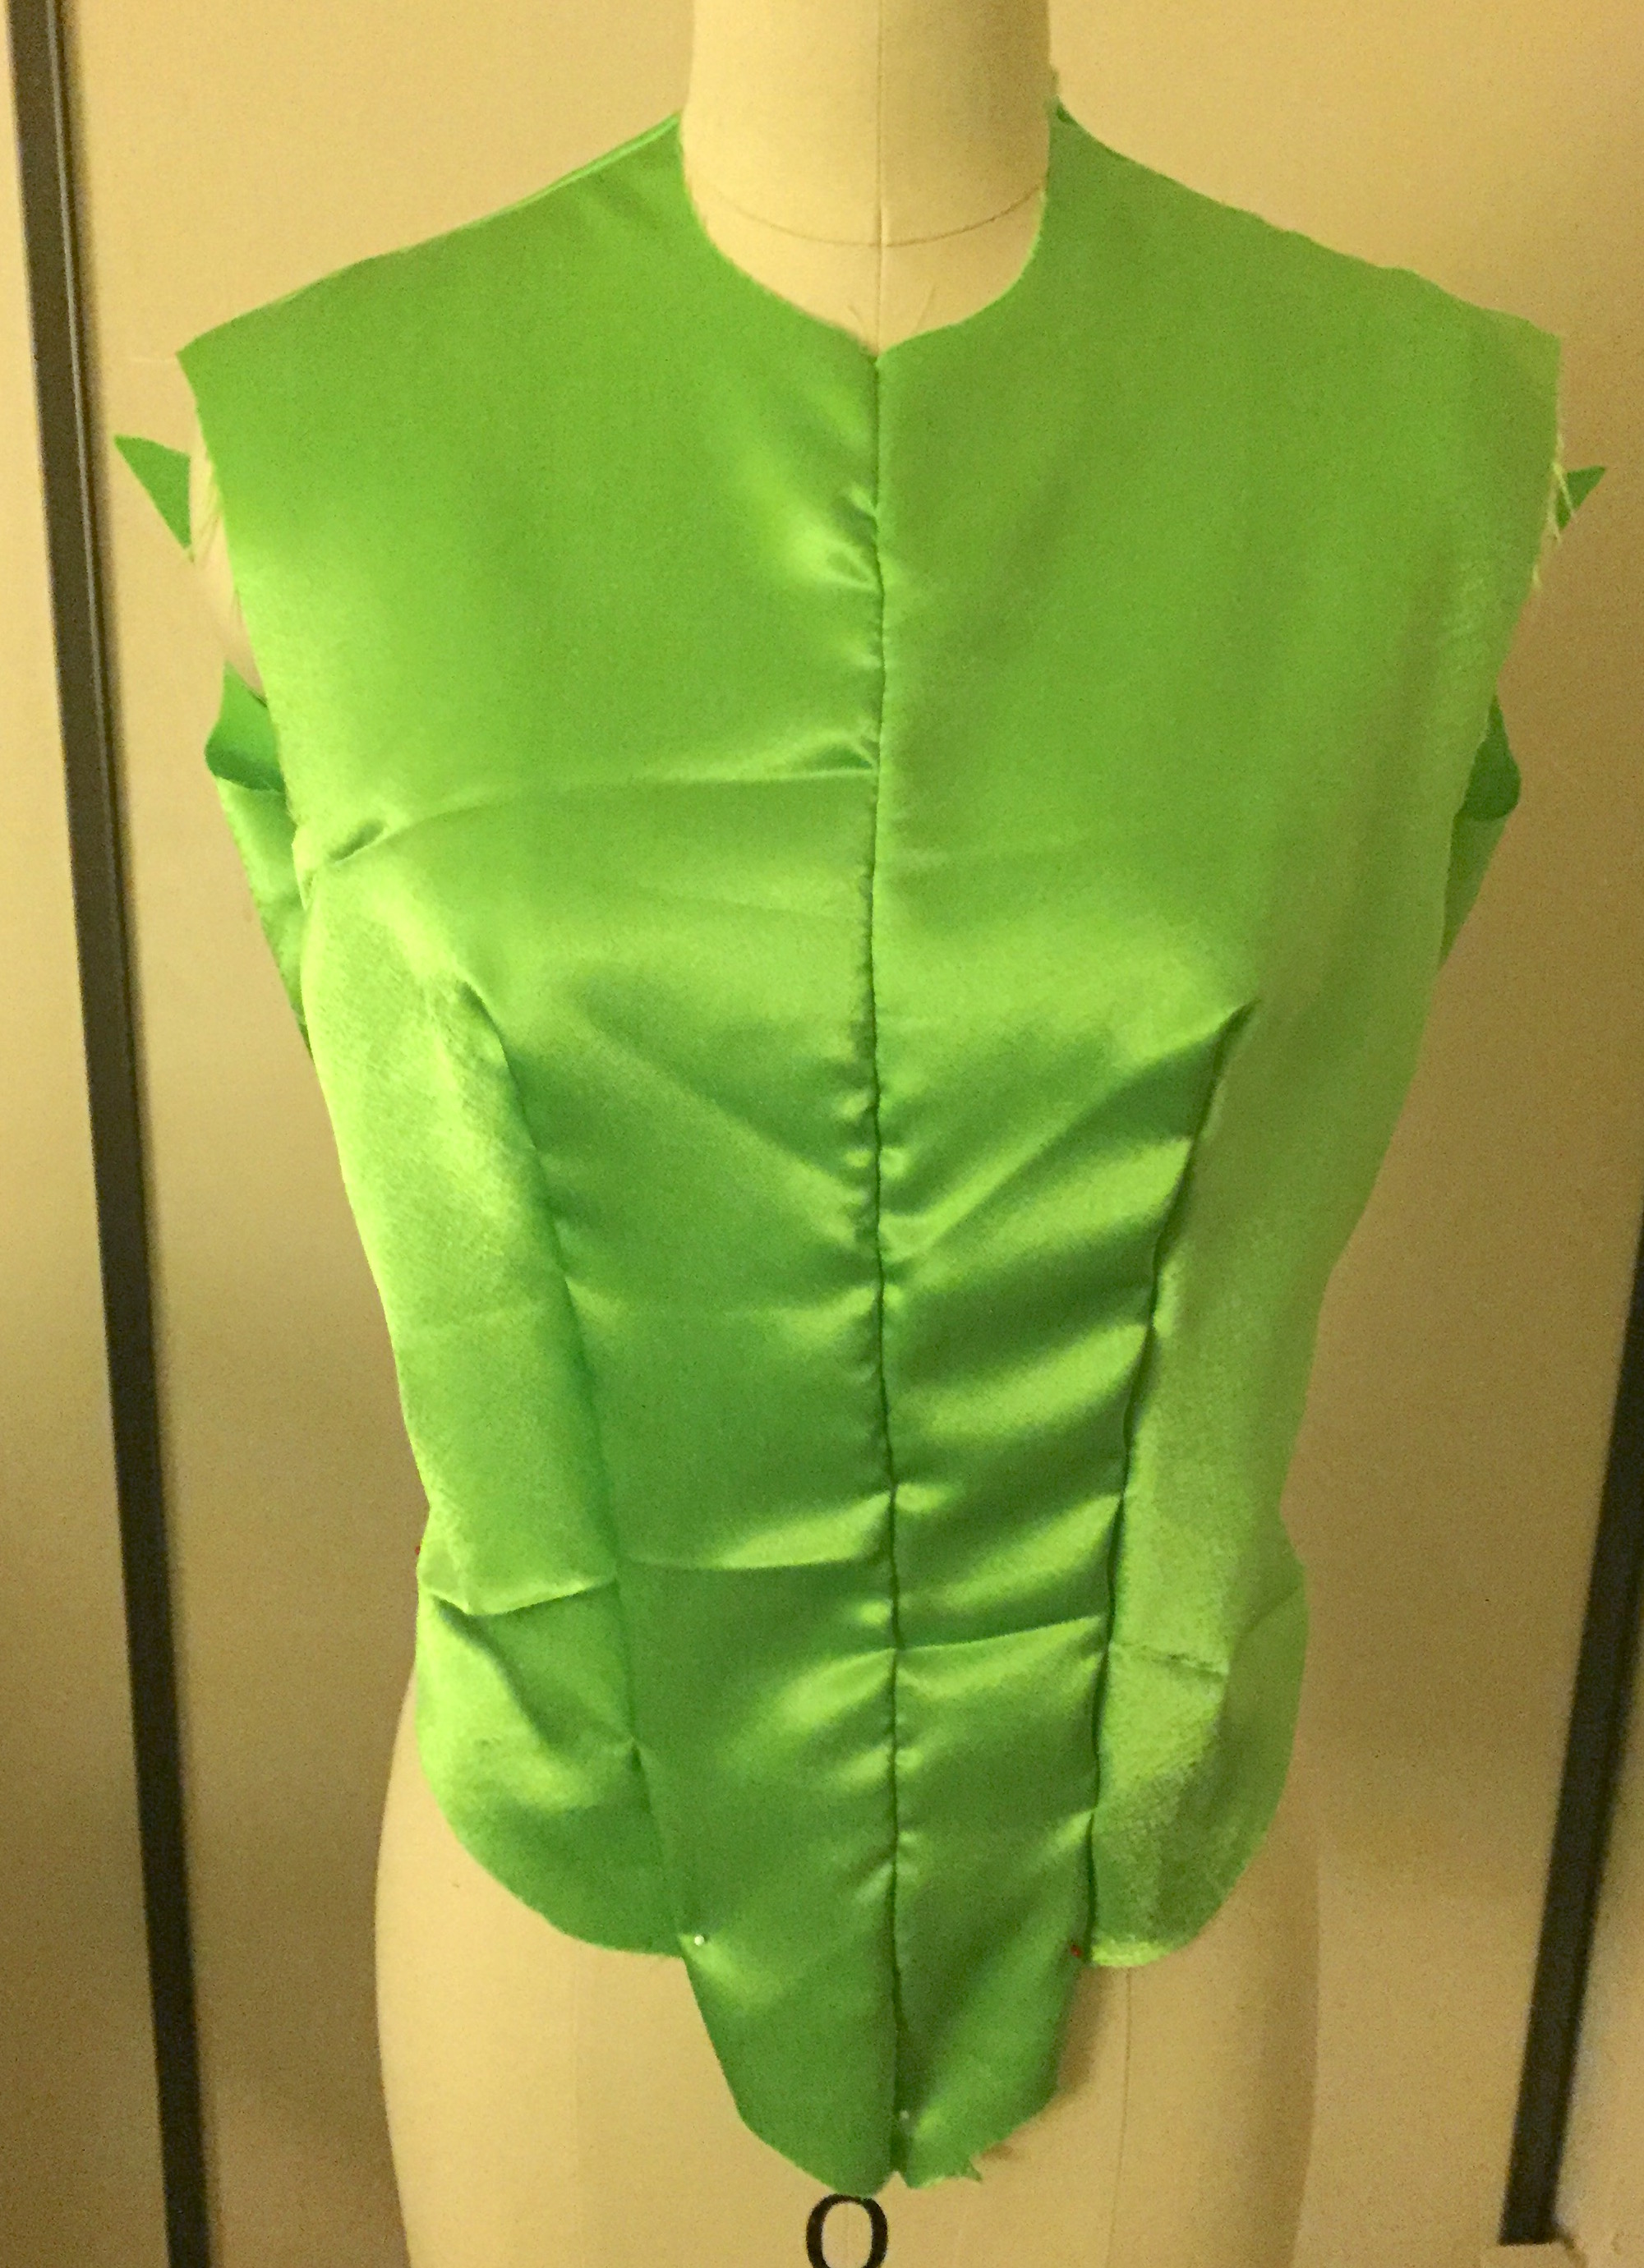
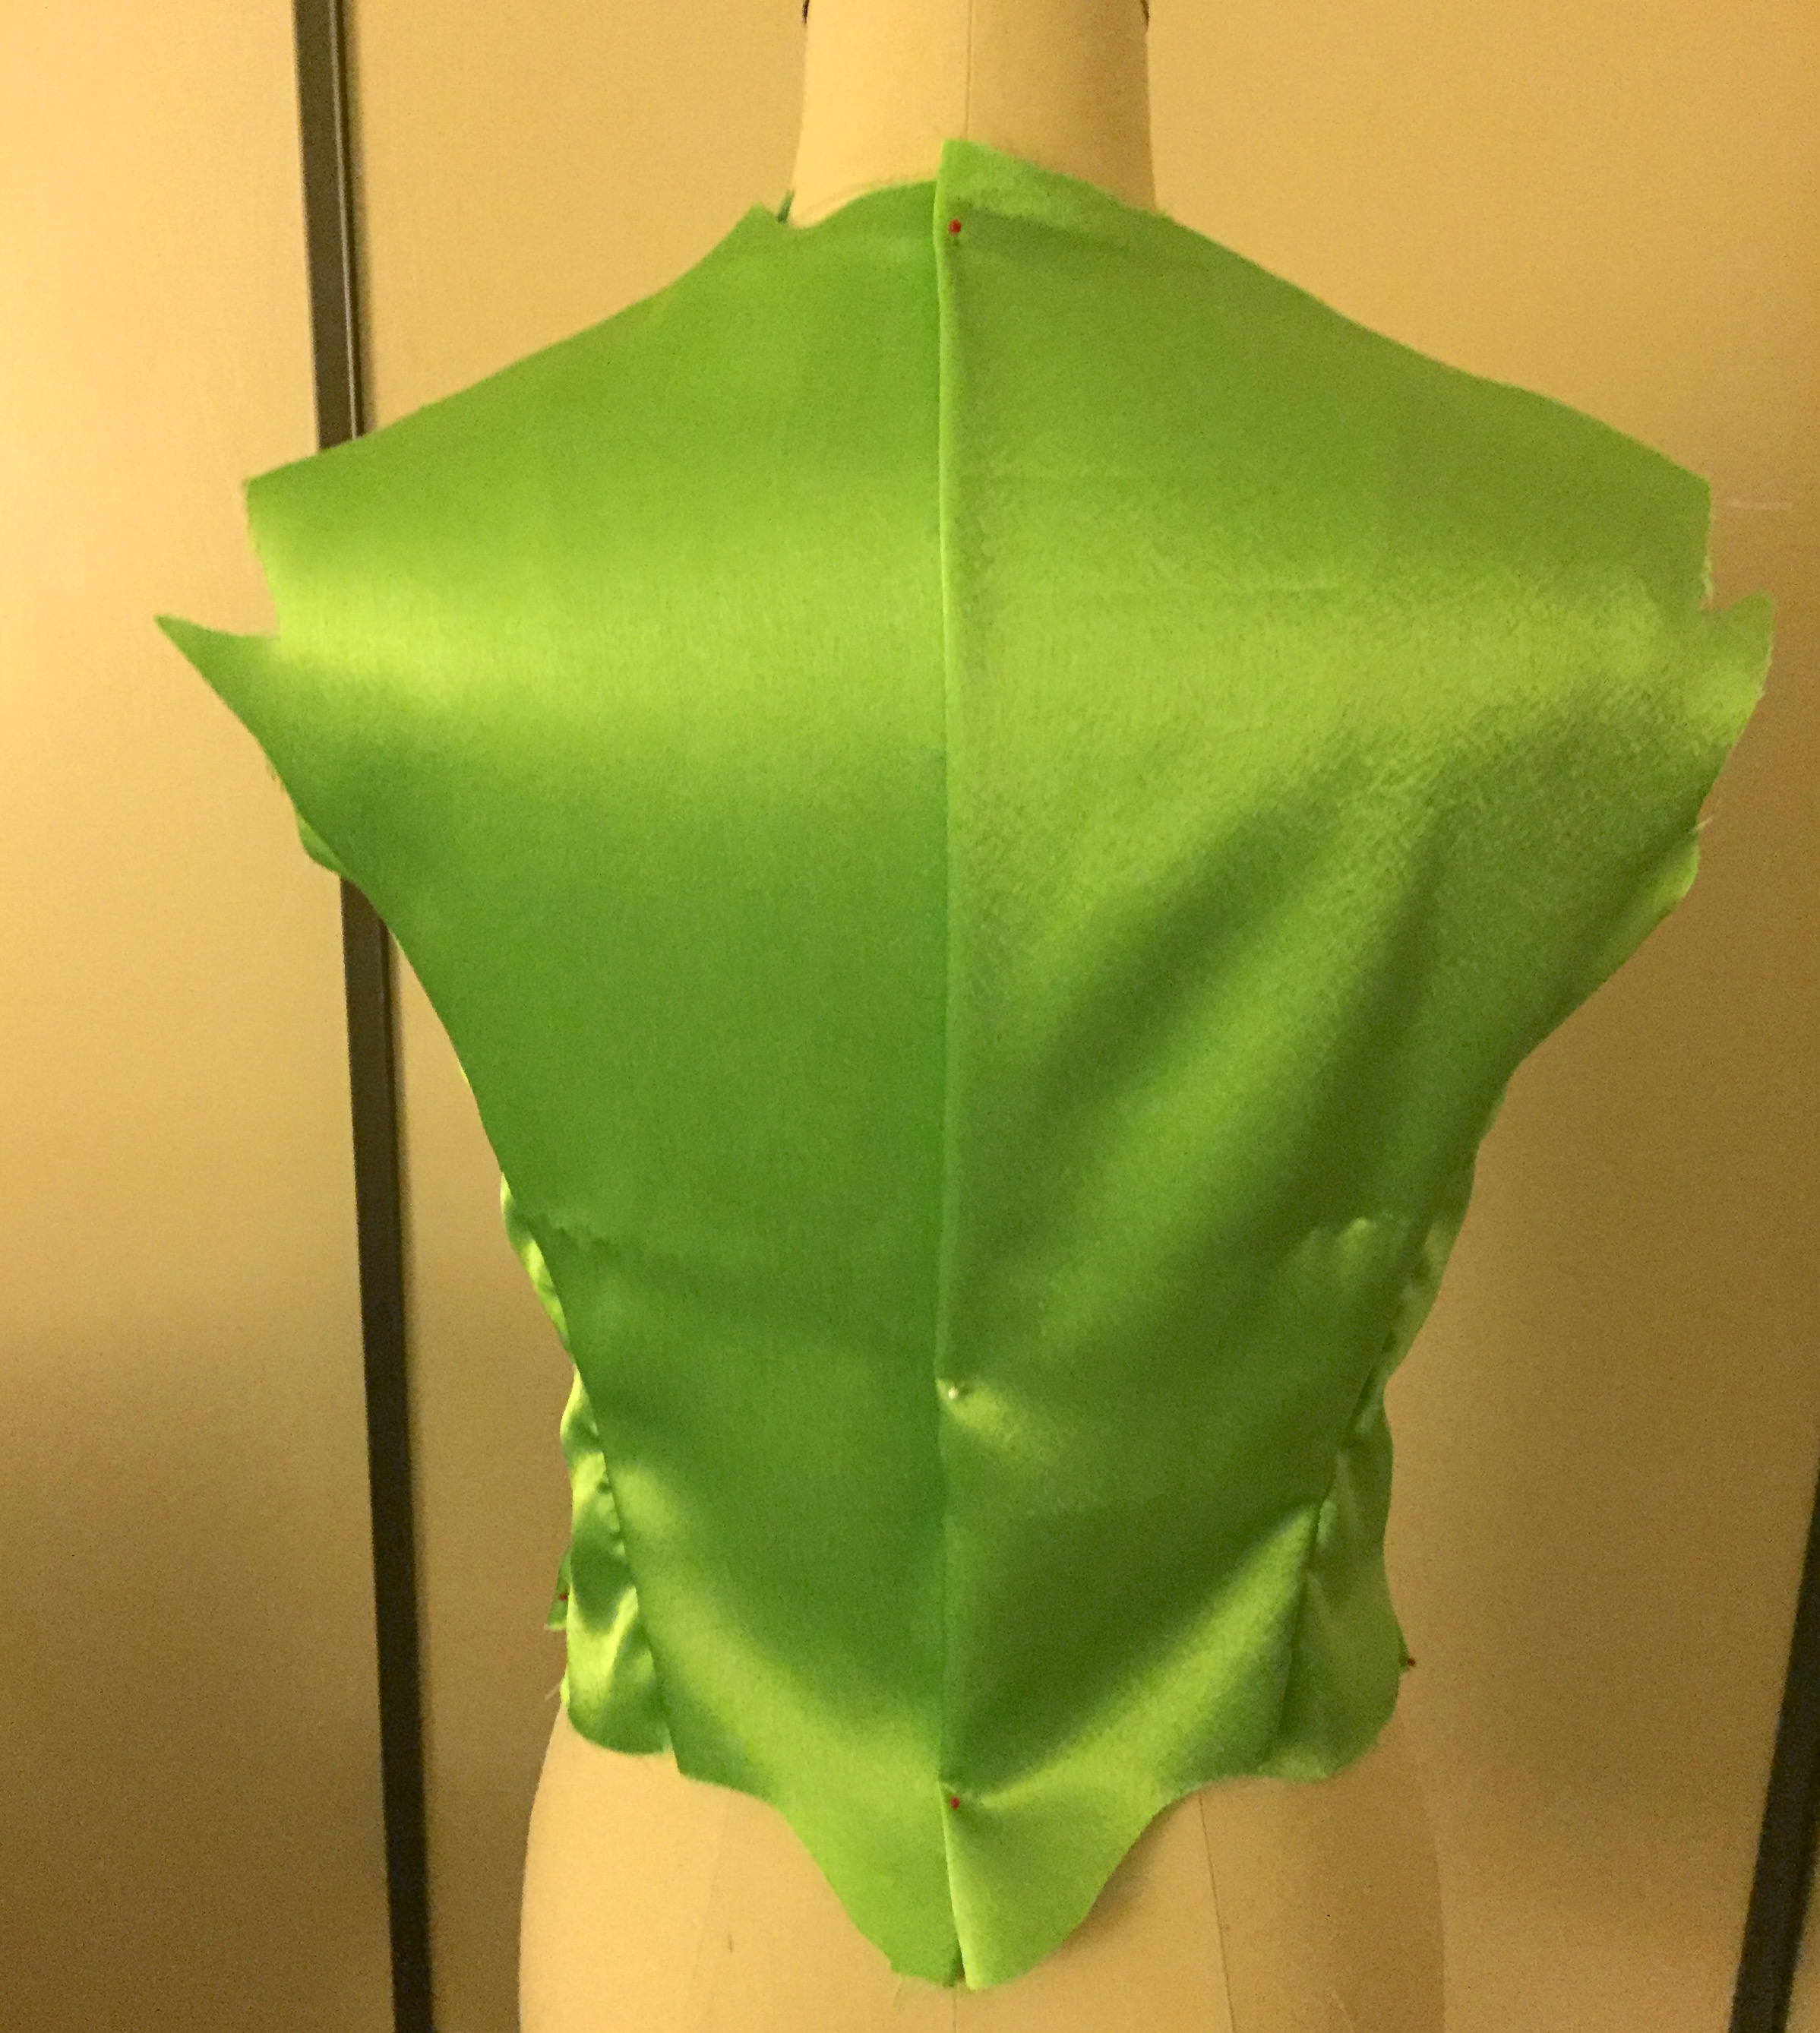
I then made mockup #2, which is wrinkly because I was too lazy to iron the fabric beforehand. =)
Then finally I cut out my sequined fabric! The sequins are on a sheer georgette, so I had to flat-line it with satin so that any raw seams tucked under would not show. The edges were serged because the satin was fraying and the sequins were falling off.
A note about sequins: The “right” way to sew sequined fabric is to unpick the sequins next to your seam allowance to avoid a bulky seam, or having some of the sequins be punctured or bent by your sewing machine needle. I skipped this step for several reasons: 1) I am working with very small sequins which will hide much better in the seam than large ones. 2) I am hand-sewing the bodice pieces together so that I can feel any resistance in my needle that I wouldn’t be able to tell by machine. 3) I am lazy and short on time to unpick so many tiny sequins and sew them back on.
Here is the current bodice. I still need to add sleeves, trim the neckline and bottom, add closures, and start the scary process of flocking!
Last Saturday was the 1940s PEERS Ball, and my “crew” and I wore our 1940s Star Trek mashup outfits! (From left to right: Riker, Data, Troi, Red Shirt, Dixon Hill, Wesley, Dr. Crusher, and Geordi).
I was very worried that I couldn’t get the hair right, but with some tips from friends, a lot of foam curlers, and the magic setting lotion Lottabody I felt fabulous!
My hair was so fluffy you can’t see the vintage Bakelite dome earrings I’m wearing. They are mustard-colored and match the ring.
Here we are all so serious!
I had enough leftover fabric to give to Breanna so we could match! Her use of silver netting for Geordi’s visor was so clever!
Dr. Crusher made a dress and a coat!
Although Wesley was not so impressed by Mom.
Troi and sexy Riker got a little frisky!
Riker had to do the signature weird chair leaping!
And every away mission needs a Red Shirt!
All the ladies in our group made their own dresses from vintage or altered patterns. We had a wonderful time and I definitely want to wear my outfit again to Costume College!


 The skirt panel is faced with self-fabric and contains all the buttonholes while the buttons are sewn onto the pants. There are two options to attach the skirt panel. You can have one side sewn into the seam of the pants (which means you won’t lose the panel and you can make half as many buttonholes) or you can have the panel completely removable. If you have the panel attached you fold it over to one side and button it down. I opted to have the panel completely removable because my self-faced fabric folded over would have meant 4 layers of medium-weight wool and more bulk than I wanted. (If you use a lightweight wool or other fabric you don’t have to be concerned about that).


 12-14-19")
