RSS Feed

Tag Archives: historical

My Historical Loki Variant Cosplay (Borgias-Inspired Renaissance Dress Costume)

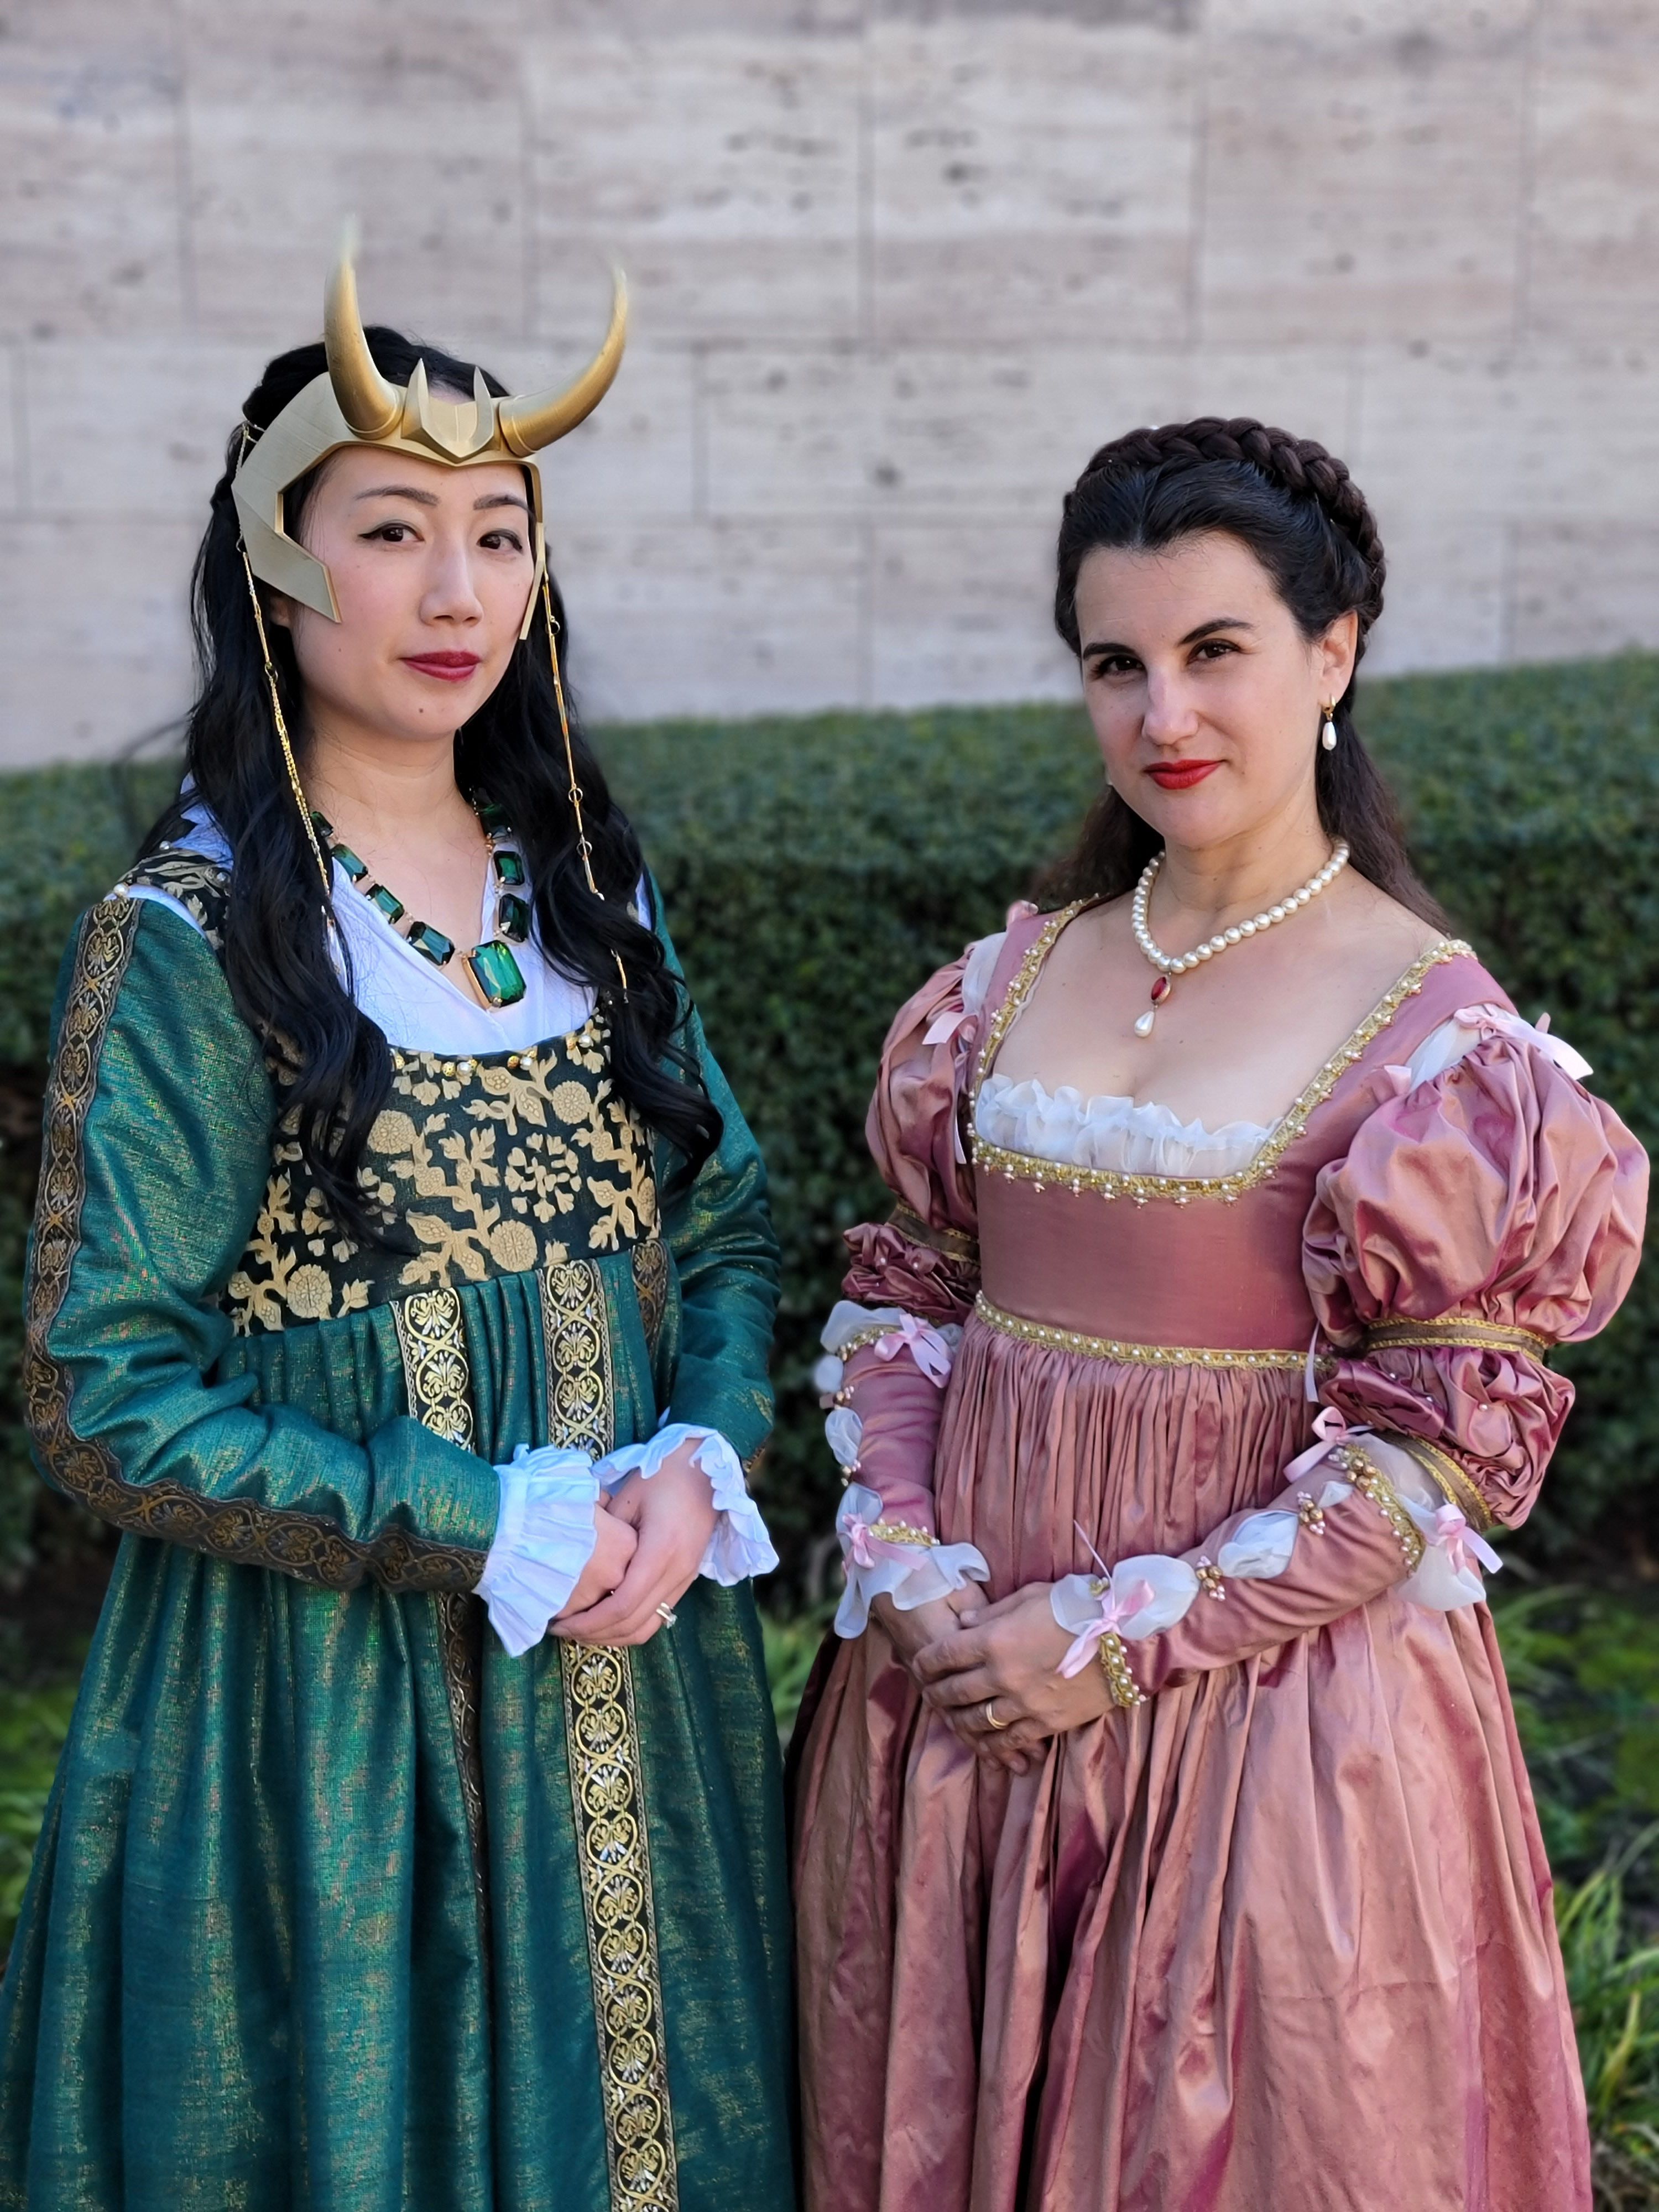
I was making a Borgias-inspired Renaissance dress and decided to lean into to the green gold color scheme and make it a historical Loki variant costume. I wanted a Renaissance gown but being shiny and pretty was more important to me than historical accuracy so this isn’t pegged to a specific decade, but rather a look inspired by both the Borgias HBO show and the character Loki from the Marvel Cinematic Universe.

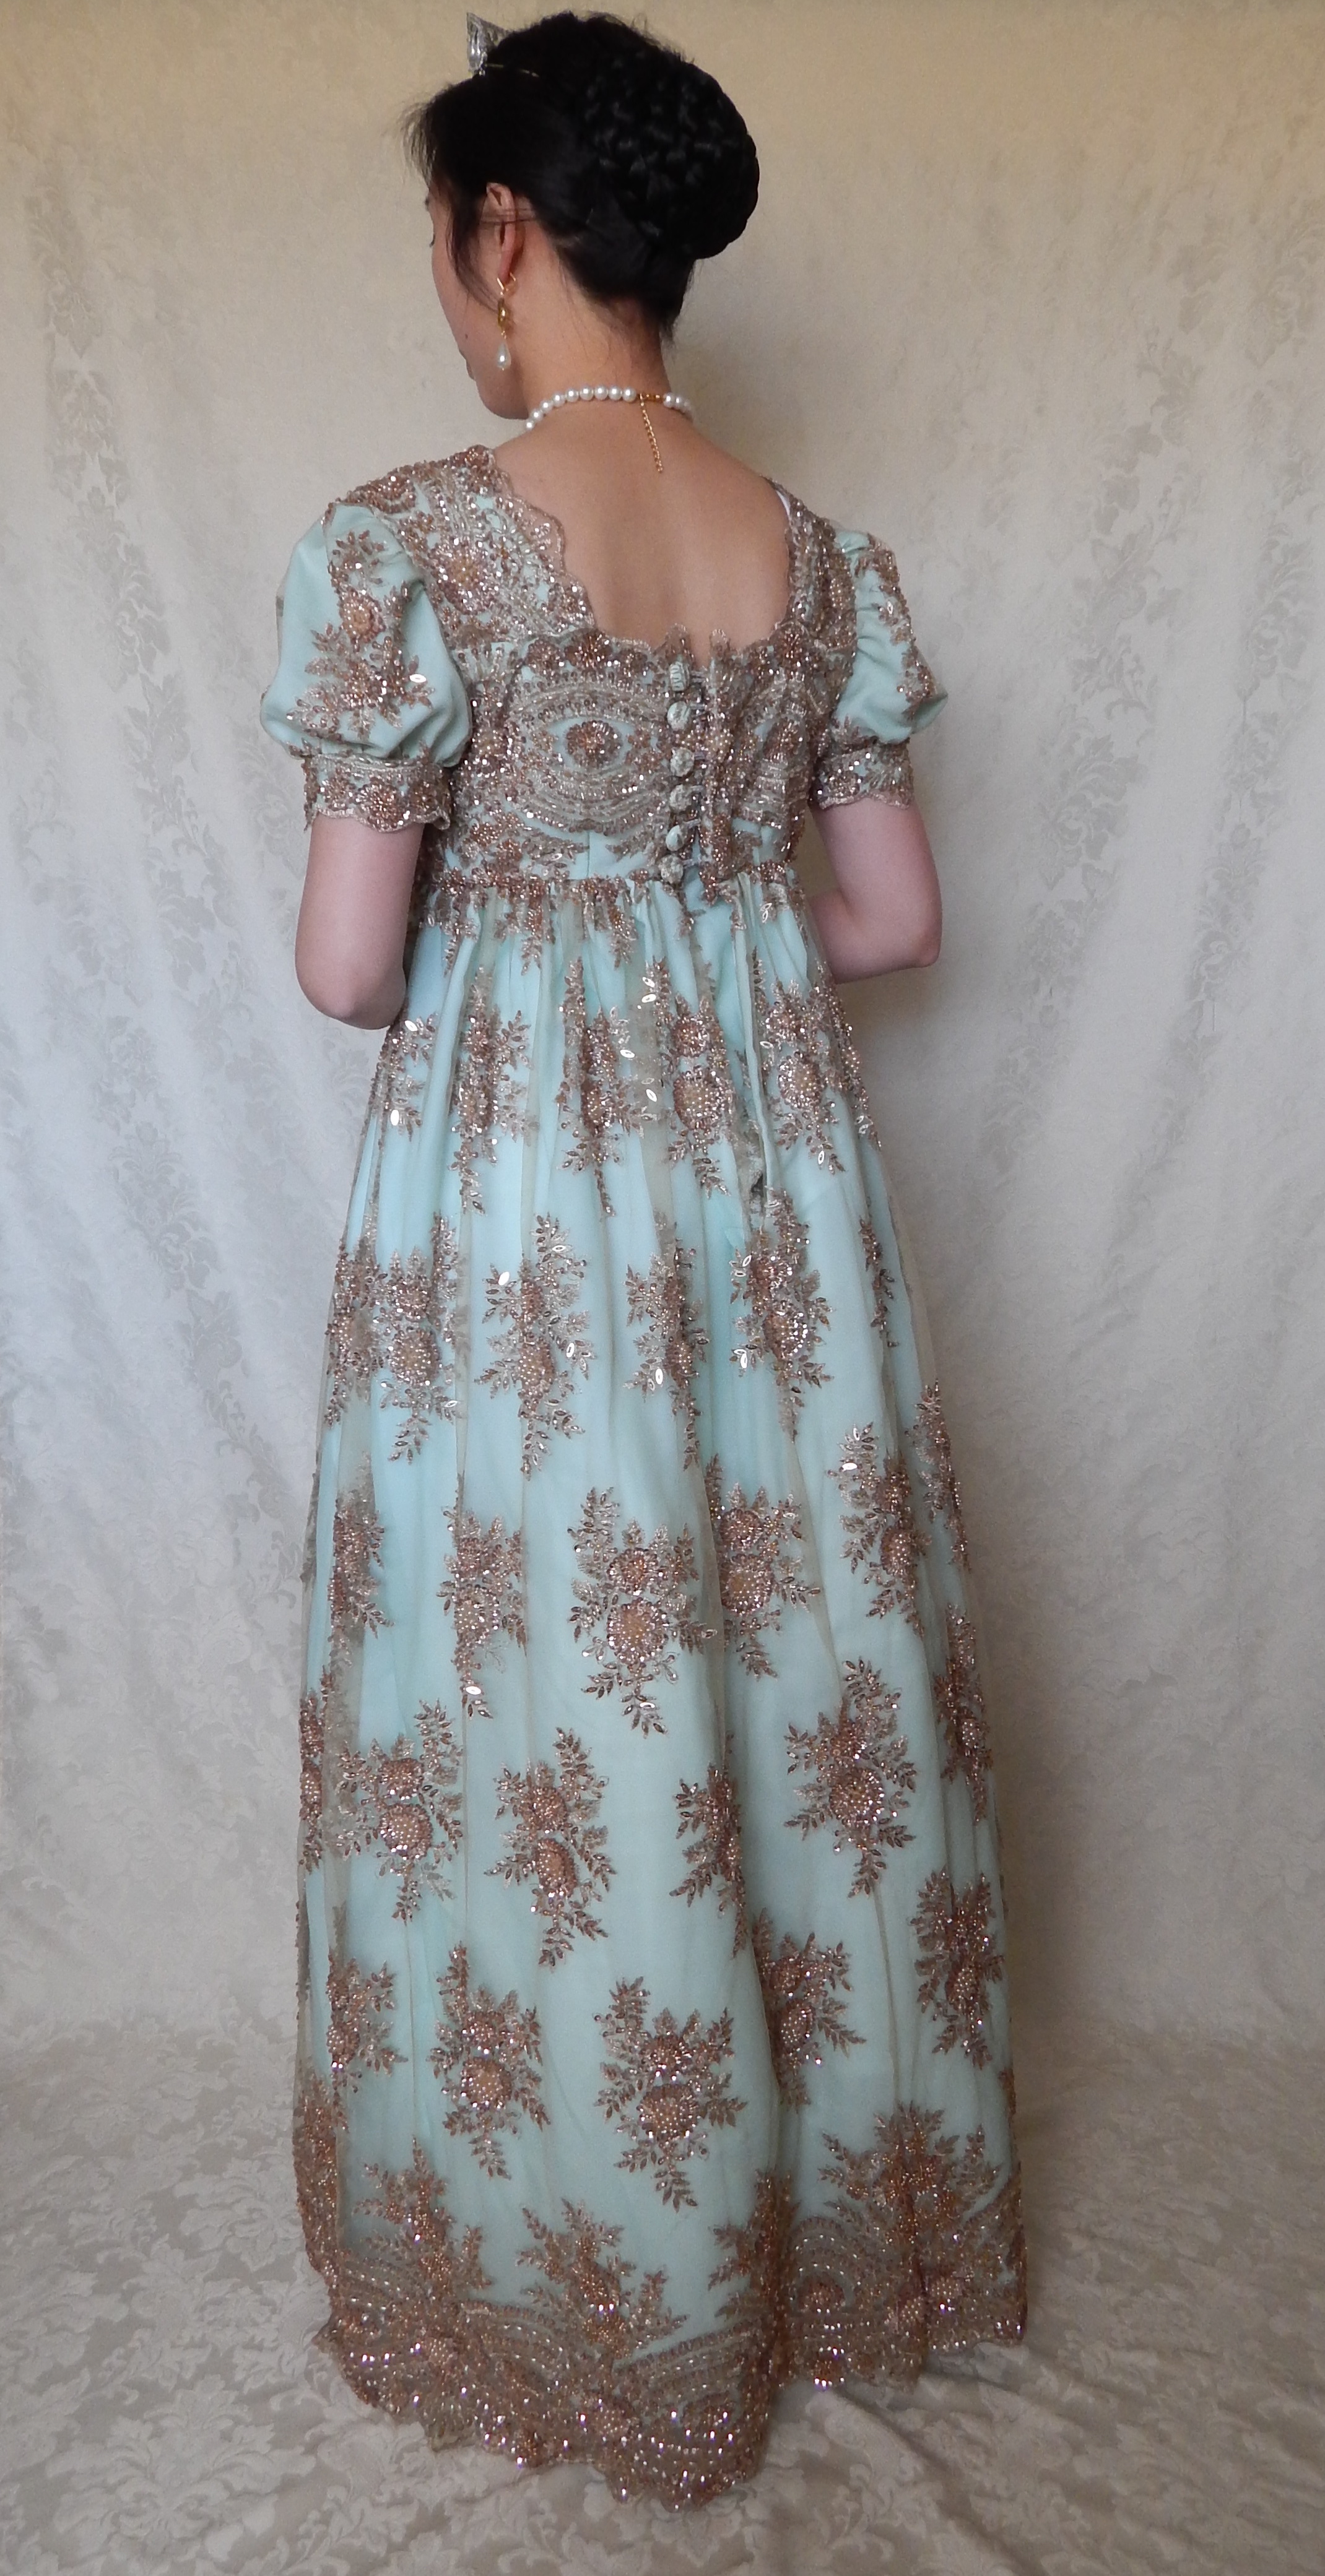
The dress is made from beautiful green and gold shot raw silk suiting. The bodice uses the same fabric but with a silk/rayon organza burnout overlay, and the lining is a black cotton canvas for structure.

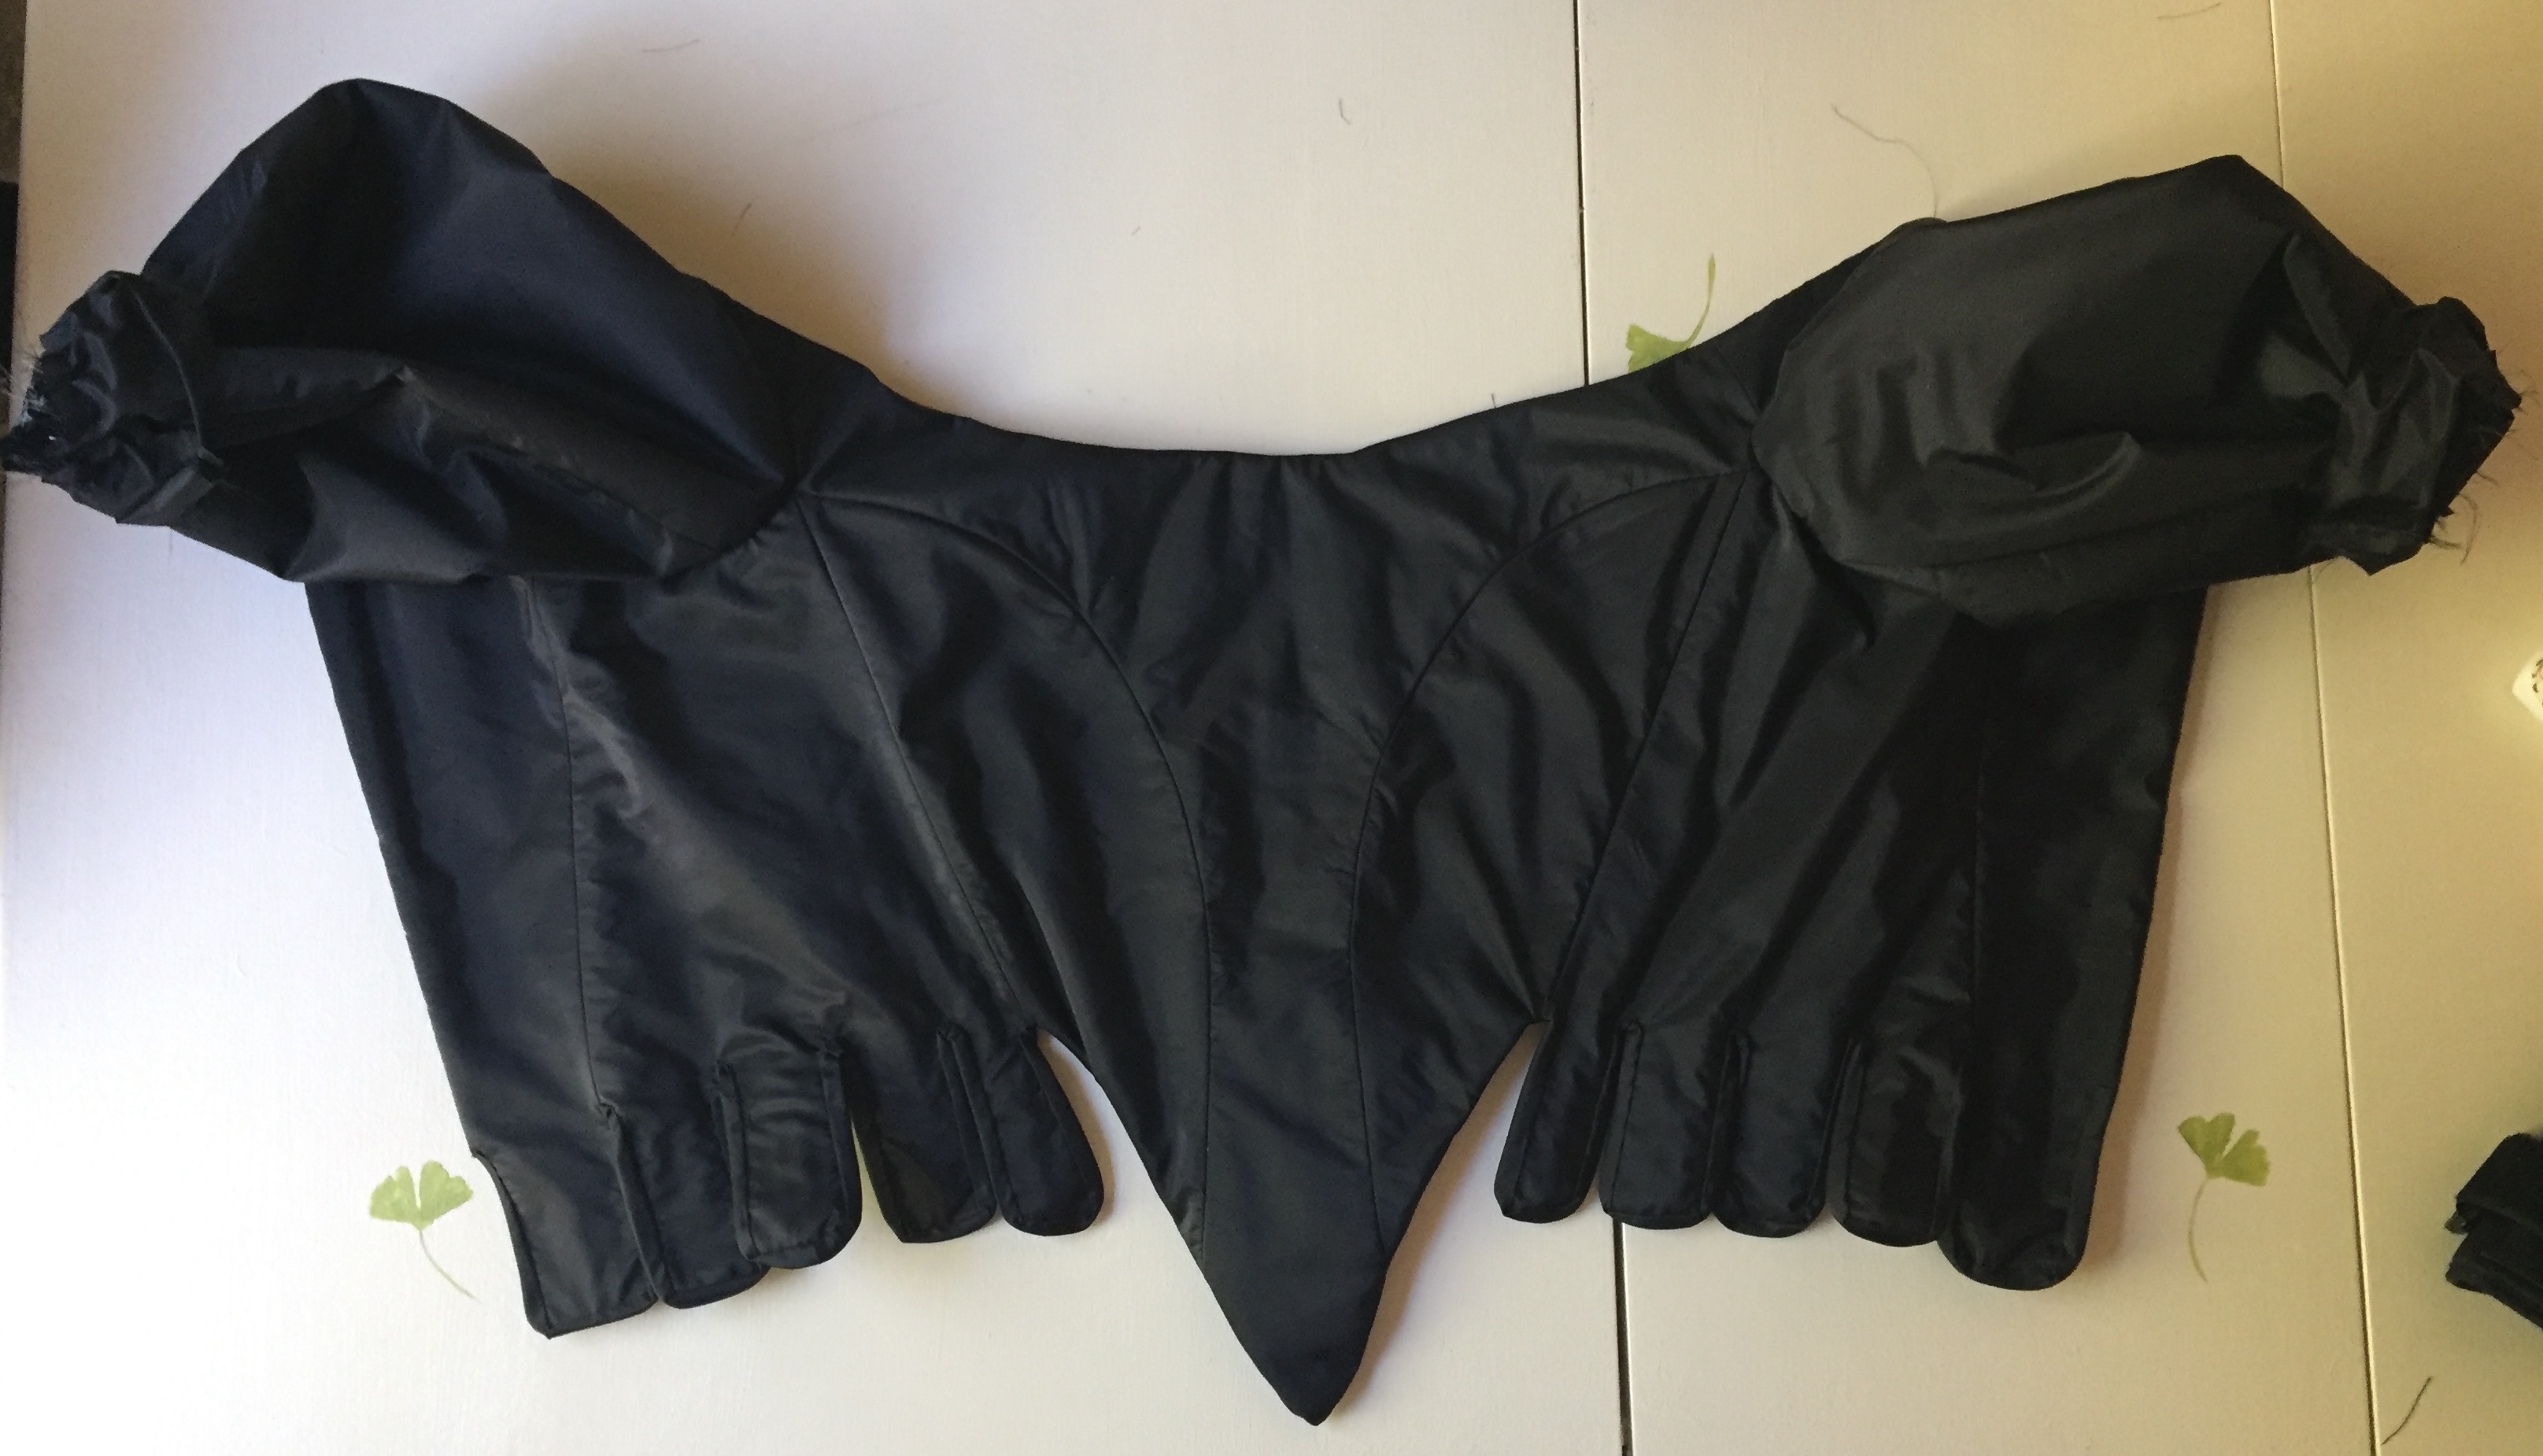
Rather than using a commercial pattern I Frankensteined together math and modified pattern bits from previous costumes I made. The bodice is a shorted version of the kirtle I previously made using help from the Tudor Tailor book (Amazon affiliate link). I widened the shoulder straps and added some more seam allowance but it is otherwise generally the same.

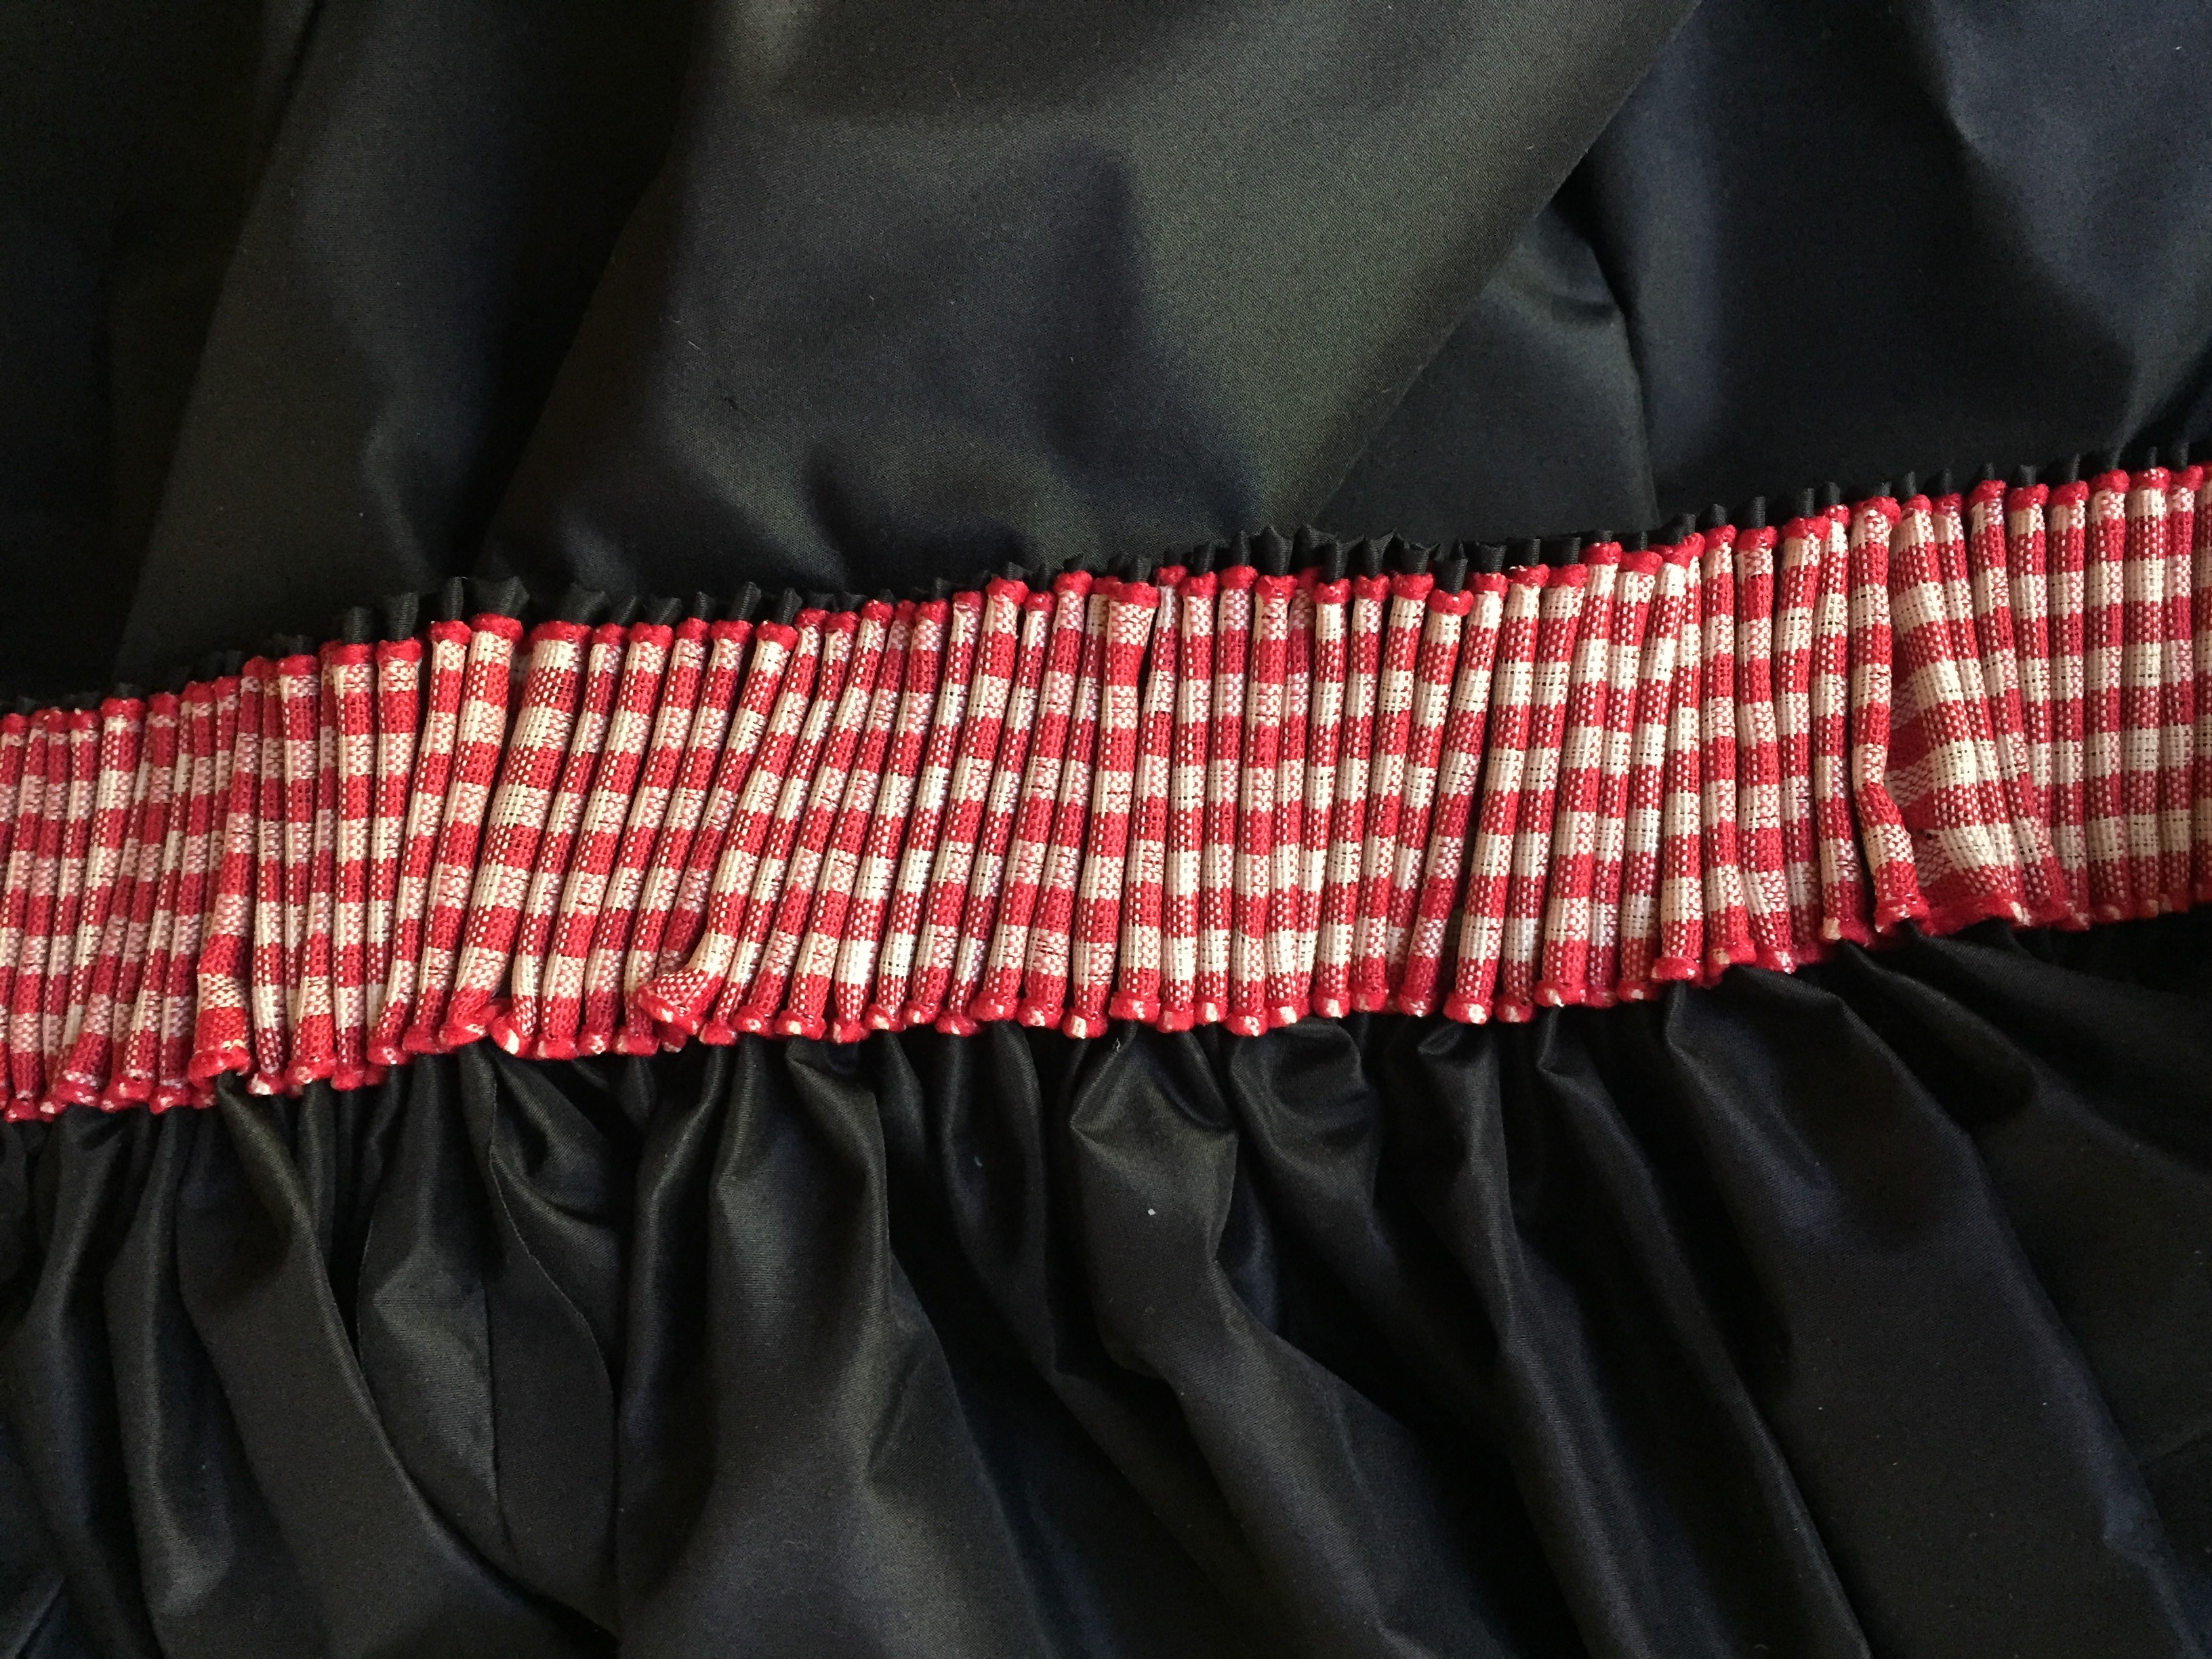
The skirt is made of pleated rectangular panels. Each of the front and back are 1.5 panels wide, with the seam hidden under the metallic jacquard trim.

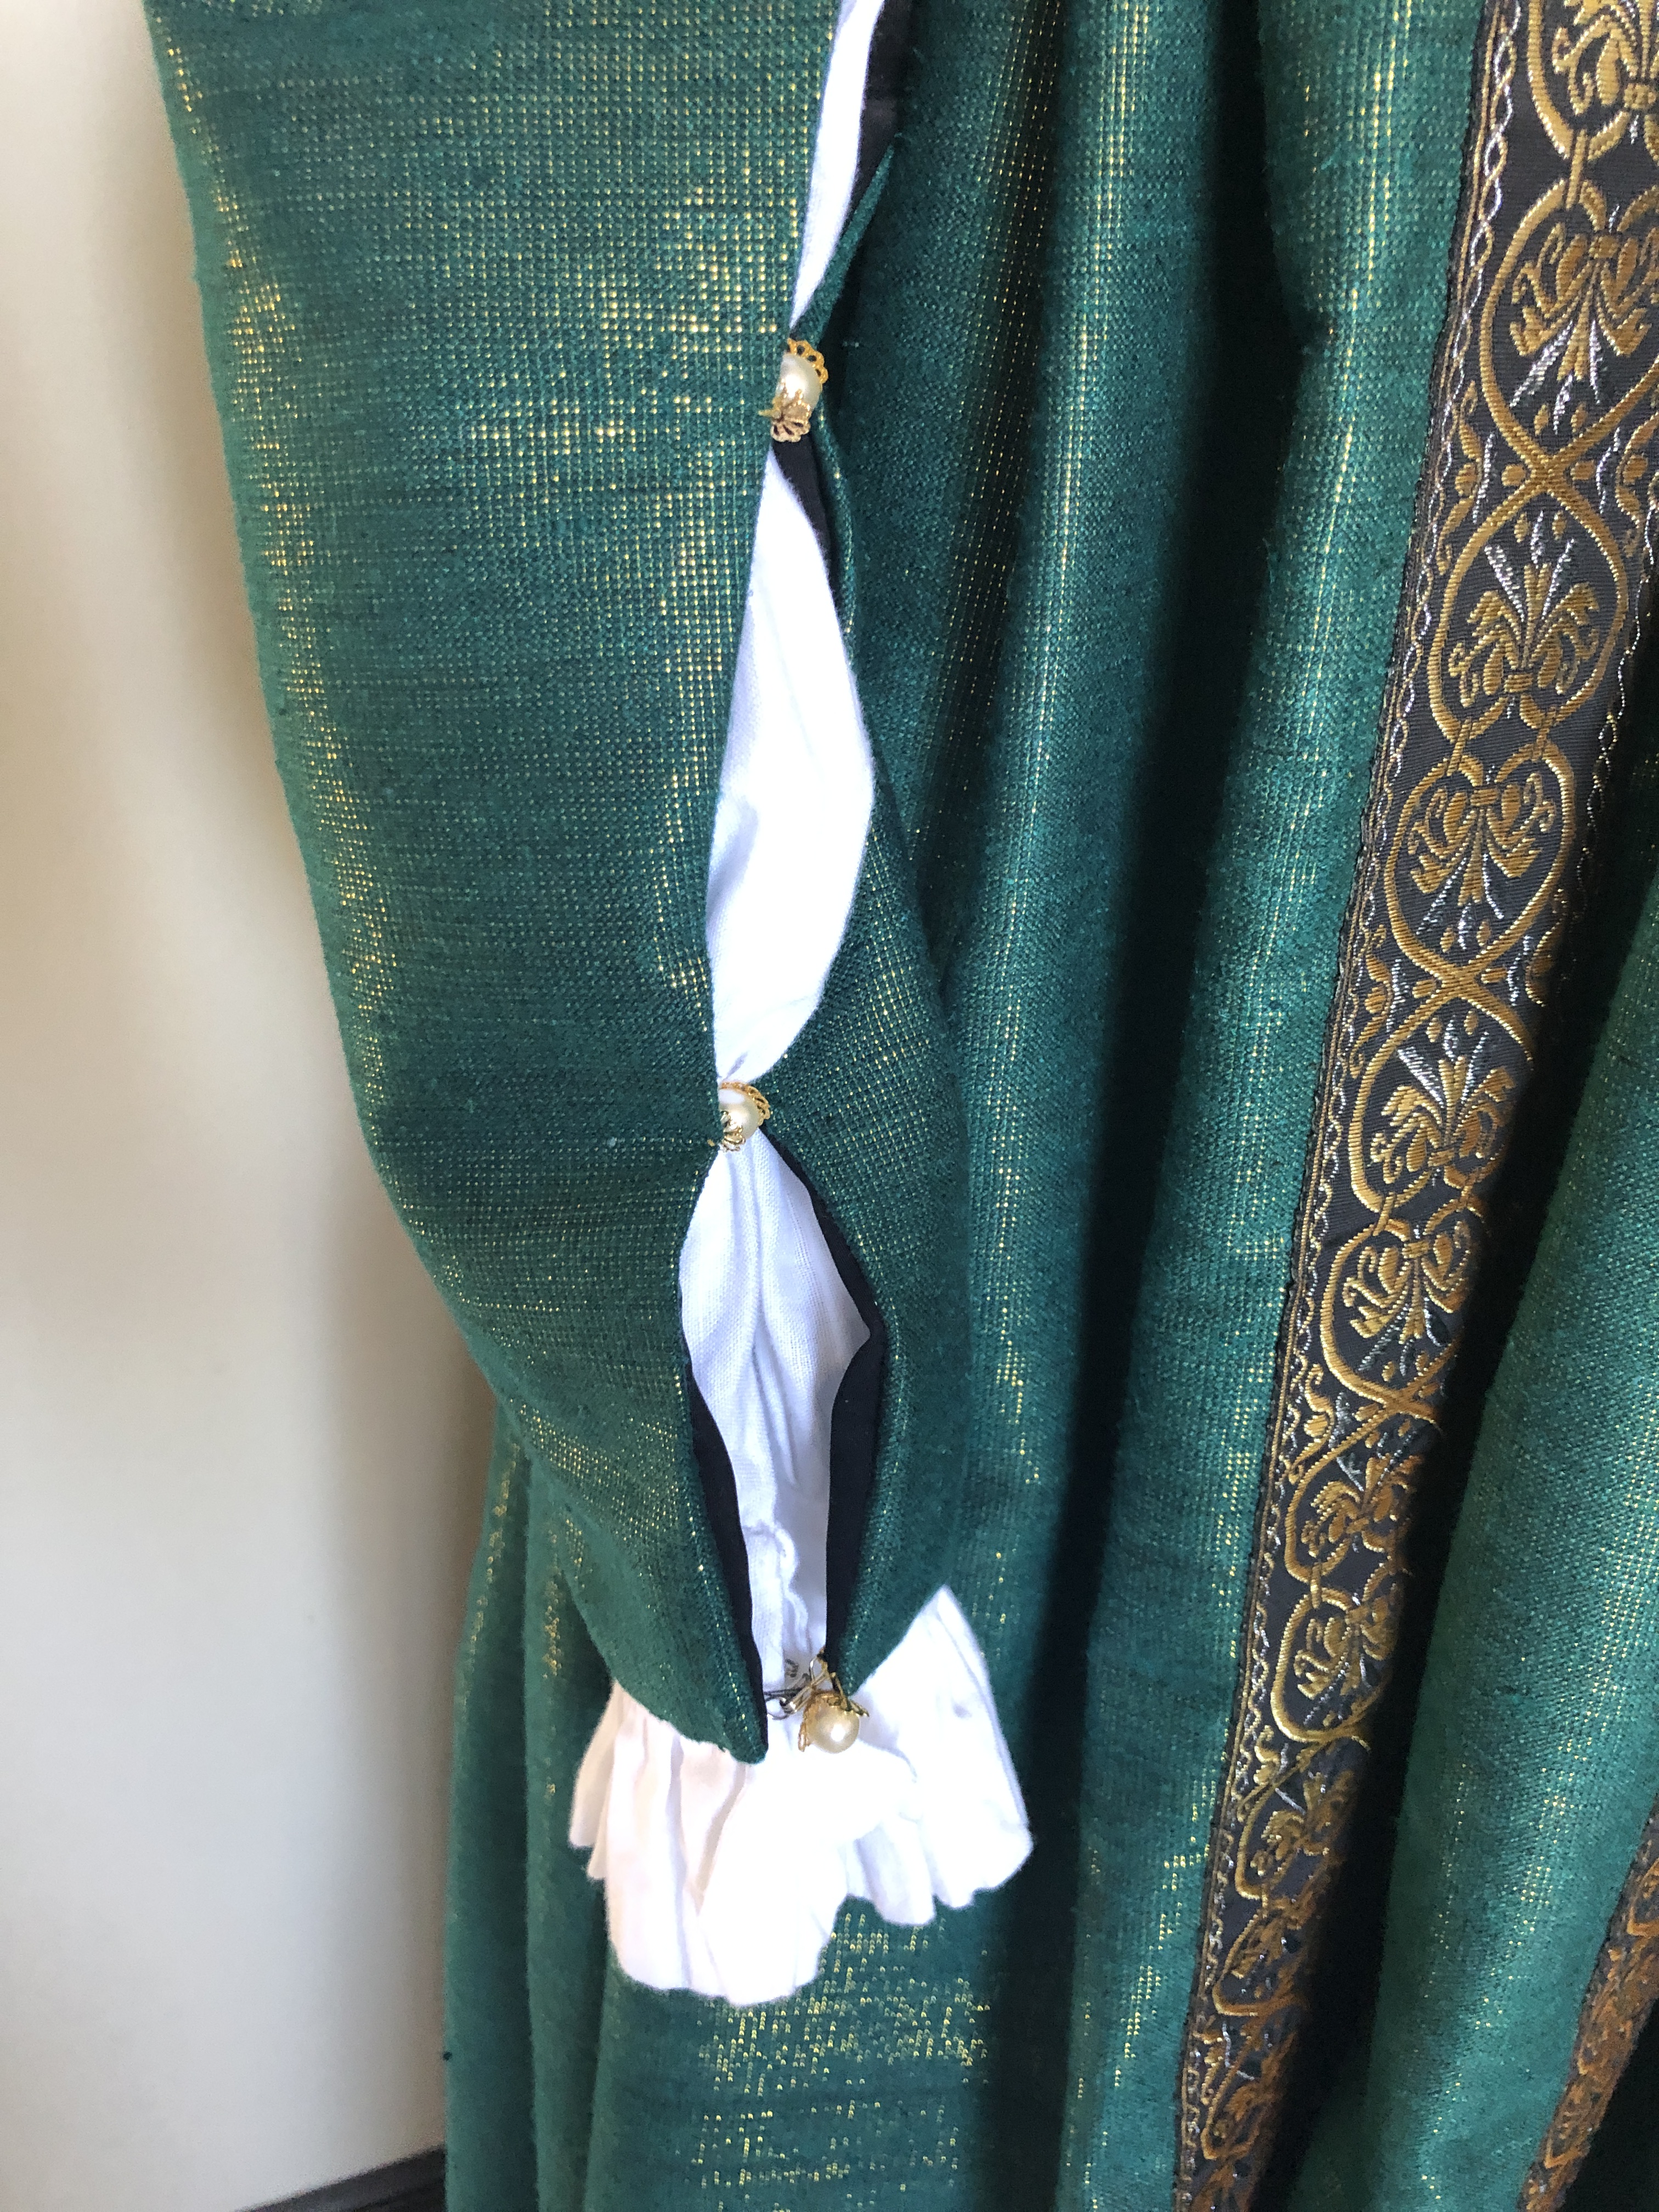
The sleeves are basic sleeve shapes but cut a little loose to allow for the chemise underneath. They are somewhat like tie-on sleeves except instead of ribbons I sewed them at the meeting points with a glass pearl and some gold bead caps.

Underneath the dress I wore a Tudor chemise because that is what I had on hand. (It was also made using a pattern from the Tudor Tailor book). However, at a later point I’d like to make a Renaissance camicia with a different neckline and much fuller sleeves to puff out through the gaps in the green sleeve.

LOKI CROWN

I bought the Loki crown as 3D printed pieces from Parton Prints on Etsy. The horns come as separate pieces for ease of shipping and I glued them on using E6000 glue. After a little sanding, I used a primer that someone recommended to me for 3D printed plastics Tamiya Gray Fine Surface Primer (Amazon affiliate link) I finished up with two coats of Rust-Oleum Metallic Spray Paint in Gold. Originally I used more E6000 to glue on a black elastic strap but decided to cut them off. Instead I used the nubs of those straps as an anchor point to sew on some gold necklace chains both as decorative dangling elements in the front and also as a visible gold band across the back to hold the crown on.

I am wearing a wavy black wig from Amazon (affiliate link) under the crown. I wish my hair was that luxurious! The necklace is a secondhand eBay find.

And here is a video of the dress in action!

I had so much fun pretending to be a villain. Here are a few of the fun TikTok videos I made as Lokizia Borgia:

  1. Transforming into Lokizia Borgia:

2. Asking you to join me in ruling the galaxy:

3. Starting my villain arc:

MATERIALS

  • 5 yards green/gold raw silk suiting from Fabricmartfabrics.com: $52.50 + $9.99 shipping (some left over)
  • 2 yards organza burnout from Fabricmartfabrics.com: $16.10 (shipped with silk suiting, a lot left over)
  • 10 yards metallic jacquard trim from Aliexpress store Lucky Zakka: $9.42
  • Thread, hooks/eyes, glass pearls, lining scraps, paint, glue, etc. from stash/left over from other projects: ~$5
  • Package of 9 mm gold-colored bead caps: $5.90 from Amazon (affiliate link); I have many left out of that 100 pack.
  • Gold chains: $0 (gifted from someone’s destash)
  • 3D printed Loki crown pieces: $32.12 including shipping from Parton Prints on Etsy

Total cost: $131.03 (with about $100 of that in the dress itself).

OTHER RESOURCES MENTIONED IN THE POST (Amazon affiliate links below):

I had a lovely time wearing this to a Sistine Chapel art exhibit with my lovely friend Sara, who took a number of the pictures in this post.

Thank you for reading!

Advertisement

Edwardian Dress at the Monet Exhibit at the de Young Museum (Plus Butterick B6229 Pattern Hack)

Last weekend my local costume guild organized an outing to see an exhibit of Monet paintings at the de Young Museum in San Francisco and I wore a dress made of blue cotton sateen and antique lace.IMG_7850

I had to take photos looking upwards because my broad-brimmed hat created shadows on my face, and I was also trying to hide a splint on my hand, so sorry about the weird poses! It was a bit cold that morning so I wore an antique Edwardian blouse underneath my dress as a guimpe.IMG_7818

I needed a quick and simple dress so I used Butterick B6229, with modifications. I picked that pattern because I was already familiar with it after using it for my Downton Abbey maid costume, and knew it fit.IMG_8004

This is what the pattern looks like before I hacked it.IMG_7539

The 4 main changes I made to the pattern for this dress:

  • I changed the dress from front-opening to back-opening. The front button closures were turned into back hook/bar closures. (Cut the front bodice piece as one piece instead of two, and cut the back bodice piece as two instead of one. Do the same for the skirt panels).
  • The sleeves were shortened. (I cut them off a little below the elbow and turned the edges inside the sleeve. You don’t need to cut the cuff pattern pieces).
  • I cut a square neckline and omitted the standing collar. (I pinned the lace collar and strudel panel on the unfinished dress while it was on a dress form and marked where to cut the neckline).
  • Instead of having the belt go completely around my waist it does not cover the center lace panel. (I shortened the belt and based on my waist measurement minus the lace panel plus seam allowance).

IMG_8013

I am calling this my Strudel Dress because of the slits in the lace panel down the front. I bought the panel a while back and wasn’t sure what to do with it until I realized it was perfect for this dress. I had just barely enough; I literally had 1 inch of lace left over. My shoes are American Duchess Theda Edwardian shoes, aka “Skeletor,” which also have a bit of a strudel-y look to them.IMG_7560.JPG

The Supima cotton sateen I used has a lovely sheen to it, but is a bit thin and prone to wrinkling so I flat-lined all the pieces with cotton broadcloth. In retrospect I should have skipped the flat-lining for a more flowy Edwardian look, but perhaps having no flat-lining would have made the dress wrinkle even more when I sat down.IMG_8006

The dress closes in the back with hooks and bars, and the belt is sewn down on one side and attaches on the other with hooks and bars. The buttons are decorative only. (They were made with a covered button kit).IMG_8018

The collar is antique lace, picked up at the Costume College Bargain Basement.IMG_8007

The “strudel” lace is from a Costume College marketplace vendor.IMG_8008

The antique lace cuffs were a scrap piece left over from my Downton Abbey maid project, and I had just enough!IMG_8015

Dress Cost:

  • 3 yards blue Supima cotton sateen: $13.20 including tax with stacked coupons at Joann’s
  • 3 yards white cotton lining: $12 including shipping from eBay
  • Pattern: $0, already previously used
  • Lace panel: $5.50 from Costume College vendor
  • Lace collar: $1 from Costume College bargain basement
  • Lace cuffs: $0, leftover from other project
  • Lace for buttons: $0, gifted
  • Buttons, thread, hooks and bars: ~$3 from stash, bought in bulk

Total cost: ~$34.20

Woohoo, less than $35 for a dress!

My hat was made from a straw beach hat I already had and I don’t recall how much I spent on it, but they are easy to find. I hot-glued a lot of fake flowers from my stash onto the hat and filled in a few spots with assorted feathers. (Tip: buying a floral garland from the craft store is cheaper than buying individual stems).IMG_7915

Oops, I just noticed that stray thread. I admit this dress was a bit of a rush job. Aside from the closures and hemming, I made the bulk of it in a weekend using a machine and forgot to iron flat all the seams like I usually do.

There was a neat doorway in the garden where I posed for some photos.IMG_7952 copy

And here are some of the other lovely ladies that were there that day. There were many more that I forgot to capture.IMG_7855

Overall it was a lovely day!IMG_7906

1660s Cavalier Dress at Costume College (and Bonus: Hacking the American Duchess 18th Century Undergarments Pattern to Make a 17th Century Chemise)

I now have photos for my 1660s Cavalier dress from official Costume College photographer Andrew Schmidt, as well as a great group photo of the rest of my Cavalier ladies!IMG_4216-(ZF-7662-83598-1-001)

You can see my previous posts about this project under the tag “Cavalier” but if you keep reading I will discuss the things that went wrong with this project, and what I would do differently in the future, so you can learn from my mistakes!IMG_4217-(ZF-7662-83598-1-002)

I am very happy with how our group turned out, with the variety of colors, trimming, and hairstyles. Left to right, back to front: me, Teresa, Cate, Kim, Jessie, and Elizabeth.IMG_4211-(ZF-7662-83598-1-003)

I used the Nehelenia 1660 Baroque dress pattern. This era is completely new to me, and I have no experience with this shape of the bodice, so I followed all the instructions. This included making bound bodice tabs (similar to 18th century stays, seen below) to help distribute the weight of the skirt, and sewing all the bodice pieces of the fashion fabric together before attaching it to the boned interlining.IMG_2904

These steps may be period correct, but created some extra work and issues, so I have some comments about what I would do differently if I made another dress of this style:

  1. No tabs! Anyone who has made stays knows how time-consuming it is to bind them! Since my skirt was a lightweight taffeta, I could have skipped the tabs and pleated the skirt directly to the bodice and saved a lot of time. (I would not recommend this for a heavy skirt like velvet or brocade). Dressing would have been much easier too, since I would have had a one-piece dress to slip over my undergarments. Instead, I had to make sure the front tab was over my skirt, while my back and side tabs were underneath my skirt, while my bum roll was over my bodice back tabs but under my skirt. It took some help getting dressed!
  2. Do not finish the fashion layer before sewing it to the interlining. I had some problems with wrinkling in the bodice. I think it would have helped if I sewed the fashion fabric to the interlining, and then sewed each pattern piece together (the way 18th century stays are made). This would have reduced the wrinkling and wiggling. I talked to someone else at the  Gala who was also wearing a 1660s gown, and hers was so smooth! She said she sewed the bodice the way she would a pair of stays.
  3. Maybe skip the cartridge-pleating. I love tiny cartridge pleats; they look delightful and neat. I am glad I did them for this dress, but for speed in the future I would probably do larger pleats to save time. I ended up spending so much time on them that I was not able to do my eyelet closures before a medical procedure made it impossible for me to sew, and recovery took longer than expected so I had to be sewn into my dress at CoCo! (I can’t remember the last time I showed up at an event without closures, but it’s a humbling reminder that life sometimes intervenes.)

Some of my problems may have been attributable to my use of silk taffeta instead of a thicker silk satin, but I wanted to use what I had in my stash, and the skirt was so light and lovely to wear.

I made the jewelry out of giant acrylic pearls, strung with fishing line. Glass pearls would have been lovely, but very heavy, and since I was going to pin the drape directly to a silk taffeta dress with a silk gauze neckline, I wanted it lighter.

Bonus: Hacking the American Duchess 18th Century Undergarments Pattern to Make a 17th Century Chemise)

I promised a pattern hack in the title, and here it is! This 17th century dress required an off-the-shoulder chemise, which I did not have. I also did not want to draft one from scratch, so I hacked the American Duchess 18th Century Undergarments pattern (Simplicity 8162). This is what the original pattern looks like:8162

Ignoring the ruffles, you have a body panel with a shoulder strap, a sleeve gusset for the underarm, and a square sleeve that is folded to form a tube.IMG_2634.JPG

However, what if you fold down the shoulder strap, shift the sleeve and gusset down, and double the size of the sleeve piece to make it fuller? (Previously you cut a square that became a tube, now you cut a large rectangle that becomes a square).IMG_2639.JPG

This is the shape you get:IMG_2644.JPG

Add a drawstring neckline, and you get an off-the-shoulder chemise!IMG_2648.JPG

Please note, my sleeves are a bit shorter than what you see historically. A proper 17th century chemise would have had much longer and exaggerated sleeves. I made these shorter for several reasons:

  1. I plan to reuse this with other gowns where a billowy chemise sleeve would be inconvenient.
  2. The portrait I am using as inspiration has an exposed chemise sleeve made of finer materials than the linen I used, plus little ribbon ties; thus I made false sleeves that can be attached to my black bodice that will allow for nicer fabric and no need to fuss with tying bows each time I wear it.

So, if you do not have the reasons enumerated above, you should quadruple (not double) the original sleeve pattern into a giant square, not a rectangle.IMG_3853

(Yes, those are green and purple crayons because my child left them next to my computer and I was too lazy to go looking for nicer writing implements).

Final reckoning:  Let’s tally up!

  • 10 yards of 35″ black silk taffeta: $49.90 + $8.75 shipping = $58.65 (Yay for fabulous sales from FabricMart!)
  • Nehelenia pattern: $23.96 including shipping (I ordered with a few other ladies and split the postage from Europe)
  • Lining and boning: $0 (left over from my 18th century stays project)
  • 2 yards linen (for chemise) and 1 yard silk gauze (for bodice neckline): $23.94 including tax and shipping from Dharma Trading (I ordered double that but am setting the rest aside for a different project, so I’m halving the cost)
  • 1 yard silk cotton blend for lower sleeves: $17.99 from Amazon
  • 120 giant pearls: $11.28 from Aliexpress
  • 2 brooches: $5.40 from Aliexpress
  • 2 “small spiral corkscrew” cheerleading/Irish dancing hair clips: $43.11 including shipping from eBay seller american_costumes
  • Ribbon, thread, hooks and eyes, polyfill for the bumroll, etc. from stash ~$5?

Total: $189.33

So the silk was cheap, but all the extras added up! Normally I do not count accessories and hairpieces, but in this case they are very specific to this era and the portrait inspiration, and they’re not very versatile for other eras.

Finally of course, as always, my shoes are American Duchess. They are the Pompadour French Court Shoes in black (affiliate link).

Screen Shot 2017-09-03 at 9.55.04 PM

This was a long post, so thanks for reading!

Regency / Napoleonic Court Gown and Train at Costume College 2017

I received my photos from the official Costume College photographer Andrew Schmidt  so I can show you my complete Regency/Napoleonic court gown and train ensemble!*

* A note about terminology: Technically, English Regency court gowns were a really odd silhouette where you had the high waist but very wide shape, and French gowns of the Napoleonic period had the more columnar shape, so my whole outfit is French style. However, for simplicity in some of my past posts I have been using the term “Regency” because I can wear my gown without the formal court train.IMG_3396-(ZF-3567-92908-1-002)IMG_3397-(ZF-3567-92908-1-003)

I love this view of the back. Thanks Mr. Schmidt for making sure the circle was laid out nicely!IMG_3399-(ZF-3567-92908-1-001)

I have made a number of posts about the construction process of the dress and train and you can find them under the Napoleonic tag on my blog, but I will summarize a few main points here.

For the dress I used the Butterick B6074 pattern, with some modifications (described in previous posts). The dress is made out of a mint green chiffon with white cotton voile lining, and the fancy layer on top is a heavily embellished net with embroidery and several types of sequins, beads, and faux pearls. I had a few questions about whether I used a sari. It is not a sari, but a bridal lace from Fabric Wholesale Direct. Here is a close-up of the fabric before I cut it out:img_0802

For the court train I used the Butterick B4890 Josephine pattern, but I modified it to have straps instead of a bodice back. The train is made with silk velvet, lined with a linen/cotton blend, and edged in a gold-tone netting lace. The front underbust strap is closed with a vintage brooch that I found on eBay.IMG_2362

My pearl necklace and earrings were made by Gloria of In The Long Run Designs, whose Etsy shop is full of beautiful historical jewelry!

il_570xN.1127614541_if7j

Photo by In The Long Run Designs

My regency diadem was made by me using brass lamp banding and faux pearls. (I posted about a party where I made some other diadems here).IMG_2927

This whole outfit was really heavy and became quite uncomfortable to wear by the end of the evening! I’m glad it was worn for only a few hours at the Friday Night Social. The dress is heavily beaded and sequined, and the train is quite heavy too, and unlike a Victorian outfit where I can have a corset and hoops to help support the weight, everything was supported by my shoulders.

Here’s a quick twirling video here where you can see the dress sparkle!

So, what’s the final tally of what everything cost? This was my “splurge” project for the year so it cost more than my usual outfits, but I think this one was worth it!

Dress:

  • 3 yards beaded lace (from Fabric Wholesale Direct): $149.85
  • 3 yards mint chiffon (from FWD): $7.47
  • 3 yards white cotton voile (from FWD): $11.97
  • Thread and fishing line (from stash)

Total = $0 (All the fabric for this dress was a gift from Fabric Wholesale Direct in exchange for a tutorial you can see on their website. Thanks FWD!)

Court train:
  • 6 yards silk velvet (from Amazon, affiliate link): $113.84 (I used 5 yards)
  • 5 yards linen/cotton lining (from Renaissance Fabrics): $32.50 + tax and shipping = $43.59
  • 10 yards lace (from Aliexpress): $34.94 (I only use half, and sold the remainder)
  • Pattern (from eBay): $7.59
  • Brooch (from eBay): $3.84 (yay no one else bid on it)
  • Button cover kit (leftover from another project): $0
  • Button loops (braided from random string I found in my house): $0

Train total = $203.80

Ouch, that’s a bit of a splurge, but it’s not terrible considering I have a lot of huge scraps of silk velvet left over, and can probably make a 1920s dress with some careful cutting, so I can get two dresses out of that price!

Tiara: The cost of this is a little tricky to calculate, because a lot of the supplies I bought in bulk, used to make other tiaras, and shared with friends. I think if you shop right and share with friends you can make one for $30 depending on how fancy you get with beads, pearls, or gemstones. A big part of the cost is buying the brass online and paying for shipping.

  • Brass banding: Etsy or lamp supply stores
  • Faux pearls and head pins: eBay or Michael’s
  • Metal hair combs: Amazon or beauty supply shops

My shoes were Pemberly Regency slippers from American Duchess (affiliate link) that I previously owned. I am also wearing short stays and a corded petticoat (not period correct, but needed to support the weight of the dress).

So in total, this ensemble will cost you about $400 of materials (not including accessories), but represented a little more than $200 out of pocket, with enough leftovers to make a second dress, so not too bad! I try to keep most gowns $100 or less, so this was my “big project” for the year.

I am very happy with how this court outfit turned out, especially how the mint and rose color combination worked together, and how the accessories completed the look. It’s also always nice too when a dress looks good from the back as well!IMG_3399-(ZF-3567-92908-1-001)

1660s Cavalier Dress

The Costume College theme this year is “60s” and the Gala theme is “Dinner at Tiffany’s” so I am making a black 1660s dress with large pearls, inspired by this portrait of Grand Duke Ferdinand II of Tuscany and his wife Vittoria Della Rovere by Justus Sustermans at the National Gallery in London.1660s-probably-grand-duke-2

This is a stash-busting project!

A while back I got 10 yards of 36″ black silk taffeta for $5/yard. With this project my goal was to stay as close to $50 as possible, which meant the other materials had to not only be stash, but what I call “legit stash” (leftovers from other projects). As much as we like to pretend it doesn’t count if you buy it and hide it in the closet for a few years, it still cost money up front. Aside from the black silk I wanted to use things that were already accounted for in the costs of other projects. Luckily I had scraps for lining, reed from my stays, and other miscellaneous materials:

This means not all of the materials are ideal. However, my rallying cry is STASH-BUSTING! Stash-busting

I used silk taffeta for the interlining that encases the boning because I didn’t want my bodice to be too thick, since I will have to add more layers afterward (a fashion fabric that has to be flat-lined to prevent the boning from showing).

Please keep in mind that silk can be rather insulating and warm! I used silk interlining anyway because:

  • STASH-BUSTING!
  • I’m going to be wearing this in the evening and indoors, in an air-conditioned hotel.
  • I feel cold all the time. I promise I’m not a vampire.

I am using the Nehelenia 1660 Baroque dress pattern.IMG_2598.JPG

Please note, this pattern is not for beginners. No boning channels are marked, and you have to figure them out by yourself. I recommend having made stays before you tackle this project, because the bodice is essentially stays with fashion fabric on top.

The pattern calls for about 2.5 meters of fabric for the skirt, which is 98 inches. That is not particularly full. I looked at some other bloggers’ recommendations and Kendra of Demode and the Dreamstress both recommend about 150 inches for a modern frame, even though a smaller circumference was historically accurate. I ended up using 4 panels of 36″ fabric.

Here are some quick progress shots of the inside and outside of the bodice. (The sleeves are still a mess and I have to add eyelet closures down the back and some silk gauze to the neckline).IMG_2601IMG_2603

I have cartridge-pleated about 3/4 of the skirt. My trick to save time marking and measuring is to sewing gingham to the inside and keep it there as a way to make the pleats fuller.IMG_2605IMG_2606

For a “simple” black dress this is proving to be a lot of work (much of it hidden). There is. boning, binding of tabs, cartridge-pleating of the skirt and sleeves, etc. I am having surgery later today so I will have to take a bit of break from sewing and the computer. I hope I can still finish before Costume College!

Beaded Regency Court Dress (Part 3)

I’m still working on the rest of the court ensemble but at least my dress is complete! B.JPG

I didn’t have all my accessories yet at the time so I wore a pearl tiara I had instead of a Regency diadem and did a quick updo. (My next post will be about Regency diadems; I got together with a group of friends for a tiara-making day).D.JPG

You can read Parts 1 and 2 for more information, but to summarize a few details, my dress is made up of one layer of beaded and sequined mesh, an interlining of seam foam chiffon, and a lining of cotton voile. It is made from Butterick B6074 View B, with some modifications:

  • I combined some pattern pieces to minimize seams in the beaded fabric.
  • I skipped the gathered overlay on the bodice which is recommended for solid fabrics.
  • I raised the back neckline about 1 inch.
  • I extended the bottom front bodice about 1 inch since I was not trying to achieve the tiny bodice/pushup bra look.

Note: Butterick B6074 runs large! It has a lot of ease built in for the modern wearer. I recommend going down 2 sizes.

a

For undergarments I am wearing a shift, short stays, a corded petticoat and a ruffled petticoat. I normally would not wear a corded petticoat with Regency but this dress is heavy.

I have decided to go with a rose velvet for the train, and I have been spending far too much time searching for pink velvets, getting swatches, and looking for trim. However, I think we have a winner. IMG_1185.JPG

I still need to order the rest of the fabric and find the trim, but I’ve purchased lining and have the pattern ready. I’m mulling over whether I should use my leftover beads and sequins to decorate the trim, but that may be madness speaking.

By the way, in case you think my life is glamorous, here’s a peek at real life (bad posture, clutter, and photobombing) vs. the cropped version of a selected few pictures for the blog!img_1155

UPDATE:

I wrote a tutorial for this dress, which Fabric Wholesale Direct spiffed and made into this post on their website! 

All the fabric I used for this project is from Fabric Wholesale Direct. Thank you!