RSS Feed

Category Archives: Home Decor

Baby Name Wall Art for the Nursery

A full nursery reveal post will be up later, but for now I’d like to show you some wall art I made for my baby’s nursery. I wanted his name on the wall, but didn’t want to paint wooden letters.

The nursery is loosely based on a woodland theme, so I made the art to match.

 DSCN0055

The gold frames are from the dollar store. I hot-glued dried preserved moss mats directly onto the glass, then hot-glued on the other materials.

The O is a bird’s nest with fake eggs.

Image

The T is a mushroom I made out of red wool felt and white linen.

ImageThe second T is cut out of birch bark.

ImageThe last O is made of sola wood flowers, which are wonderfully light-weight. I think I would like to use them for millinery sometime.

Image

The moss, nest, bark and flowers were purchased from Sav-on Crafts.

DSCN0054

Advertisement

Quick Cushions for a Vintage Rocking Chair

I have this green wooden rocking chair I bought from the Alameda Antiques Fair, 1-2 years ago.

chair1

Now that I will be using it in the nursery and sitting in it a lot more I decided it needed some cushions. My original plan was to buy some padding and cute fabric and make a bottom and back cushion set.

Then I realized, I had materials on hand and didn’t need to spend anything. Free projects are my favorite!

I received a thick block of foam as padding material from an online purchase, and used a pocket-knife to carve off the corners to fit the chair. I also had a pillow that my mom made me back in high school, out of a rice sack. (She liked that it was “AA” brand and said it would remind me to get AA grades). The pillow followed me to college and grad school, and I like the idea of using something from my mom in the baby’s room.

chair2

I was still planning to make new fabric covers for the cushions until I remembered I had some green, king-sized pillow cases in the closet. They came with my bedding set and I never used them because they were not as practical as plain, white pillow cases. Here’s a photo of one of them, with the foam block inside.

chair3

After folding, tucking and stitching excess fabric underneath the cushions, I ended up with a pair of cushions that match the chair perfectly.

chair4

Cute Way to Store Cupcake Wrappers

Cute Way to Store Cupcake Wrappers

I’ve been spending a lot of time on Pinterest. I’ve seen this idea floating around: storing your cupcake liners in a mason jar. It’s neat and tidy, keeps them from being crushed in a drawer, and makes them easy to spot. I added a twist by decorating the lid with one of the cupcake wrappers.

Shoe Closet

As I mentioned in my flooring post, here’s some more details about the extra shelving I built to organize my shoe closet.

closet

(The little gold things on the floor are hinges and a lock for the crawl space).

The top shelf was already in the closet when I moved into the house. It was so handy it inspired me to make a row of shelves for extra storage.

I measured the width of the closet, then went to Home Depot to get boards. Originally I planned to buy plain boards and paint them white, but they already had white composite wood shelves. They were nice enough to cut them to the shorter length I needed, which saved me some sawing at home! (Plus I don’t have an electric saw, which would have made trimming the composite tricky).

The boards are held up with L-shaped shelf brackets. It took a while to measure and drill holes that were level, but not a difficult project overall, and a great way to organize your shoes.

I would have liked to put more shelving on the sides of the closet (for an epic shoe display!) but the stud finder told me that there was electrical wiring on those walls and therefore unsafe to go exploring with a drill bit.

About the shoes: It’s taken me a while to build up this collection. I haven’t changed shoe size for a long time, and I take good care of things, so some of the shoes you see are years old. Since I started doing historical costuming I’ve had reasons to accumulate even more, especially since I discovered all the beautiful things at American Duchess, my current favorite shoe company!

Confession: The closet is never this neat and spacious. I took this photo right after installing the floor, and before I moved all the coats and folding chairs back inside.

Bon Voyage! (Retro Suitcase with Vintage Luggage Stickers)

Shortly before Christmas I got a new suitcase, which came in handy for holiday travel. I decided to jazz it up by making my own “vintage” luggage stickers.

Image

I’ve been wanting a retro suitcase for a long time, but kept running into very expensive reproductions, or antiques in poor condition. I was so happy when I found this particular suitcase on eBay. It has the old-fashioned look I wanted, with the convenient modern wheels and retractable handle. Plus bonus combination locks! Here’s what it looked like before I went to town:

Image

You can buy reproduction luggage stickers but I printed my own. (I have a HP color inkjet printer, so nothing terribly fancy). I found various images online, re-sized them, and them printed them on regular white office paper.

Image

I cut each one out with scissors, then used Mod Podge to glue them onto the suitcase. I also put on another layer of Mod Podge after it dried to seal it in. (If you have printable sticker paper this would speed things up, but I didn’t have any on hand).

Image

I also put stickers on the back.

Image

And a side shot:

Image

I also love the interior of this suitcase! It’s lined with a soft, creamy faux leather that is much nicer than the other suitcases I’ve had.

ImageThe interior pockets and snap straps were perfect for holding my iPad.

ImageNow I want to get a smart tweed suit and pillbox hat, put on some sweet shoes and ladylike gloves, and go flying!

New Year, New Floor! (Style Selections / Novalis Vinyl)

We redid the flooring in our living room. It’s something that I have wanted to do for a long time, so I’m very pleased that I finally have a shiny new floor that’s easy to clean. Plus it was inexpensive, but more on that later. =)

My house was built in the 1980s and had a composite flooring material that looked like fake wood planks. Unfortunately, whatever the top layer was had started to chip, discolor, and wear away in patches. The floor was highly scuffed and scratched.

Image

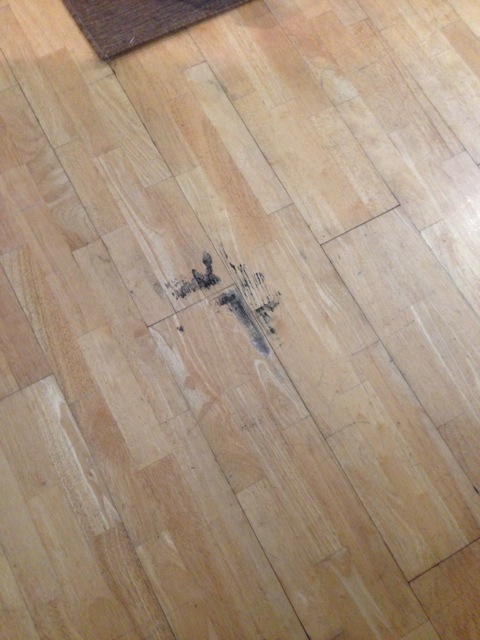
It also had some mystery stains that I could not get out.

Image

I started to suspect they were actually scorch marks because there was some slight bubbling in the finish.

We didn’t want to spend a few thousand on a new hardwood floor, or deal with the mess of ripping up all the old boards. I did some research online and found a lot of good reviews for the Style Selections vinyl plank flooring at Lowe’s. (The older reviews call it Novalis Peel and Stick).   At first I was skeptical that the vinyl would look like cheesy printed plastic sheets, but after taking a look in person I was sold.

We used the “Style Selections 4-in W x 36-in Luxury Vinyl Plank” in the “Golden Oak” color. (There were also lighter and darker shades at the store but I felt this was the most realistic-looking). The surface was textured with a wood grain pattern.

Best part? It’s peel and stick! That meant I could lay it on top of my existing floor. Also, instead of moving everything out of the living room I could shift the furniture around as I worked.

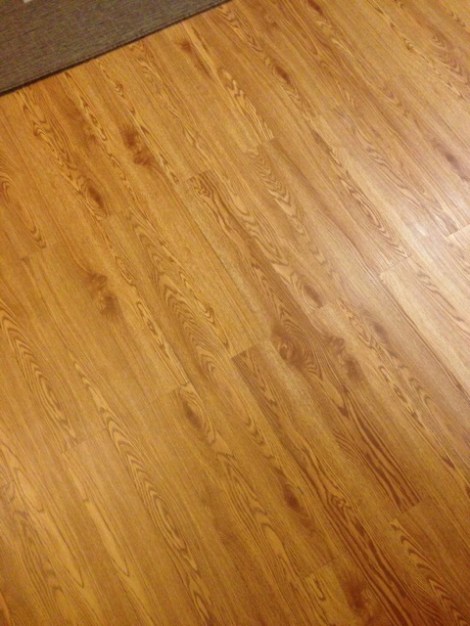
Here’s an in progress shot to show the difference between the new flooring (on the left) and my old flooring (on the right).

Image

I apologize for the funny lighting. I took these with my iPhone at night, because that’s when I did a lot of the work!

The vinyl is about 2 mm thick and thin enough to cut with sturdy scissors or an Exacto knife. This was good because I had to cut some rather oddly-shaped pieces to go around door frames.

Image

Putting down the pieces in the middle of the room went very quickly, but going along walls took more time than expected due to the fact that I had to cut very specific shapes. The living room is a central hub, with entrances to multiple rooms, which meant lots of doorways. My husband had to cut and nail down a lot of carpet bars! Here’s a doodle I made of the irregularly-shaped room before I went to buy supplies.

Image

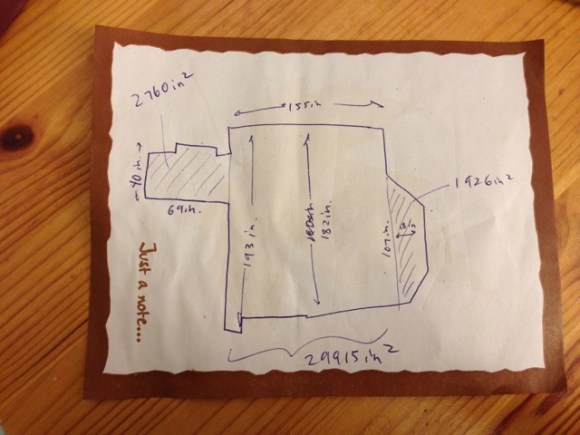
(That’s my desk, not the floor).

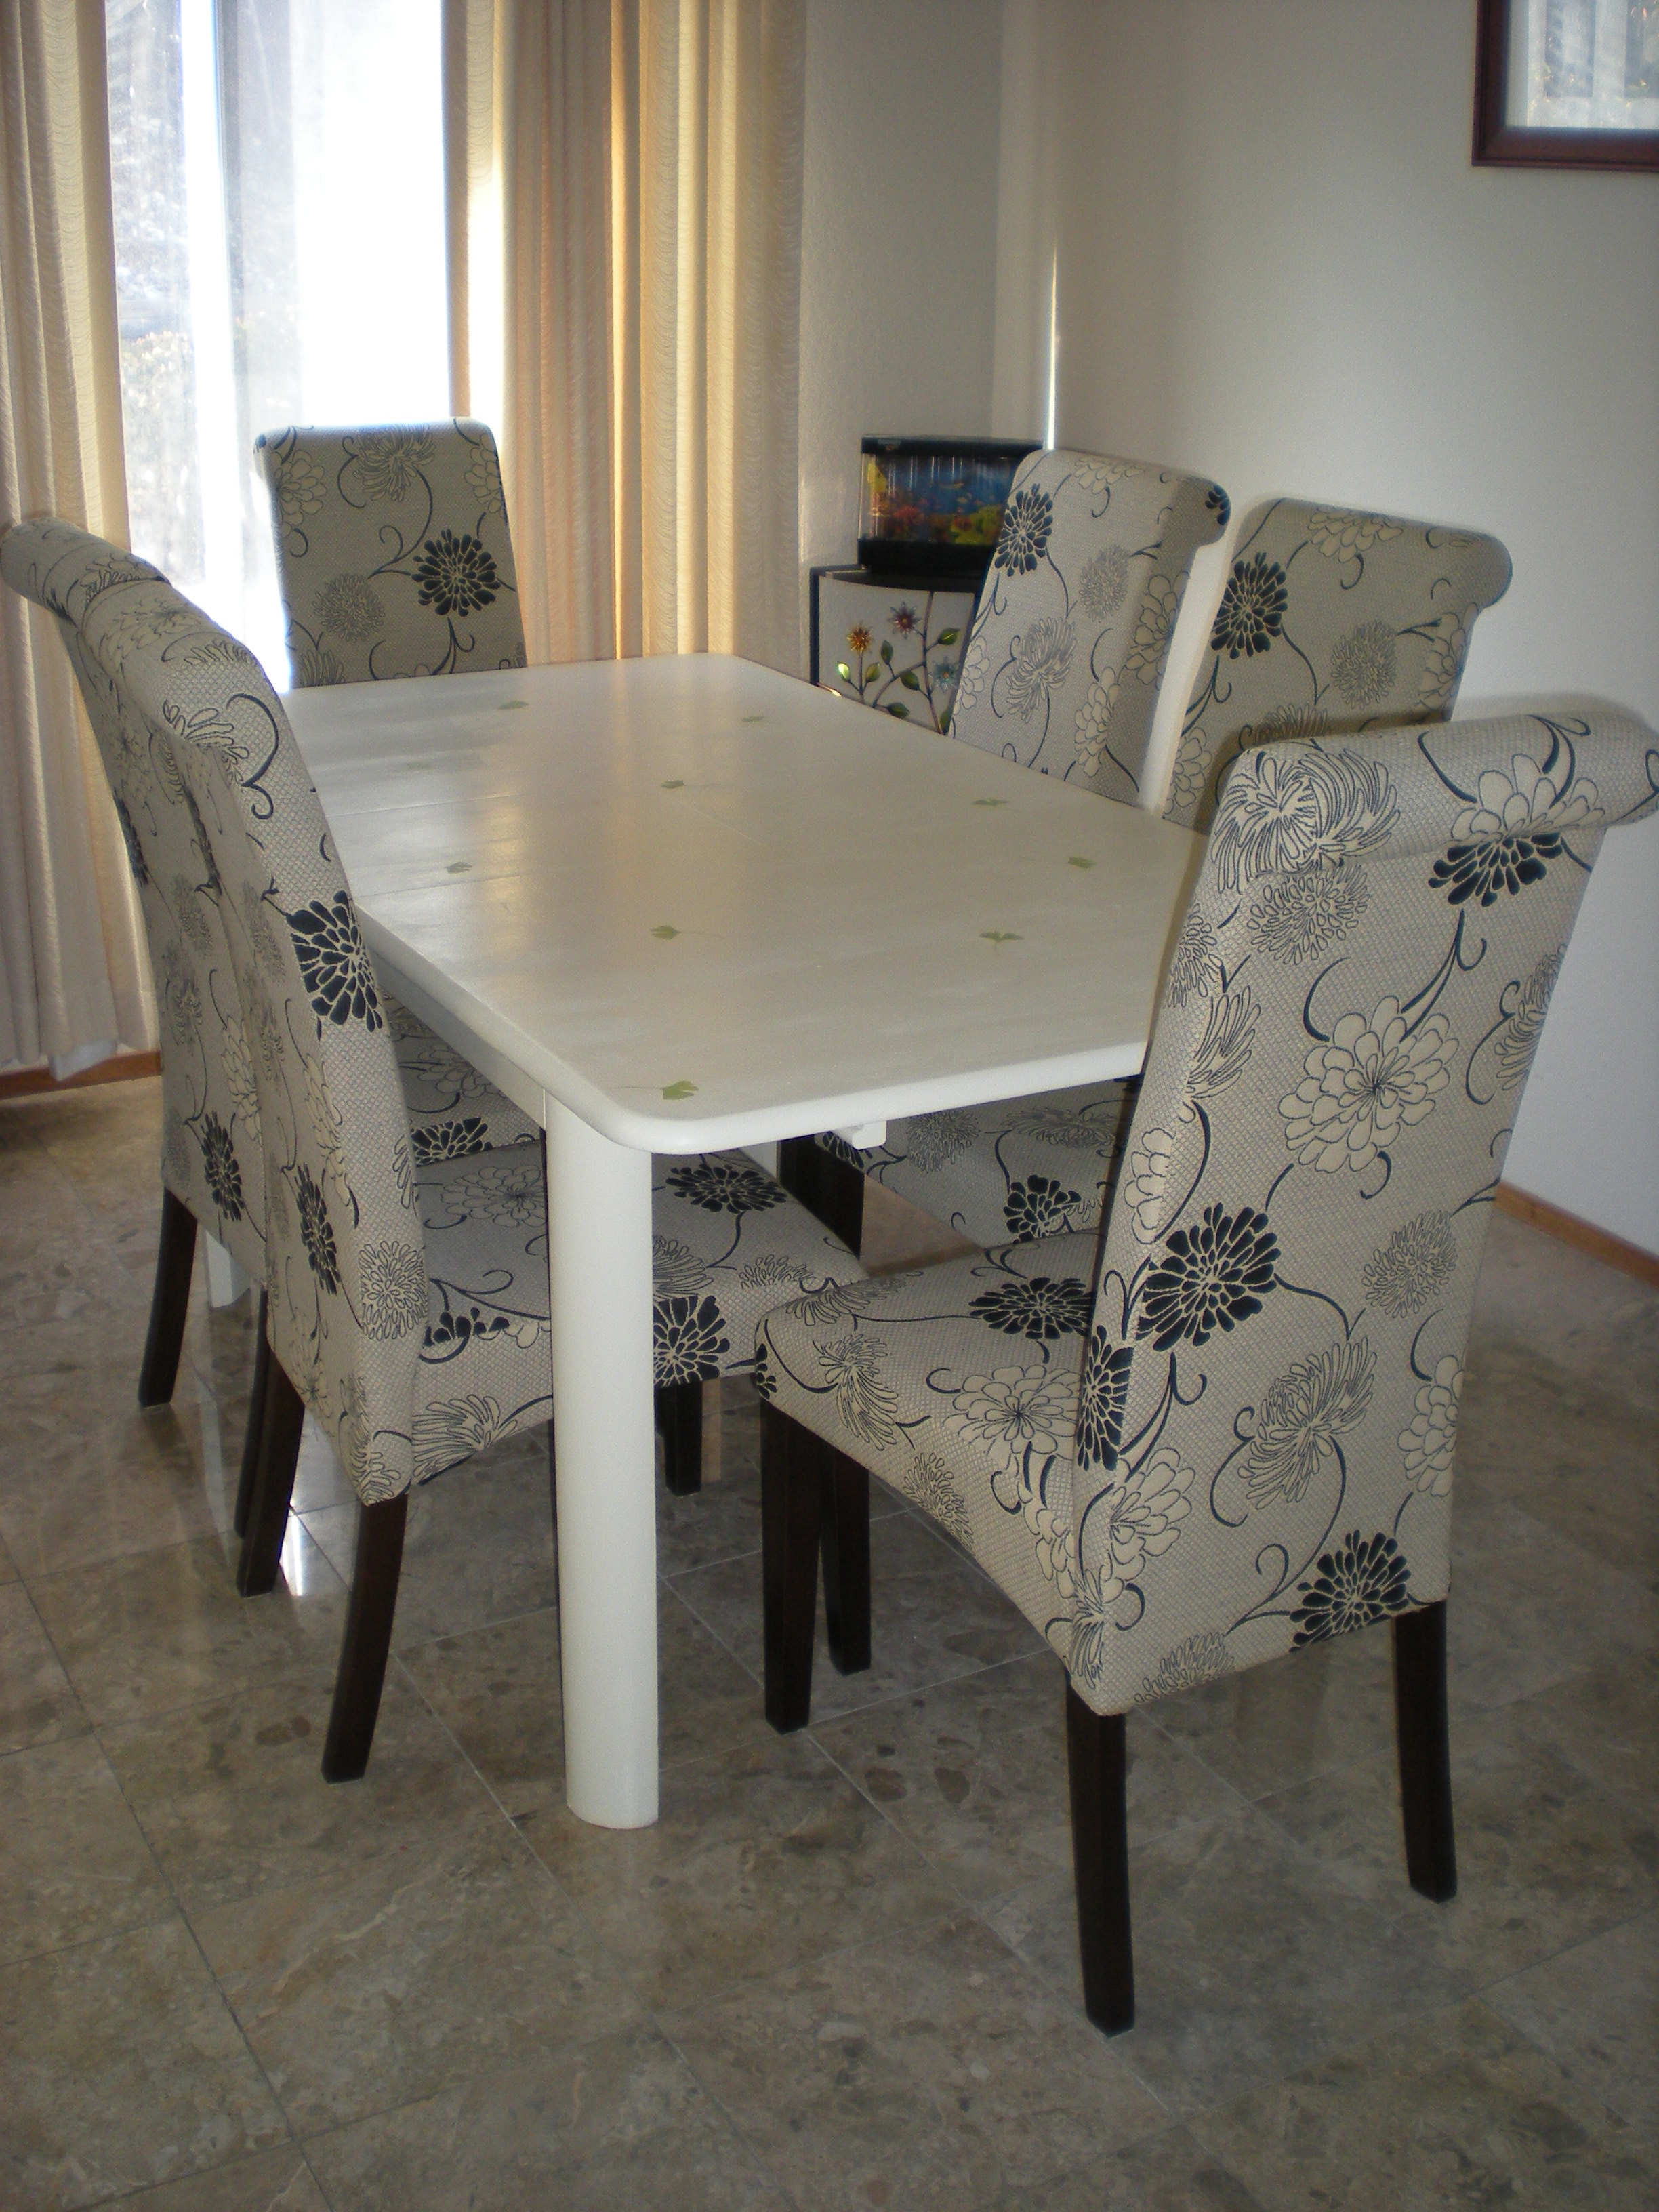
I don’t have a picture of a big empty room showing all the flooring at once, because I never had to take out all the furniture. Here’s a shot of the finished area shown in the progress photo.

Image

We have had a number of visitors who were impressed by how much it looked like real wood.

Image

It took two of us several days (not working the entire day). If you had a square room without a lot of doorways I think you could get it done in one day with some help.

Lowe’s sells the planks in singles or boxes of 30 planks. I bought an extra box just in case we made mistakes or miscalculations, but ended up having enough to redo my closet as well!

Image

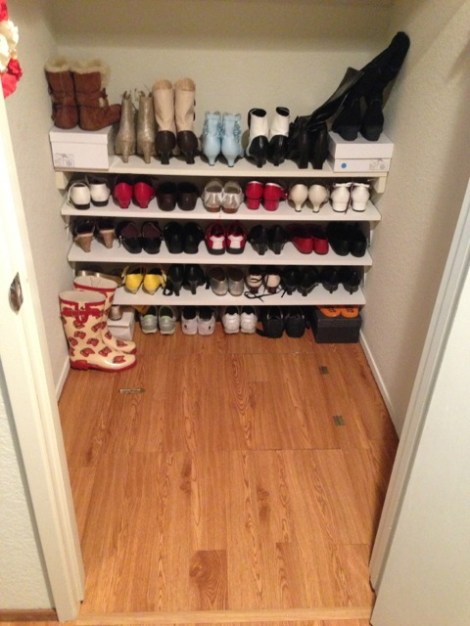
I’ll discuss the closet more in a later post, including how I built the shelves.

A few tips:

– Since it’s plastic and can expand slightly due to temperature fluctuations, leave the boxes in the room you plan to do the installation in for 24-48 hours beforehand.

– Vacuum and mop thoroughly before and during the installation. The boards won’t stick very well if there’s dust. My husband and I also went over each area with a rag right before putting down a board.

– Buy knee pads! You can get cheap foam ones for $5/pair but do it!

– Go over the planks with a heavy rolling pin and also shimmy around on top with socks to make sure they stick well.

– Some of the reviews I read recommended putting down a floor primer first to improve the stickiness. I didn’t use it because my floor was already pretty smooth, but I think it would have been good for the closet, which was plywood.

So, what did all this cost?

The planks were 98 cents each (per square foot). I bought 270 of them, plus 2 pairs of knee pads. I also had a 10% off coupon, and a gift card I purchased at a discount. I spent $252.04 at Lowes, plus about another ~$65 at OSH buying 3 faux wood transition bars, 1 gold metal carpet bar, a metal stair protector and a hack saw.

About $300 for a brand-new living room and closet floor that looks like it cost a lot more? Yes!

Mod Podge Hedgehog Tray

I haven’t been posting any large projects because I’ve been busy with a special house fix-up (which you’ll see in a later post).

This is a quick project I did last night: hedgehog tray!

Image

This is a very easy craft to do with some Mod Podge (glue and sealant). I got the tray for free because it was a little banged up. The cute hedgehog paper I bought from Paper Source.

Image

Using a foam brush put a thin coat of Mod Podge on the tray. Put another thin coat of Mod Podge on the back of your paper and then lay it on top of the tray. You can use a roller to eliminate bubbles. Wait 15 minutes, then put another thin coat of Mod Podge on top as a sealer. (It looks like white glue but will dry clear). I put on 2 coats of sealer.

I love hedgehogs! I wish they were legal to own in California.

Image


Painting an Old Table to Look Like New

Image

I have a dining room table that I received for free. It was very scuffed and stained so I always used it with a table cloth.  Recently I painted it a cream color.

This is what it looked like before.

Image

Image

I used Zinsser primer (~$10/quart) because the back of the can said it was suitable for glossy surfaces.

Image

I used Rustoleum Painter’s Touch (~$9/quart) as the surface paint because there was a picture of furniture on the front of the can, and figured it was okay for furniture. I put in a few squirts of mustard-colored craft paint to make the paint more cream-colored. Yes, you can mix latex and acrylic paint!

I used only about half of each can so there’s enough for another project.

Image

Originally I was going to use a stencil to make damask patterns on the table but then decided it was rather busy-looking. Instead I painted some little gingko leaves using green paint I already had on hand.

Image

Image

I also spent about $10 on a pack of painting tools from Home Depot and $4 for a sanding sponge that I barely used.

Image

Image

It was a few hours of work but much cheaper than buying a new table!

Image

Fall Decorating

It’s October so I can officially decorate for fall. I removed the plants from my kitchen window and replaced them with a pumpkin coach display.

Image

The metal pumpkin was purchased from Collections Etc. and the fake grapes and grape leaves are from the local dollar store. Everything else is real. Inside the coach are 7 gourds from Target and several items from my yard (1 bumpy squash, 2 pomegranates, some berries and flowers from an unknown bush).

Image

I like that the wheels have a mottled black and orange color.

Image


Button Tree Pillow

During my recent jury duty I worked on this button tree pillow while in the waiting room.

Image

I sewed the buttons onto the linen at the courthouse, and then added the trunk and pillow back at home. (I found the printed cotton from a rummage sale years ago).

I slipped the cover over a pillow I already had and hand-stitched the bottom closed.

I got the idea from BHG.com.

Image


I think the BHG one is really nice because the tree is fuller, but that was way more buttons than I wanted to sew on by hand. Plus, I only had a certain number of green buttons.

I wanted mine to look like an apple tree so I mixed in some red buttons. Here’s a close-up!

Image

And a side view.

Image

I already had all the materials on hand so hooray for using up more stuff from my craft supplies stash!