Tag Archives: crafts

Regency Diadems

The Napoleonic era is filled with gorgeous golden diadems, studded with coral, pearls, gemstones, or lovely cameos. What court outfit is complete without a tiara?

This garnet diadem was sold on Ruby Lane.Screen Shot 2017-03-10 at 7.28.31 PM.png
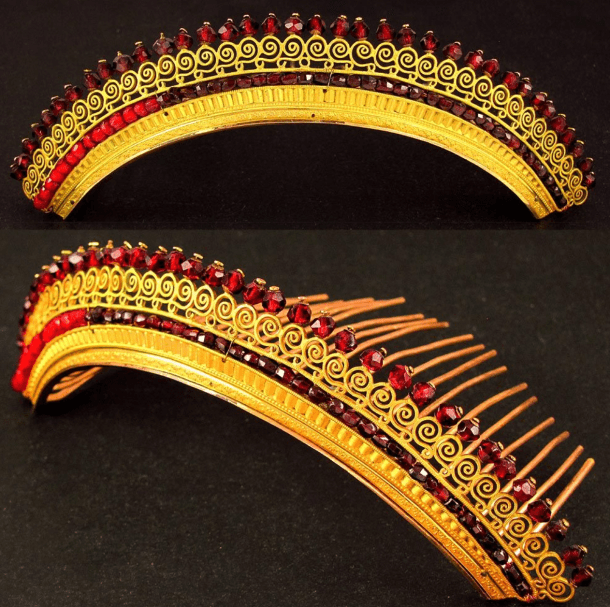
This coral diadem made from gilded brass from A. Brandt is very elegant.Screen Shot 2017-03-10 at 7.23.31 PMScreen Shot 2017-03-10 at 7.23.51 PM

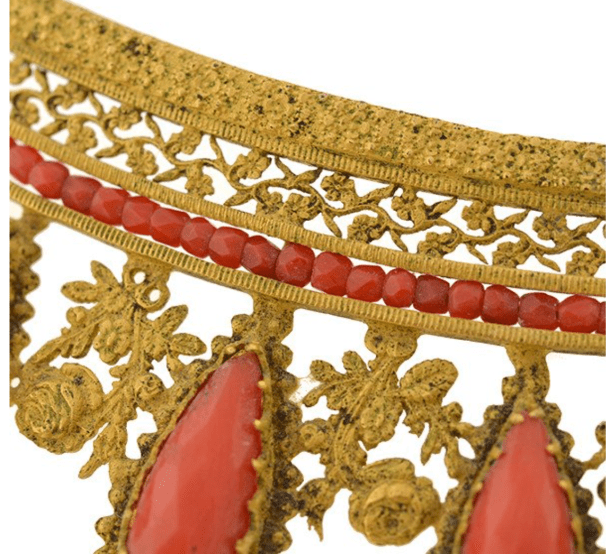
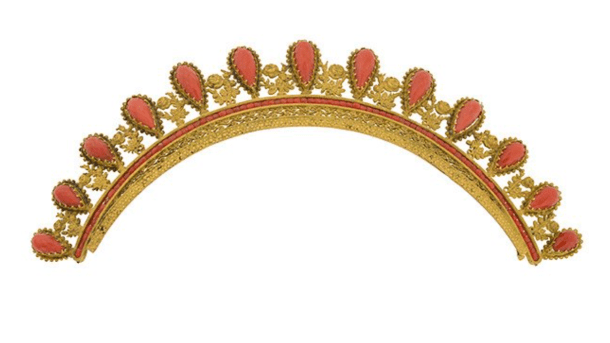
Here is a beautiful cameo tiara sold by Sotheby’s that inspired me to want my own.Regency2

This parure (matching set) that belonged to Caroline Bonaparte is stunning!Regency

Last month, I hosted a group of friends and we decided to try our hand at making our own, using this great tutorial from the Mistress of Disguise, for a Regency Tiara Making Day! Behold, crafting chaos.IMG_1157.JPG

We bought materials from a variety of places, including Michael’s,  Joann’s, and eBay for beads and wire; Hobby Lobby or Amazon for brass sheets and metal combs; and Whittemore-Durgin, Etsy, and Ebay for our brass lamp banding. It’s hard to say how much it cost to make each one, since some things were bought in bulk and we did a lot of sharing. Here are our tiaras!IMG_1159

There was some trial and error, and things we learned during the process:

  • Soldering looks better but hot glue is much faster than soldering, especially when you have a group.
  • High-temp hot glue is required; the mini glue guns used for crafting don’t stick as well.
  • Big tin snips instead of small jewelry snips are better for cutting through the brass banding. (Regular scissors can cut through the brass sheets).
  • If you have tarnish on your brass, use Simichrome polish.
  • Wiring metal combs to the diadem is more sturdy than gluing metal or plastic combs.

Here are my “practice tiaras.” They are not perfectly straight and there are some little issues I’d like to work on (such as the thickness of the brass, the overall proportions, and remembering to push the head pins down before the glue set!) but they were really fun to make and I want to make more! I’d like a thinner, more delicate pearl one, and a pink coral one to go with my court gown.
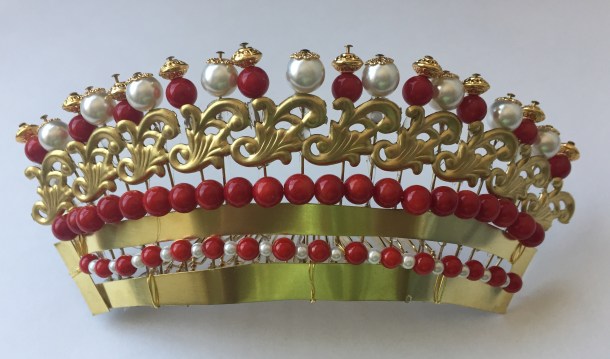
IMG_1258IMG_1261IMG_1266IMG_1264

Handmade, DIY & Vintage Woodland Themed Nursery Reveal

I mostly finished the nursery months ago, but haven’t posted because there was one last piece of artwork I wanted to hang. A friend sent a beautiful handmade card that I framed, but I had very limited chances to hang it because hammering into the wall when the baby sleeps is not a good idea.

Most of the items in the room are handmade, modified or vintage, so that the baby could have a unique room (without too much expense).

Here is an overview of the room as you walk in.

DSCN0018

The rocking chair is vintage, and I made the chair cushions. I also made the toadstool footstool.

DSCN0025

The nightstand is from Ikea, the elephant hamper from Home Decorators, and the Carter’s Forest Friends lamp and blue baby box were gifts.

DSCN0020

I used decals from eBay on the door, closet doors and walls.

DSCN0039

DSCN0022

The wall art was made by me to spell out my baby’s name.

DSCN0054

I made the fabric birds using scrap fabric. Originally, I had them all hanging on a large vine wreath, but it was so heavy I did not feel comfortable suspending it from the ceiling. I got the pattern from Spool Sewing.

DSCN0023

I made the tree stump ottoman, and should make a construction how-to post later on.

DSCN0029

It works triple-duty as a table, extra seating and hidden storage for toys.

DSCN0031

The cushion covers and button tree pillow were sewn by me. The Martha Stewart storage bench and fabric bins are from Home Decorators.

DSCN0032

The convertible crib with attached changing table and dresser are from Target. Later on, the crib parts reassemble into a toddler bed and full-size bed.

DSCN0033

I painted the drawer knobs with mushrooms.

DSCN0035

The laser-cut bamboo clock is from Decoylab and was used in my sewing room. If I was buying from them now I’d get the hedgehog clock for the nursery.

DSCN0037

I made the curtains and tiebacks from gnome fabric. I love the print, but the cotton wrinkles so easily.DSCN0042

I have a second set of green thermal curtains (purchased from Target and hemmed by me) so I can control the lighting in the room.

DSCN0043

The hot air balloons in the corner were another craft project of mine.

DSCN0045

The mushroom light switch plate cover was purchased from eBay. (Can you tell I really like mushrooms?)

IMG_0663

And finally, the card from my friend, which is made of different colors of paper glued to cardstock.

hedgehog

Some Project Summaries:

Baby name wall art: https://freshfrippery.com/2013/12/20/baby-name-wall-art-for-the-nursery/

Rocking chair cushions: https://freshfrippery.com/2013/11/22/quick-cushions-for-a-vintage-rocking-chair/

Mushroom pouf (toadstool footstool): https://freshfrippery.com/2012/06/08/toadstool-footstool-mushroom-pouf/

Deer bench pillow covers: https://freshfrippery.com/2013/07/21/fabric-covers-for-storage-bench-cushions/

Button tree pillow: https://freshfrippery.com/2012/09/08/button-tree-pillow/

Hot air balloons: https://freshfrippery.com/2012/07/23/hot-air-balloons/

Fabric Covers for Storage Bench Cushions

This weekend I finished making fabric covers for my storage bench cushions.

ImageI got the Martha Stewart storage benches and bins from HomeDecorators.com during a sale last Thanksgiving, but thought the accompanying cushion on top was a little too plain. (It is the same beige color as the trimming on the fabric bins).

ImageThe cute deer fabric is from the Woodland Pals collection by Robert Kaufman. I purchased it at Stonemountain and Daughter in Berkeley.

I cheated by faking seams to minimize cutting. The edges you see are really one continuous piece of fabric pinched together and sewn on the blank side, instead of 2 pieces of fabric sewn together. This makes me look a little better at pattern-matching than I really am.

ImageBasically I ended up with a tube that slipped over the cushions, and then I tucked the edges in the same way you would wrapping paper on a present. The sides were then sewn down by hand.

This was a quick project that required only 2 yards of fabric, and I had a gift card, so the total cost was $0 out of pocket.

Right now the bins hold sewing patterns and other things, but will make a great reading nook and toy storage for children later. =)

Cream and Blue Gloves and Coat

Image

5 minute project: Pretty up an old pair of cream vintage gloves by sewing on ribbon roses from my craft stash.

I think these will go nicely with the blue wool coat I made a while back.

Image

When I made the bustle back I thought it’d be cute, but didn’t realize how heavy all those layers of wool would be! I have to wear a strong petticoat underneath (which I did not have when I took these photos).

Image

The tricorn was made by Lily of the Valley Designs.

I used several kinds of venise lace, a striped taffeta lining and little heart buttons.

Image

Image

Why yes, that is the same wool as my riding habit, which was made from the leftovers from this coat.

Hot Air Balloons Are Up / Jules Verne Bathroom

My hot air balloons are now installed in the ceiling of my sewing room. (See my previous post here for more construction details). Originally I planned to put them in my bathroom but when my husband was about to start drilling holes in the ceiling he realized there was a lot of electrical wiring in the place where I wanted to hang the balloons.

Oh well, change of plans!


Putting balloons in my sewing room throws a slight wrench into my plans to redecorate my bathroom with a Jules-Verne theme. I wanted airships, submarines and other things inspired by 20,000 Leagues Under the Sea and Around the World in 80 Days.

I’ve been posting ideas on my Pinterest board but it looks like I will have to figure out another way to do hot air balloons without ceiling holes.

Hot Air Balloons!

I haven’t been working on my riding habit recently because I have been distracted by hot air balloons.Image

Here they are hanging on my thread spool rack until I can string them up with fishing wire. I plan to have my little fleet dangling from the ceiling of my bathroom.

More details behind the jump.

Read the rest of this entry