Category Archives: Halloween

Victorian/Edwardian Pumpkin Witch Costume

For Halloween I made myself a Victorian/Edwardian-inspired mashup witch costume. I got large amounts of sari fabrics rather cheaply from a local person after they were used as party decorations, and even after distributing most of it to friends I still had a lot left over, and decided they were perfect for a bright Halloween witch. Since this was a costume I didn’t worry about combining details from various decades.BZWR0824

The skirt is a basic pleated two-panel skirt with seams on the sides. One seam has a pocket and the other has an invisible zipper. Since the sari is thin and I had so much of it I flat-lined it with more of the same.IMG_3705

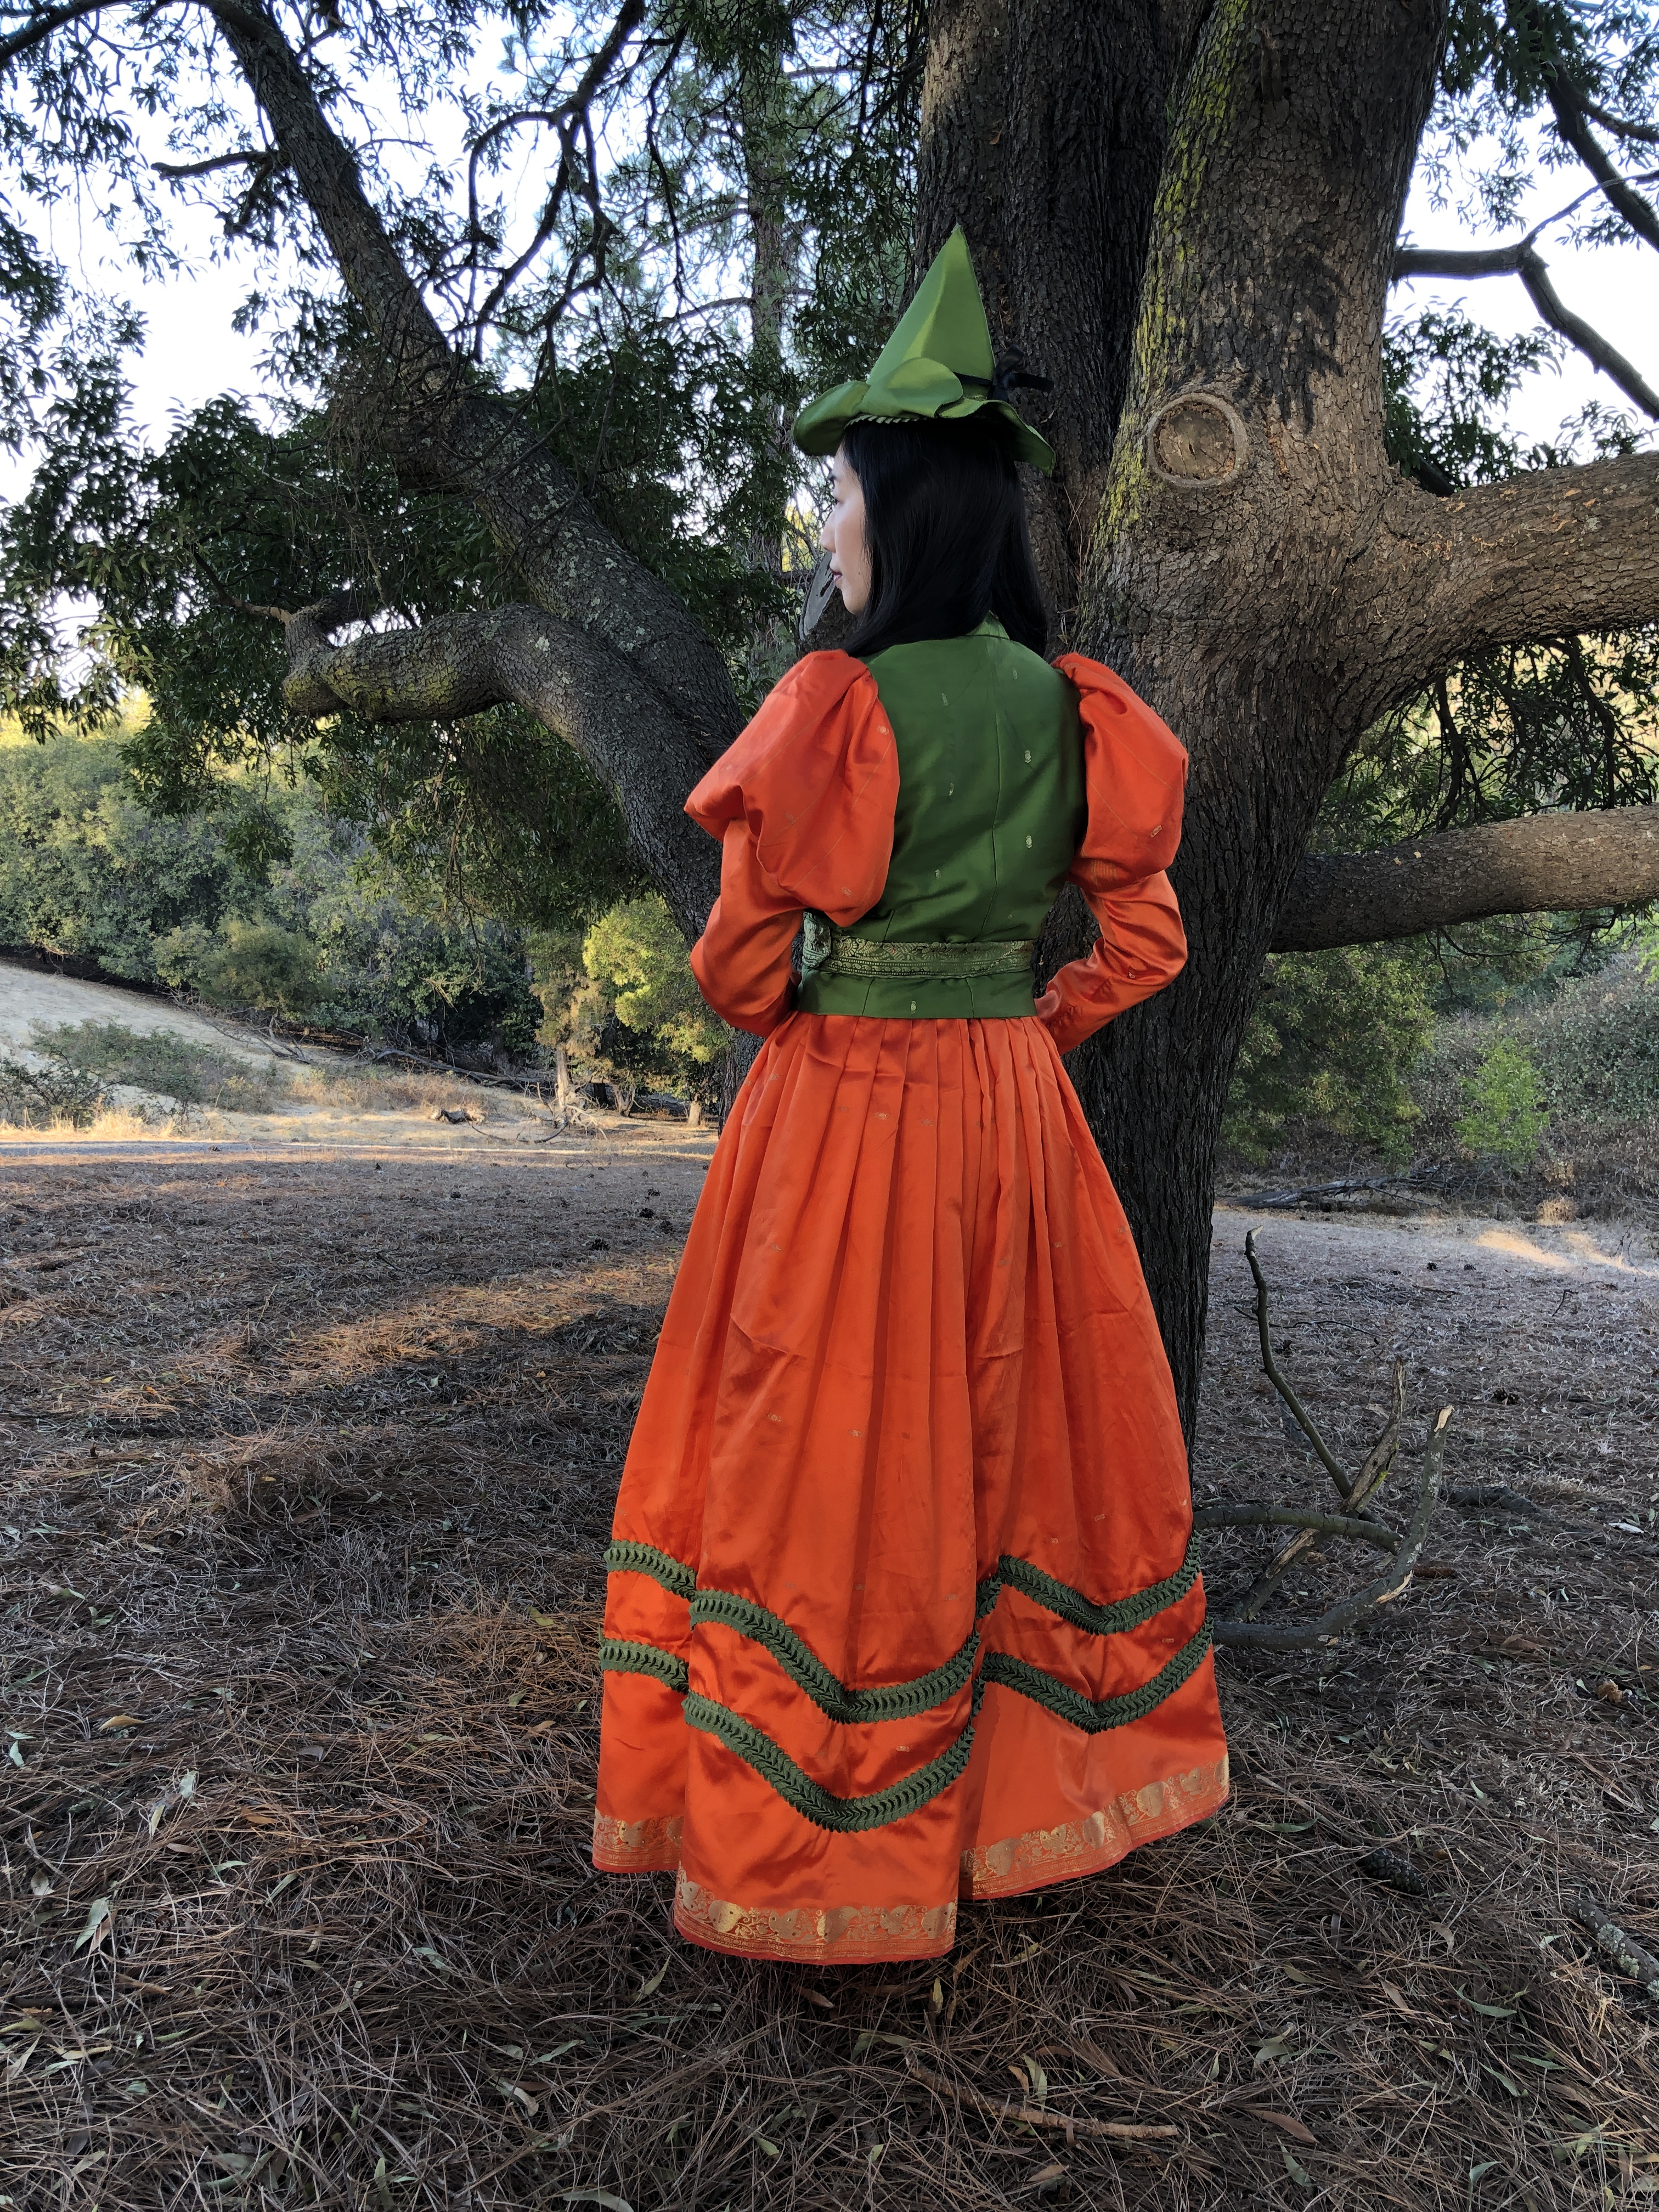
The blouse and vest patterns are both from Black Snail Patterns on Etsy. They are the 1890s Late Victorian Day Blouse/Bodice and 1890s Edwardian Ladies’ Vest. Because this was meant to be a Halloween costume I took a “theatrical” approach to the construction and skipped a lot of the detailed and historically accurate instructions in the patterns such as creating facings, boning, etc. so I cannot comment on those. As usual, I did find the pattern pieces to be well-drafted and needed very little adjustment.  My biggest cheat is I sewed the sleeves from the blouse pattern directly to the vest to make one garment. This saved me a lot of time, and also made the costume less warm with less layers!XWJE4219

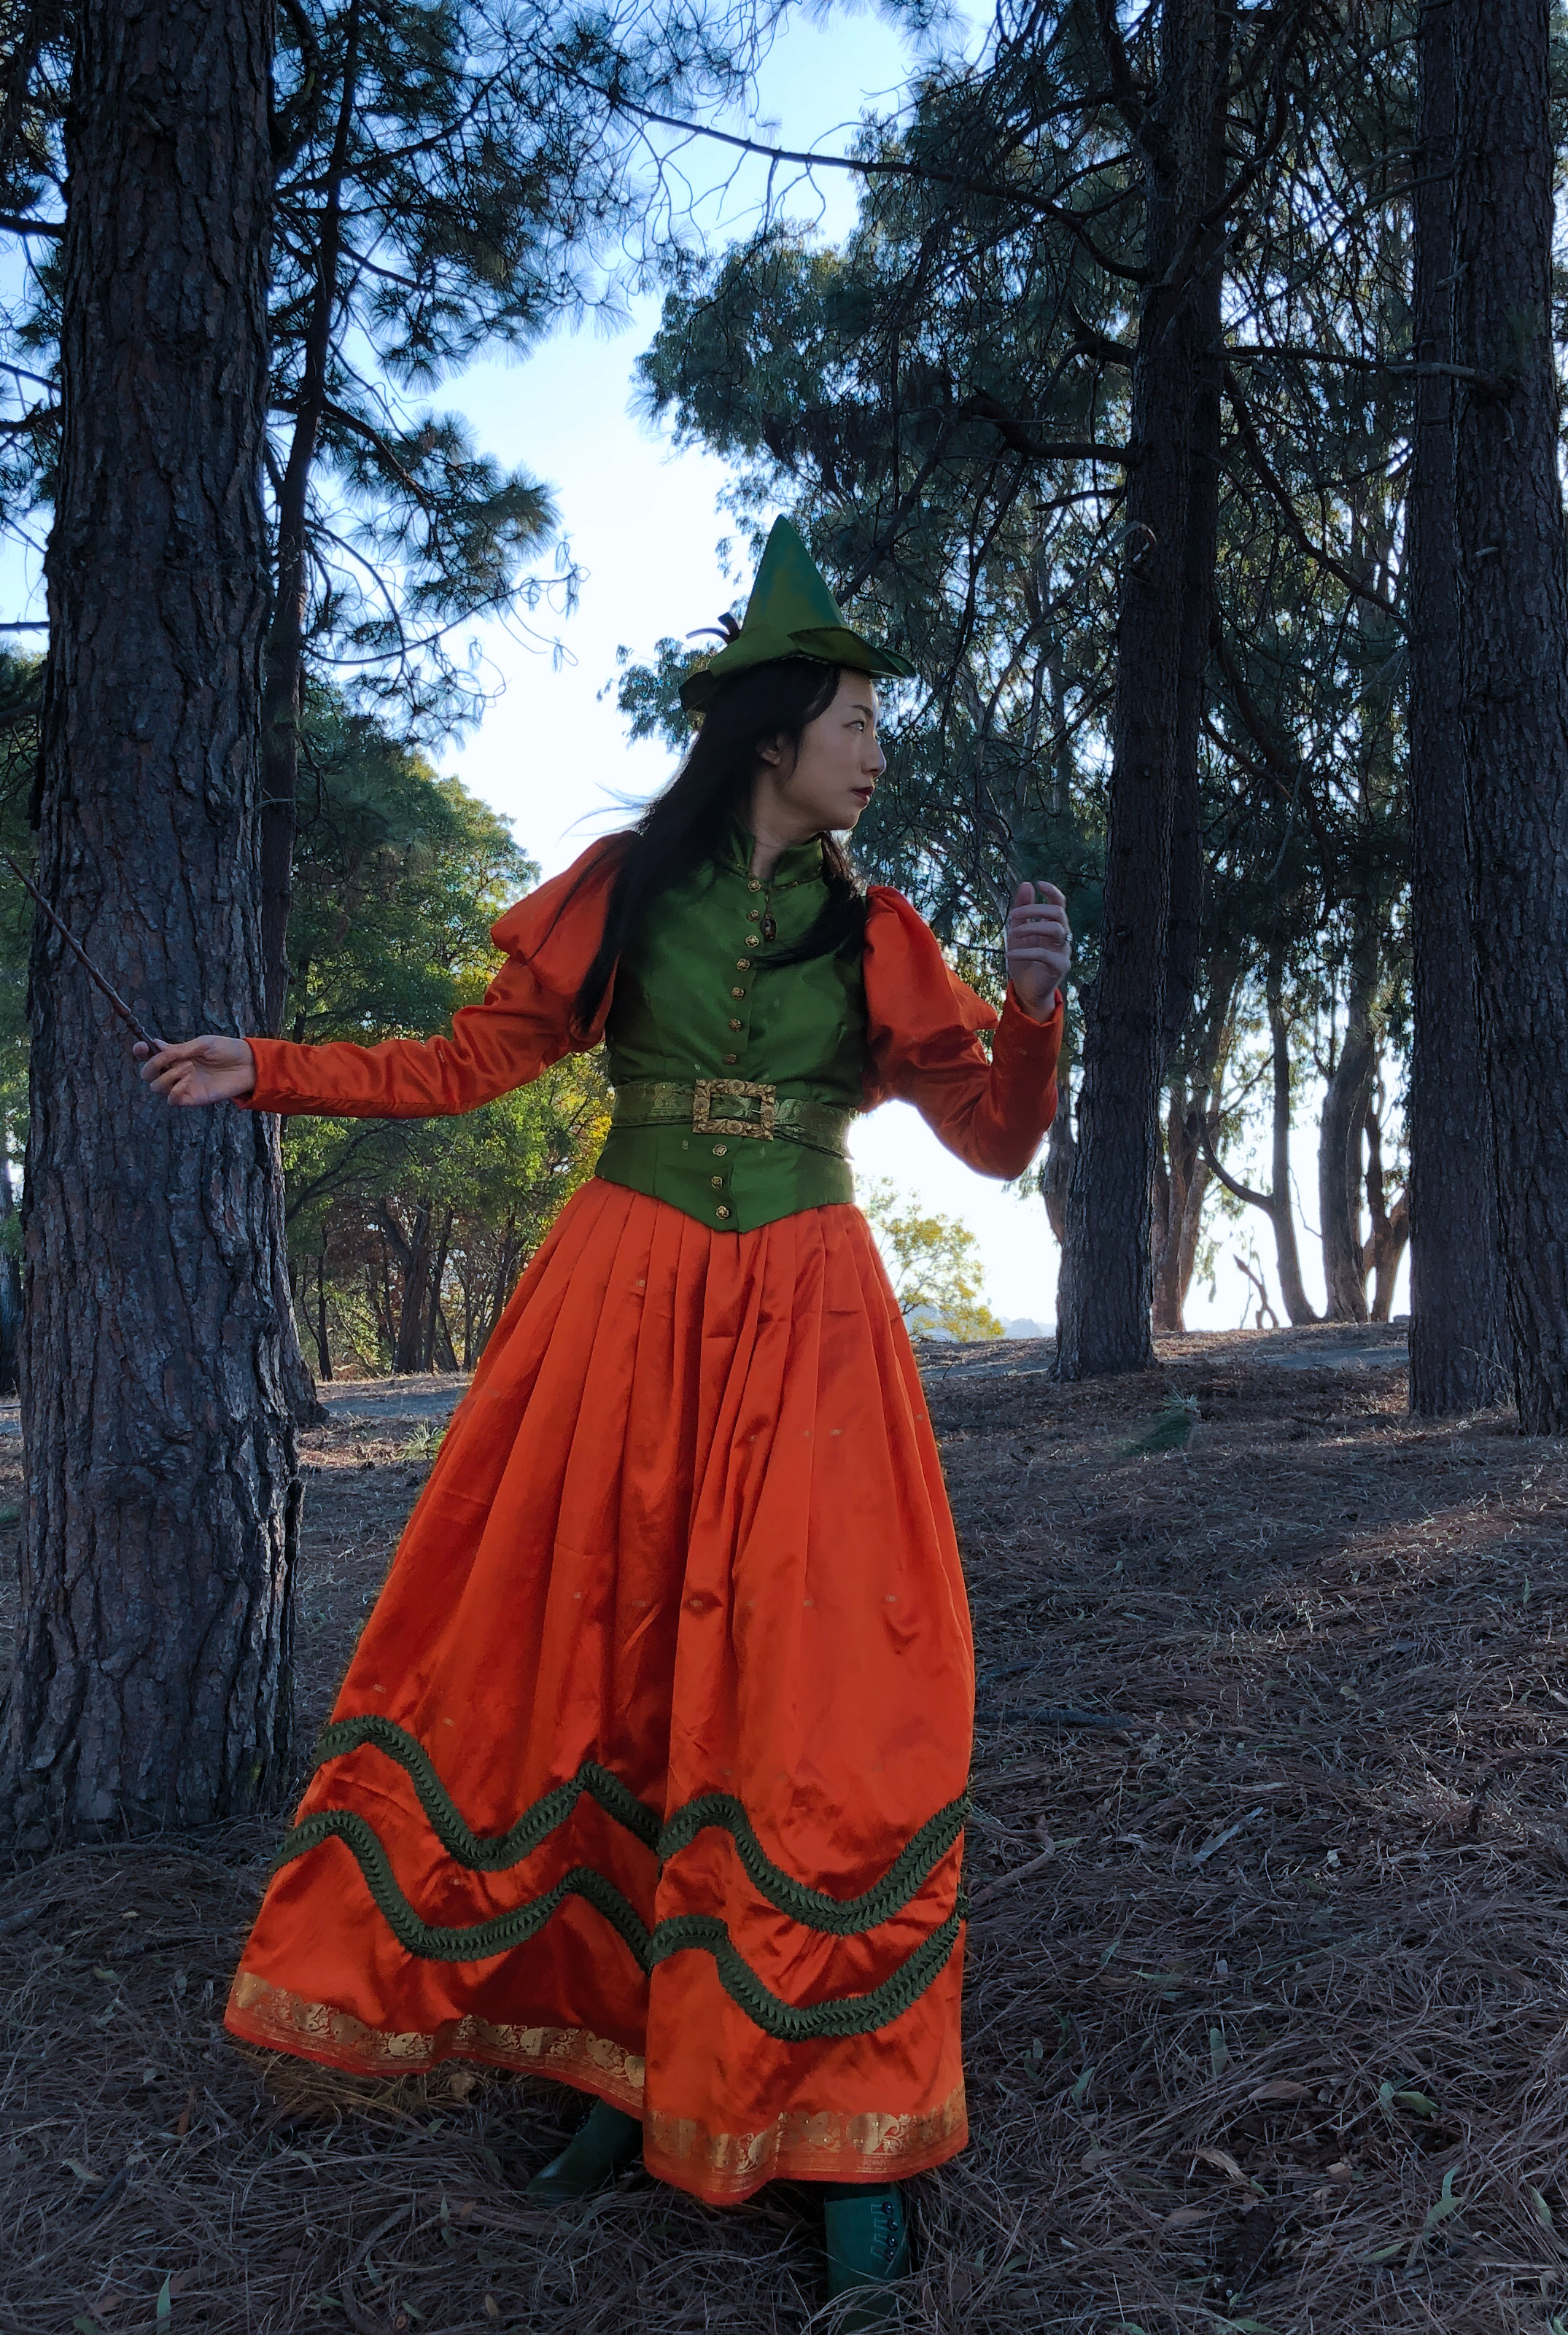
Instead of making lots of buttonholes for my small gold buttons I did hidden hooks and bars down the front of the bodice and the buttons are decorative. WRIE9403

The belt is made from a scrap of the green sari fabric, paired with a vintage belt buckle. The buckle is actually plastic painted gold but looks pretty good from a distance!IMG_3471

The green pleated grosgrain trim was purchased pre-made from Amazon (affiliate link) and comes in other colors. I used the olive color this time but you may recognize that I used a baby blue version for my pink striped bustle dress!IMG_3526

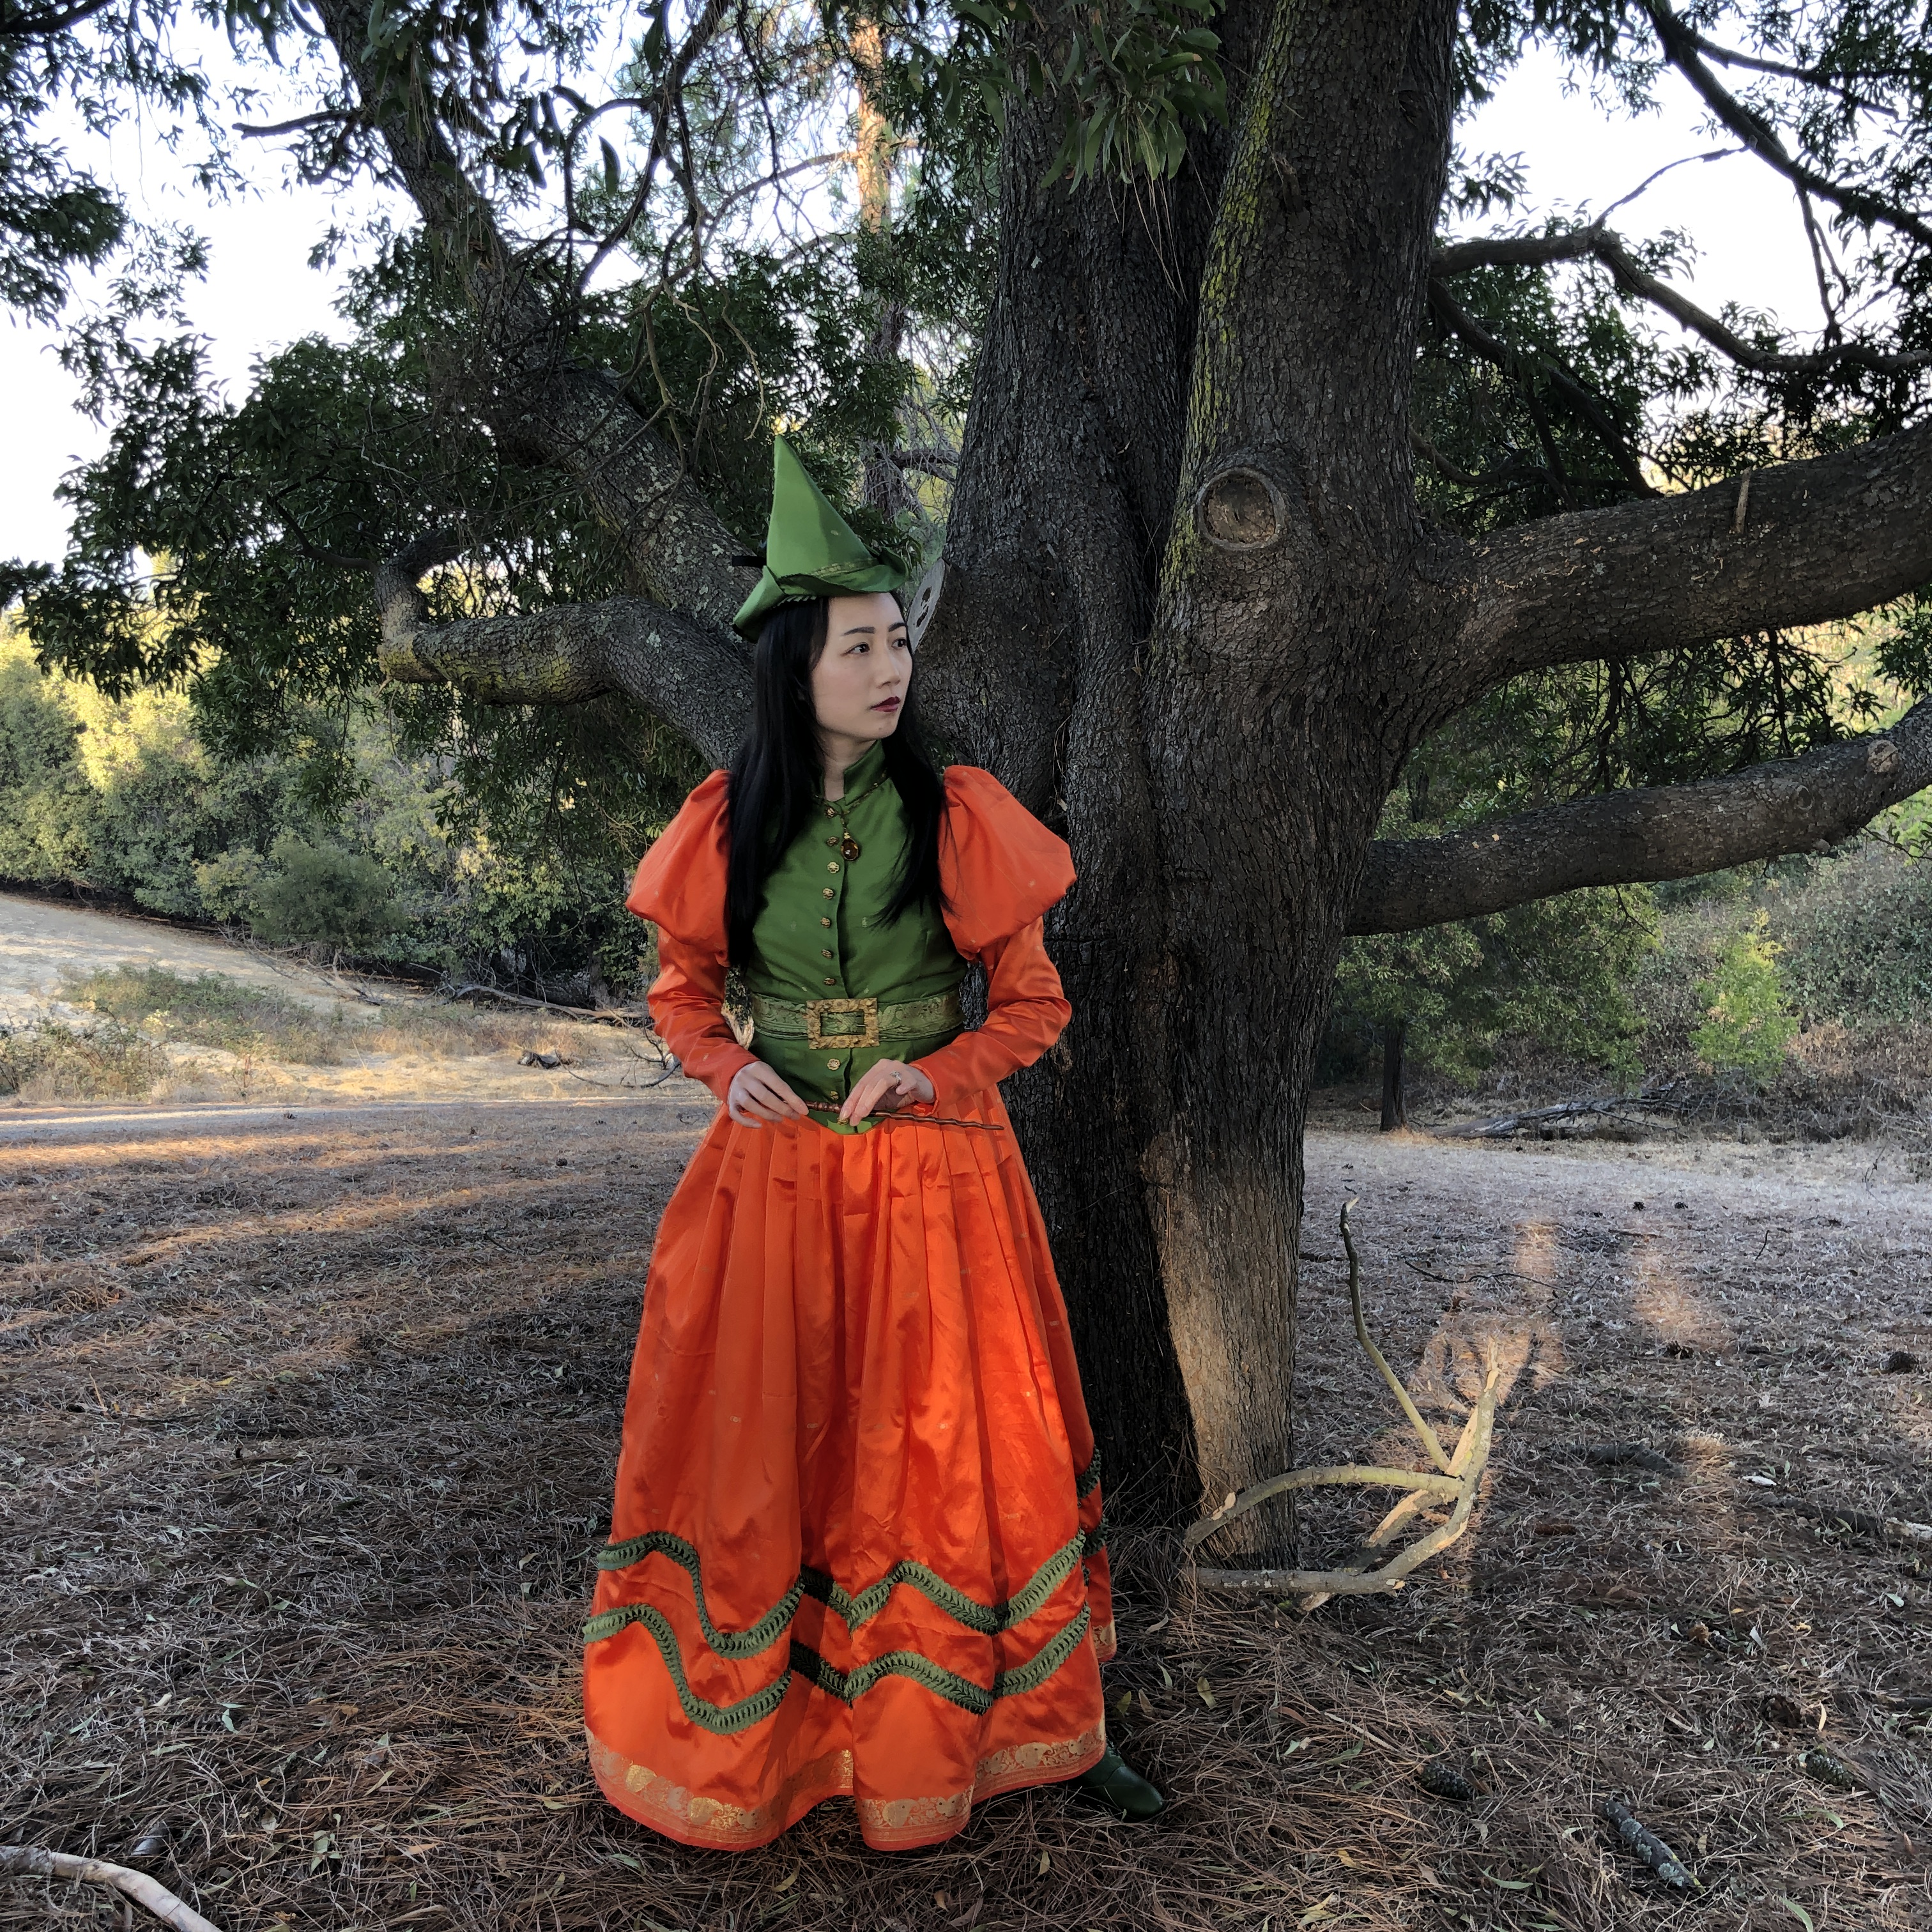
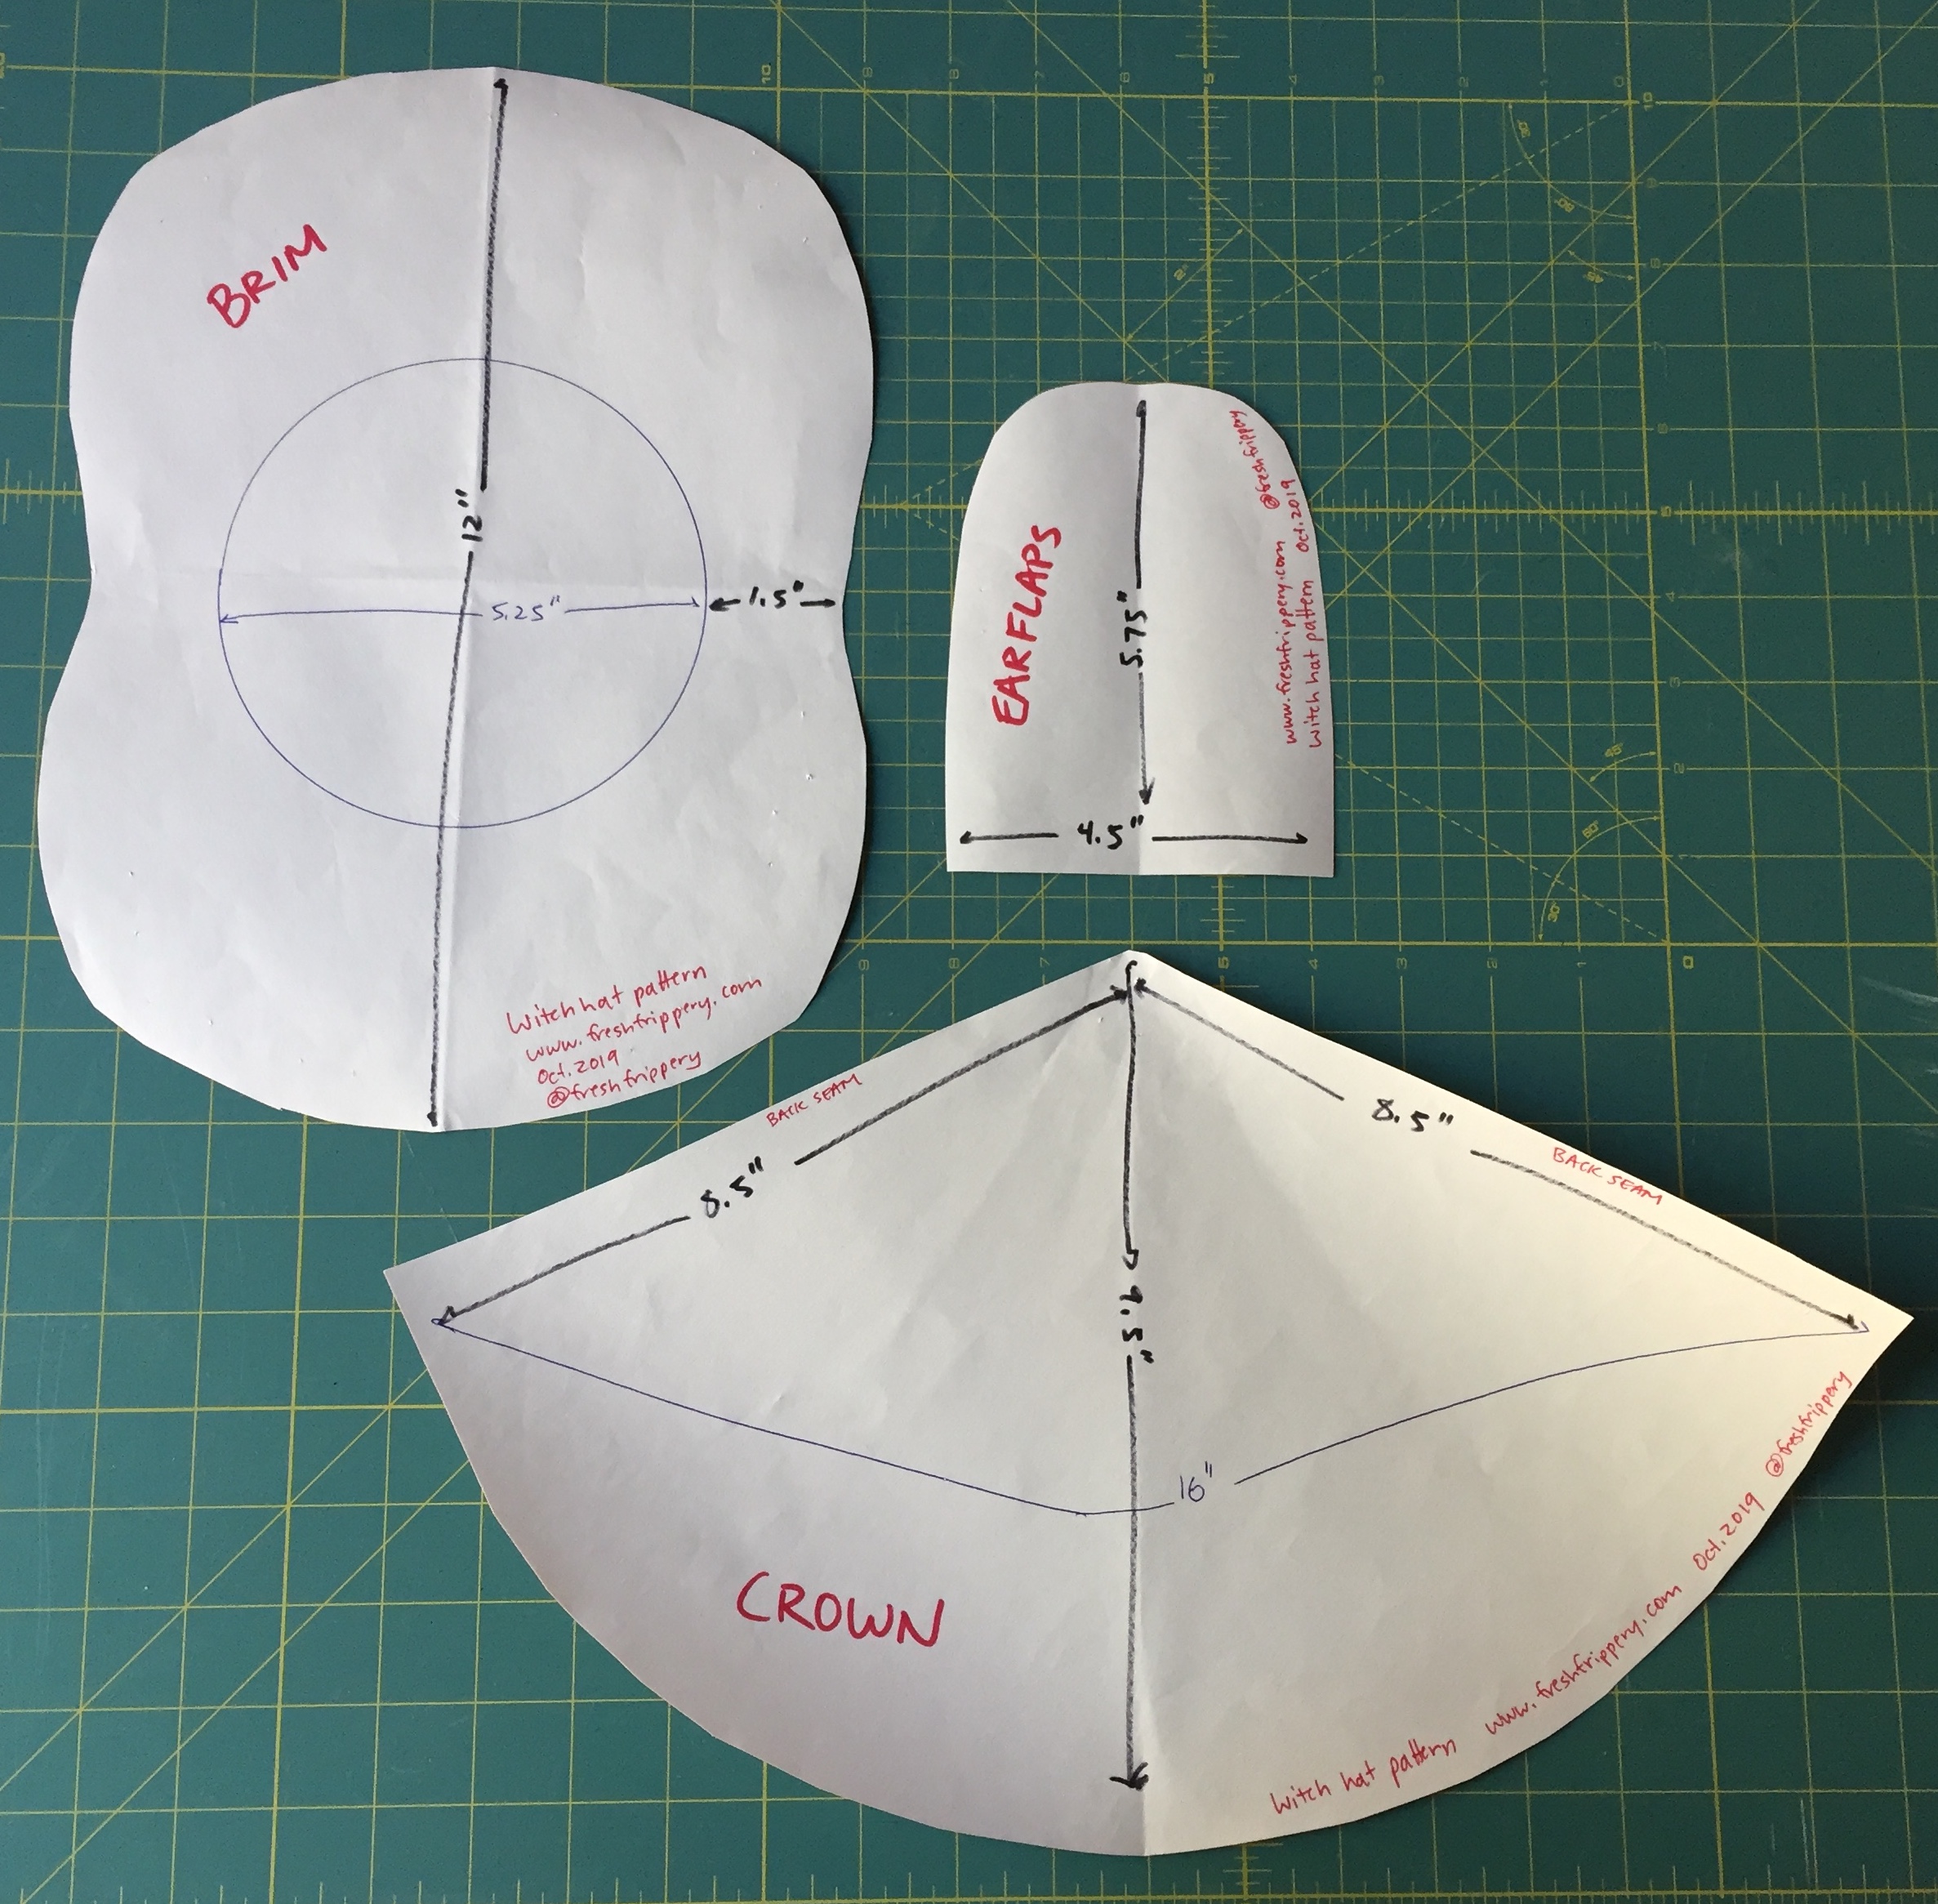
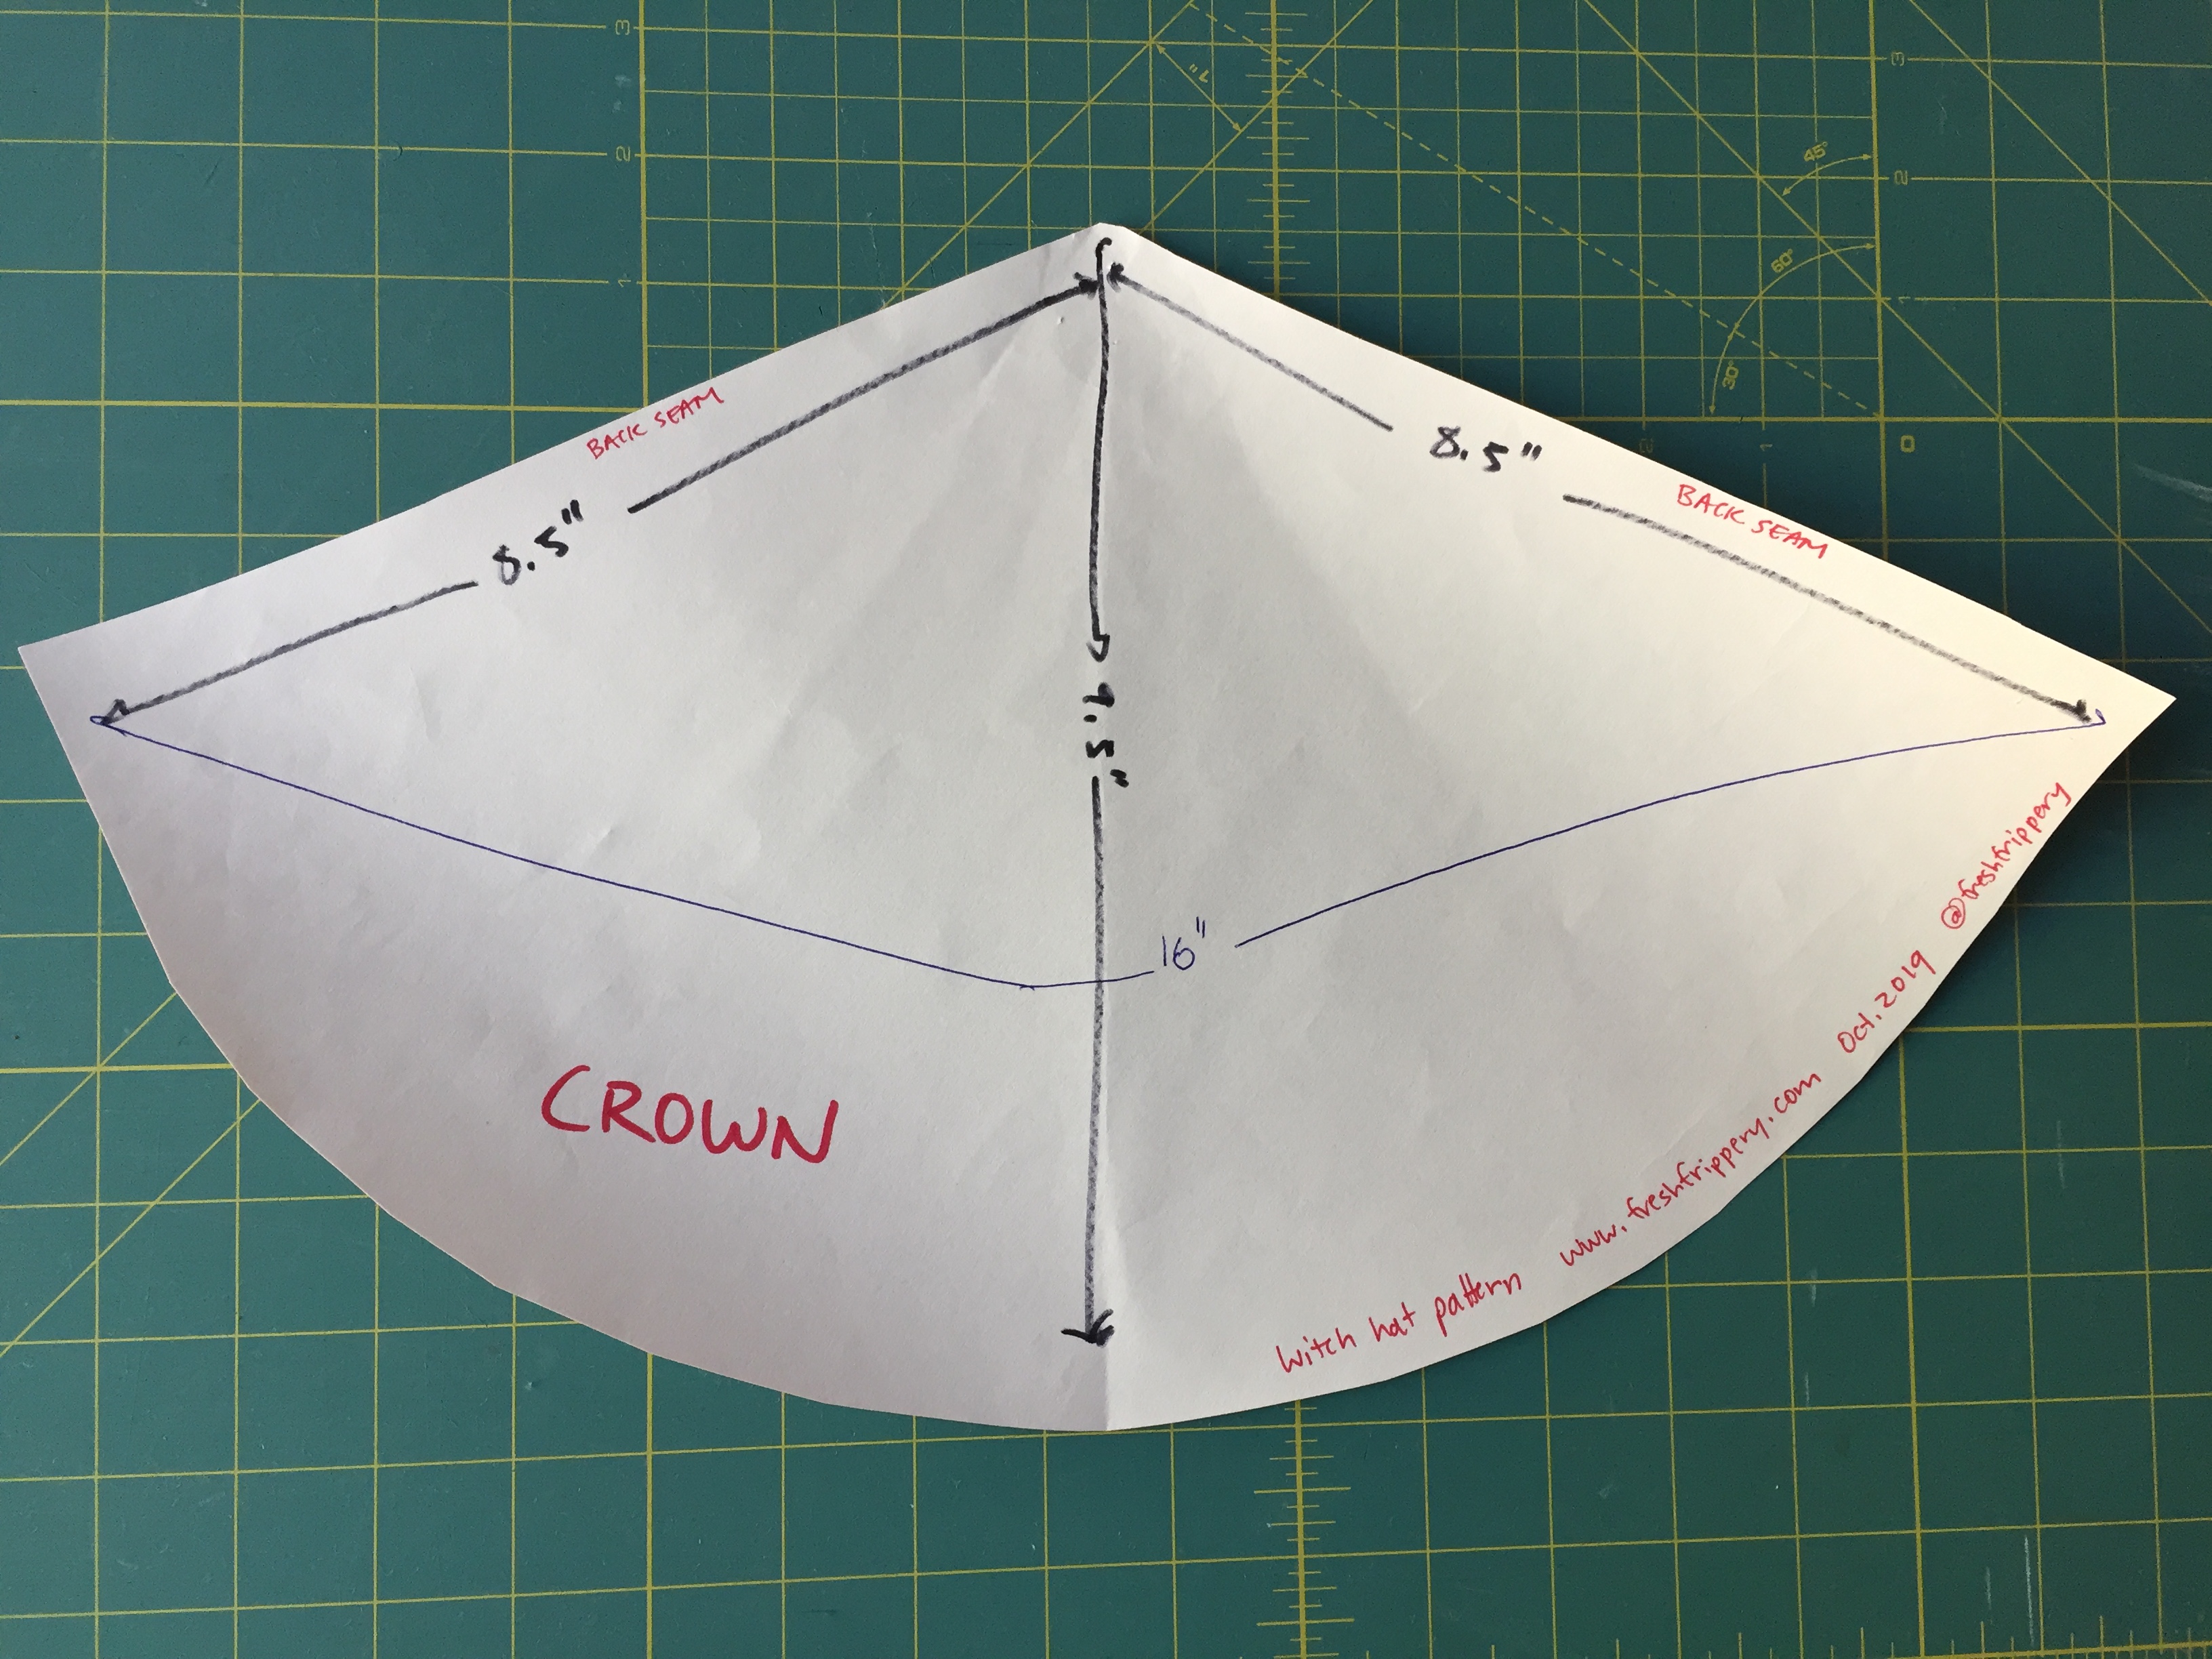
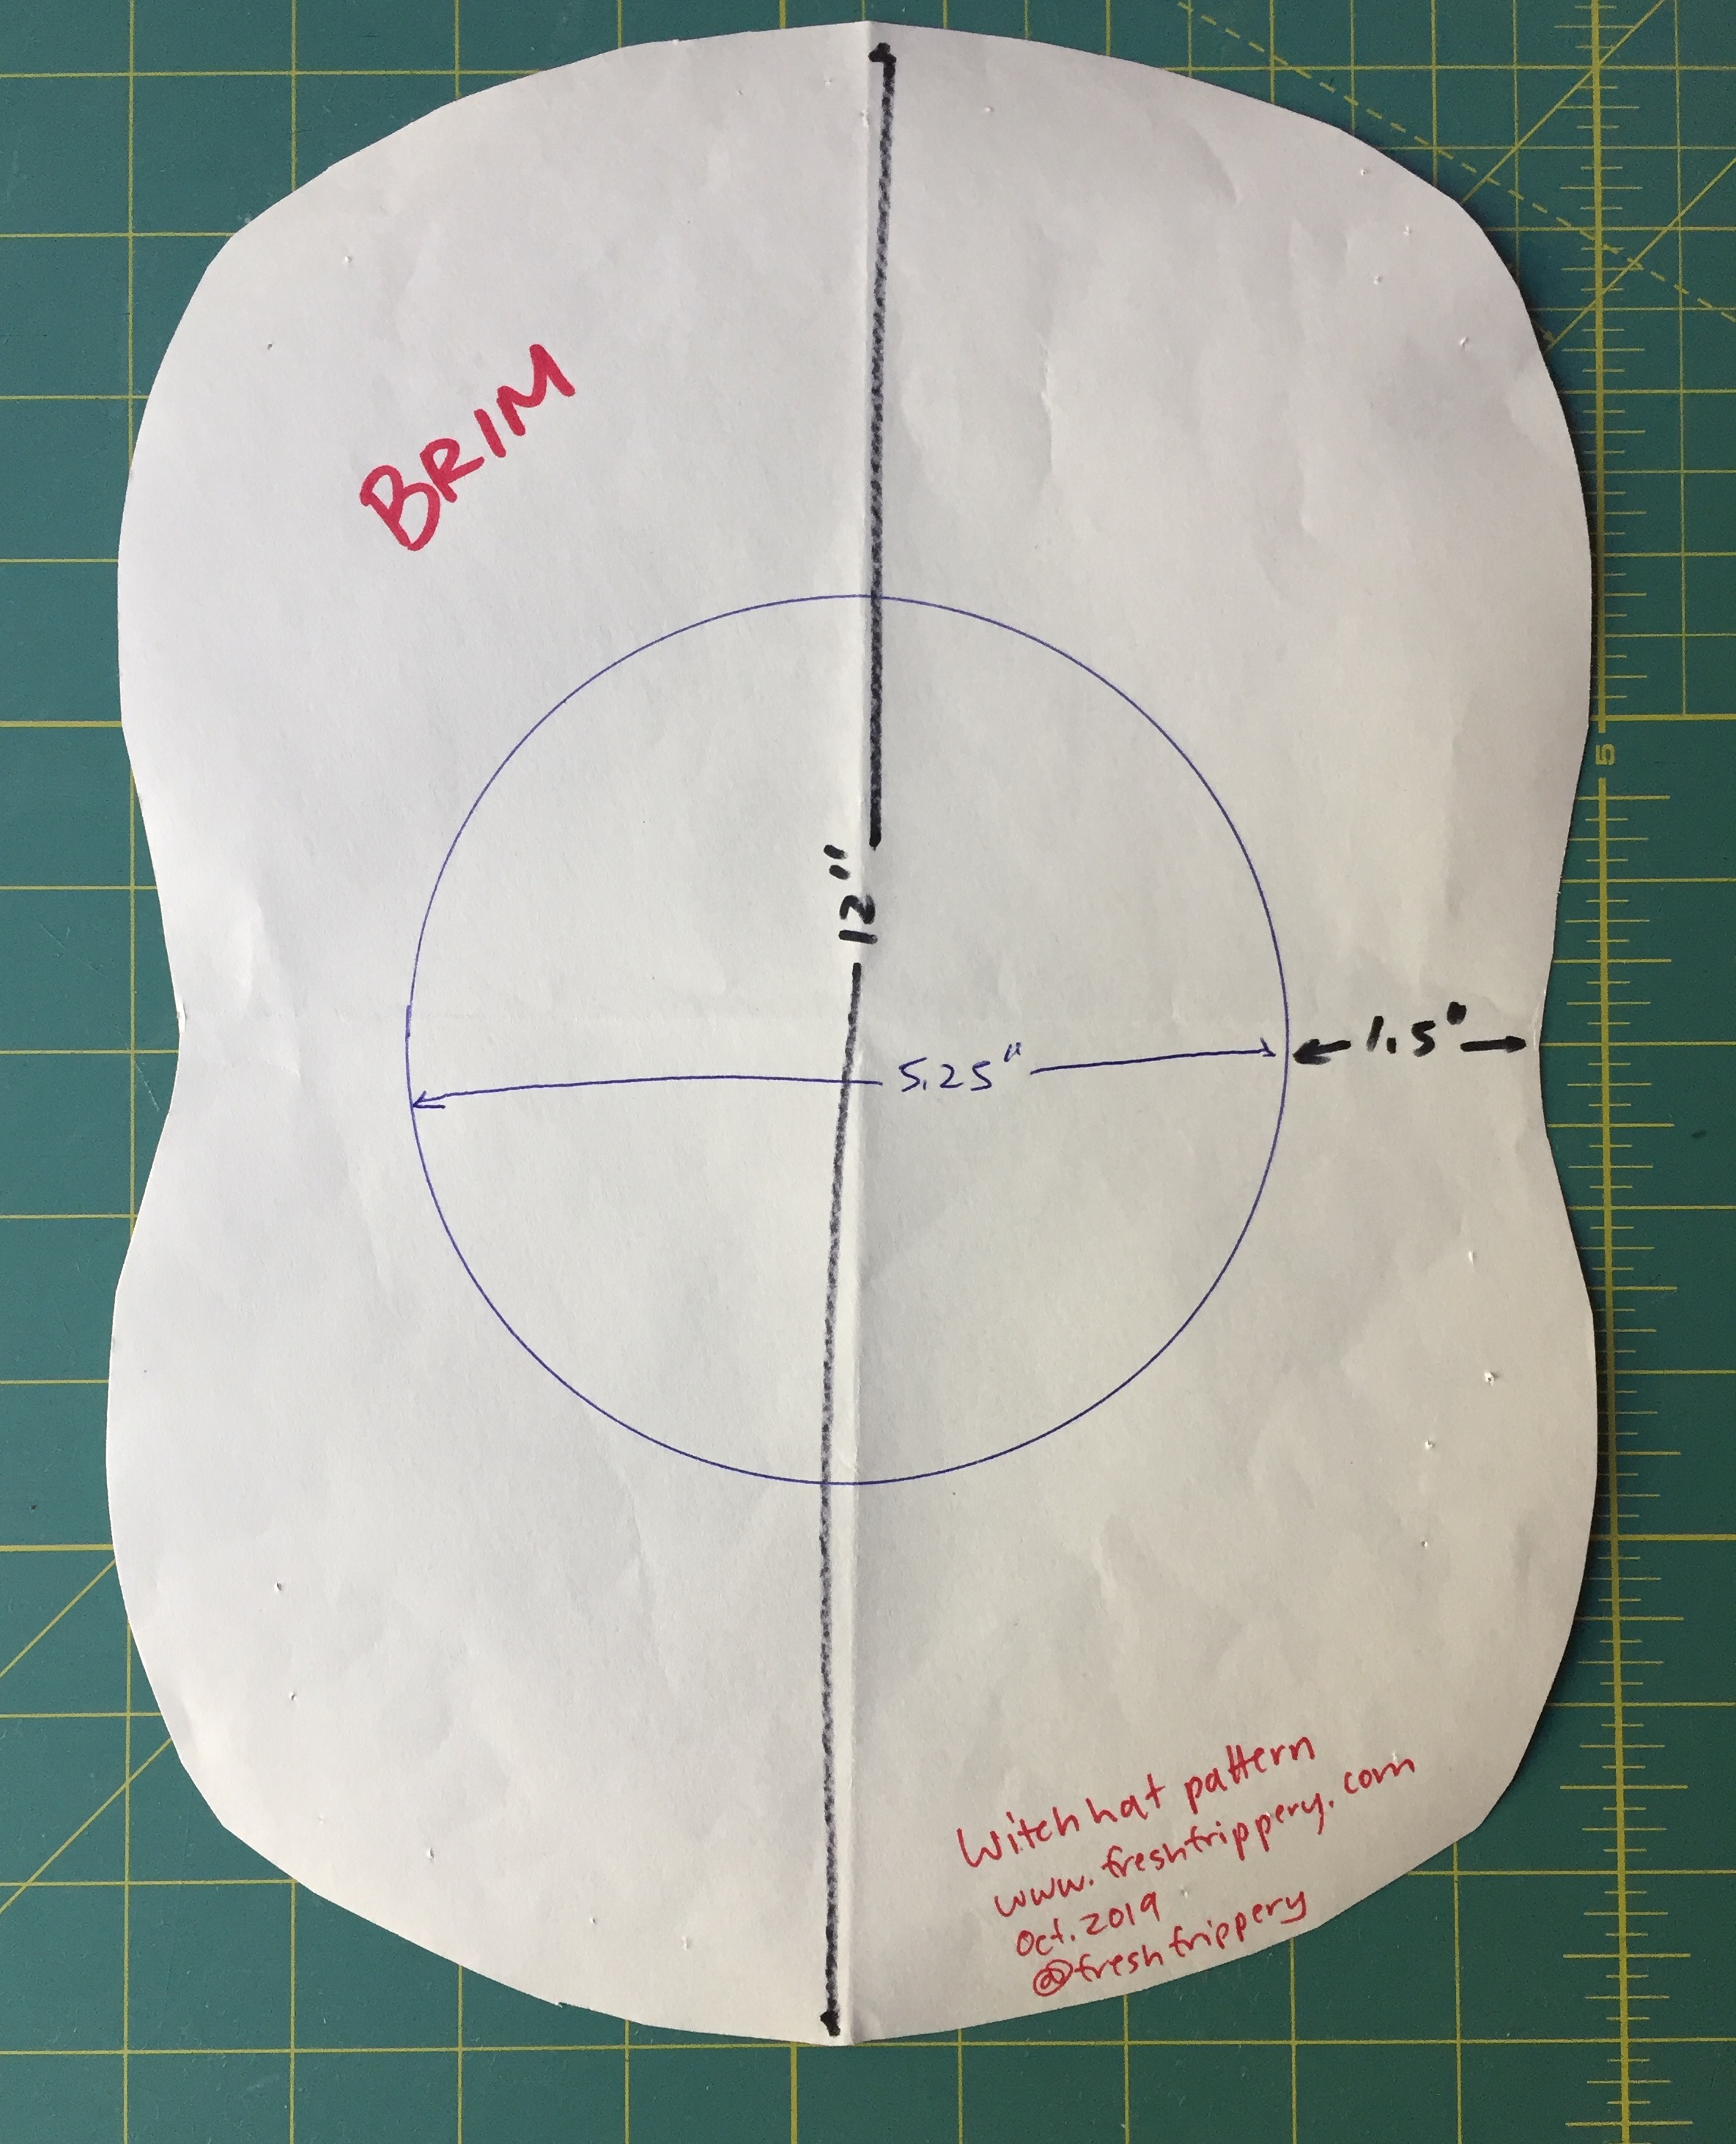
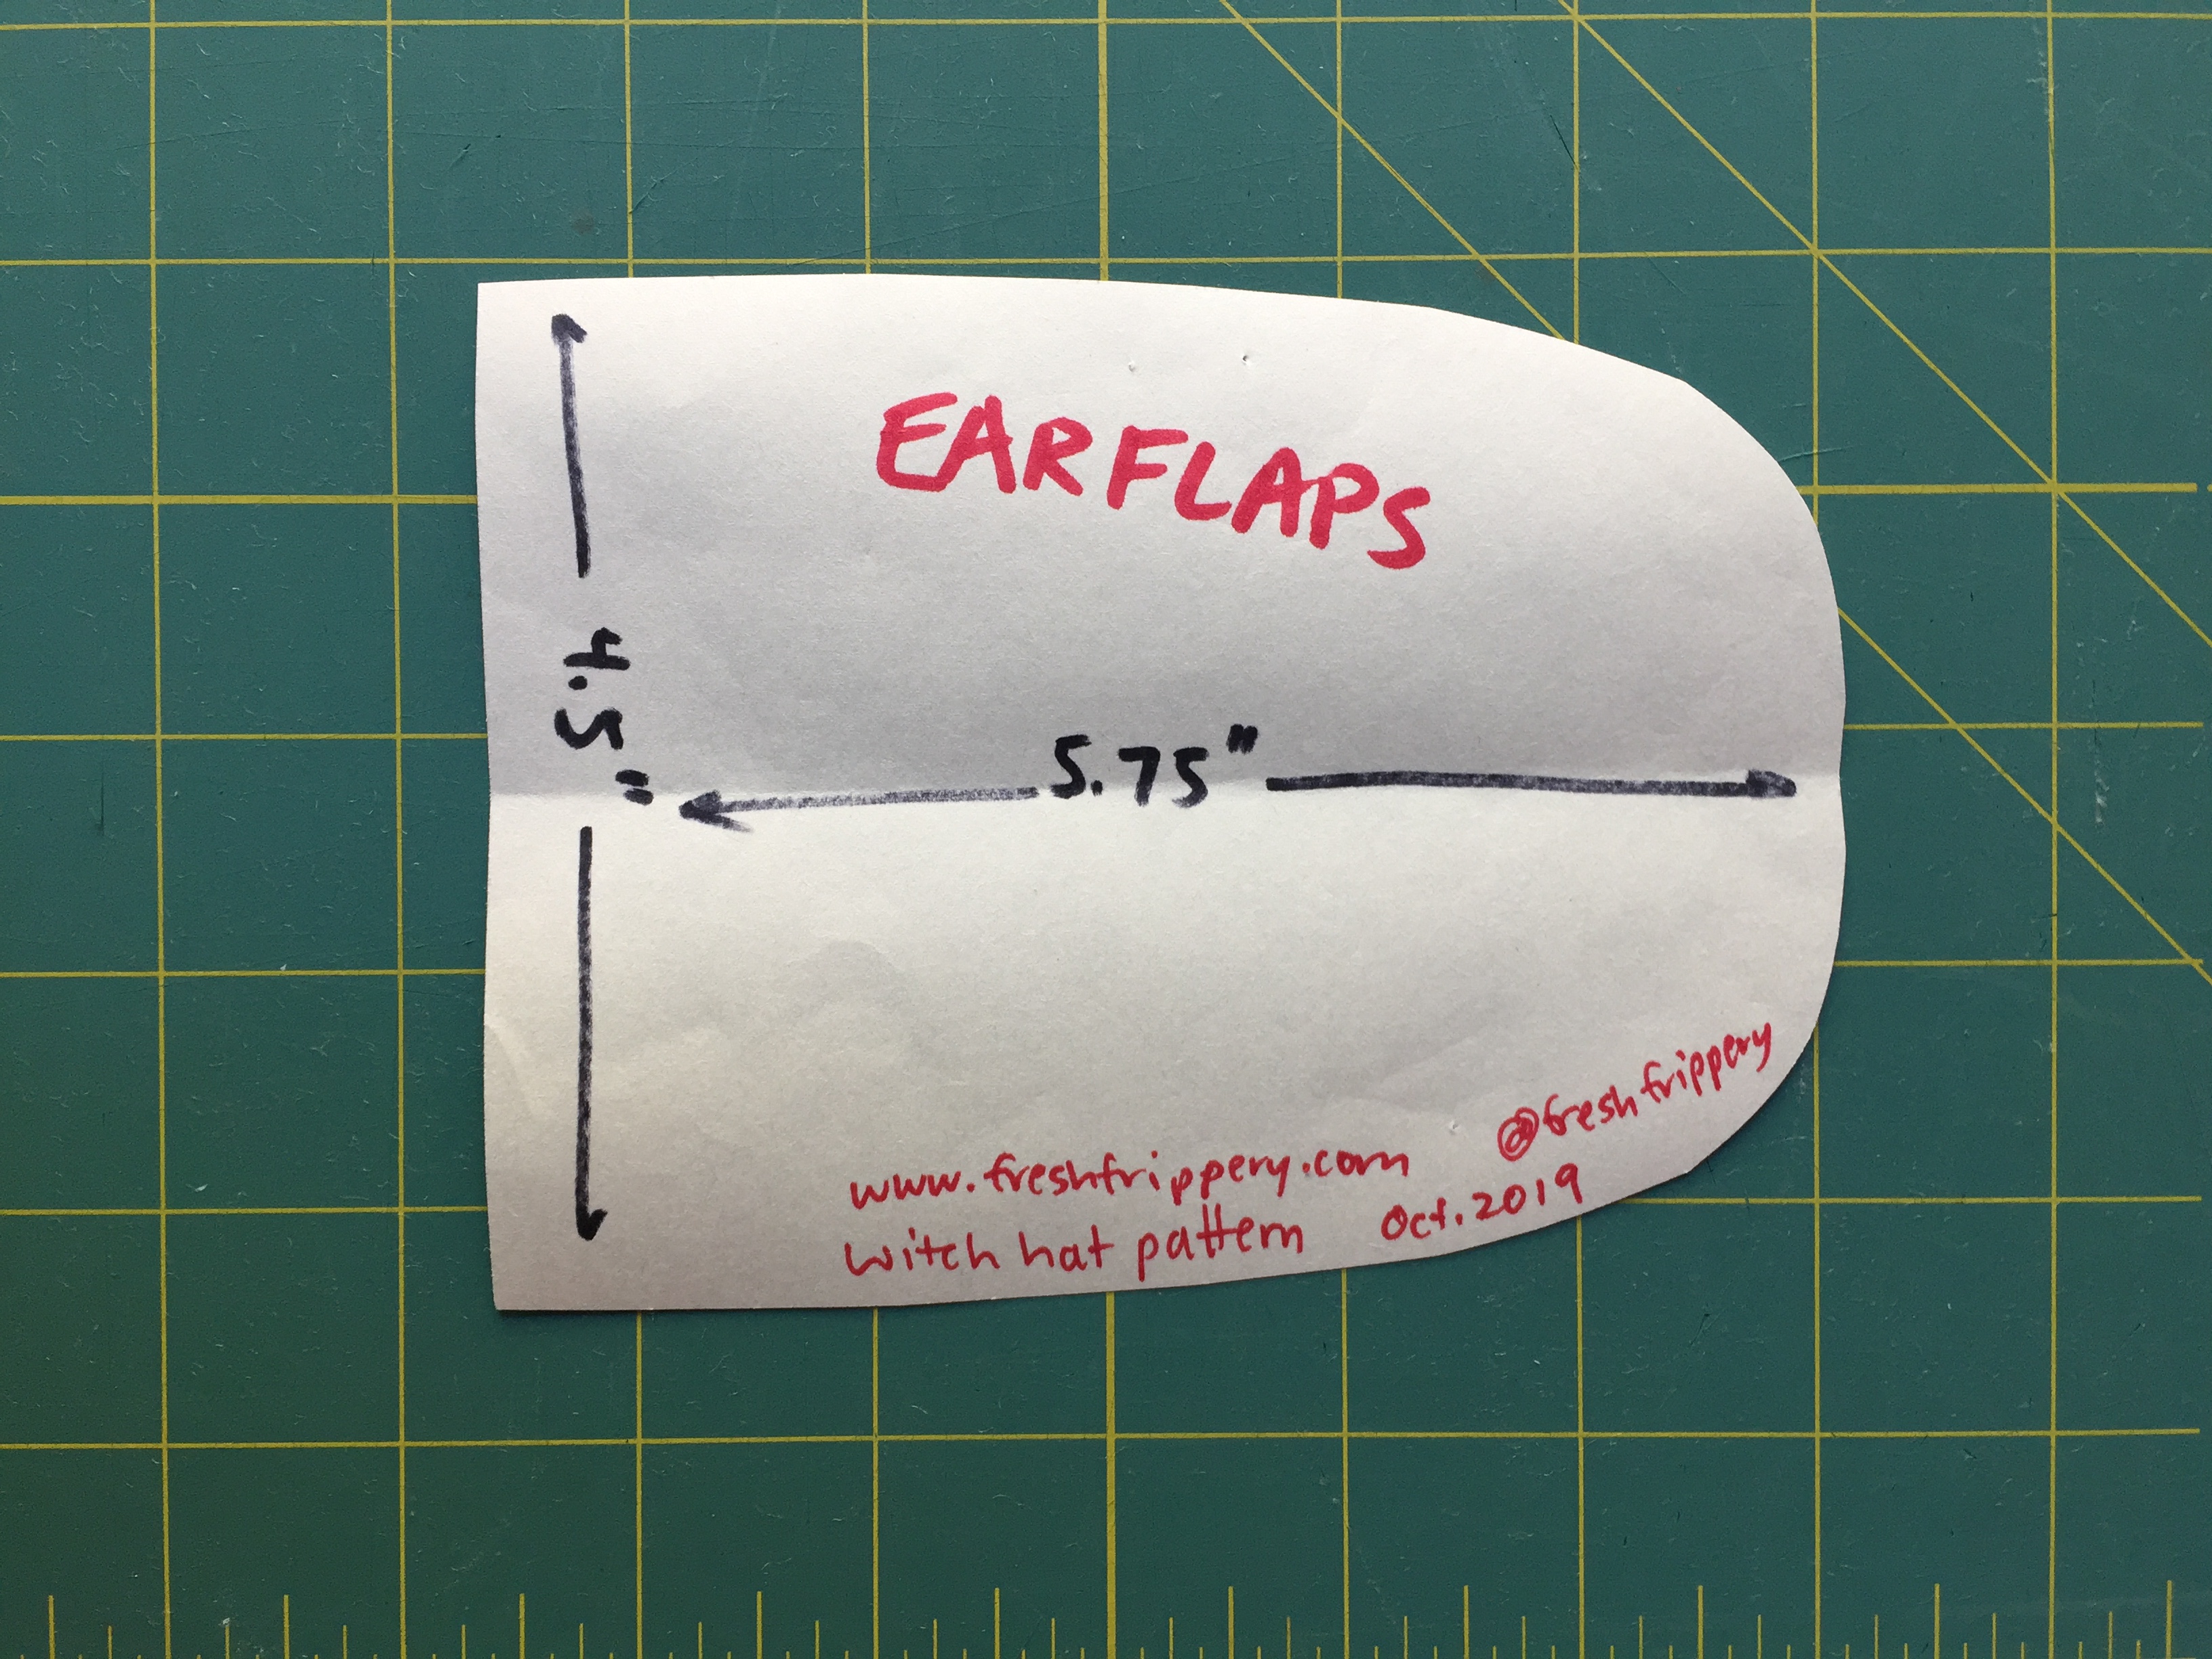
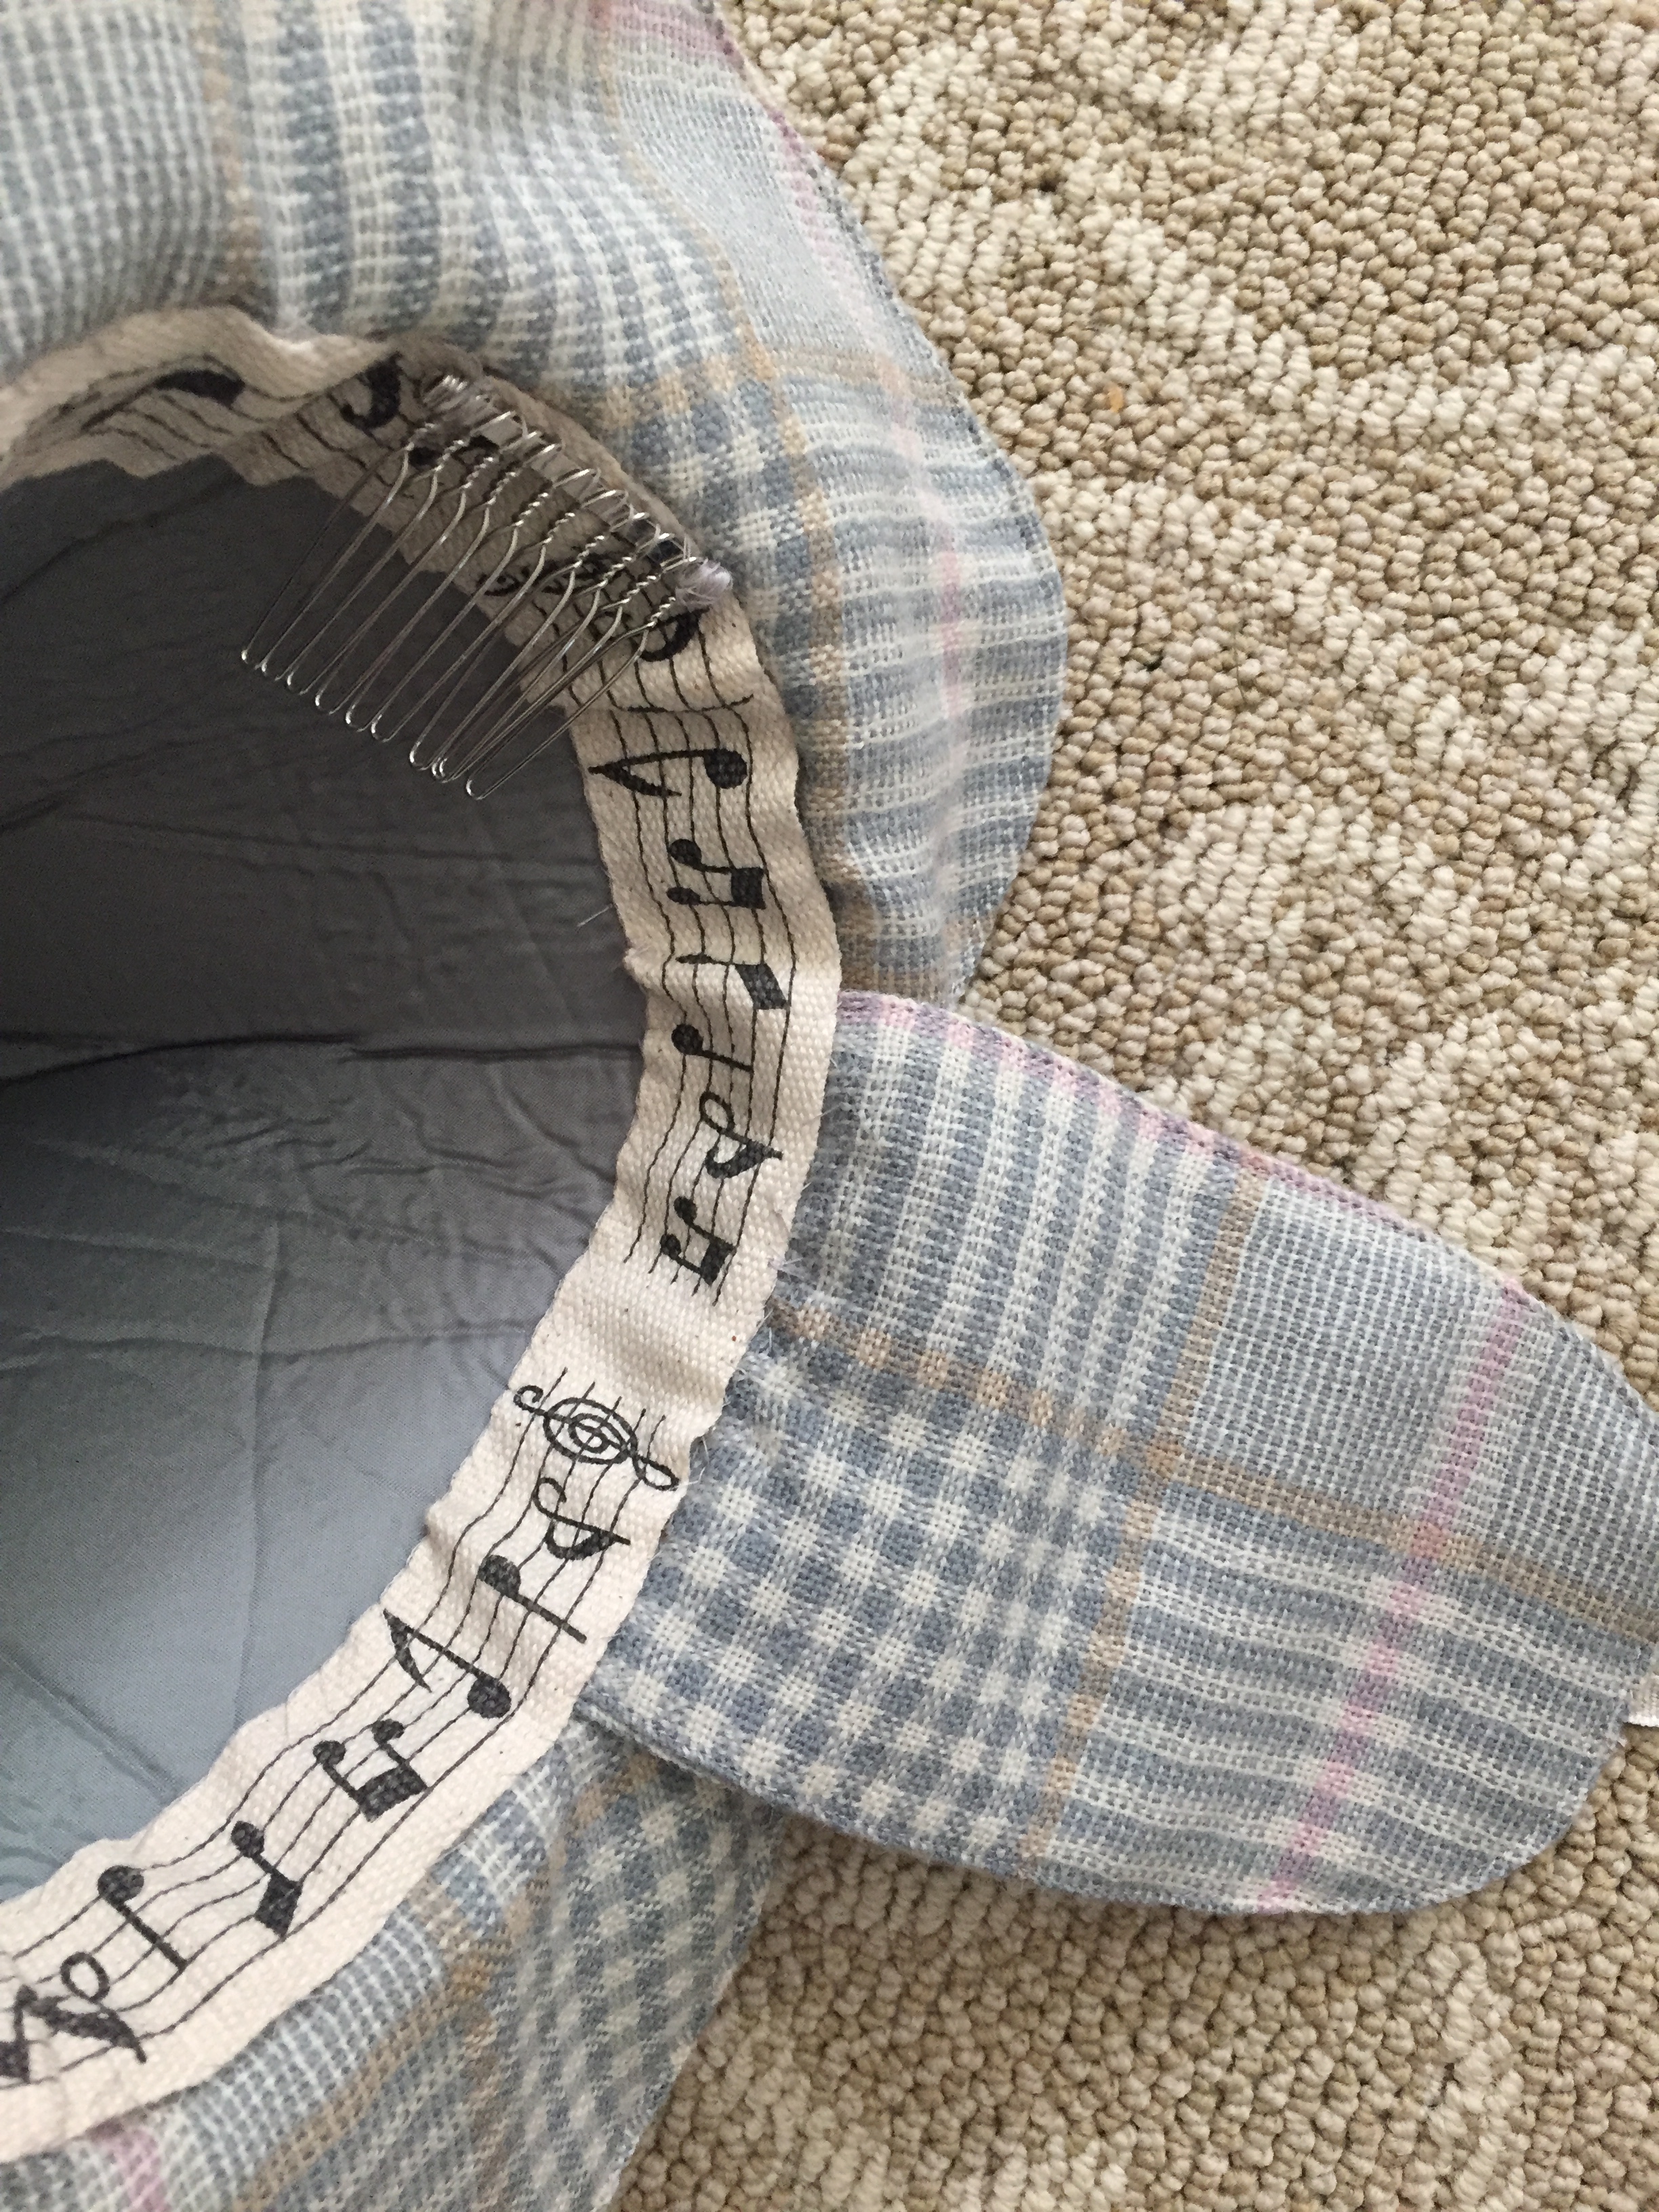
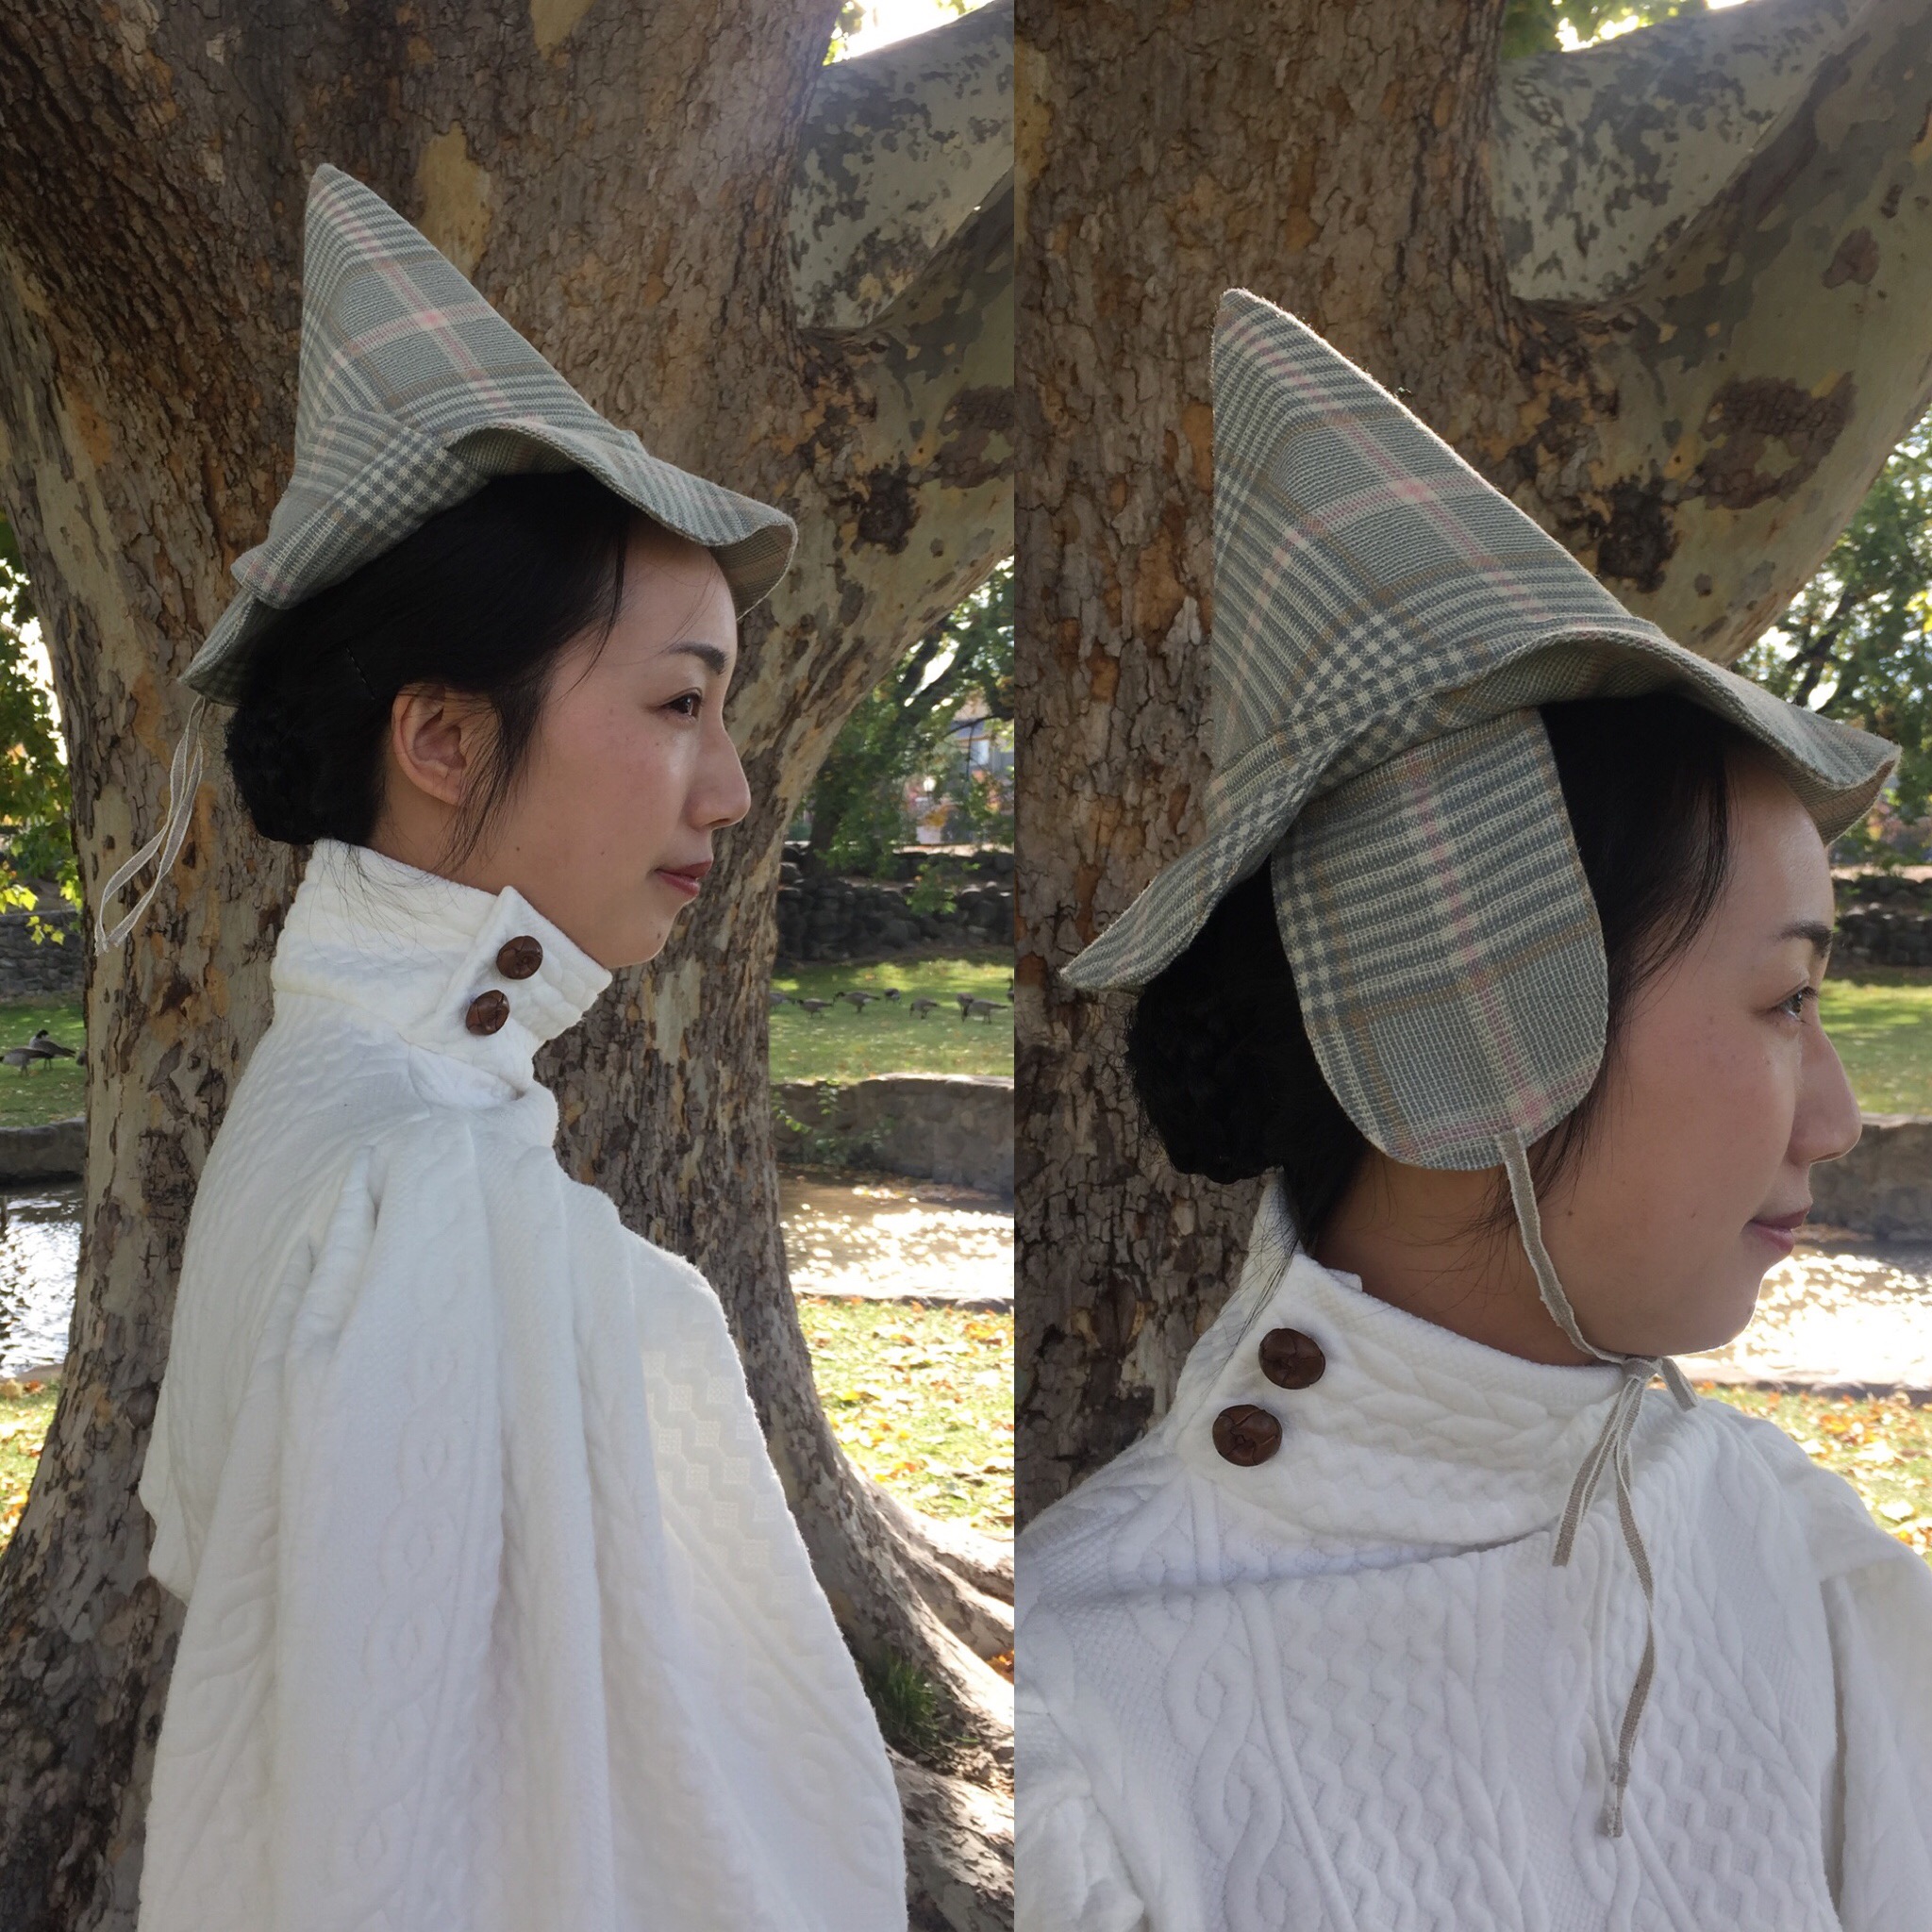
The hat was made using my own pattern for a Professor McGonagall-inspired deerstalker witch hat, and you can find the instructions on a previous post.OOMF7987

I’m afraid I didn’t do a great job tracking the yardage since I had basically unlimited fabric, but I would estimate that I used 3 orange saris (since everything was 2 layers) and one green one. The saris I got were used and pre-cut and were 3-5 meters each. Thus, my rough estimates for project costs are as follows:

  • 4 saris: ~$20 (yeah I got a great deal!)
  • 25 yard roll of pleated grosgrain trim: $9.50 from Amazon, and I have a lot left. (The trim usually runs about $40 a roll but I’ve bought other colors through random price drops).
  • Gold buttons: free from a friend
  • Vintage buckle: ~$10? (I don’t remember).
  • Thread, hooks and eyes, collar interfacing, lining: ~$5 (stash and scraps from other projects)
  • Bodice pattern: $8.60
  • Vest pattern: $7.37
  • Printing costs: $5.56 plus shipping (I had my A0 patterns printed by PDFplotting.com and the shipping was bundled with other things)

Total: ~$45 for materials and ~$25 for patterns I will reuse

Some final thoughts:

This project was all polyester. The fabric was pretty enough it didn’t “matter” if it was silk and I hope this a reminder that costumes don’t need to be expensive.

Did you notice that I pleated the front of the skirt differently than I did the back? I didn’t until I put the waistband and zipper on, and I didn’t care to redo it! Here’s a reminder that maybe “mistakes” aren’t really that big of a deal and probably most people won’t notice. 

I did some cheats to simplify construction.  What works for you is what works for you, whether it is historically accurate, historically appropriate, historically adequate, or historically adjacent!

Thank you for reading!IMG_3821

My necklace is antique glass and brass from the 1930s and my shoes are from American Duchess.IMG_3526

Professor McGonagall-inspired Deerstalker Witch Hat Pattern and Instructions

Professor McGonagall is my favorite character in the Harry Potter books/movies, and I love her tartan hat with the little ear flaps. I recently made my own and got some requests to share the pattern so here you go!IMG_3350

The hat has flaps on the ears that you can wear down or tied up. My hat is made from wool left over from a matching skirt that I made. The nice thing about this project is that it doesn’t require a lot of fabric and can be made from scraps.

IMG_3361

This hat sits on top of the head (and the pieces are sized for my 22″ head). If you want the hat crown big enough to cover your head you’ll need to resize the pieces a bit.

IMG_3359

This is the movie hat for reference.

cd4900d583933744699700073d474bd7.png

PATTERN PIECES AND MATERIALS

The hat uses several simple shapes and in the sections below I’ll describe how to draft and assemble them. I apologize in advance that I have a lot of pictures of the pattern pieces and finished item, but not the construction process since I made this at night right before a trip. However, construction is pretty straightforward! The pattern pieces include a 3/8″ seam allowance.

Materials:

  • Tartan/plaid print fabric (wool or cotton flannel)
  • Fusible foam interfacing
  • Regular fabric interfacing or stiff cotton organdy
  • Lining fabric
  • Ribbon or twill tape for ties and inner binding
  • Small comb
  • Thread, etc.IMG_3438

THE CROWN

The pattern:

The shape is a big cone. The center of the cone (which will be the front of the hat) is a little longer than the edges (which will be the back of the hat) since the crown tilts backwards a bit. To draft this shape you can draw a giant circle with a 19″ diameter, and then cut out about 1/3 of it as a starter shape, then use the measurements in the diagram below to help you get close to the final shape. The other option is to draw a triangle with 8.5″x8.5″x16″ triangle and then add the rounded part on the bottom. IMG_3439

Assembly:

Cut 1 fashion fabric, 1 lining, and 1 interfacing. For the lining I used a scrap of nylon (but any thin fabric is fine). For the interfacing I used single sided foam stabilizer which gives your crown some stiffness and structure. I use Bosal brand (Amazon affiliate link) In-R-Form, which is designed for purses but makes nice hats.IMG_3046

Iron lining to foam interfacing first; I’ll refer to it as “lining” from now on because it’s become one piece. Sew the back seams of the lining together (right sides together) to make a cone shape and trim excess bulk from the seam area. Sew fabric into cone shape the same way and flip right side out. Put fabric cone over lining cone and stitch bottom edges together to create your crown.

THE BRIM

The pattern:

The shape is a modified circle with a hole in the middle. To draft it draw a 12″ wide circle (or trace a large plate). In the center draw a 5.25″ wide circle (or trace a bowl). Cut out and discard the inner circle. Draw a curve on the sides like a butternut squash; this is to allow you to pull up your earflaps later. (Fold the pattern in half and cut both sides at the same time to keep it symmetrical).IMG_3442

Assembly:

Cut out 2 brims from fashion fabric and 1 brim from interfacing. You’ll want the brim to be thin and a little floppy so do not use the foam you used for the crown. I used some stiff cotton organdy because I had that available, but you can use other kinds of fabric interfacing.

The goal is to end up with a donut with the interfacing inside, so layer your pieces in this order: fabric, fabric, interfacing (with fabric right sides together).

Stitch the outer edge of all the pieces together, then flip inside out from the center hole in order to have the fabric facing out and the interfacing sandwiched in. Then topstitch the outer edges (for neat finished look) and topstitch the inner edges (to keep the layers together for the next step).

Sew the bottom edge of the crown to the inner edge of the brim, making sure the raw edges of both pieces face into the hat. Trim extra bulk from the foam if needed.

THE EAR FLAPS

The pattern:

The ear flap is a tongue shape. You can draft this piece by making a 4.5″ x 5.75″ rectangle and curving one end. (Fold the rectangle in half length-wise and cut off a rounded corner to make sure it’s symmetrical). The straight edge is the side that will be sewn to the hat.IMG_3443

Assembly:

For each flap cut 2 fabric and 1 interfacing (4 fabric and 2 interfacing total). The ear flaps should be soft so use a very thin and light interfacing, such as the lining to your hat. The assembly for each flap is just like the brim. Summary: put the fabric right sides together with the interfacing on top, sew together on the outer edges, flip right side out, topstitch all edges.

Stitch one flap to each side of the hat underneath the brim. This should be along the area where the brim curves in. I recommend pinning the pieces to the hat and trying it on to make sure the flaps cover your ears before sewing down. Sorry I forgot to take a picture before I sewed in the binding.IMG_3447

To cover up the raw edges inside the hat, hand-stitch in a ribbon, twill tape, or bias tape. I used a 1-inch wide music print twill tape because it was cute, but actually this is too wide and will cause ripples like my hat. If you want a smoother appearance a 1/2 inch ribbon is preferred.

Since this hat sits on top of your head, for security I sewed a small comb in the front.IMG_3448

THE HATBAND AND TIES

The pattern:

The hatband is just a long finished strip. Cut a long rectangle 22 inches long x 2 inches wide.IMG_3449

Assembly:

Sew down the long edges, right sides together, making a tube. Turn right side out and topstitch both long edges. Sew the small ends together to make a big circle. Put the band on the base of the crown and tack down in several places next to the brim to keep it from falling off.

Here’s a top view to show that the top of the band is not stitched down, just the bottom.IMG_3446

For the ties cut 2 pieces of ribbon or twill tape and stitch to the ends of each earflap. I plan to mostly wear my flaps up so the the tape is stitched to the side of the flap that will not show. For an extra neat appearance you can sandwich the ties into the flaps during construction, but if they are sewn to the outside you can switch them later.

My ties are 18 inches long each so that they can also be tied under the chin. If you don’t plan to have the extra versatility you can make them shorter. I used a linen twill tape I had in the stash because it matched my wool, but a wide ribbon would look cute too!

IMG_3351
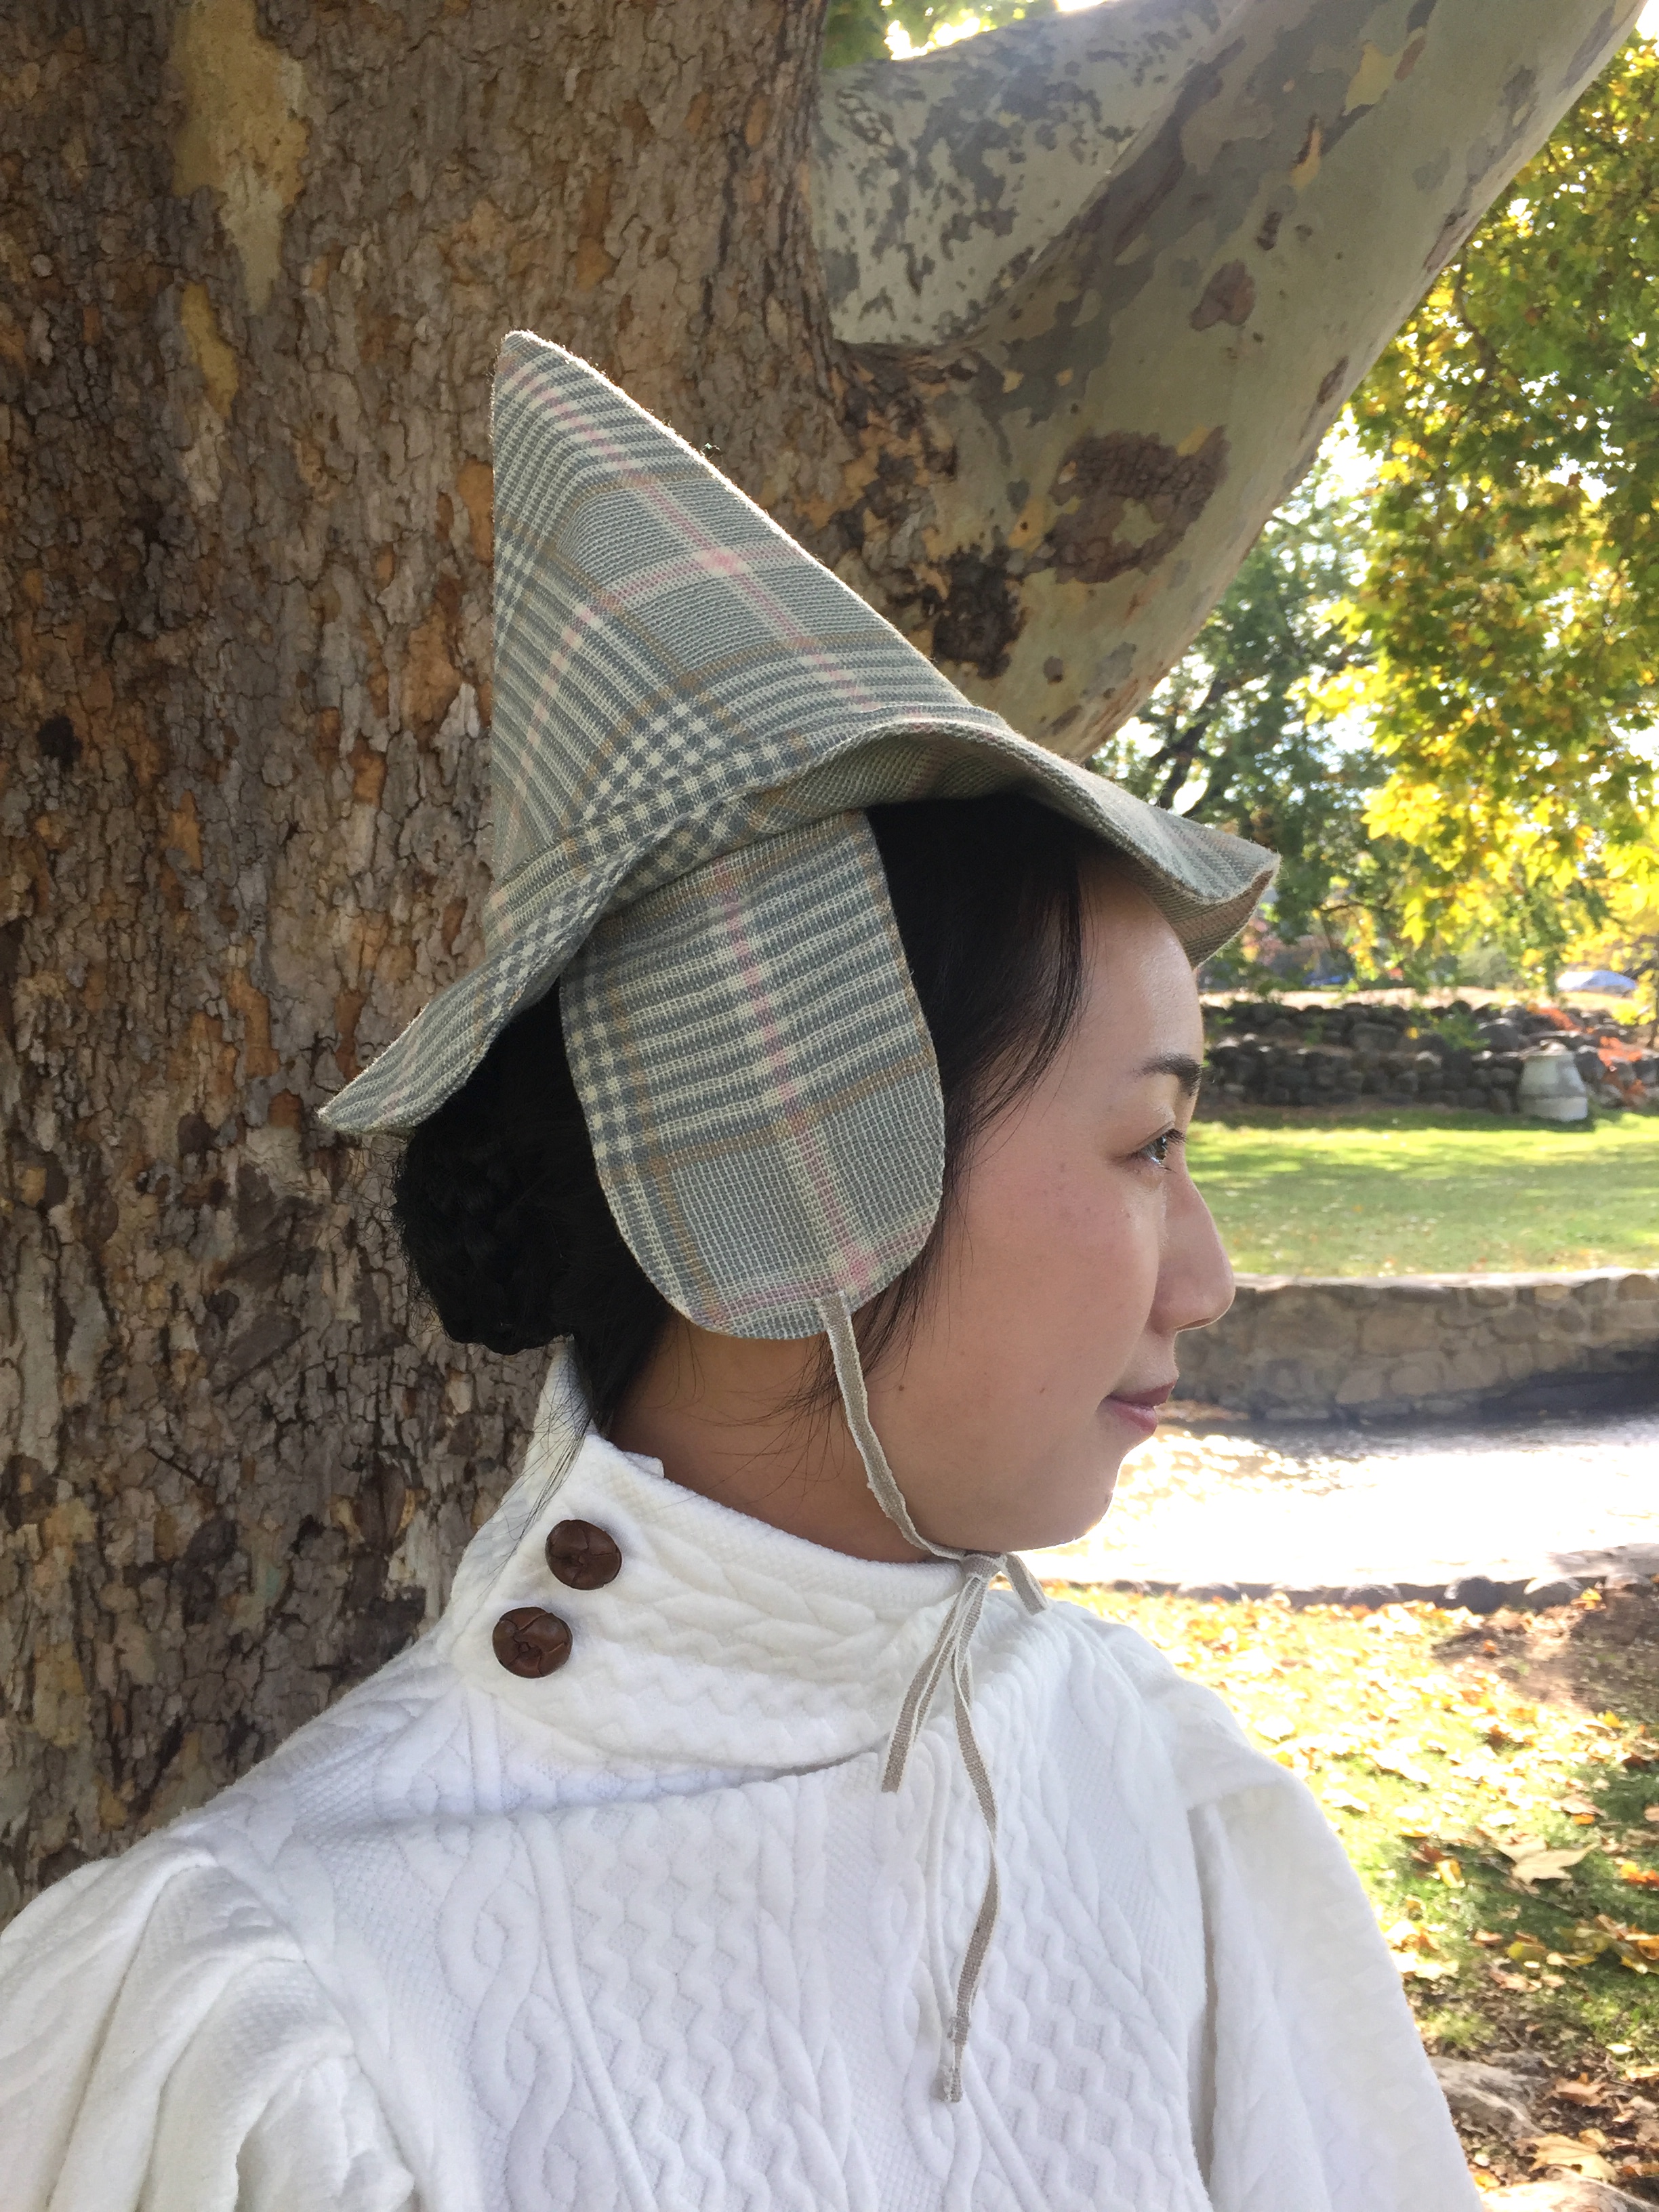
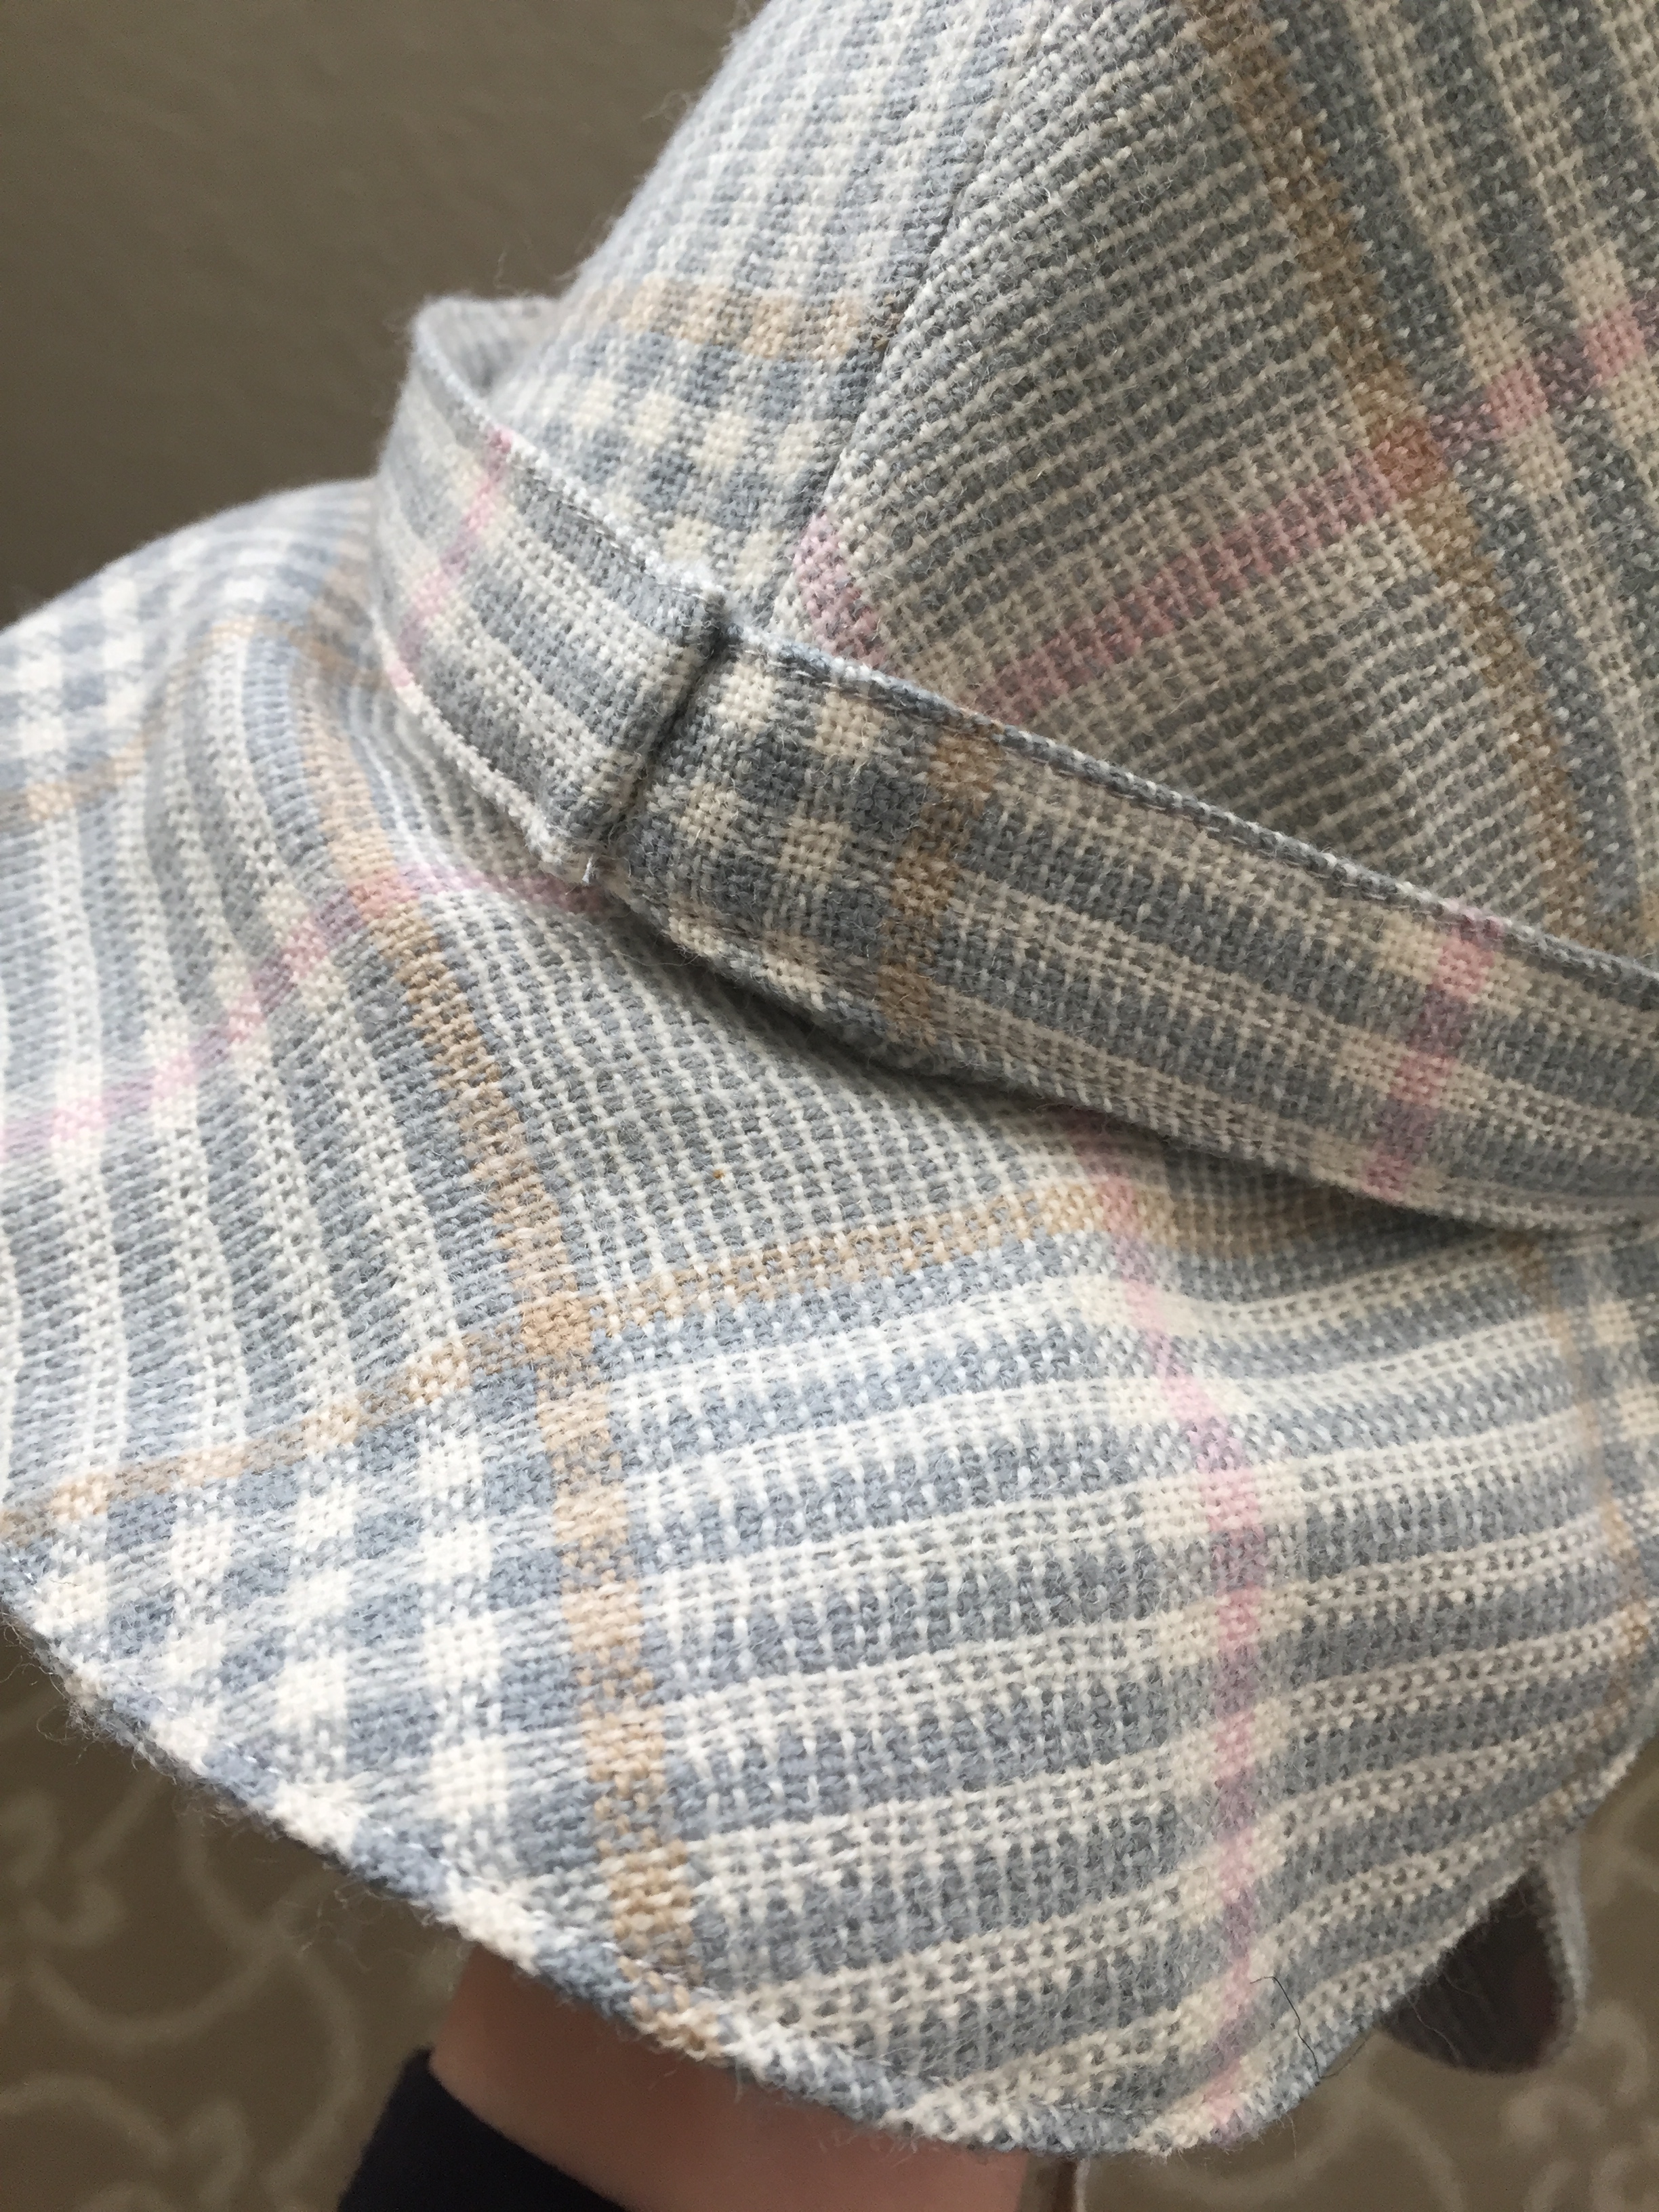
The flaps can be worn tied up but do not meet in the back.

Your hat is now done! Go forth and have witchy adventures in the woods!IMG_3293

IMG_3298.JPG

Do you like this sweater? I’ll be posting a tutorial for it too, no knitting experience required! Please subscribe to my blog or follow me on Instagram @freshfrippery to make sure you get notified when the tutorial is posted!

All patterns and tutorials are provided free on my blog. I don’t charge for them but if you would like to donate towards my domain registration and data costs of hosting the many photos on my site, consider buying me a “coffee”: https://ko-fi.com/freshfrippery

Thank you!Screen Shot 2019-11-27 at 9.28.46 PM

URWS1641.JPG

Blood Vessel Dress at the PEERS Vampire Ball

Last month I attended the annual PEERS Vampire Ball. I wore a dress embroidered with blood vessels, a heart, and lungs. In a sea of black dresses I think I was pretty easy to spot! I’ve worn the dress before, and you can read about the details in a previous post.

John Carey Photographic took some photos of me at the ball (thanks John!) that he’s kindly permitted me to post here.John Carey 3from John CareyJohn Carey 2John Carey 4

If you are curious, here are some pictures that show the whole costume. (Clearly, these were not taken by John). I think for the future I would like to dye my shoes red. (These are the Tissots from American Duchess).

I am looking forward to next year’s ball, and being spooky again!John Carey 3

Circulatory System Dress (aka the Heart, Blood, and Lungs Gown) at the Vampire Ball

Last night I attended the annual PEERS Vampire Ball wearing my circulatory system dress, complete with heart and lungs!

IMG_6037 IMG_6043I did not have time to make a new dress from scratch, so I modified a purchased dress.

I found this really neat gown that was covered in red embroidery that reminded me of blood vessels. (I think it might have intended to evoke sea coral). I thought “Hey, it would be creepy and cool to add organs to it!”

IMG_5999IMG_6005I have a friend with an embroidery machine (who has an Etsy shop), so I sent her the specs and I asked her to make me some heart and lungs in the size and color I wanted.

I cut them out of the fabric base, fray-checked the edges, and sewed them to my dress. The dress was a hit at the Vampire Ball. Lots of people told me the heart was grotesquely cool, and when I turned around they were charmed by the lungs as well. Sometimes I backed up against a friend and said “I’m breathing on you!” because I’m that kind of weirdo.

IMG_6008 IMG_6002

There were lots of amazing costumes at the event. I didn’t take as many pictures as I would have liked, but they are on my Flickr account.

I originally planned to make a brain fascinator, but decided it might take the dress over the line of “elegant and creepy” into “just plain weird.” In the end I bought a red fascinator from Amazon (affiliate link: Red feather flower fascinator)

Jareth the Goblin King and Toby Labyrinth Costumes

If you are a child of the 80s I’m sure you loved the Labyrinth movie and have been secretly wanting an excuse to wear a David Bowie wig. Well, when you are a parent you have the perfect opportunity to dress up in a Jareth the Goblin King costume, and have your baby “dance magic dance.” This is what happened today:

DSCN1355I think my son looks a little worried that I might be the real Goblin King.

Jareth has a pretty snazzy bedazzled blue coat he wears during the ballroom scene, but I didn’t have the time to make it (this year).

BallroomHowever, I thought, “Hey I have gray leggings! And black leather gloves! And countless frilly shirts!”

david-bowie-labyrinthThe best part about this costume is that it can be put together by something I call “closet diving,” except for the hair, which is a newly purchased “blonde rocker” wig from Amazon. (My son’s red and white striped romper is also from Amazon). The boots are Tavistocks from American Duchess. The blouse is vintage Gunne Sax.  The vest is a cheapy Chinese corset with straps and a high back (links below).

Overall, I think the combination of lacy shirt, corset and heeled boots makes for a more femme Goblin King, but I don’t think Bowie would mind some genderbending. =)

You remind me of the Babe. What Babe? The Babe with the power.

IMG_2861I found this cool photo of me by Gaskell Ball. There are no special effects; I’m just standing in front of a purple light and the wig glowed!
10846332_974401772587205_4503172583431805018_nUpdate 9/28/15:

Wow, it’s been nearly a year already, and people are still finding this post! I realized I didn’t link to the items I purchased so to make it easier for anyone who stumbles on to my blog, here are items I purchased on Amazon (affiliate links below) [links updated again on 11/5/18]:

This is the blonde “rocker” wig. I used it right out of the bag; it didn’t need styling: Long Rocker Wig – Mixed Blonde

I bought the red/white version of the Leveret velour striped romper which is sold out now but there’s a similar red/white set made by the same company as “Christmas PJs.“)

This is the corset-vest I used, but it runs small, so buy up 2 sizes: QinYing Women Black Classic Patterns Underbust Corset Top L The corset vest seems to be sold out as of 11/5/18 so here’s one exactly like it: Charmian Women’s Spiral Steel Brocade Waist Cincher

I bought my original leggings at a local store but bought these when I reword the costume in 2018: Satina High Waisted Leggings in Gray

My black leather gloves came from Ross but black leather gloves are easy to find on Amazon:
Women’s genuine leather gloves     Black faux leather gloves

My boots are the gorgeous Victorian button boots called Tavistocks by American Duchess: Tavistock Victorian Button Boots

And finally, a crystal contact juggling ball! Clear Acrylic Contact Juggling Ball

Here’s a photo taken of me at a Halloween ball by Christopher Mobley. Happy Halloween!

10421543_10203613976884582_3808278870530243887_n