Professor McGonagall is my favorite character in the Harry Potter books/movies, and I love her tartan hat with the little ear flaps. I recently made my own and got some requests to share the pattern so here you go!
The hat has flaps on the ears that you can wear down or tied up. My hat is made from wool left over from a matching skirt that I made. The nice thing about this project is that it doesn’t require a lot of fabric and can be made from scraps.

This hat sits on top of the head (and the pieces are sized for my 22″ head). If you want the hat crown big enough to cover your head you’ll need to resize the pieces a bit.

This is the movie hat for reference.

PATTERN PIECES AND MATERIALS
The hat uses several simple shapes and in the sections below I’ll describe how to draft and assemble them. I apologize in advance that I have a lot of pictures of the pattern pieces and finished item, but not the construction process since I made this at night right before a trip. However, construction is pretty straightforward! The pattern pieces include a 3/8″ seam allowance.
Materials:
- Tartan/plaid print fabric (wool or cotton flannel)
- Fusible foam interfacing
- Regular fabric interfacing or stiff cotton organdy
- Lining fabric
- Ribbon or twill tape for ties and inner binding
- Small comb
- Thread, etc.
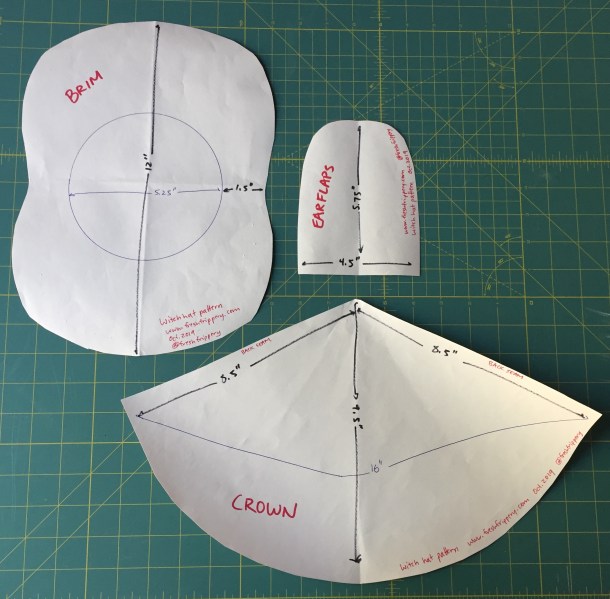
THE CROWN
The pattern:
The shape is a big cone. The center of the cone (which will be the front of the hat) is a little longer than the edges (which will be the back of the hat) since the crown tilts backwards a bit. To draft this shape you can draw a giant circle with a 19″ diameter, and then cut out about 1/3 of it as a starter shape, then use the measurements in the diagram below to help you get close to the final shape. The other option is to draw a triangle with 8.5″x8.5″x16″ triangle and then add the rounded part on the bottom. 
Assembly:
Cut 1 fashion fabric, 1 lining, and 1 interfacing. For the lining I used a scrap of nylon (but any thin fabric is fine). For the interfacing I used single sided foam stabilizer which gives your crown some stiffness and structure. I use Bosal brand (Amazon affiliate link) In-R-Form, which is designed for purses but makes nice hats.
Iron lining to foam interfacing first; I’ll refer to it as “lining” from now on because it’s become one piece. Sew the back seams of the lining together (right sides together) to make a cone shape and trim excess bulk from the seam area. Sew fabric into cone shape the same way and flip right side out. Put fabric cone over lining cone and stitch bottom edges together to create your crown.
THE BRIM
The pattern:
The shape is a modified circle with a hole in the middle. To draft it draw a 12″ wide circle (or trace a large plate). In the center draw a 5.25″ wide circle (or trace a bowl). Cut out and discard the inner circle. Draw a curve on the sides like a butternut squash; this is to allow you to pull up your earflaps later. (Fold the pattern in half and cut both sides at the same time to keep it symmetrical).
Assembly:
Cut out 2 brims from fashion fabric and 1 brim from interfacing. You’ll want the brim to be thin and a little floppy so do not use the foam you used for the crown. I used some stiff cotton organdy because I had that available, but you can use other kinds of fabric interfacing.
The goal is to end up with a donut with the interfacing inside, so layer your pieces in this order: fabric, fabric, interfacing (with fabric right sides together).
Stitch the outer edge of all the pieces together, then flip inside out from the center hole in order to have the fabric facing out and the interfacing sandwiched in. Then topstitch the outer edges (for neat finished look) and topstitch the inner edges (to keep the layers together for the next step).
Sew the bottom edge of the crown to the inner edge of the brim, making sure the raw edges of both pieces face into the hat. Trim extra bulk from the foam if needed.
THE EAR FLAPS
The pattern:
The ear flap is a tongue shape. You can draft this piece by making a 4.5″ x 5.75″ rectangle and curving one end. (Fold the rectangle in half length-wise and cut off a rounded corner to make sure it’s symmetrical). The straight edge is the side that will be sewn to the hat.
Assembly:
For each flap cut 2 fabric and 1 interfacing (4 fabric and 2 interfacing total). The ear flaps should be soft so use a very thin and light interfacing, such as the lining to your hat. The assembly for each flap is just like the brim. Summary: put the fabric right sides together with the interfacing on top, sew together on the outer edges, flip right side out, topstitch all edges.
Stitch one flap to each side of the hat underneath the brim. This should be along the area where the brim curves in. I recommend pinning the pieces to the hat and trying it on to make sure the flaps cover your ears before sewing down. Sorry I forgot to take a picture before I sewed in the binding.
To cover up the raw edges inside the hat, hand-stitch in a ribbon, twill tape, or bias tape. I used a 1-inch wide music print twill tape because it was cute, but actually this is too wide and will cause ripples like my hat. If you want a smoother appearance a 1/2 inch ribbon is preferred.
Since this hat sits on top of your head, for security I sewed a small comb in the front.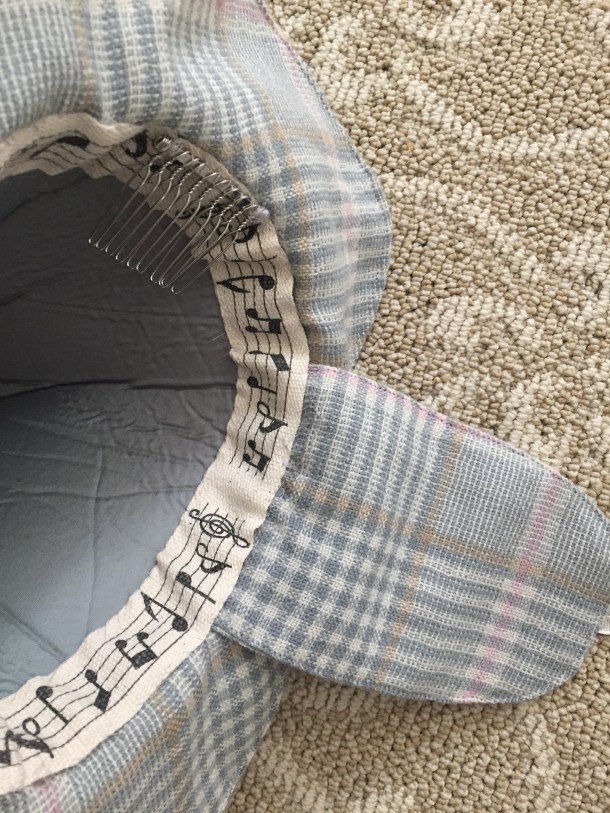
THE HATBAND AND TIES
The pattern:
The hatband is just a long finished strip. Cut a long rectangle 22 inches long x 2 inches wide.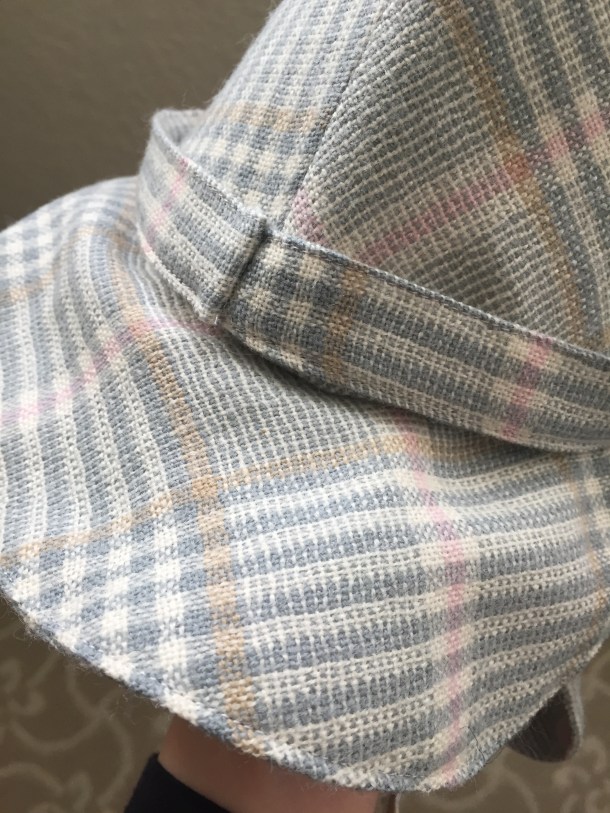
Assembly:
Sew down the long edges, right sides together, making a tube. Turn right side out and topstitch both long edges. Sew the small ends together to make a big circle. Put the band on the base of the crown and tack down in several places next to the brim to keep it from falling off.
Here’s a top view to show that the top of the band is not stitched down, just the bottom.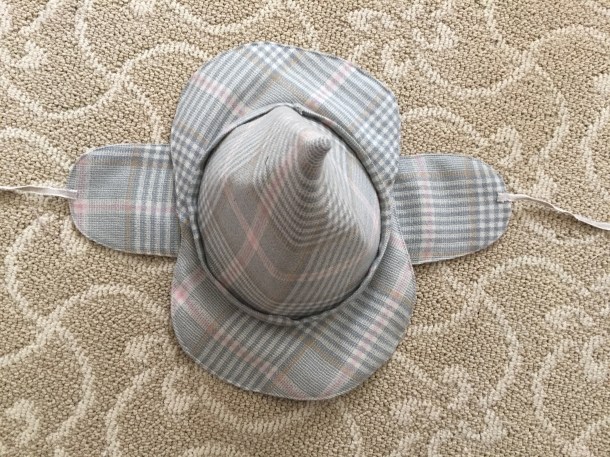
For the ties cut 2 pieces of ribbon or twill tape and stitch to the ends of each earflap. I plan to mostly wear my flaps up so the the tape is stitched to the side of the flap that will not show. For an extra neat appearance you can sandwich the ties into the flaps during construction, but if they are sewn to the outside you can switch them later.
My ties are 18 inches long each so that they can also be tied under the chin. If you don’t plan to have the extra versatility you can make them shorter. I used a linen twill tape I had in the stash because it matched my wool, but a wide ribbon would look cute too!
 The flaps can be worn tied up but do not meet in the back.
Your hat is now done! Go forth and have witchy adventures in the woods!

Do you like this sweater? I’ll be posting a tutorial for it too, no knitting experience required! Please subscribe to my blog or follow me on Instagram @freshfrippery to make sure you get notified when the tutorial is posted!
All patterns and tutorials are provided free on my blog. I don’t charge for them but if you would like to donate towards my domain registration and data costs of hosting the many photos on my site, consider buying me a “coffee”: https://ko-fi.com/freshfrippery
Thank you!


 12-14-19")

Oh – how fantastic!
Thank you!
I’m a beginner and don’t have any scraps yet, how much fabric should I buy?
Half a yard should be plenty but some stores require a one yard minimum purchase.
Love it and the sweater. Looking forward to that tutorial. One of those is on my to make list.
Thank you! I am going to post the sweater tutorial; I’ve just been so busy with life stuff!
Pingback: 1890s Bicycling Sweater Tutorial and Sewing Pattern | Fresh Frippery
Great Post and lovely pictures! Have you ever wondered why some authors wear hats? “The most important reasons to wear a hat is to keep ideas in. Ideas are abstract, fluffy things, prone to floating away, remaining just out of reach if you don’t contain them” – I have written an article titled “The Art of Wearing Hats” – https://authorjoannereed.net/the-art-of-wearing-hats/ – Feel free to check it out!
Thank you for reading my post!
Pingback: 2019 Costuming Year in Review | Fresh Frippery
Pingback: Victorian/Edwardian Pumpkin Witch Costume | Fresh Frippery
I bought this hat years ago and lost it. Thanks for this info. I can now make it myself!
You’re welcome! I hope you enjoy making your own!
Pingback: Deerstalker Witch Hat | Hopefully Creative
Very disappointed. Followed the instructions, used the given dimensions, and the brim in no way fit the crown. I spent three days hand sewing only to have to scrap the project. I’m angry and my 8 year old, whom this was for, is immensely upset. Will be going to YouTube for a more accurate guide in an effort to get something made for my kid.
Hi I’m sorry it didn’t work out for you, given that I’ve seen dozens of successful makes on Instagram. I understand if you don’t want to try again, but for future reference if you had made a drafting error you’ll want to check you didn’t cut the hole in your brim too big or small, and that the curve of the bottom of the cone isn’t too shallow or deep. Before hand sewing do a quick check that the crown fits in the brim.
I love this! Do you have a pattern that I can actually cut out or more direct measurements? I’m not a big sewer and it confuses me every time. Ty
Thank you! I’m sorry but I don’t have a downloadable PDF.