If, like me, you’ve long admired the 1890s bicycling or sporting sweaters but did not know how to knit, this sewing tutorial and pattern is for you, no knitting required!
I wore this sweater to the Reno Tweed Ride, along with a wool skirt and witch hat I made. (A tutorial for the Professor McGonagall-inspired deerstalker hat is in my previous blog post).
This lovely example is from the Met Museum. It features a heavy knit, giant upper sleeves, fitted lower sleeves, a turtle neck collar, and buttons.
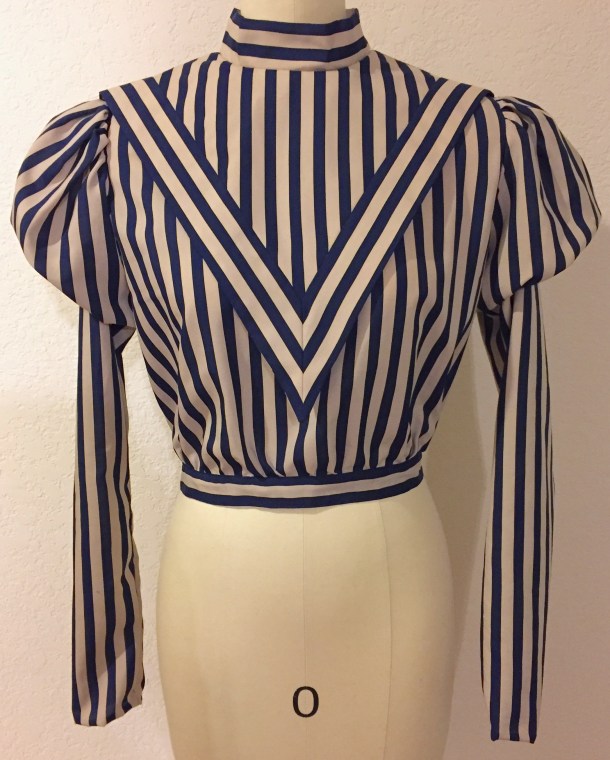
I have made a simplified version with a similar silhouette using 2 yards of 59″ wide “Telio cable knit” fabric from Amazon (affiliate link). It also comes in pink, gray, and blue. It’s not a real yarn sweater knit but it is inexpensive because of its wide width, easy to get, and most importantly it is chunky and not thin. If you want a more authentic look you can look for a real cable knit fabric in cotton or wool, but it will be more pricey because those come in smaller widths. (If you end up using a “real” knit it will be stretchier so cut a slightly smaller size of pattern).
This tutorial assumes some basic pattern drafting skills and also that you have a serger. (This will keep the knit fabric from fraying and also keep the seams stretchy).
The pattern pieces were drafted to fit a woman with a 34″ bust and 28″ waist (or slightly larger because of the stretch). If you are busty or have a soft belly I have an alternative pattern piece for the front that will fit at least a 36″ bust and 30″ waist, with some extra stretch for slightly larger measurements. (If you don’t fit these measurements I will explain what to do below as well).
All pieces include a 1/2″ seam allowance.
BODICE PATTERN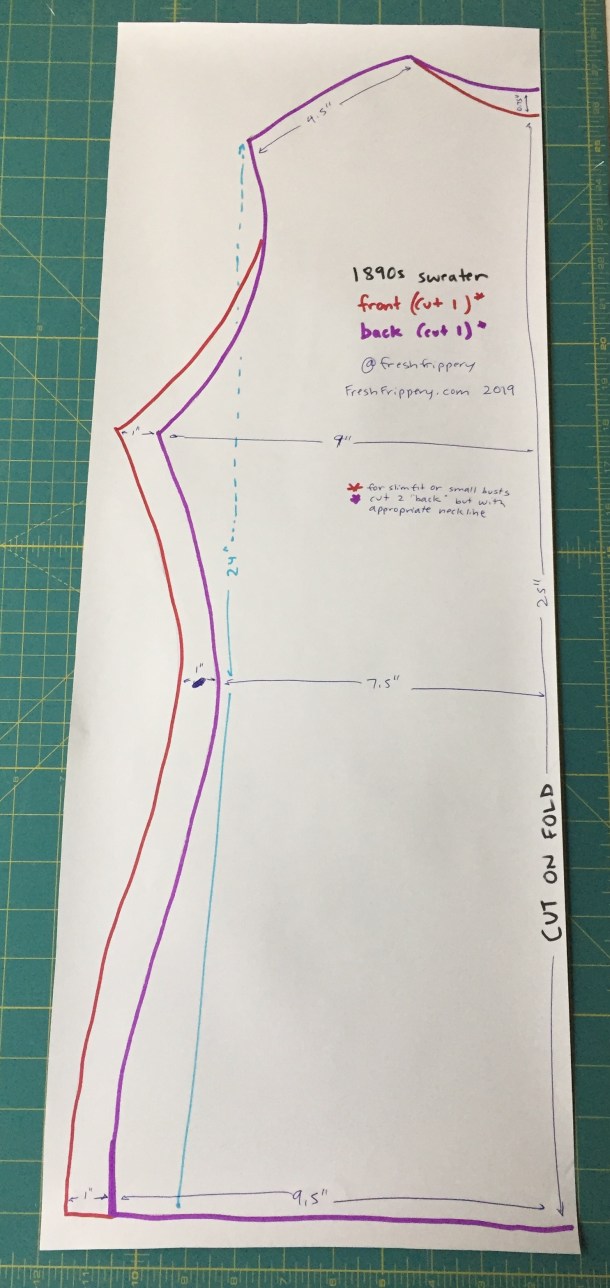
The pattern pieces for the front (red lines) and back (purple lines) of the sweater resemble a sleeveless top. They are mostly the same except the front piece is a little wider and the neckline is cut a little lower. If you are flat-chested or like a tighter fit use two of the back pattern pieces (and cut the neckline lower on one piece to make it a front). If you use two back pieces this will fit a 34″ bust/28″ waist. If you use the front and back this will fit a 36″ bust/30″ waist. This will fit larger sizes depending on how stretchy your fabric is.
For each piece FOLD YOUR FABRIC IN HALF and put the pattern piece on top, with the folded edge on the right. When you cut through 2 layers of fabric and open them you will have a complete pattern piece. Do not cut the fold!

If you are slightly larger than the measurements you can scoot the pattern piece towards the left and add extra inches to the folded size.
If you are very different from the measurements you can make your own pattern by taking a sweater that fits you and tracing the main body as a guide. Remember to add seam allowances! 
BODICE CONSTRUCTION
After you have your front and back, sew them (right sides) together at the sides using your serger. Repeat by sewing the shoulders together. (Note: on the extant sweaters the shoulders are not sewn together but fastened by buttons. If you prefer that look then you’ll want to not sew your shoulders closed at this part. You’ll also want to extend the top shoulder area of your front bodice piece to ensure an overlap, and serge the raw edges. I opted to sew my shoulders closed because my fabric is stretchy enough that the neck opening was sufficient).
For an extra fitted look (or if you’re wearing a corset) I recommend putting it on inside out, pinching out any excess on the side, marking it with chalk, and sewing and trimming the excess. Do this before you put on the sleeves or collar!
To keep the raw edges from fraying, also serge along the edges of your armholes, neck opening, and bottom hem. Turn up the excess length on the bottom hem and stitch down with your preferred technique (with your serger, zig-zag stitch on sewing machine, or straight stitch if you don’t mind losing horizontal stretch).
You should now have a sleeveless top.
UPPER AND LOWER SLEEVE PATTERN
Each sleeve consists of two parts: a large puffed upper sleeve and a fitted tube-like lower sleeve.


As you can see, the upper sleeve is huge. (The sleeves are the main reason I chose a wide width knitted fabric). If you are uncomfortable drafting a curved sleeve head based on the diagram above you can start with an existing large puffed sleeve pattern from your collection. Perhaps you have a Regency or Victorian dress pattern in your stash? Trace that puffed sleeve, then slice it down the vertical center. Pull the two halves apart. Further. Keep going. Yes, they really are that big. Then fill in the missing middle by tracing your new pattern on another (really large) piece of paper. If the sleeve isn’t tall enough to match the measurements given, you can also slice it horizontally and extend.
The lower sleeve is mostly a tube that tapers below the elbow. I have long slender arms; you may have to widen this part of the pattern if you have a more athletic build.
SLEEVE CONSTRUCTION
Sew the long edges of the lower sleeve (right sides) together to make a tube. (Again, use your serger for the sleeve construction to avoid fraying).
Sew the straight edges of the upper sleeve (right sides) together to make a giant um, thing. Serge all edges of your sleeve openings now because it may be too thick to put through your serger once it is gathered/pleated.
Gather the bottom opening of the upper sleeve so that it fits into the top part of the lower sleeve and sew the two parts together. You should now have something resembling a chicken drumstick. 
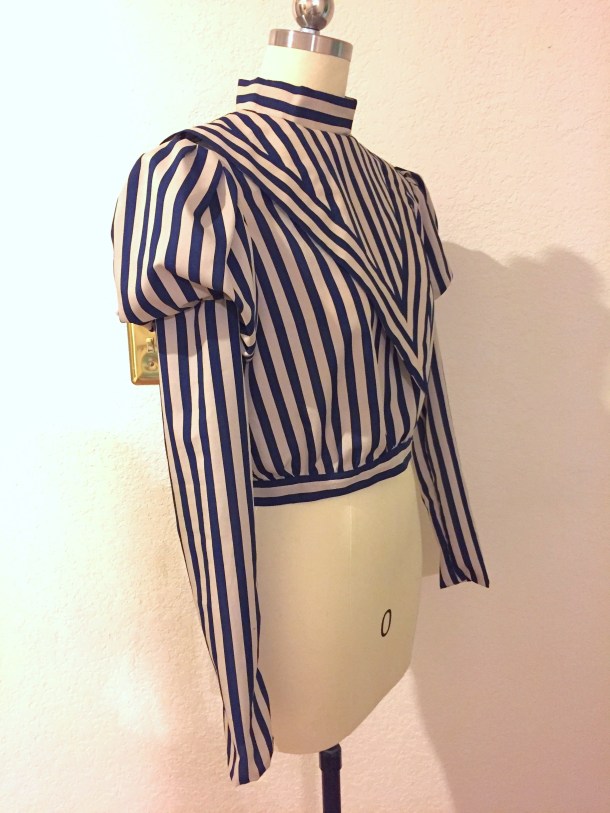
When worn, you will push part of the lower sleeve up so that the bottom of the upper sleeve hangs over it, like the next photo:
Pleat the top part of the upper sleeve to fit into the armhole of your top. The direction of your pleats is a matter of personal preference, but just make sure you mirror them on the other sleeve. 
Put on the sweater, push the lower sleeve to the desired location as described above, and mark where you want your sleeve to end (at the wrist).
Fold up the excess at the end of the sleeve and stitch down to have a finished edge in the same way you did the bodice hem.
COLLAR PATTERN
The turtleneck collar is based on trapezoids. Fold your fabric in half and put the shorter edge of the trapezoid against the fold and cut out your shape, ending up with sort of a hourglass drum. Do this twice.

COLLAR CONSTRUCTION
For each piece you are going to fold it down the center horizontally, right sides together (so that it is inside out). Sew the side seams and then flip it right side out. The top doesn’t need to be sewn because it was on the fold. Serge the bottom (long edge) shut.

Pin the collar pieces to the neck opening of your bodice. The front and back collar pieces are going to overlap on the sides where you put your closures. You will want the front to overlap the back on the outside. Sew the collar pieces to the neck opening, right sides together so that the serged seams are hidden inside when worn.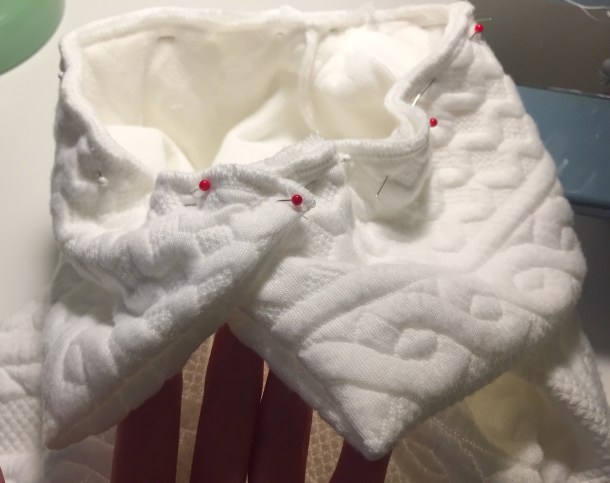
For closures you will add buttons on each side of the collar. The number will vary depending on the size of your buttons. 
I put hidden snaps on my collar because my knit was too thick to put through the buttonholer on my sewing machine, and I was not about to make buttonholes by hand! If you’re not as lazy as me or you have a thinner knit you can certainly make buttonholes for your buttons.
Now you are done and your 1890s sweater is ready for a Tweed ride, historical costume event, or even everyday wear as history bounding!
PROJECT COSTS:
I paid $23.06 including shipping and tax for 2 yards of “Telio cable knit” fabric from Amazon (affiliate link). The buttons, snaps, and thread were items previously purchased cheaply and/or in bulk so my total cost was about ~$25 for this project. Obviously, your costs will differ depending on what kind of fabric and buttons you buy, but this is to demonstrate that a historical sweater doesn’t need to be expensive!
FINAL THOUGHTS:
I hope this tutorial was an understandable and accessible way for people who cannot knit (or don’t have the time) to make an 1890s sweater. If you make one with my tutorial please comment below or send me a message on Instagram @freshfrippery and let me know!
For those of you brave souls who actually want to knit your own, there is a knitting pattern for an 1890s sweater by Kelsey Patton on Ravelry.
For now I am wearing my sweater with a wool skirt but I have plans to make some bicycling pants in the future.
Have fun and go on splendid adventures with your sweater!
I am happy to provide all patterns and tutorials for for free on my blog. It is absolutely optional, but if you would like to donate towards my domain registration and the data costs of hosting the many photos on my site, consider buying me a “coffee”: https://ko-fi.com/freshfrippery. Thank you!


 12-14-19")
