Category Archives: Regency

A Regency Couple at a Winery Plus Costume Hack: How to Upcycle a Men’s Regency Outfit Using Thrift Store Items

My husband and I attended a Regency-themed event called “Wine and Peace,” hosted by the Greater Bay Area Costumer’s Guild at Wente Vineyards. My husband is not a costumer, but agreed to dress up when lured by the prospect of wine tasting. Thus, although this post contains some nice photos of the both of us, the real point is to show how a panicked person can put together a passable men’s regency outfit when time is too limited to make one from scratch.

IMG_7449

He certainly looks like he enjoyed himself!IMG_7454

It was too cold for me to take off my pelisse, so you can read about the silk gown I wore underneath in my previous post. The pelisse and bonnet are not new, although I’ve only had the chance to wear them once before, and you can read about those items in an older post.

IMG_7457IMG_7458IMG_7459

My husband’s outfit consisted of a navy blue coat, a green waistcoat, a white shirt and neck tie, ivory trousers, and black boots.IMG_7375

It is not completely historically accurate, especially the back where I had to fudge it a bit, but it did just fine for a quick outfit!IMG_7370

The coat is up cycled from a double-breasted woman’s coat. (Women’s military-stye coats are longer than men’s).  I made a number of changes:

  1. I cut an upside-down U shape out of the front of the coat to mimic the high waist of a man’s regency garment.
  2. I used that extra fabric to make cuffs, thus lengthening the sleeves for my husband’s long arms.
  3. I also used that extra fabric to make false pocket flaps for the back of the coat.
  4. I split the bottom back of the coat open to mimic a tailcoat, and added some more of the extra fabric in between the split to hide a gap.
  5. I changed the plastic buttons on the front of coat to ones that matched my own coat.
  6. I added the same buttons to the back, next to the pocket flaps.
  7. I changed the plastic buttons on the sleeves to small gold-colored ones.

Before and after: IMG_7250MMUF8222

I recommend looking for a coat like this during the winter. When the weather warms up you may have to go shopping at several places to get one!

I also recommend making sure your subject isn’t slouching or looking down when you mark the cutting line in the front of the coat. When I sewed it up I realized it was cut a little higher than I intended. The look is accurate and fashionable for the time period, but I had planned on a little more coverage.

The waistcoat is an even easier upcycle. Modern vests have pointed fronts while Regency period waistcoats have flat fronts. If you can find a vest with a nice pattern in the fabric, just fold up the front points and tack them to the inside of the vest. (We already had a vest for my husband, made by our friend Kim for our wedding in 2010).

IMG_7190.JPG

If the fellow doesn’t plan to take off his coat, very little of the shirt will show except the collar.  Find a nice dress shirt with a good stiff collar that will stand up. This will not work so well if you have a floppy collar that is not interfaced.IMG_7180.JPG

Flip the collar up, cut off the points, and hem nicely. The modern sleeves and buttons will be hidden by the coat.IMG_7270.JPG
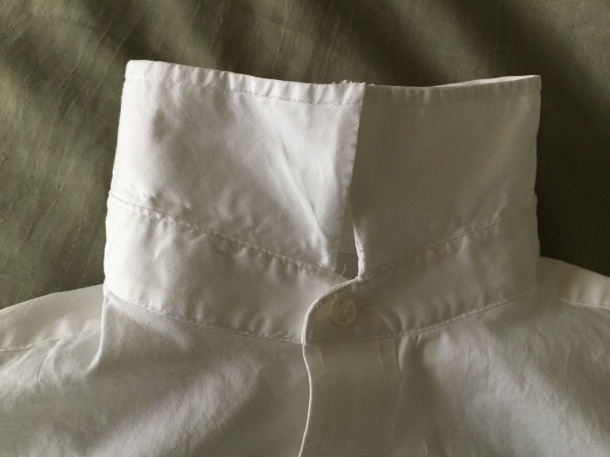
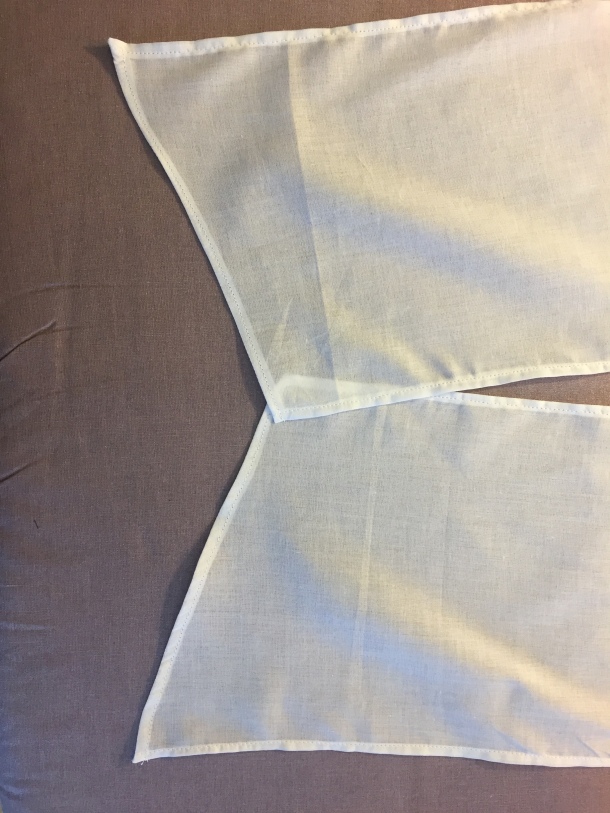
The button at the throat will be covered by the neck tie, which is simply a long rectangular piece of cotton fabric. If you don’t have fabric around your home, you can cut up some textile from the thrift store. You will want the cotton to be thin, to make wrapping and knotting easy. In this case, a cheap bedsheet or semi-sheer curtain is better than a nice tablecloth that will be too thick. The neck tie I made for my husband is 2 yards long and 8 inches wide, made from cotton voile. IMG_7269

Hem the edges and taper the ends a little. IMG_7268
The trousers were a a tricky part of the outfit because of the fall-front, which is not seen in modern men’s fashions. I found a number of high-waisted sailor pants, but they were generally women’s pants in the wrong materials or cut. I then considered making them myself, but after pricing out a pattern from Laughing Moon and buying nice fabric and buttons, I realized it would cost me at least $50 to make and about $70 to buy them. Thus, the trousers were purchased from Historic Emporium. The lesson here is sometimes it’s worth buying and being done with it! (The pants come long enough for you to hem into breeches or keep as trousers).

007238_00The boots were Ovation rubber riding boots (affiliate link) purchased from Amazon for about $40. They weren’t real leather, but still looked pretty nice, and can be reused with other costumes in the future. If you are lucky, you may able to get some nice boots locally. Don’t forget to look in the women’s footwear section for larger boots! There’s a lot of “riding boot” style women’s boots sold during the fall and winter that could work with Regency.Screen Shot 2018-04-02 at 8.19.26 AM.png

I hope this post was useful, and now you can keep an eye out for the right kind of coat and other items to upcycle into a Regency men’s outfit!QVLO1071.JPG

A “Quick” Regency Silk Gown

I’m calling this a quick regency dress because there wasn’t a lot of planning ahead or blogging during steps, fitting was easy because I’ve used the pattern before, and the event I’m wearing it to is next week!IMG_7216

The pattern is Butterick B6074 view B, with minor modifications. The fabric is a printed silk taffeta from my stash.IMG_7222

The bodice is gathered in the front, and the stiffness of the taffeta gives the bust more fullness than I have in real life. 😉IMG_7217

The pattern has drawstring closures at the neckline and waistline, which is period, but I prefer hooks and eyes when the fabric is not a soft cotton.IMG_7220

If you’re curious about how to put in hooks and eyes to minimize gapping, I have the hooks away from the edge, and the eyes sticking over the edge. (Some people also alternate hooks and eyes on each side. I am lazy, and also wanted to use up the last few inches of hook and eye tape that I had).

I serged the armscye and bottom of the bodice to keep them neat. The shoulder straps are sewn in by hand. Here’s an inside look at the dress.IMG_7228

I have a pelisse that I will be wearing over this if the weather is cold, so I admit to be a little sloppy in some of my construction, but eh, I find most people are too distracted by pretty fabric to care. =)

I also made a matching reticule, with my leftover fabric and lining. I made the tassel out of some thick thread.IMG_E7254.JPG

Project costs:

  • 5 yards printed silk taffeta: $38 including shipping from a destash group; I have about 2 yards left over
  • Pattern: $0, already used for another dress
  • Bodice lining: $0, scraps from another project
  • Skirt lining: 2 yards cotton voile: ~$13 with tax and shipping (purchased with other items from Dharma Trading Co.)
  • Thread, lace scrap, and hooks and eyes: ~$5 from stash
  • Silk ribbon: $0, left over from another project

Total: ~$56 (even less if I sell the leftover 2 yards of taffeta to recoup some costs). Not bad for a silk dress!

I plan to wear this dress with my Pemberly slippers from American Duchess, and some beautiful new grape earrings from The Lady Detalle.IMG_7106.JPG

I look forward to wearing this print! Simple, but cute. IMG_7115.JPG

Regency / Napoleonic Court Gown and Train at Costume College 2017

I received my photos from the official Costume College photographer Andrew Schmidt  so I can show you my complete Regency/Napoleonic court gown and train ensemble!*

* A note about terminology: Technically, English Regency court gowns were a really odd silhouette where you had the high waist but very wide shape, and French gowns of the Napoleonic period had the more columnar shape, so my whole outfit is French style. However, for simplicity in some of my past posts I have been using the term “Regency” because I can wear my gown without the formal court train.IMG_3396-(ZF-3567-92908-1-002)IMG_3397-(ZF-3567-92908-1-003)

I love this view of the back. Thanks Mr. Schmidt for making sure the circle was laid out nicely!IMG_3399-(ZF-3567-92908-1-001)

I have made a number of posts about the construction process of the dress and train and you can find them under the Napoleonic tag on my blog, but I will summarize a few main points here.

For the dress I used the Butterick B6074 pattern, with some modifications (described in previous posts). The dress is made out of a mint green chiffon with white cotton voile lining, and the fancy layer on top is a heavily embellished net with embroidery and several types of sequins, beads, and faux pearls. I had a few questions about whether I used a sari. It is not a sari, but a bridal lace from Fabric Wholesale Direct. Here is a close-up of the fabric before I cut it out:img_0802

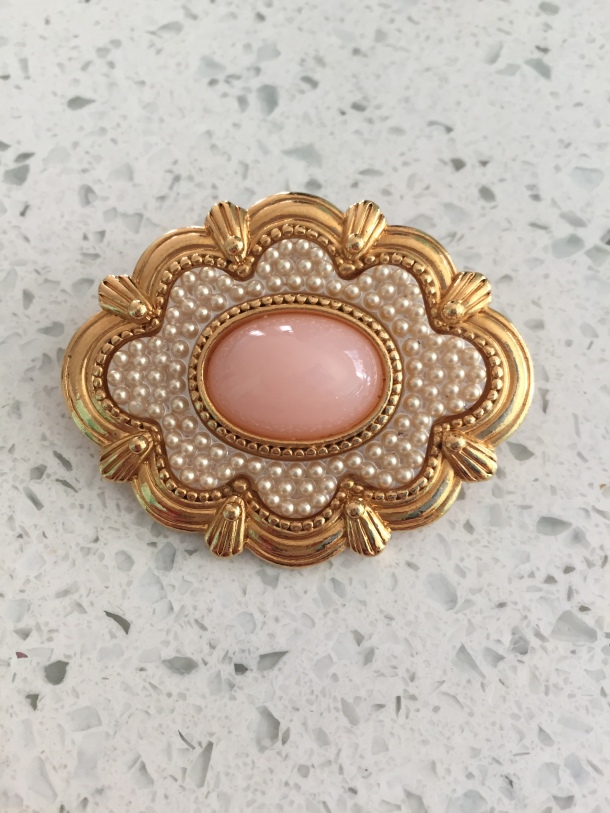
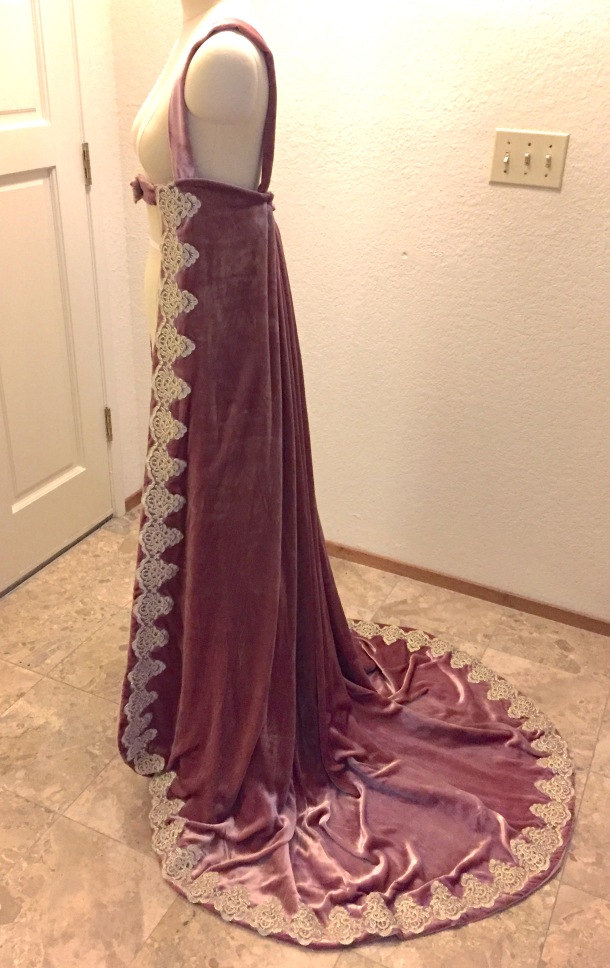
For the court train I used the Butterick B4890 Josephine pattern, but I modified it to have straps instead of a bodice back. The train is made with silk velvet, lined with a linen/cotton blend, and edged in a gold-tone netting lace. The front underbust strap is closed with a vintage brooch that I found on eBay.IMG_2362

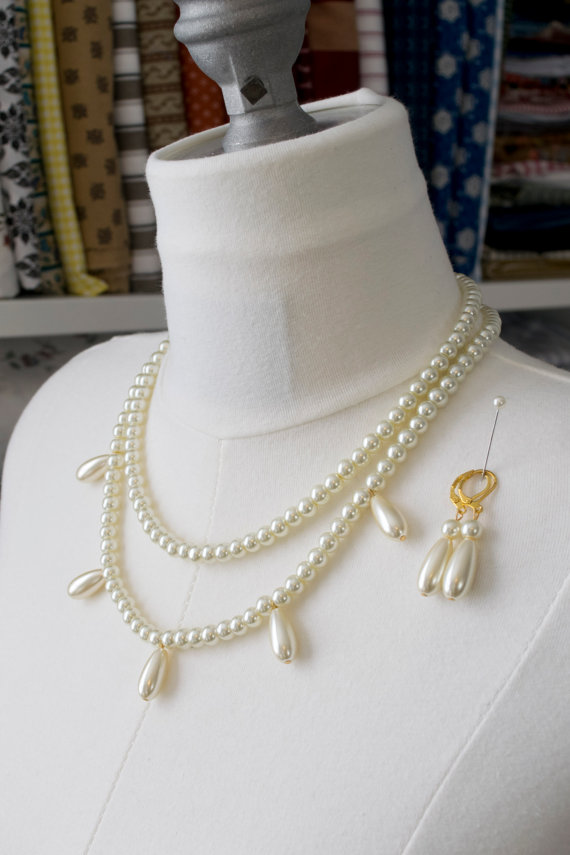
My pearl necklace and earrings were made by Gloria of In The Long Run Designs, whose Etsy shop is full of beautiful historical jewelry!

il_570xN.1127614541_if7j

Photo by In The Long Run Designs

My regency diadem was made by me using brass lamp banding and faux pearls. (I posted about a party where I made some other diadems here).IMG_2927

This whole outfit was really heavy and became quite uncomfortable to wear by the end of the evening! I’m glad it was worn for only a few hours at the Friday Night Social. The dress is heavily beaded and sequined, and the train is quite heavy too, and unlike a Victorian outfit where I can have a corset and hoops to help support the weight, everything was supported by my shoulders.

Here’s a quick twirling video here where you can see the dress sparkle!

So, what’s the final tally of what everything cost? This was my “splurge” project for the year so it cost more than my usual outfits, but I think this one was worth it!

Dress:

  • 3 yards beaded lace (from Fabric Wholesale Direct): $149.85
  • 3 yards mint chiffon (from FWD): $7.47
  • 3 yards white cotton voile (from FWD): $11.97
  • Thread and fishing line (from stash)

Total = $0 (All the fabric for this dress was a gift from Fabric Wholesale Direct in exchange for a tutorial you can see on their website. Thanks FWD!)

Court train:
  • 6 yards silk velvet (from Amazon, affiliate link): $113.84 (I used 5 yards)
  • 5 yards linen/cotton lining (from Renaissance Fabrics): $32.50 + tax and shipping = $43.59
  • 10 yards lace (from Aliexpress): $34.94 (I only use half, and sold the remainder)
  • Pattern (from eBay): $7.59
  • Brooch (from eBay): $3.84 (yay no one else bid on it)
  • Button cover kit (leftover from another project): $0
  • Button loops (braided from random string I found in my house): $0

Train total = $203.80

Ouch, that’s a bit of a splurge, but it’s not terrible considering I have a lot of huge scraps of silk velvet left over, and can probably make a 1920s dress with some careful cutting, so I can get two dresses out of that price!

Tiara: The cost of this is a little tricky to calculate, because a lot of the supplies I bought in bulk, used to make other tiaras, and shared with friends. I think if you shop right and share with friends you can make one for $30 depending on how fancy you get with beads, pearls, or gemstones. A big part of the cost is buying the brass online and paying for shipping.

  • Brass banding: Etsy or lamp supply stores
  • Faux pearls and head pins: eBay or Michael’s
  • Metal hair combs: Amazon or beauty supply shops

My shoes were Pemberly Regency slippers from American Duchess (affiliate link) that I previously owned. I am also wearing short stays and a corded petticoat (not period correct, but needed to support the weight of the dress).

So in total, this ensemble will cost you about $400 of materials (not including accessories), but represented a little more than $200 out of pocket, with enough leftovers to make a second dress, so not too bad! I try to keep most gowns $100 or less, so this was my “big project” for the year.

I am very happy with how this court outfit turned out, especially how the mint and rose color combination worked together, and how the accessories completed the look. It’s also always nice too when a dress looks good from the back as well!IMG_3399-(ZF-3567-92908-1-001)

Regency/Napoleonic Court Train (Part 2) 98% Done!

My Regency/Napoleonic court train is nearly done! (I am just missing a proper brooch closure for the front; right now the straps are pinned into place).IMG_2285

I apologize for the weird lighting. I recently changed some of the lighting in my house to LED bulbs, which is great for my energy bill but not for the color of my pictures.

Don’t you just loooove the way silk velvet drapes?IMG_2276

Here is a shot with my court dress previously described here.IMG_2301

A reminder of what the gown alone looks like:b

I hope to get proper photos of the whole ensemble at Costume College.IMG_2307

Here is another mmm silk photo since I love the back so much.IMG_2278

I used Butterick B4890 to get the teardrop shape, but did not use the bodice portion of the pattern. I opted for the shoulder and underbust straps I saw in extant examples of court trains. I also decided to have a more “modest” length train since I will be using this at Costume College and it will be easier to navigate the crowds.

I can’t wait to wear this!IMG_2297

I still have to make a matching regency diadem and I have a pearl jewelry set on the way. Once that’s taken care of I can finally start on my gala gown!


(I will do my usual final tally of project costs once the whole ensemble is actually complete, but it is nearly there).

Regency/Napoleonic Court Train (Part 1)

The blog has been a little quiet lately since my last post on Regency diadems because I’ve been having some issues with my wrists and haven’t done much sewing except for things I can make completely by machine, like curtains. However, I have received all my materials for my court train, to go with my beaded court dress.

I have 6 yards of silk velvet, which depending on the light and the direction of the nap appears either a deep rose color or a silvery-pink. (I tried getting swatches of cotton velvet, but they were the wrong texture and stiffness and were obviously meant for upholstery). I didn’t realize before starting my search how hard it is to find a nice rose-colored velvet that isn’t either baby pink or hot pink! I would have been happy with a synthetic velvet if it was the right color, but ended up having to go over budget and buy silk. Of all the places I looked, you’ll never guess that the final winner was Amazon!IMG_1454

After a few tries at swatches of lining I settled on a linen-cotton blend from Renaissance Fabrics. The dusty pink color is good match to the underside of the silk velvet, and lighter than the deep rose but close to the silvery-pink. (Left to right: underside of the silk, the velvet, and the lining).IMG_1452

The lace I ordered online was a brighter gold than the stock photo (and what I was able to photograph below), but still rather pretty. However, I think bronze would be a better match to my dress, so I’m going to have to tone down the lace. I have a friend who has sponge-painted acrylic craft paint onto lace before, so I will be doing some experiments! I hope it works; after the purchase of the silk velvet I’d rather not spend any more money on this project buying new lace and crossing my fingers that it is the right color!IMG_1455

Mmm so buttery soft!IMG_1451

Regency Diadems

The Napoleonic era is filled with gorgeous golden diadems, studded with coral, pearls, gemstones, or lovely cameos. What court outfit is complete without a tiara?

This garnet diadem was sold on Ruby Lane.Screen Shot 2017-03-10 at 7.28.31 PM.pngThis coral diadem made from gilded brass from A. Brandt is very elegant.Screen Shot 2017-03-10 at 7.23.31 PMScreen Shot 2017-03-10 at 7.23.51 PM

Here is a beautiful cameo tiara sold by Sotheby’s that inspired me to want my own.Regency2

This parure (matching set) that belonged to Caroline Bonaparte is stunning!Regency

Last month, I hosted a group of friends and we decided to try our hand at making our own, using this great tutorial from the Mistress of Disguise, for a Regency Tiara Making Day! Behold, crafting chaos.IMG_1157.JPG

We bought materials from a variety of places, including Michael’s,  Joann’s, and eBay for beads and wire; Hobby Lobby or Amazon for brass sheets and metal combs; and Whittemore-Durgin, Etsy, and Ebay for our brass lamp banding. It’s hard to say how much it cost to make each one, since some things were bought in bulk and we did a lot of sharing. Here are our tiaras!IMG_1159

There was some trial and error, and things we learned during the process:

  • Soldering looks better but hot glue is much faster than soldering, especially when you have a group.
  • High-temp hot glue is required; the mini glue guns used for crafting don’t stick as well.
  • Big tin snips instead of small jewelry snips are better for cutting through the brass banding. (Regular scissors can cut through the brass sheets).
  • If you have tarnish on your brass, use Simichrome polish.
  • Wiring metal combs to the diadem is more sturdy than gluing metal or plastic combs.

Here are my “practice tiaras.” They are not perfectly straight and there are some little issues I’d like to work on (such as the thickness of the brass, the overall proportions, and remembering to push the head pins down before the glue set!) but they were really fun to make and I want to make more! I’d like a thinner, more delicate pearl one, and a pink coral one to go with my court gown.IMG_1258IMG_1261IMG_1266IMG_1264

Beaded Regency Court Dress (Part 3)

I’m still working on the rest of the court ensemble but at least my dress is complete! B.JPG

I didn’t have all my accessories yet at the time so I wore a pearl tiara I had instead of a Regency diadem and did a quick updo. (My next post will be about Regency diadems; I got together with a group of friends for a tiara-making day).D.JPG

You can read Parts 1 and 2 for more information, but to summarize a few details, my dress is made up of one layer of beaded and sequined mesh, an interlining of seam foam chiffon, and a lining of cotton voile. It is made from Butterick B6074 View B, with some modifications:

  • I combined some pattern pieces to minimize seams in the beaded fabric.
  • I skipped the gathered overlay on the bodice which is recommended for solid fabrics.
  • I raised the back neckline about 1 inch.
  • I extended the bottom front bodice about 1 inch since I was not trying to achieve the tiny bodice/pushup bra look.

Note: Butterick B6074 runs large! It has a lot of ease built in for the modern wearer. I recommend going down 2 sizes.

a

For undergarments I am wearing a shift, short stays, a corded petticoat and a ruffled petticoat. I normally would not wear a corded petticoat with Regency but this dress is heavy.

I have decided to go with a rose velvet for the train, and I have been spending far too much time searching for pink velvets, getting swatches, and looking for trim. However, I think we have a winner. IMG_1185.JPG

I still need to order the rest of the fabric and find the trim, but I’ve purchased lining and have the pattern ready. I’m mulling over whether I should use my leftover beads and sequins to decorate the trim, but that may be madness speaking.

By the way, in case you think my life is glamorous, here’s a peek at real life (bad posture, clutter, and photobombing) vs. the cropped version of a selected few pictures for the blog!img_1155

UPDATE:

I wrote a tutorial for this dress, which Fabric Wholesale Direct spiffed and made into this post on their website! 

All the fabric I used for this project is from Fabric Wholesale Direct. Thank you!

Beaded Regency Court Dress (Part 1)

My current project is a beaded Regency court dress using Butterick B6074 as a starting point. Here is a sneak peek of the bodice; I took this picture before closures were added.img_0973

The dress consists of 3 layers: a sheer netting with beads, sequins, and faux pearls; a seafoam green chiffon interlining, and a cotton voile lining. I don’t know if the seafoam green is historically correct. Most of the extant Napoleonic court gowns I’ve seen are white or ivory, with most of the color in the embroidery and the sumptuous court trains.  However, I love that particular shade, and the way it looks against the bronze sequins in the netting. (The fabric is from Fabric Wholesale Direct and has gold embroidery, with round and cylindrical seed beads, round and leaf-shaped sequins, and round and oval faux pearls).img_0802

I did find this portrait of the Empress Marie Louise in what appears to be a light blue gown.lefevre_maria_luigia

Because the fabric I’m using for the outer layer of the gown is sheer and beaded I am trying to minimize seams. It keeps me from cutting through too many motifs, and saves me some time since I have to remove all the beads and sequins from each seam to reduce bulk. I altered the pattern by combining the two should strap pieces into one (eliminating the shoulder seam), and redrafting the back bodice and side bodice pieces to be one. The placement of the seams are no longer quite correct, but it did make sewing easier. I also raised the back because it is very low cut and my stays would have shown.IMG_0887.JPG

img_0803

Because of all the beading, and because the foot pedal of my sewing machine is having electrical problems, this gown is mostly hand-sewn. Thus, it is taking a while, especially since I am super paranoid every time I have to cut into this precious fabric!img_0998

2017 Costuming Plans

I have three large projects planned for 2017, although I’m sure little projects will pop up in between if I get invited to events or get distracted by shiny things. I’m happy to report that I already have most of the materials on hand for my three projects, much of it acquired through some lucky bargains!

Regency court dress

I am not planning to reproduce this exact outfit, but this picture is to give you an idea of what I have in mind. I will be making a beaded Regency evening dress, for which I already have the materials (courtesy of Fabric Wholesale Direct). I’ve started on the dress so that will be the focus of my next series of posts. The color and type of fabric I will be using for the train has not been decided and will depend on what I can get for a reasonable price.

1660s Cavalier gown

I’ve never made a 1660s outfit before, so this is an era that is new to me. Although I think satin might be a little more appropriate, I will be making this out of black silk taffeta because I happen to have it in my stash (from the wonderful $5/yard sale from Fabric Mart!) Although I had already picked out this dress to make for the gala at Costume College this year before the theme was announced, it ended up being the perfect choice. The theme will be “Dinner at Tiffany’s” so a black dress with pearls is quite appropriate!

Crimson Peak picnic outfit

06a80c2771674a757c37cc5248095268

I already have the right color silk for the skirt due to a serendipitous find from a friend’s garage sale! I won’t be able to find the exact lace for the blouse but I have something with a similar feel. The biggest challenge will be sculpting the hand belt. This outfit is being planned for a spooky Victorian tea in October.

I hope your sewing adventures in 2017 are fun and fabulous!

Regency Pelisse

I have finished my navy Regency pelisse that goes with my bonnet.

DSCN0781

There are no progress shots to share since sometimes I worked on this for literally a few minutes here and there over the past year. Sometimes all I had time to do was sew on a hook and eye.

DSCN0776

The fabric is a jacquard woven with a subtle diamond pattern. I’m not sure of the fiber content since I found it as a remnant. I’m sure it’s at least partially synthetic, but I liked the texture.

The lining is gold and cream jacquard, and the sleeves are lined with satin. The coat is military-inspired, with cream braid down the front, on the belt and sleeves cuffs, and around the edges of the pointed collar. The front and back are decorated with gold-colored and faux pearl buttons, but the coat closes with hooks and eyes. The belt has a golden buckle.

DSCN0777DSCN0786

I used the Sense and Sensibility “Regency Spencer Jacket and Pelisse Pattern” as a starting point, but made new sleeves and collar. (A quick note about this pattern: I was disappointed to find it is not actually a pelisse pattern, although it is advertised as such. It is really a spencer jacket pattern only, with some instructions telling you to just add a skirt to lengthen it. Although that wasn’t terribly difficult to do, when I buy a pattern it is because I want to pay someone else to do the math).

The pelisse has some wrinkles to work out, but overall I am pretty pleased with it, and plan to wear it to Costume College.

DSCN0791

I still have to paint some shoes to match, but I think it will look nice with the bonnet.

bonnet side

Project cost (not including bonnet materials):

– 3 yards fabric: $29.99 + tax

– pattern: $12 + $3 shipping

– 8 yards braid: $7.60 + tax

lining, interfacing, buttons, thread, hooks and eyes: from the stash

Less than $60. Not bad.