My husband and I attended a Regency-themed event called “Wine and Peace,” hosted by the Greater Bay Area Costumer’s Guild at Wente Vineyards. My husband is not a costumer, but agreed to dress up when lured by the prospect of wine tasting. Thus, although this post contains some nice photos of the both of us, the real point is to show how a panicked person can put together a passable men’s regency outfit when time is too limited to make one from scratch.
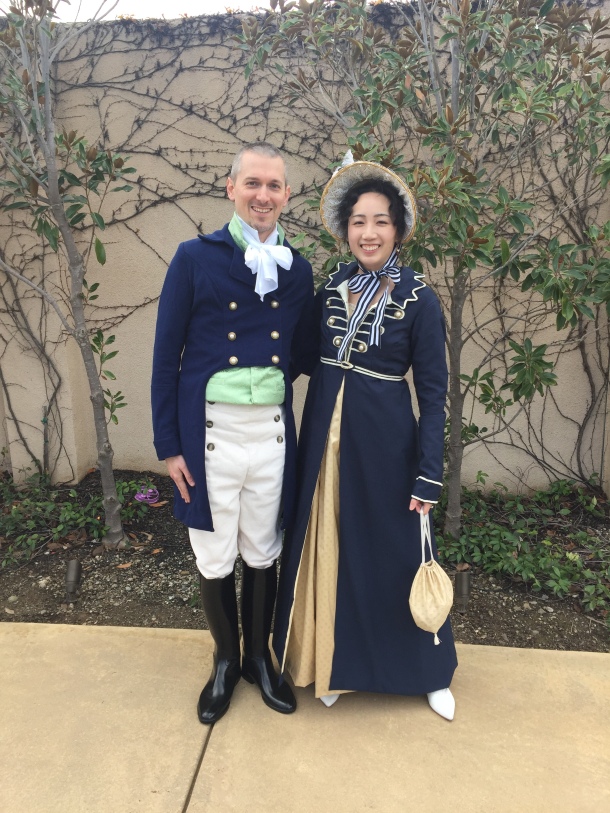
He certainly looks like he enjoyed himself!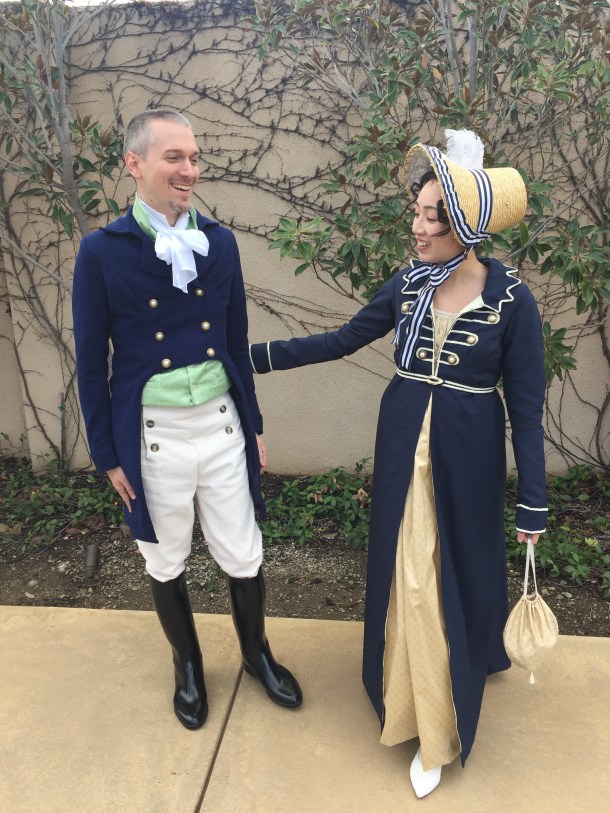
It was too cold for me to take off my pelisse, so you can read about the silk gown I wore underneath in my previous post. The pelisse and bonnet are not new, although I’ve only had the chance to wear them once before, and you can read about those items in an older post.


My husband’s outfit consisted of a navy blue coat, a green waistcoat, a white shirt and neck tie, ivory trousers, and black boots.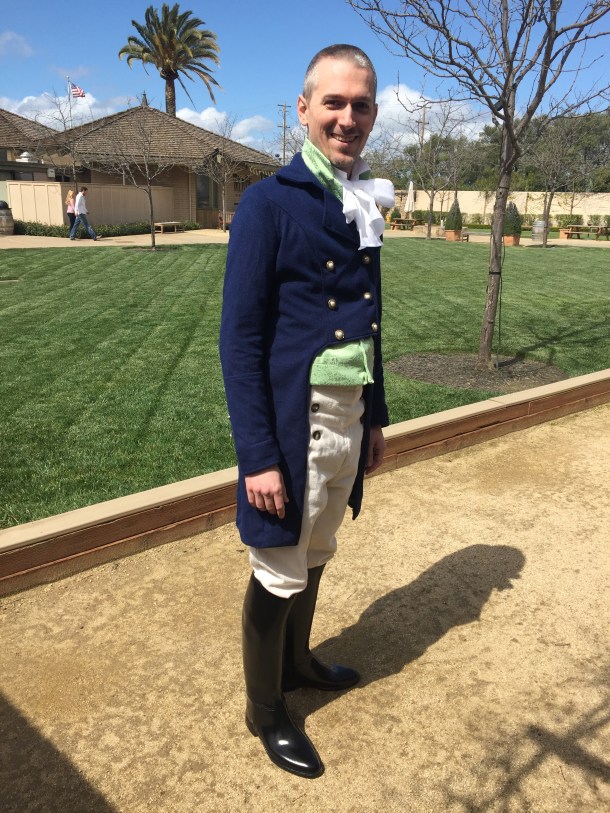
It is not completely historically accurate, especially the back where I had to fudge it a bit, but it did just fine for a quick outfit!
The coat is up cycled from a double-breasted woman’s coat. (Women’s military-stye coats are longer than men’s). I made a number of changes:
- I cut an upside-down U shape out of the front of the coat to mimic the high waist of a man’s regency garment.
- I used that extra fabric to make cuffs, thus lengthening the sleeves for my husband’s long arms.
- I also used that extra fabric to make false pocket flaps for the back of the coat.
- I split the bottom back of the coat open to mimic a tailcoat, and added some more of the extra fabric in between the split to hide a gap.
- I changed the plastic buttons on the front of coat to ones that matched my own coat.
- I added the same buttons to the back, next to the pocket flaps.
- I changed the plastic buttons on the sleeves to small gold-colored ones.
Before and after: 

I recommend looking for a coat like this during the winter. When the weather warms up you may have to go shopping at several places to get one!
I also recommend making sure your subject isn’t slouching or looking down when you mark the cutting line in the front of the coat. When I sewed it up I realized it was cut a little higher than I intended. The look is accurate and fashionable for the time period, but I had planned on a little more coverage.
The waistcoat is an even easier upcycle. Modern vests have pointed fronts while Regency period waistcoats have flat fronts. If you can find a vest with a nice pattern in the fabric, just fold up the front points and tack them to the inside of the vest. (We already had a vest for my husband, made by our friend Kim for our wedding in 2010).

If the fellow doesn’t plan to take off his coat, very little of the shirt will show except the collar. Find a nice dress shirt with a good stiff collar that will stand up. This will not work so well if you have a floppy collar that is not interfaced.
Flip the collar up, cut off the points, and hem nicely. The modern sleeves and buttons will be hidden by the coat.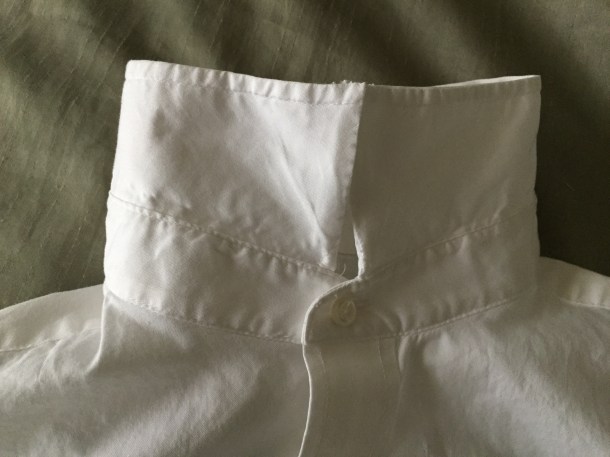
The button at the throat will be covered by the neck tie, which is simply a long rectangular piece of cotton fabric. If you don’t have fabric around your home, you can cut up some textile from the thrift store. You will want the cotton to be thin, to make wrapping and knotting easy. In this case, a cheap bedsheet or semi-sheer curtain is better than a nice tablecloth that will be too thick. The neck tie I made for my husband is 2 yards long and 8 inches wide, made from cotton voile. 
Hem the edges and taper the ends a little. 
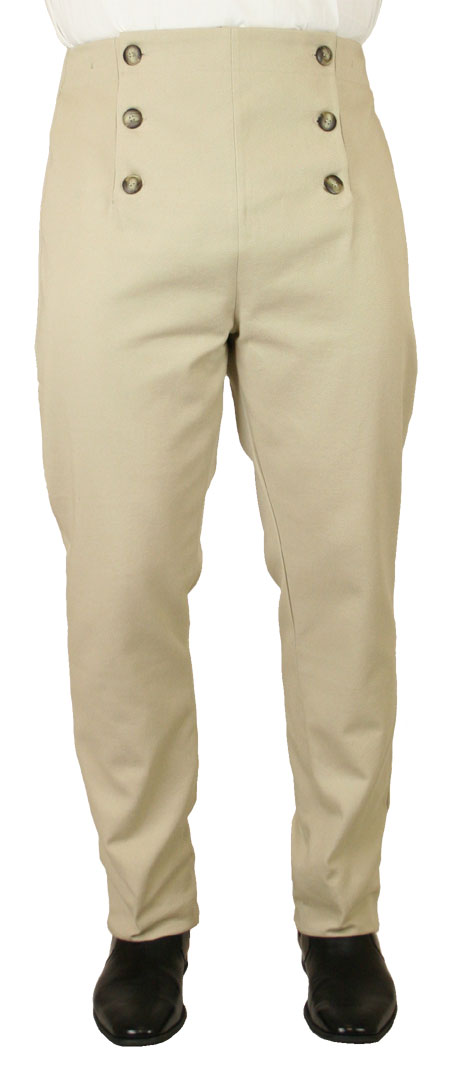
The trousers were a a tricky part of the outfit because of the fall-front, which is not seen in modern men’s fashions. I found a number of high-waisted sailor pants, but they were generally women’s pants in the wrong materials or cut. I then considered making them myself, but after pricing out a pattern from Laughing Moon and buying nice fabric and buttons, I realized it would cost me at least $50 to make and about $70 to buy them. Thus, the trousers were purchased from Historic Emporium. The lesson here is sometimes it’s worth buying and being done with it! (The pants come long enough for you to hem into breeches or keep as trousers).
 The boots were Ovation rubber riding boots (affiliate link) purchased from Amazon for about $40. They weren’t real leather, but still looked pretty nice, and can be reused with other costumes in the future. If you are lucky, you may able to get some nice boots locally. Don’t forget to look in the women’s footwear section for larger boots! There’s a lot of “riding boot” style women’s boots sold during the fall and winter that could work with Regency.
I hope this post was useful, and now you can keep an eye out for the right kind of coat and other items to upcycle into a Regency men’s outfit!


 12-14-19")

What a fun post! It’s amazing what the promise of some wine can do. And I will keep this in mind if there comes a time I can get my husband to join me in a regency event.
I hope you can get him to join you!
I am so going to force– er, “convince”– my husband to do this now… The problem will be finding a coat to fit his 6’3″ frame!
Yes, that was a problem for me too! I had a little trouble finding a coat at first because they were all too short, even though my husband is not super tall. Luckily I had enough left over fabric to extend the sleeves. Good luck!
Thanks for this! I was going to ask you about your husband’s Regency outfit… especially the boots. Good to know that the outfit was upcycled. My husband needs a new Regency outfit so I’ll forward this info to him.
You’re welcome Jean! I hope this post is useful to your husband!
Pingback: JAFA on a budget – a quick guide | A Lady's Wardrobe
This is amazing! His outfit looks really good. I’ve always considered buying a coat from a thrift store and making it into a spencer for myself (but then I got too lazy to go to the store so I drafted a pattern for myself). I hope both of you had fun in your ensembles. Your pelisse is stunning by the way.
Thank you! I’m glad you liked our outfits!
Nice matching outfit. Welcome to visit my site
https://styleofbonnie.com/
Pingback: 2018 Costuming Year in Review | Fresh Frippery
Pingback: JAFA on a Budget – 2019 update | A Lady's Wardrobe
This is fantastic! I stumbled on your blog while searching for an easy way to make a couple of Regency era dresses for myself and an outfit for my husband. I love the different costumes you make and the easy tips you guve for making my own.
Hi Sandy, thank you so much for reading and telling me that you are making costumes for you and your husband. I’m so glad I could help!
Thank you very much for this! As a college student with exceedingly little money, seeing that I can make actual good regency garb with what I have (a vest and shirt) and a tight budget is very reassuring.
You’re very welcome! I’m glad you found this post helpful and encouraging!
I’m so glad I’ve found this even though it’s an older post. I have been surprised by a trip in two weeks and I have to put my husband in something.
And I must somehow produce it while working full time and having full time classes. We’re hacking literally everything together.
I think I can hammer out a waistcoat to cover my sins, but the shirt suggestion and the coat are 1000% what I needed. Love it!
I’m so glad to help and I hope you have wonderful trip with your husband!