Category Archives: Uncategorized

Tutorial for Cozy Halloween Robe Made with Cuddle Minky Fabric 

As someone who loves both fall and Halloween it is the perfect time of year for me to make a cozy robe made of super soft Cuddle minky fabric using my Janome Skyline S9. The print I chose is called “Eye of Newt” by Shannon Fabrics. A lot of robes are only a single-layer but I wanted to have mine lined with a plush fabric for extra warmth and luxury. I used “Luxe Cuddle Glacier” (a textured black minky fabric) for my lining.

img_1img_2

Note: I am a member of the Janome Maker program and this skirt is sewn on a Janome Skyline S9. (This post is sponsored by Janome but all content and opinions are mine). All the fabric was gifted by Shannon Fabrics.

img_3

WHAT YOU WILL NEED (exact amounts depend on your measurements and the width of your fabric):

  • 4 or more yards of 58-60 inch wide fashion fabric (minky or fleece fabric)
  • 2 or more yards of 58-60 inch wide lining (more minky for extra softness, or a non minky fabric if you want a lighter robe)
  • thread, elastic, pins, scissors, chalk, etc.

PATTERN:

Any wrap robe pattern with a shawl collar can be used as a base.  I adapted Butterick 6837 view A with modifications in order to turn it into a lined robe.  I used this pattern because I already had it on hand from making PJ bottoms for my family, but if you use this pattern you may want to make these same changes:

  • Keep in mind this pattern runs large and you should size down unless you have broad shoulders or a large torso.
  • I added a lining, which the pattern does not include instructions for, so my construction methods are adapted for that.
  • I shortened the robe to make it knee-length instead of calf-length.
  • The belt loops and pockets are very large and the recommended placement on the pattern is too low.
  • Since this robe is lined, it is not necessary to cut separate collar pattern pieces because the robe fronts already have the under collar attached, and you will cut out collar facings.

CUT OUT THESE PIECES OF FABRIC:

Robe (out of your fashion fabric): 2 fronts, 1 back, 2 collar facings, 2 sleeves, 2 sleeve cuffs, 2 sleeve facings, 2 pockets, 2 belt loops, and 1 belt

Lining (out of your solid fabric): 2 fronts, 1 back, 2 sleeves

FABRIC PREP:

Wash and dry your fabric before cutting and sewing. (Cuddle minky can be machine-washed on gentle in cold water, and then dried on low heat). Serge all sides of the pockets. The rest of the pieces do not need to be serged because raw seams will be hidden by the lining or turned inside (like the belt).

CONSTRUCTION OF THE ROBE FASHION LAYER:

  1. Make the belt loops by cutting out two rectangles that are 5 inches by 3 inches. You will make a tube by folding the right sides together lengthwise, stitching it down, and then turning right side out. (Alternatively you could make one long 10 inch tube and then cut it in half). Set aside.img_4
  2. Sew the 2 fronts to the back at the shoulder seams. Do not sew the side seams yet.
  3. Sew one sleeve cuff to the bottom of each sleeve.
  4. Sew the top of each sleeve to the shoulder where the front/back meets. img_5
  5. Pin the side front to the side back (right sides together). Pin belt loops at waist level, sandwiching them between the front and back, with the unfinished ends inside the robe.img_6
  6. Sew the sleeve seam and side seam shut as one long continuous seam, catching the belt loops as well. (The reason why you don’t assemble the sleeves and top separately and then try to sew them together is so you don’t need to carefully set the assembled sleeve into the armhole opening and try to make it fit).img_7
  7. To make the pockets fold all the edges of your pocket piece inwards, with the top part having a deeper fold. Pin the pocket to your robe fronts at the desired location (checking that they are at a comfortable level for your hands). Top-stitch the sides and bottom to sew the pocket into place. img_8img_9
  8. Stitch the two shawl collar facings at the center back seam. Then put the curved facing edge along the curved front edge and stitch together.img_10img_11
  9. To make the belt you will need to cut out a very long rectangle (78 inches x 5 inches) with diamond pointed ends. Fold the right sides together lengthwise and stitch all along the edges, leaving a 4 inch area unstitched towards the center of the belt. You will use this opening to pull the right sides out.
  10. After the belt is right side out, fold the raw edges in and pin the opening shut. Top stitch the opening closed, and continue to top stitch the entire perimeter of the belt. This will make the belt lie flat since the fabric is puffy. (See below for a comparison).img_12

CONSTRUCTION OF THE LINING:

The construction of the lining is very similar to that of the fashion fabric but you do not have pockets, belt loops, or the belt. You also need to note the directionality of the sleeve facing.

  1. Sew the 2 fronts to the back at the shoulder seams. Do not sew the side seams yet.
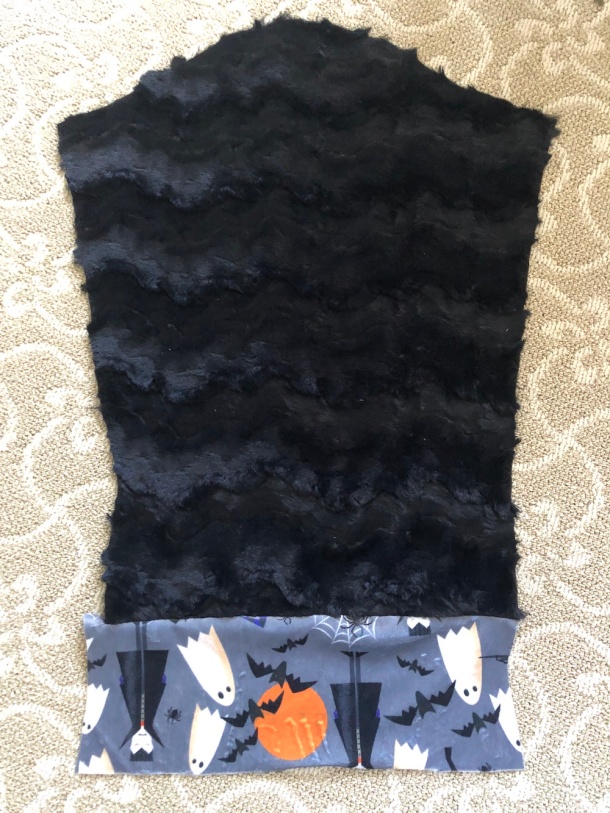
  2. Sew the sleeve facing to the bottom of the sleeve lining. If you have a print, sew the sleeve facing with the print upside down since it will be flipped up when the cuff is rolled.img_13
  3. Sew the top of each sleeve to the shoulder where the front/back meets.
  4. Sew the sleeve seam and side seam shut as one long continuous seam (as seen in step 6 of the robe construction).

ASSEMBLY:

  1. Put the lining inside the robe fashion layer, wrong sides together. (Put the lining sleeve into the robe sleeve).
  2. Pin the curved edge of the lining front to the robe front, then sew them together. (Remember that the robe front is already attached to the collar facing, forming a sandwich consisting of collar facing, robe front, and lining. The right sides of the printed collar facing and fronts are together, while the wrong sides of the front and lining are together).img_14
  3. Flip the collar facing inside the robe, covering part of the lining. To finish the collar facing: Top stitch the outer edge of the collar facing about a half inch from the edge. Fold the raw edge of the other side under and slip stitch closed to the lining (indicated by the pins). img_15img_16
  4. To finish the sleeve cuffs: Line up the bottom edges of the sleeve cuffs and sleeve facings and fold the raw edges of both inward. Top stitch the edge closed, then flip the finished cuff up to show off the sleeve facing.img_17
  5. Hem the bottom of the robe: Fold the bottom of the robe inside, covering the raw edge of the lining, then fold the robe fabric inward again to hide the raw edge. You may want to cut some excess lining before hemming to reduce bulk. Sew down the edges to finish the robe. img_18
  6. Put the belt through the belt loops and you have a finished robe!img_19

Thank you again Janome and Shanon Fabrics for making this project possible! I hope everyone has a beautiful fall season!img_2

Tutorial for Cute Mushroom Skirt

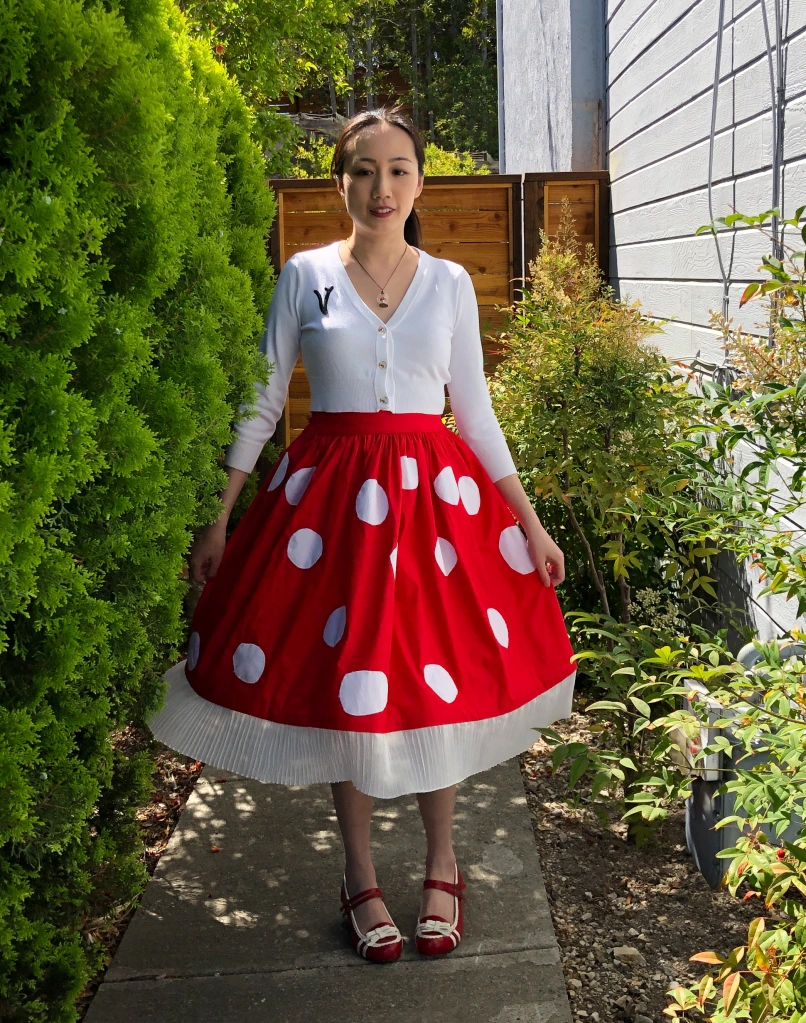
I adore the red and white toadstool mushrooms known as Amanita muscaria (aka fly agaric) and wanted to make a cute skirt inspired by them. I’ve worn it in my photos with a monogram cardigan and big fluffy petticoat for a 1950s style look, but this skirt could be styled with a romantic shirt and a flower crown for a cottage core outfit. The front half of the skirt has a flat waistband for a smooth look while the back half of the skirt has an elasticated waistband for comfort and for adjustability!

Note: I am a member of the Janome Maker program and this skirt is sewn on a Janome Skyline S9. (This post is sponsored by Janome but all content and opinions are mine).

SKILL LEVEL: Beginner/intermediate

TIME REQUIRED: 4-5 hours

WHAT YOU WILL NEED (exact amounts depend on your measurements):

  • 2 or more yards of red cotton fabric
  • 1 yard or various scrap pieces of white cotton fabric
  • 3-4 yards or more of white pleated trim or lace
  • strip of interfacing the same size as your waistband
  • thread, elastic, pins, scissors, chalk, etc.

Before you begin you’ll want to take a few basic measurements: your waist circumference, and the desired length of your skirt. For the latter you’ll want to measure from the smallest part of your waist to wherever you would like the skirt to stop (above the knee, below the knee, etc.) Use the diagram below to convert those measurements into A, B, and C for the pattern pieces.

Using the pattern diagram as a guide, use chalk to mark the rectangles on red fabric. Cut out your front and back skirt panels, front waistband, and back waistband. Use the front waistband as a pattern to cut out a piece of interfacing the same size, then iron or sew the interfacing to the front waistband.

Note: the 5 inch width of the waistband pieces will result in a final 2 inch tall waistband (once it is folded over with 1/2 inch seam allowances). If you want a shorter or taller waistband you can adjust the width when cutting.

Fold the red waistband pieces in half lengthwise and iron to mark a crease down the center.

Cut circles and ovals out of your white fabric in a variety of sizes from 3-5 inches wide. These will become the mushroom spots. The number of spots depends on personal preference and the size of your spots and skirt, but for reference I have 28 total on my skirt.

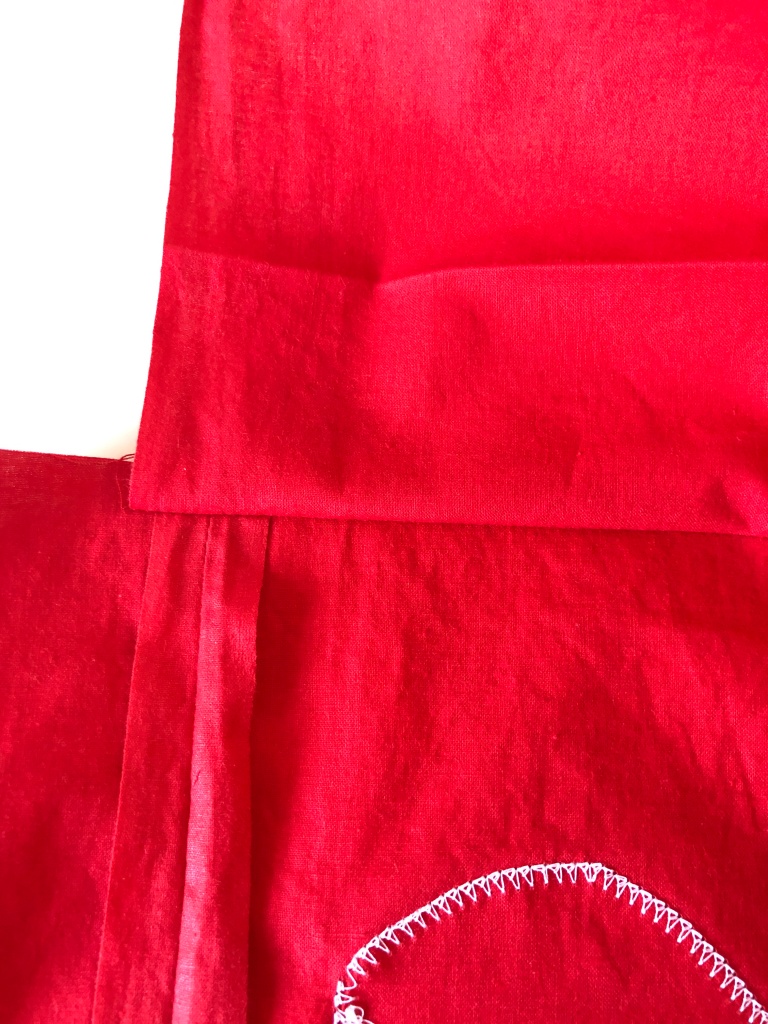
Pin the mushroom spots onto both the front and back skirt panels in a scattered, random pattern. Leave enough room at the top, bottom, and sides for seam allowance and hemming. (There are half inch seam allowances on the side and top, and you will want the bottom 2 inches free).

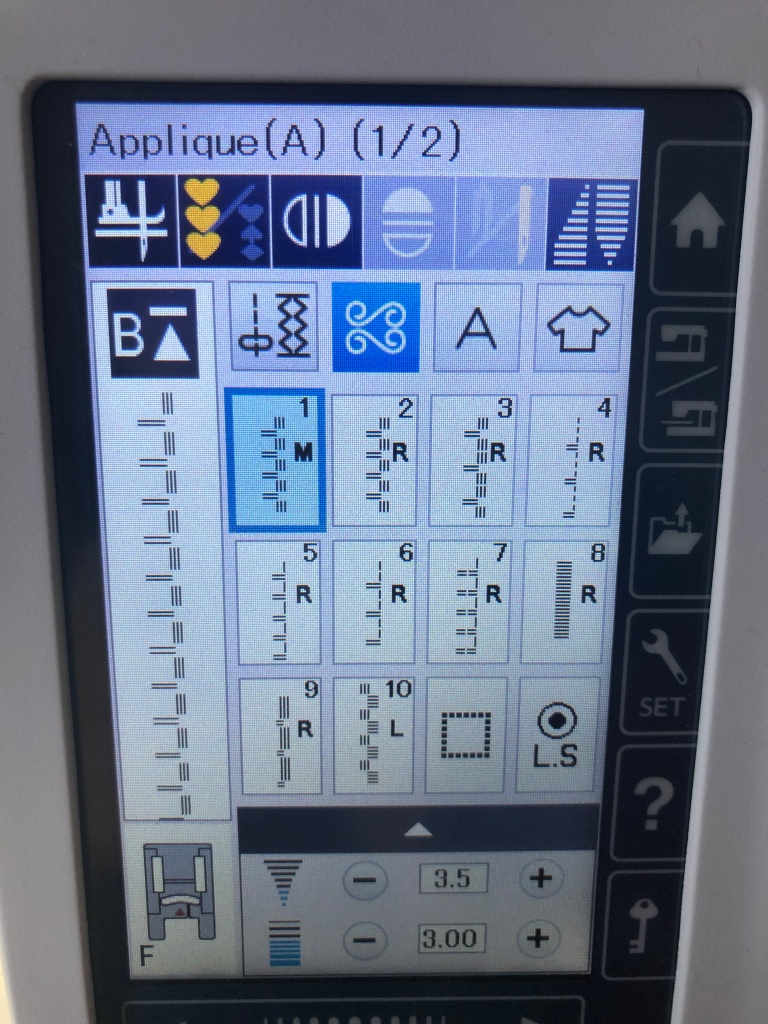
Use your machine’s appliqué stitch (shown below on my Skyline S9) to attach all the spots to your skirt panels. (If you do not have an appliqué stitch on your machine model you can use a zigzag stitch but it is recommended you use a white fabric not prone to fraying). If you are using the appliqué stitch start with your needle just outside the mushroom spot.

Sew up the side seams and press open flat.

ATTACHING THE BACK WAISTBAND:

Sew the WRONG side of the back skirt panel to the RIGHT side of the back waistband with a 1/2 inch seam allowance. (This means you will start by putting one of the long edges of the waistband against the top inside edge of the skirt). You should have the ends of the waistband extend slightly past the seam. Sew down the long edge then flip up the waistband up, creating a clean finish on the inside of the skirt.

Using the ironed center crease to help you, fold half of the waistband over towards the outside of the skirt, then tuck under the seam allowance.

Pin down the edge of the waistband on the outside of the skirt and topstitch. You will now have a channel to thread your elastic through.

Cut a piece of elastic the same length as what your final back waistband will be. (This is half your waist measurement plus another inch, for 1/2 inch seam allowance on each end). I used a 1 inch wide piece of elastic to reduce bulk, but you can use up to 2 inches wide if preferred.

Insert the elastic through the back waistband channel, which will cause the waistband to gather up. (A tip: Use a safety pin to anchor one end of the elastic to the waistband so it doesn’t get lost as you use a second closed safety pin attached to the other end of the elastic to thread it through the channel).

Securely stitch down each end of the elastic inside the waistband channel.

ATTACHING THE FRONT WAISTBAND:

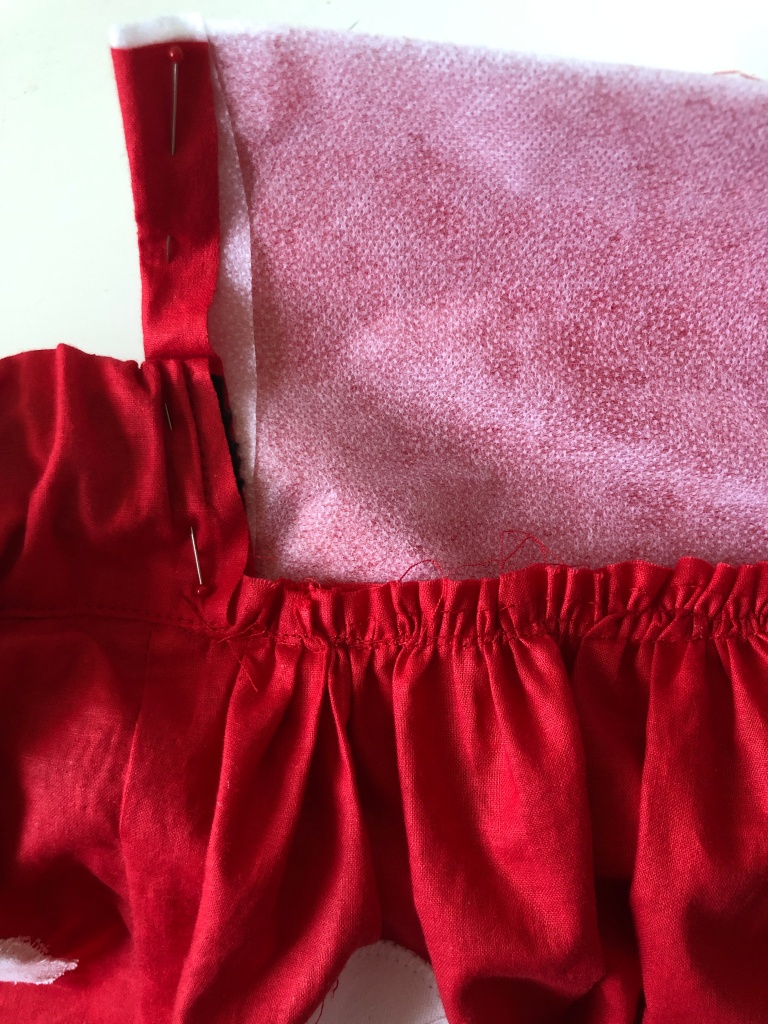
Gather the front skirt panel across the top edge into a final width equal to half your waist size. To do this, sew 2 rows of straight stitches 1/4″ apart, then pull both threads at the same time to gather the skirt into the desired width.

Attach the front waistband in a similar manner to the back waistband by first sewing the WRONG side of the skirt panel to the RIGHT side of the waistband. Make sure the ends of the front waistband (with the seam allowance folded over) overlaps the raw edges of the back waistband. Flip up the waistband and turn your skirt over to look at the outside.

Similar to the method used for the back waistband, flip half of the front waistband over to the outside front of the skirt, tuck in the raw seam allowance, and pin down, covering the gathered portion.

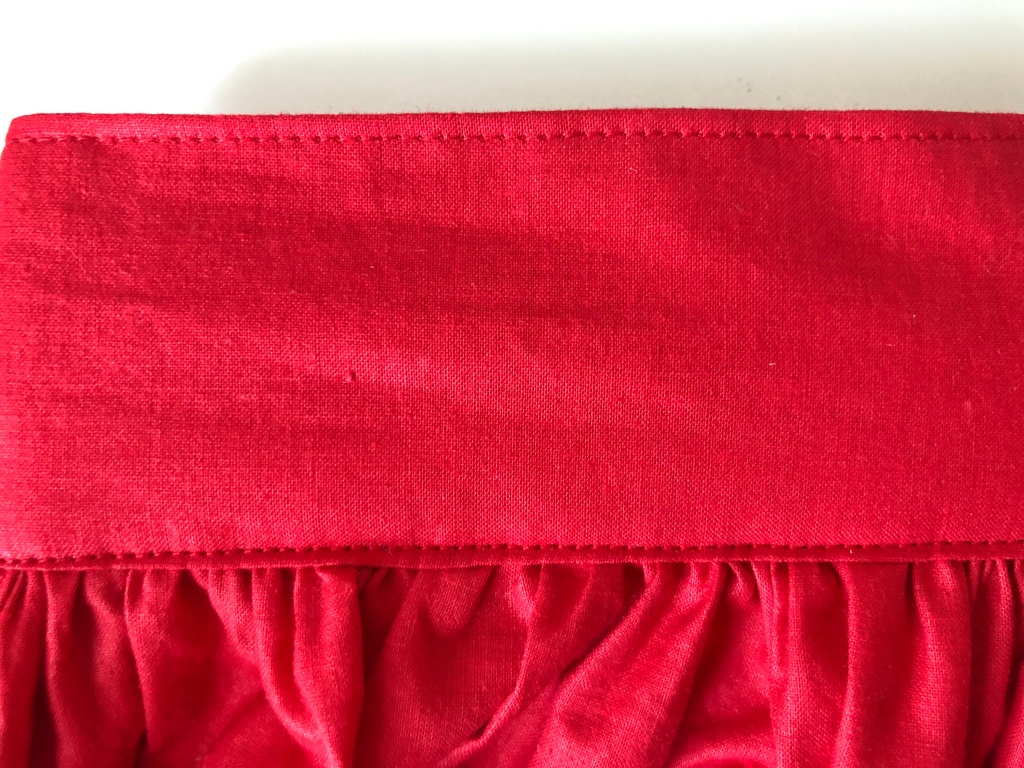
Top-stitch the front waistband along the bottom edge and the sides where it meets the back waistband. Also top-stitch across the top edge of the entire top front/back waistbands of the skirt.

ADDING TRIM:

To mimic the gills of the mushroom you’ll want to add trim to the hem of the skirt. I’ve used a pleated chiffon trim but you can also use lace or a plain white fabric ruffle.

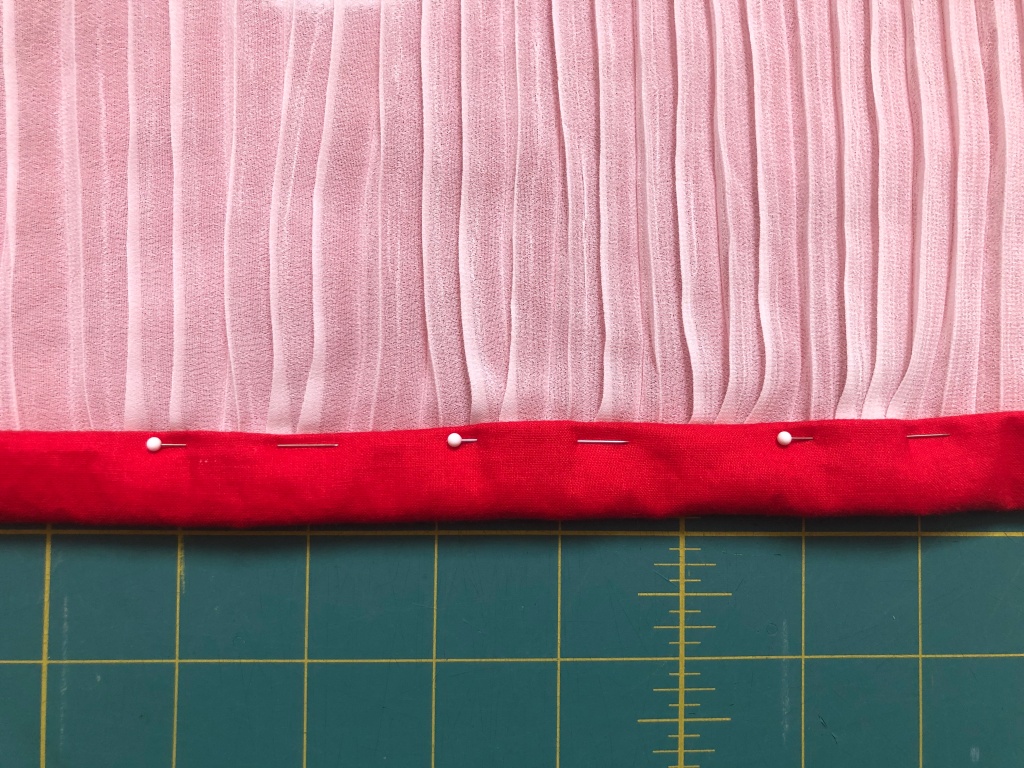
Measure the bottom circumference of your skirt. You will need to cut some trim the same length plus an extra inch for seam allowance. Sew the ends of the trim together to make a big circle. Pin the top edge of the trim UPSIDE DOWN to the hem of the skirt.

Remove the original pins as you fold the bottom up, then over again, to cover all raw edges and re-pin. Stitch where the pins indicate.

Press the hem flat. If your trim is sheer you’ll want to press the red fabric upwards behind the main skirt panel so that it doesn’t hang down behind the trim. (This folded hem is to add a little extra body to the hem of the skirt. If you prefer, you can also serge the trim to the skirt but should shorten the panels and trim accordingly).

Enjoy your mushroom skirt!

1920s Cozy Cardigan from Wearing History Pattern

Posted on

Back in April we had some chilly weather so I made myself a soft cozy cardigan using a 1920s pattern from Wearing History.

UKLL7502

I had some gray and pumpkin-colored knit fabrics in my stash so when I saw that pattern I thought it was the perfect way to use up some fabric. This was a sewing pattern, no knitting knowledge required! Plus it has pockets! (I decided to color block my pockets. That is not in the pattern; if you like to keep things simple you may find it easier to make solid pockets as instructed).IMG_E7252

Because this is a pattern using stretch knit fabric I recommend that you have a serger. If you are very determined to make it you could probably zig-zag everything tightly. This pattern is meant for knit fabrics; I don’t know how it would look with woven fabrics.

This is a reproduction of an antique pattern from the 1920s so it came in only one size (42″ bust). This was not my size so I had to grade down from the pattern to make it fit me.  I also found the sleeves too baggy on me so I also had to slim them down. The pattern does not have a lot of pieces (back, fronts, collar, sleeves, pockets, waist tie) so if you have knowledge of grading you can manage it just fine. I am 5’6″ and did not have to adjust the overall length. IMG_E7253

Depending on the width of your knit fabric and your size you’ll need about 2-3 yards to make this cardigan. (Please see the size chart on the pattern listing). The knits I was using were very thin and fine so I had to self-line and double my yardage.  I used 2 yards of the pumpkin fabric, all lined with gray fabric. My collar, cuffs, ties, and pockets all used some gray as well.  I had scraps left over from both colors; I would estimate I used almost all of the 2 yards of pumpkin and about 3 yards of gray. (If you are using a thicker knit you won’t need to line so your yardage would be half of what I used).IMG_7255

This pattern is listed as “expert difficulty.” My personal opinion is that the construction is not very difficult but the reason why this is not a beginner pattern is because it comes in one size (42″ bust) so you will have to know how to grade patterns if it is not your size. (Luckily it is an open front cardigan so it can run big and has room for error!) The other reasons why Wearing History lists her “Archive Couture” patterns as advanced or expert is because some of her patterns (plus the instructions) are reproductions from antique patterns, which assumed a certain level of sewing knowledge and did not do illustrated step-by-step instructions like modern patterns.IMG_7259

PROJECT COSTS:

  • Pattern from Wearing History: $5 from her Etsy; it is on sale for now
  • 5 yards of rayon/poly/lycra rib knit: $26 plus $5 shipping from Fabric Mart.
  • Thread:~ $2

Total: ~$38

If you are looking for something comfortable to wear around the house I highly recommend this pattern! I’ve already been looking at my stash and thinking I can make another one for wearing at the office or with dresses.

Note: You may have noticed that my cardigan is used as an example on the Wearing History Etsy listing. The photos are used with my permission. I paid for the pattern myself, and was not paid to make this blog post. 4FB29124-FF35-45D2-BDBE-CB6683577E69

1930s Crane Coat Dress

My last project of 2019 was a 1930s coat dress using the Miss L’s Coat Dress pattern from Decades of Style.  My color scheme was inspired by Japanese cranes (featured in the embroidered appliqués on my coat).20200125-IMG_3624

(Thank you Lauren for taking all these pictures of me wearing it at the GBACG Open House!) The defining feature of this coat dress is the fabulous sleeves! All the curved black and white stripes you see are pieced together during construction; they are not appliqué. 20200125-IMG_3612

I made my coat out of a vintage twill fabric. The stripes are black cotton velvet and white canvas with a layer of sheer white organza on top. (I didn’t have any sateen in the sash and the plain canvas looked too flat next to the velvet so I added the organza to add some texture). The front of the coat features long darts, pointed lapels, a stand up collar, and big cloth-covered buttons.20200125-IMG_3621

The black and white stripes meet at the underside of the sleeve. (Not perfect but close enough for me!)IMG_4934

The back of the coat has double princess seams that are top-stitched. My collar is red rayon challis with a canvas interlining. 20200125-IMG_3617IMG_4920

All the accent materials (the velvet, canvas, organza, and rayon) are scrap pieces from past projects of mine. The buttons were purchased at a rummage sale for $2 for a large bag and I still have some left over! The main coat fabric was purchased on eBay as part of a larger lot for a bargain price. The lining was $1/yard clearance fabric. My “splurge” were the embroidered crane appliqués from Aliexpress and they still cost me less than $10, so overall I spent probably $30 on supplies to make this coat because I’m good at hoarding useful materials. =)20200125-IMG_3620

Some notes if you plan to make your own coat:

  • This is not a beginner pattern. I would not say it’s unduly difficult and the instructions are very good, but this should not be your first project!
  • You should be comfortable with fish eye darts, top-stitching, interlining, grading curves, and setting a sleeve.
  • There are a lot of pieces and a lot of steps, so make sure you have a way of labeling all the bits as you go.
  • The lining must be attached by hand so be comfortable with some hand-sewing.
  • The pattern is true to size; follow the size chart.
  • Use a mid-weight fabric. I made mine out of twill but I’ve also seen some really lovely wool and velvet versions of this coat on Instagram. You want enough structure but not something so thick that sewing the curves on the sleeves makes bulky seams.
  • This pattern takes some time but I feel like it’s quite worth it in the end! I got a lot of nice comments when I wore it and people asking if it was a real vintage coat, so Decades did a great job on the pattern.

I enjoyed making and wearing this coat. Thank you Decades of Style for the pattern! 20200125-IMG_3623

(My shoes are from American Duchess. My hat is vintage with faux pearls).

An 18th Century Weekend at Wagner House

This past September there was an 18th century themed weekend at Wagner House (Lakewold Gardens) in Lakewood, Washington, hosted by Vanessa of @pinksewing. The weekend consisted of a picnic and a dinner, plus a day of workshops. Jenny of Jennylafleur taught a historical hair class and Denise of Romantic Recollections taught fly fringe. Additionally, photoshoots were provided by Gloria and Mike of In the Long Run Designs and there were trunk shows from Redthreaded and Dames a la Mode.

Here is a photo of the attendees of the picnic, taken by In the Long Run Designs.wagner-house_48828852158_o

And the following are the beautifully attired dinner guests, photo also by In the Long Run Designs.48844032341_9d21e5cf42_o.jpg

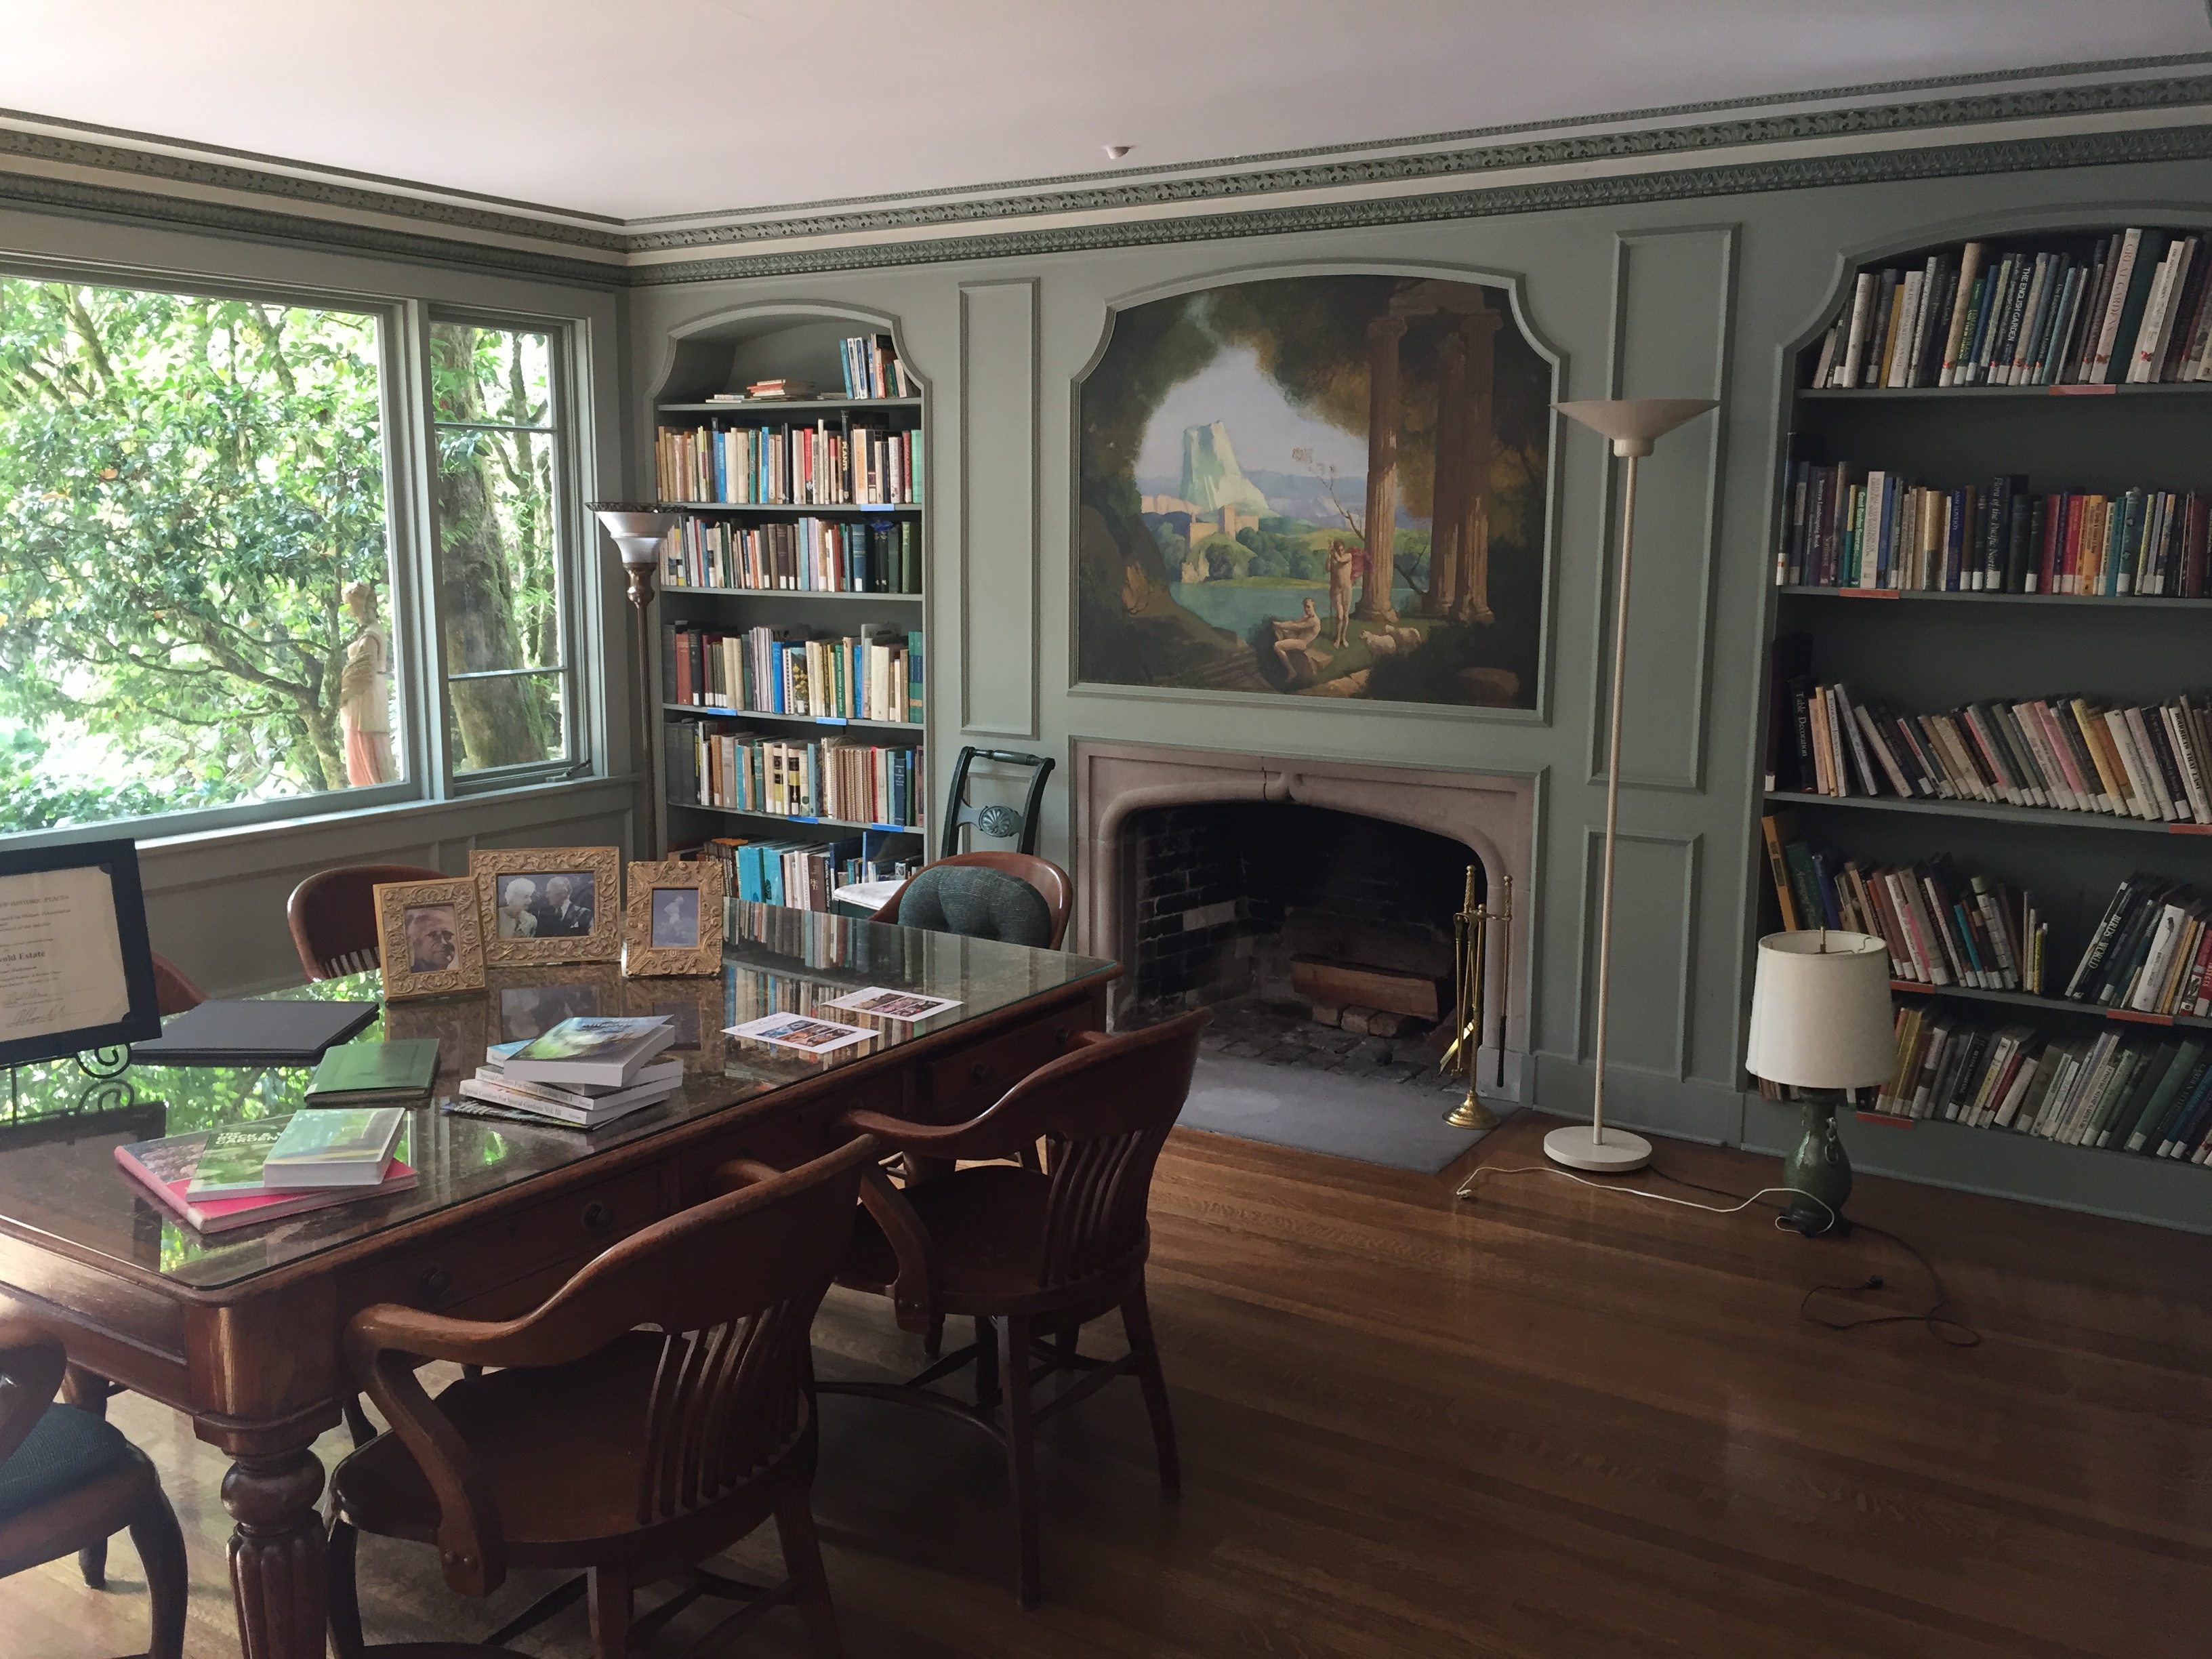
Wagner House is not huge but very elegant. The rooms of the house have been converted to conference/meeting rooms. Downstairs there’s a dining room, solarium, bathroom, marbled foyer, library, and kitchen. We were not allowed upstairs but could take photos at the bottom of the stairs during dinner. In my opinion though, my favorite parts were the gardens and the beautiful woods surrounding the property! IMG_2735IMG_2731IMG_2717

I am in love with this library!IMG_2740IMG_2737IMG_2742IMG_2743

Wagner House is not set up for overnight stays so most of us stayed in a nearby hotel or Airbnb and drove to Lakewold Gardens for the events. Some guests were local to Washington state.

In the first group photo I am wearing my 18th century shepherdess costume, and you can read more about it in my previous post.(Photo by In the Long Run Designs).48867872061_9edf6e25a0_o

In the second group photo I am wearing a mauve silk Italian gown that I previously wore to the Casanova exhibit at the Legion of Honor, but added additional trim to for this event. (Photo by In the Long Run Designs).wagner-house_48829563677_o

I normally wear this dress with a large split bum pad, but it would have taken up half the space in my suitcase, so I opted for a smaller half-moon bum pad and a petticoat. More petticoats would have created a fluffier look, but sometimes we have to make allowances for travel!

IMG_2926IMG_2935

And here are photos of some of the beautiful guests! I enjoyed seeing old friends and making new ones.

Here is Beth in her beautiful candy stripes.IMG_2922

Ginger is so fluffy!IMG_2934

Laina and Cathyn made a striking couple.IMG_2952

The colors that Denise and her husband wore were luminous in person.IMG_2951

Lindsey looked so pretty in pink, and I loved her hair!IMG_2946

Sacque gowns are fantastic from the back!IMG_2944

A shot of Ginger from the picnic.IMG_2904IMG_2801

Taylor and Jenny in stripes during the daytime event.IMG_2796

Guests were milling about before dinner.IMG_2966IMG_2965 2

Dinner was delightful! Vanessa took care of every detail, including limiting the number of seats at each table to fit all our giant dresses. There was also a pianist and bartender! 😉  I’m afraid my camera wasn’t good enough to do the food justice under the lighting conditions, so I’ll just provide the menu here so I can reminisce fondly:

Appetizers:
Bacon Wrapped Chili Chicken Bites
Cranberry Brie Bites
Herbed Mushroom Puffs

Dinner:
Mixed Greens Salad w/Apples, Goat Cheese, w/Balsamic Viniagrette
Tuscan Chicken
Beef Bourguignon
Garlic Parmesan Pasta
Garlic Mashed Potatoes
Roasted Herb Zucchini
Foccacia Bread

Dessert:
Rose & Lemon Macarons
Black Forest Trifles
Vanilla Cream Puffs

As a parting gift we all received an engraved fan as a memento of the weekend, as well as a champagne and macarons enamel pin by Aimee Steinberger.

IMG_2993.JPG

Thank you Vanessa for a magical weekend!48844032341_9d21e5cf42_o

Linen 1930s Beach Pajamas and a Vintage Robe for a Miss Fisher Tea Party

A group of friends and I had a Miss Fisher tea party at Pardee House, a historical home in Oakland, CA. We dressed in 1920s and 1930s clothing (or later decades if one preferred), and booked a tour of the home and a delicious tea afterwards. It was a lovely experience and I highly recommend Pardee for anyone in the area.

I wore a newly made set of linen beach pajamas using the “1930s Last Resort Beach PJs” pattern from Decades of Style, paired with a true vintage 1930s rayon robe. (Thank you Sara for all the outfit photos).IMG_2109

My green glass necklace is also vintage. My shoes are from Royal Vintage Shoes and my hat is from eBay.IMG_2110

I’ve used this pattern before and really liked it. (You can see my previous set of PJs and pattern review here).IMG_2113

I made the garment from some peach-colored linen that I had left over from another project. The trim on the neckline, back, hem and ties are orange “rococo” trim. There is a zipper in the lower back and two large pockets in the front.IMG_2115IMG_2020IMG_2025

I faked having short hair with this little clippy tool. You put your hair through the flexible center, roll it up, and then secure with the clips.TDJT1497.JPG

I felt like Miss Fisher exploring a mystery in this photo!69457657_421578011804782_4825319839214075904_o

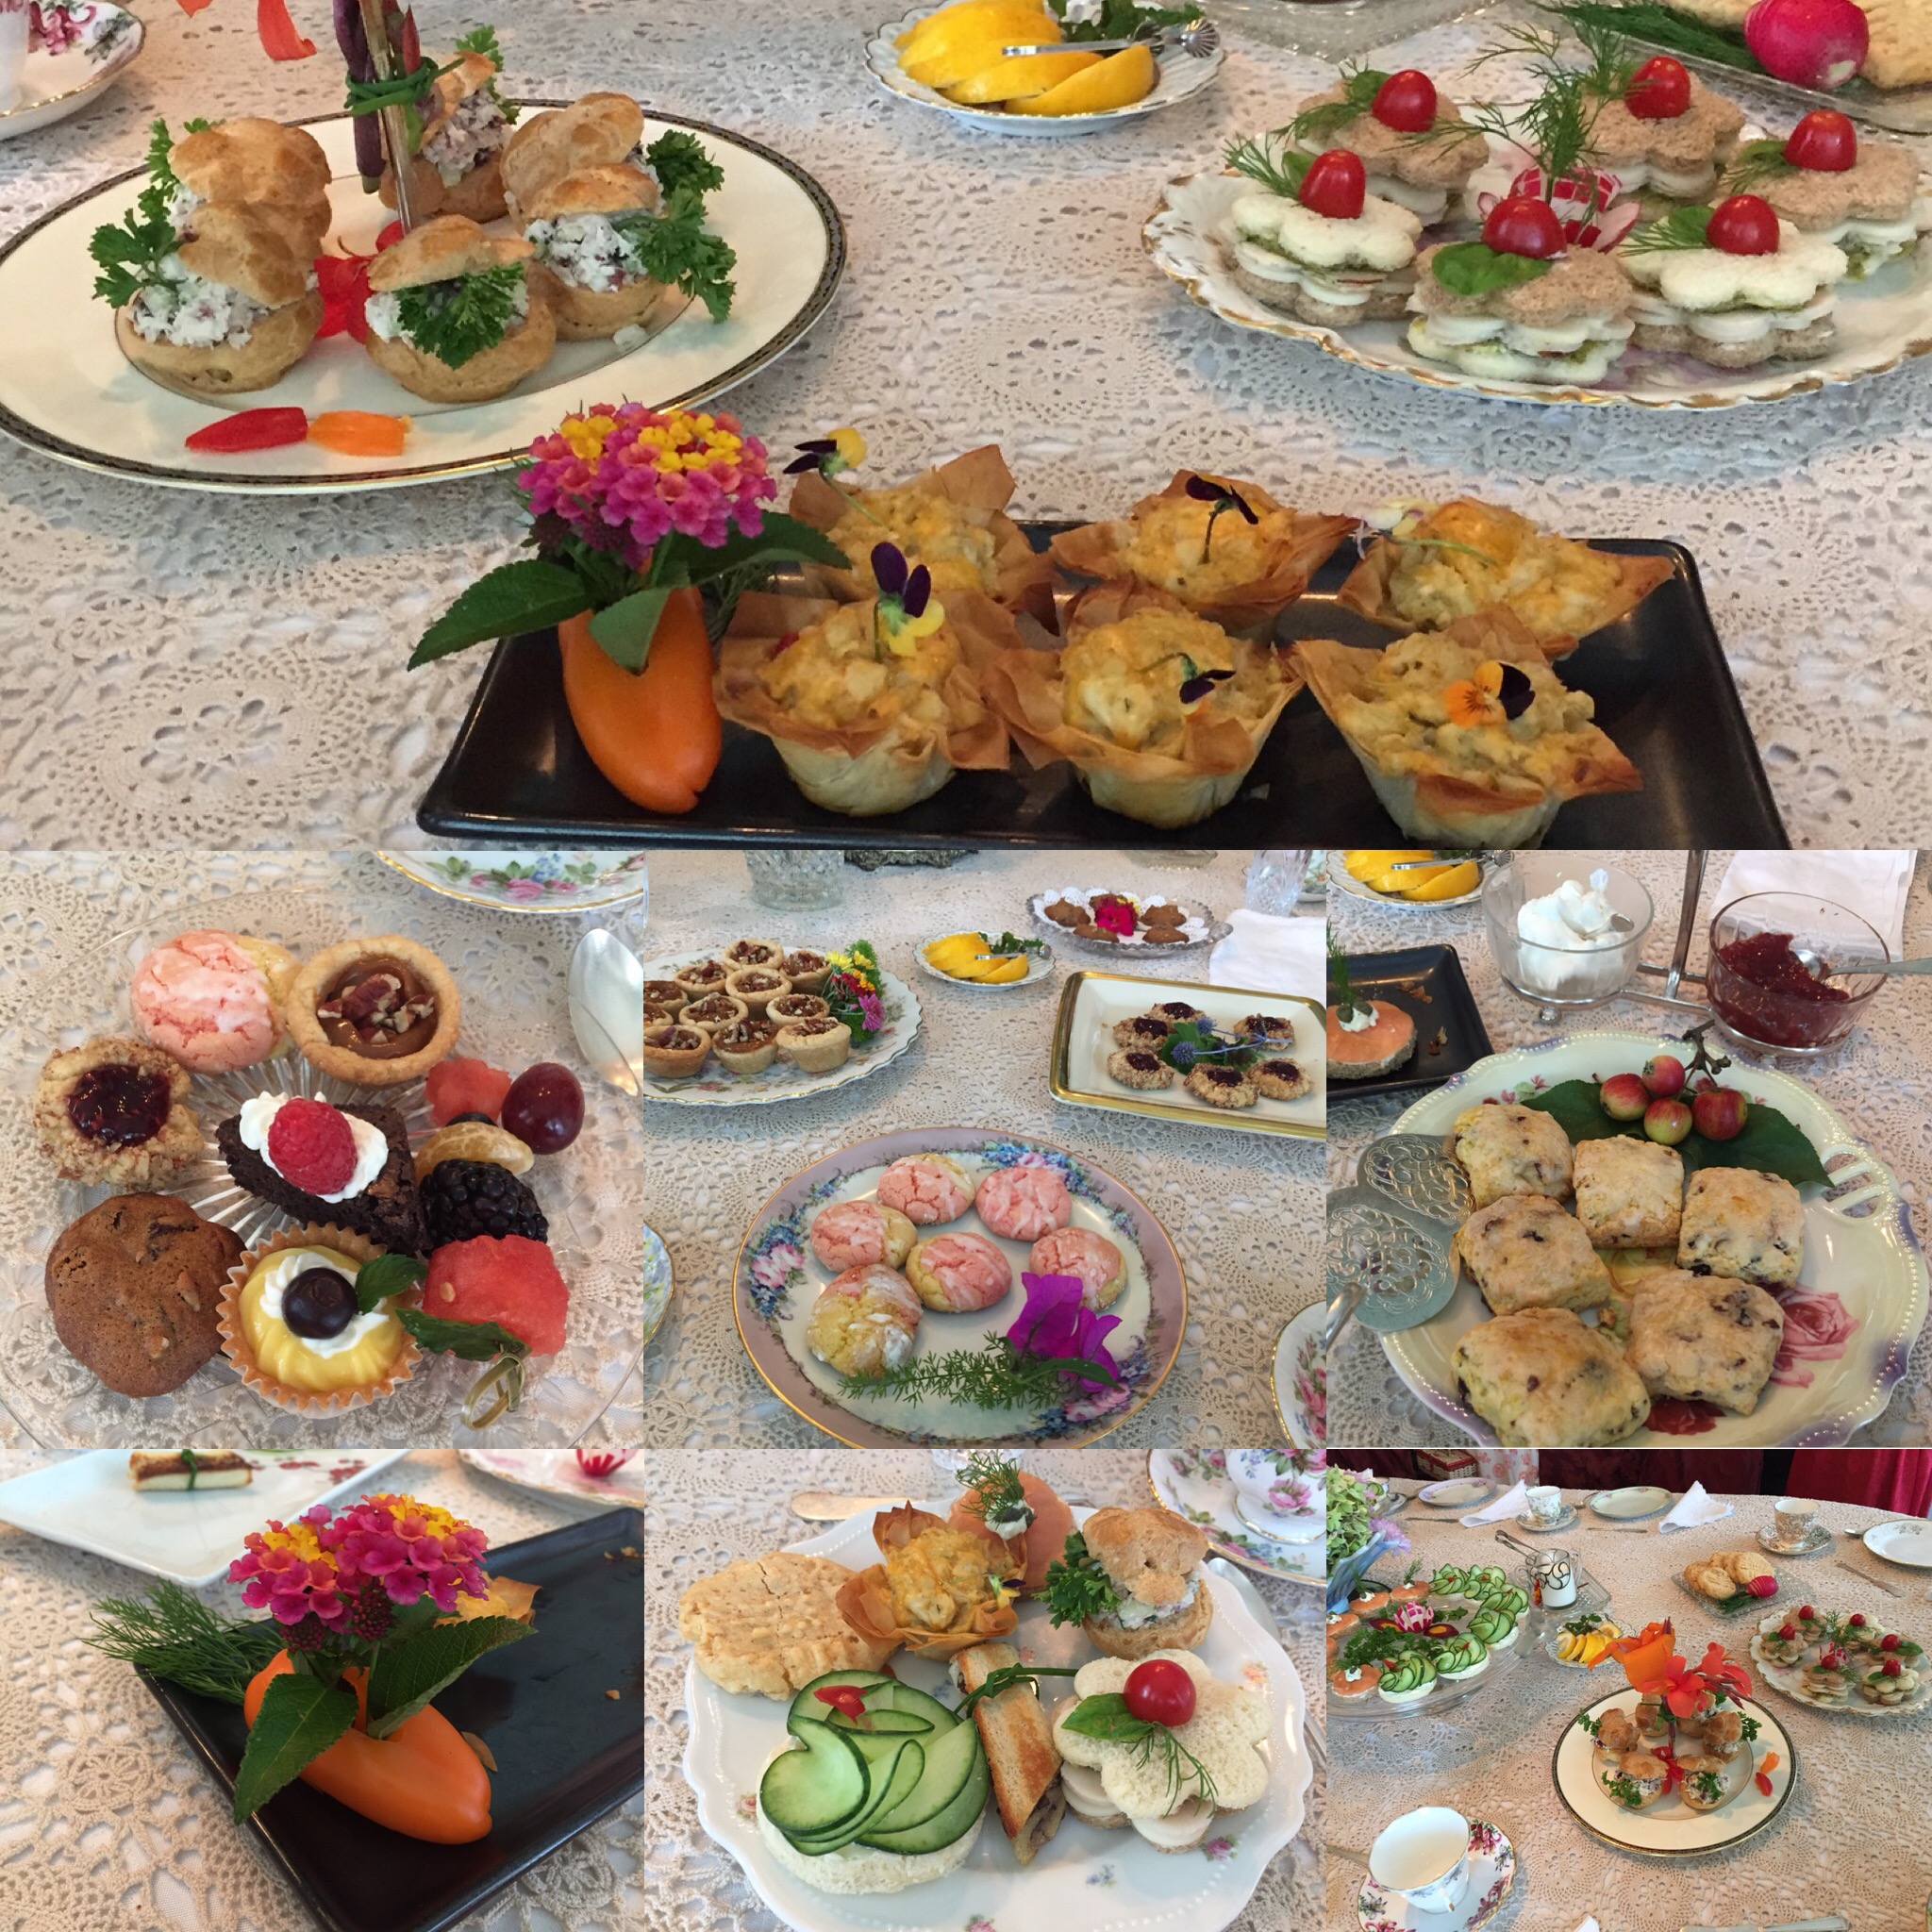
The food at the Pardee tea was so good and plentiful, and beautifully presented with all sorts of floral garnishes. RETO9820.JPG

Here are a few of the beautifully dressed ladies who were there with me: Natalie, Kelsey, Mena, Sara, and Jessica!69853869_421578128471437_8476538088061927424_o.jpgIMG_2107

Pardee Home is quite charming; I highly recommend a visit!69368379_421579175137999_5823233556041695232_o

Beach PJs project costs:

  • 5 yards trim: $6.60 from eBay (part of a larger order including shipping)
  • Pattern: $0 (used before)
  • 2.5 yards linen fabric: $25.50 from fabricmart.com (part of a larger order including shipping)
  • Zipper: $0 (salvaged from another item)
  • Thread: ~$1 from stash

Total: ~$33.10 (cool, comfortable, chic, and cheap!)


Twinkling Lights Space Dress with LEDs

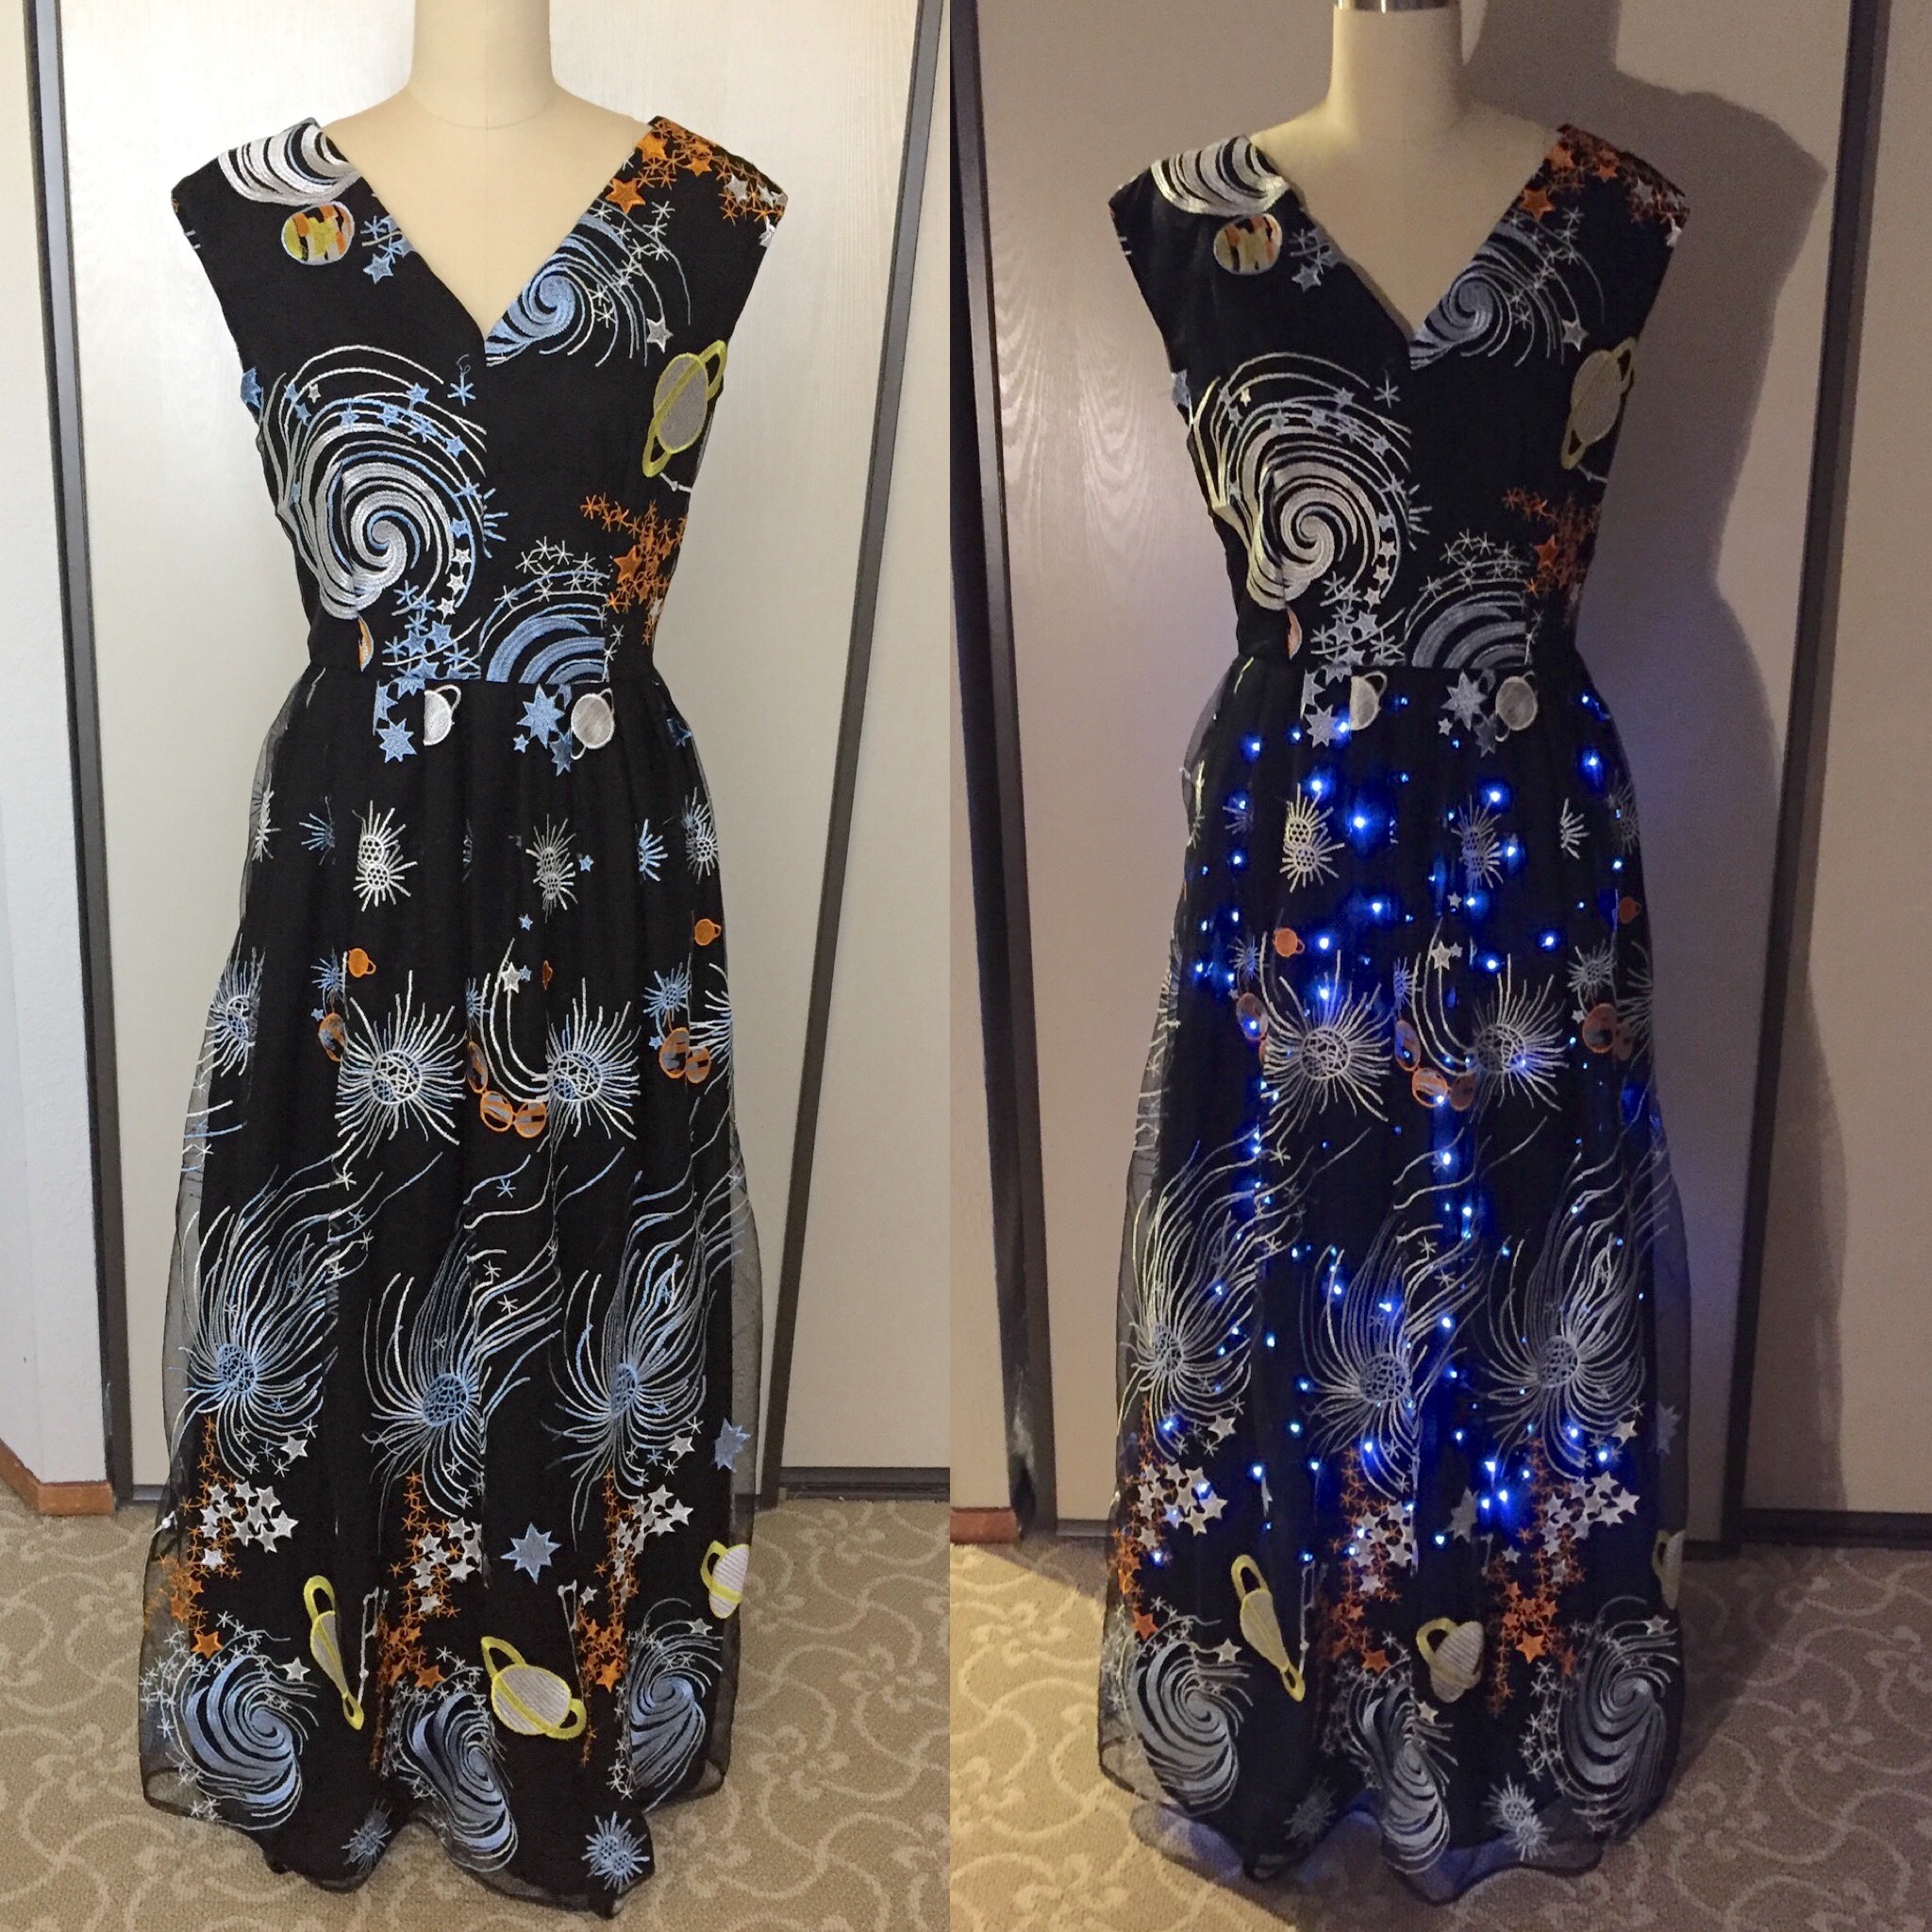
I am excited to show you my space dress, which had hidden LED lights I could turn on to make a twinkling galaxy with stars! I wore this last weekend to a private evening event at the Lawrence Hall of Science.JJPQ1221

IMG_0093

For the bodice pattern I used Vogue 8789, a 1950s dress pattern, but modified the skirt to be longer and slimmer. IMG_9752

I have used this pattern a number of times and like how easy it is to put together. The front and back of the bodice has 2 pieces each with darts, and the neckline facing just flips inside.IMG_9754

The space fabric is an embroidered galaxy-themed mesh. Since it’s transparent I flat-lined it with opaque black peach skin fabric for the top. For the skirt, I needed to maintain some transparency to let the lights show through, so the skirt is lined with a semi-sheer black chiffon. IMG_9758

Underneath the skirt I wore a petticoat with the lights sewn on in a random pattern. That way I could wash the dress separately. (It’s easier if you attach the lights while the finished petticoat is on a dress form, rather than trying to sew the lights to the fabric first). I made the petticoat about a foot shorter than the skirt of the dress because I was afraid I’d accidentally put my foot in the wrong place and trip on the light strands. (This is why the lights don’t go all the way to the bottom of the dress).IMG_0244

The petticoat is just a large rectangle gathered at the top with an elastic waistband. (Use a wide elastic at least 1 inch wide, otherwise the weight of the battery pack will make the petticoat sag). My battery pack had 3 AA batteries. I’ve seen some that use coin-sized batteries that are lighter, but this is what I happened to have on hand.IMG_0249

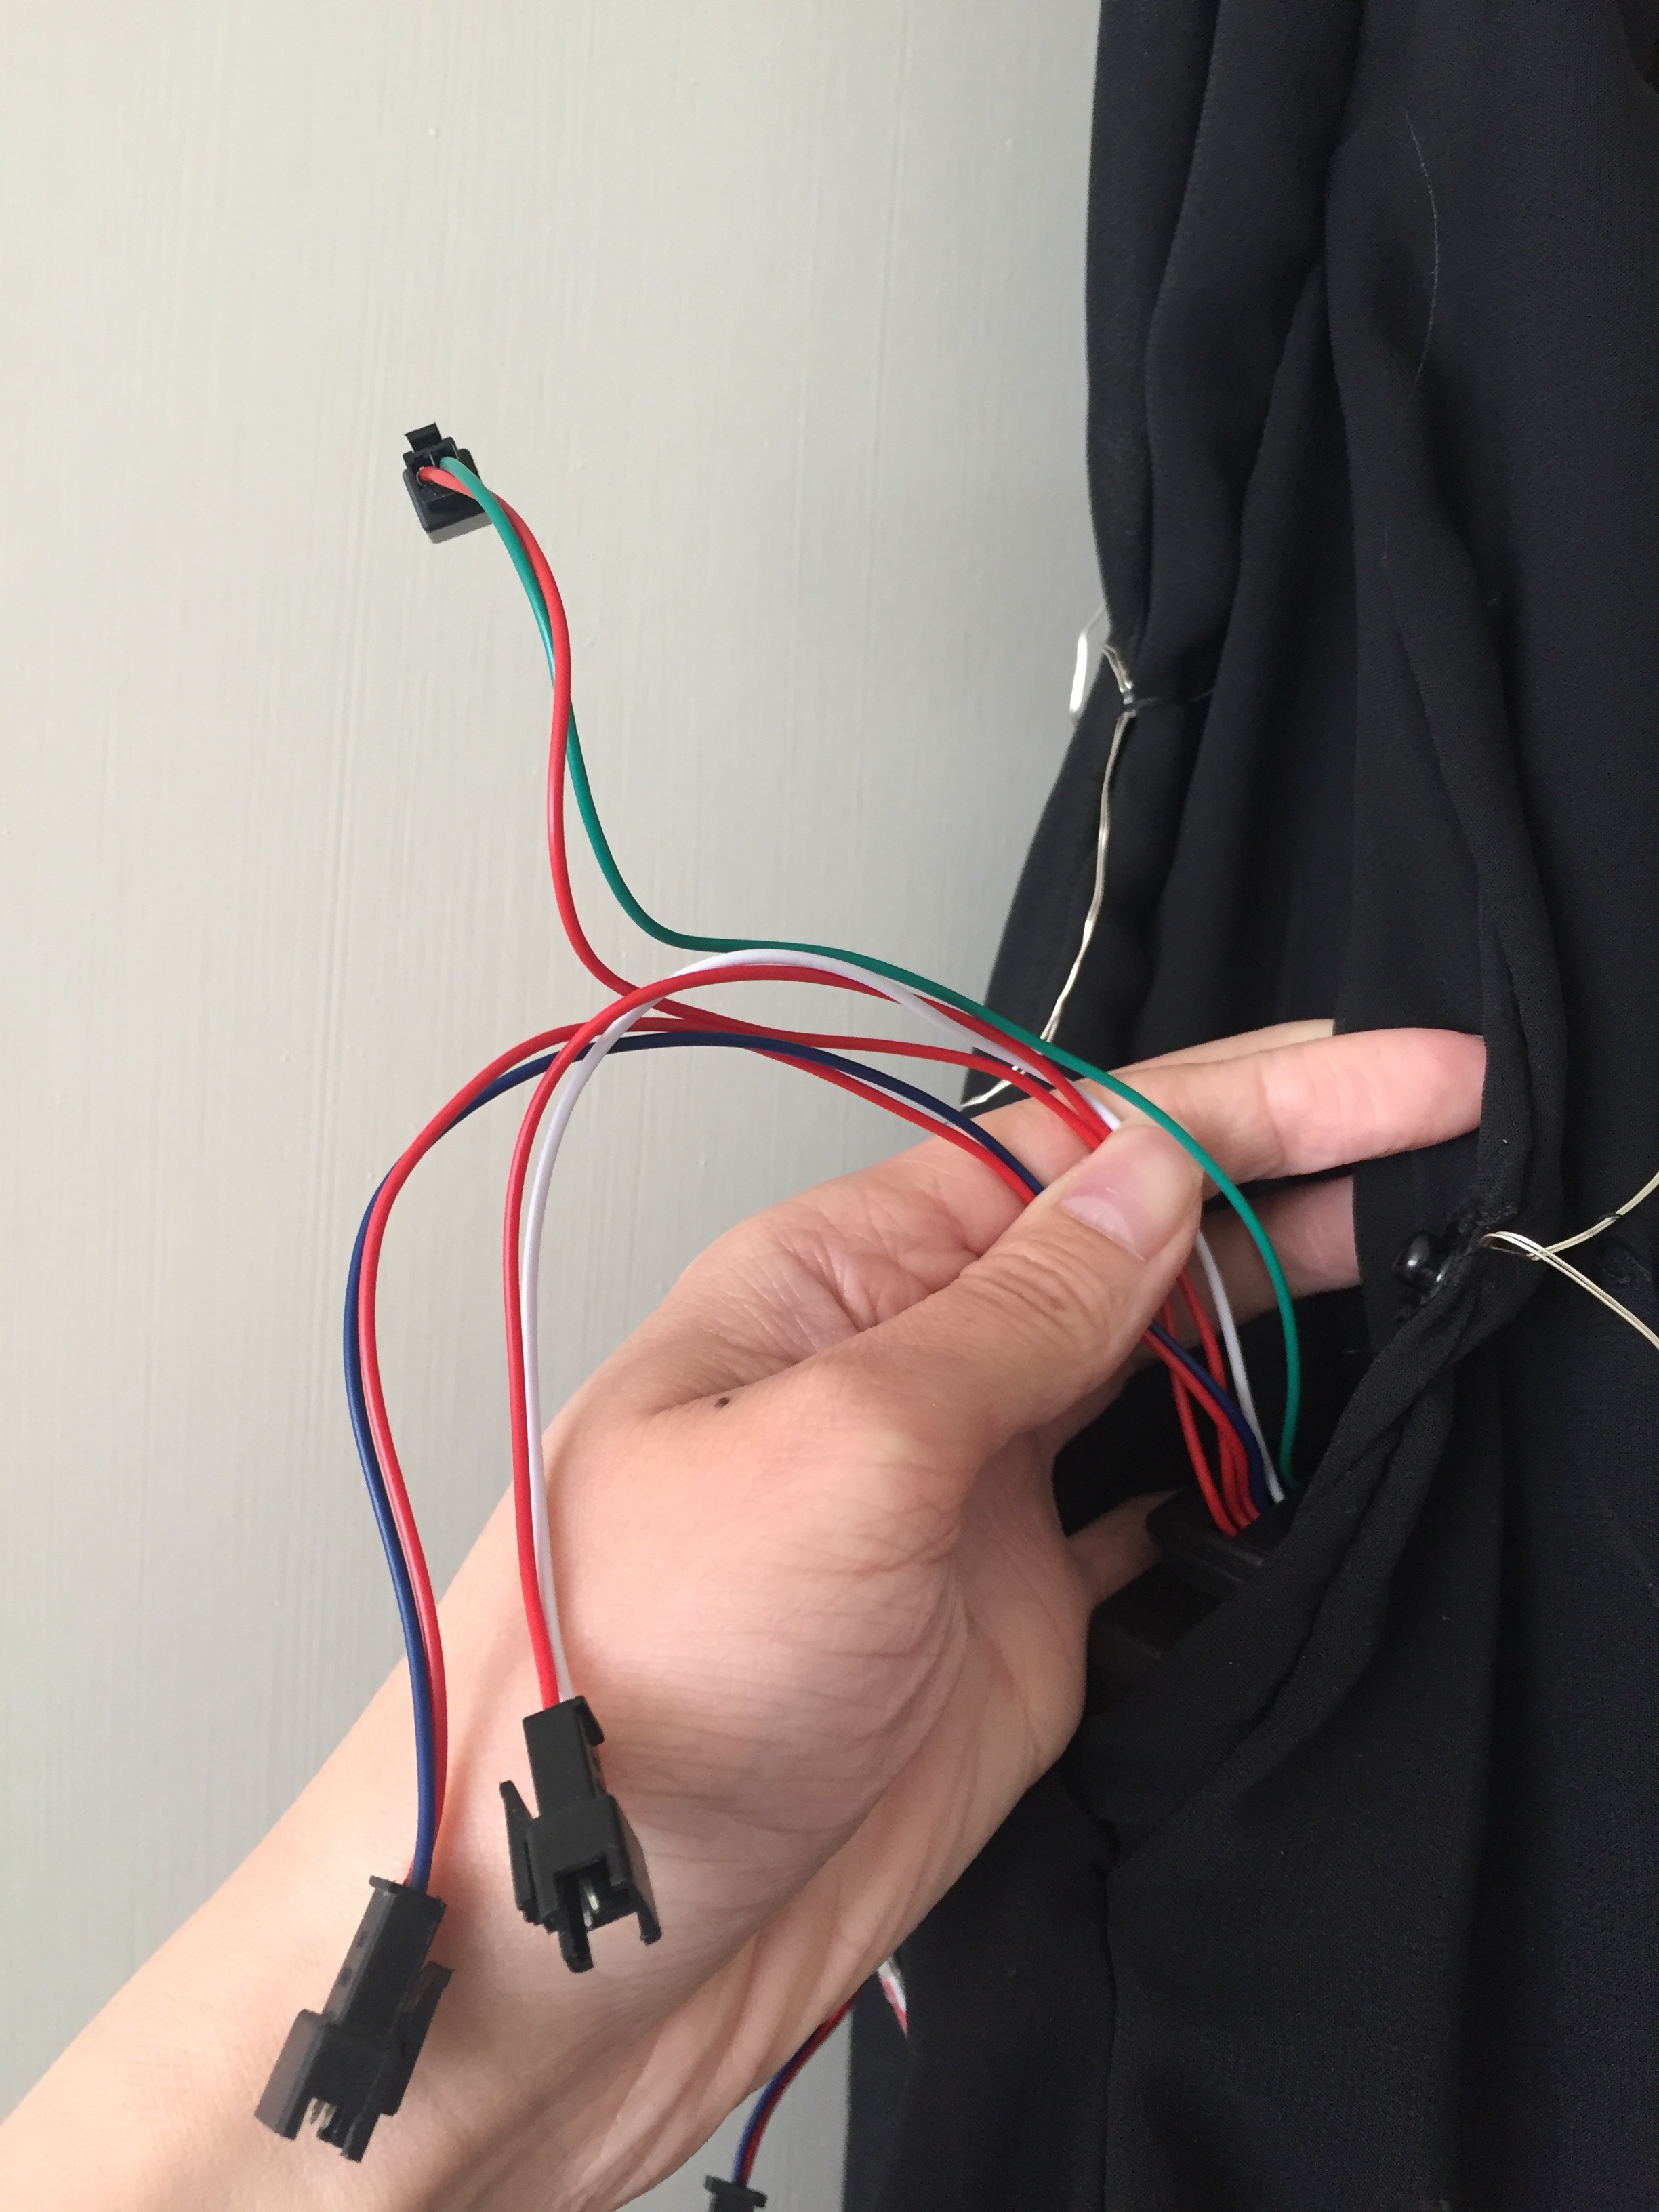
The side seam of the petticoat had a pocket for the battery pack, plus a snap to close it. The 3 sets of wires from the battery pack connected to the 3 strands of lights I had on the skirt. (Multiple strands allows you to have them twinkle because they are not all blinking on and off at the same time). I could also have them on continuously all at once.IMG_0246

I got my lights and battery for free, but it is easy to find “LED fairy lights” on Amazon and other sites. Look for battery-operated lights and long strands so you don’t have to use too many. I have not purchased this particular set on Amazon (affiliate link), but if I were to make this again I’d upgrade to these lights that have a remote control!

This dress is a bit hard to photograph in action, but here is an outdoor shot at night. You can visit my Instagram to see a video of the dress blinking.IMG_0108

I wore shoes that I dyed and rhinestoned. IMG_9767.JPG

My solar system necklace was from ThinkGeek.IMG_0250.JPG

DRESS PROJECT COSTS:

  • 3 yards space fabric: $33.57 on Aliexpress
  • 5 yards black chiffon: ~$7 from Fabricmart Fabrics. (I bought it during a $1/yard sale and bundled it with other items for shipping).
  • Thread, zipper, snap, etc. from stash: $2
  • LED lights: $0 (I got them for free but otherwise I’d spend ~$12 on Amazon)
  • 3 AA batteries: ~$1

Total cost: ~$42.57 (or ~$53 if I had to buy the lights)

If you make a space dress of your own I’d love to see it! IMG_0152

1830s Cotton Day Dress

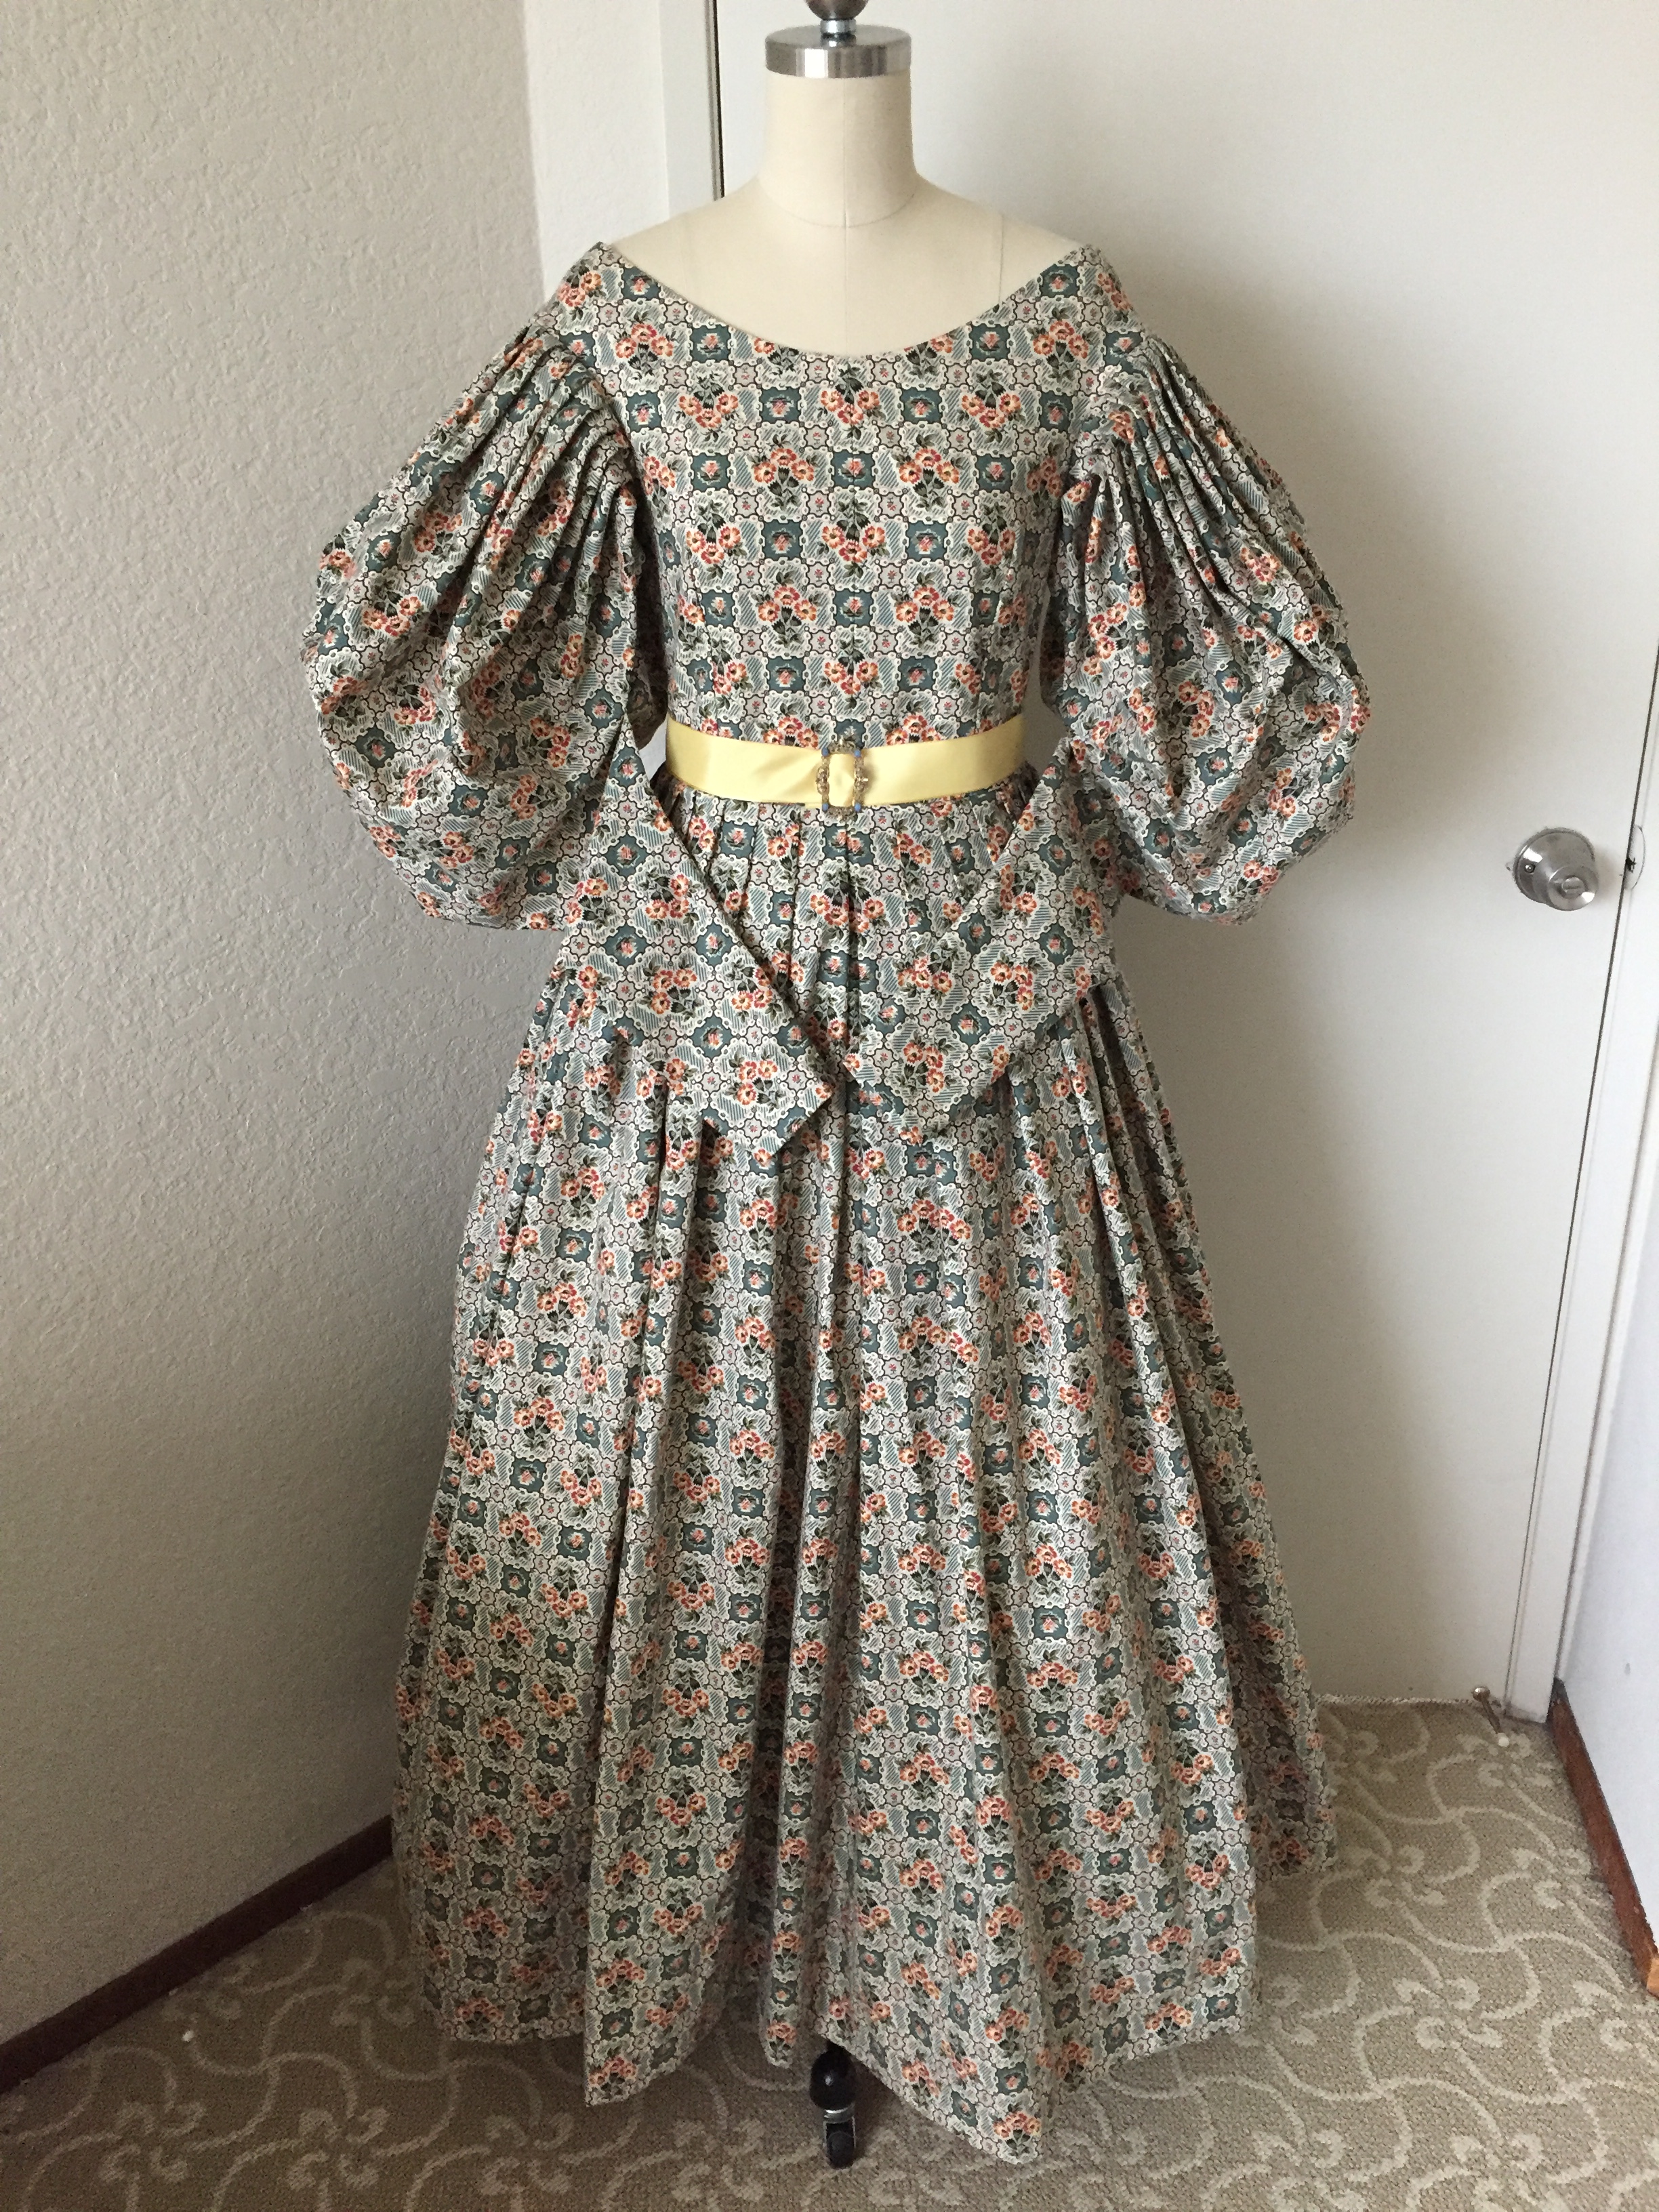
I have an 1830s-themed picnic later this year, so I made another Romantic era gown! Although I already have the plaid silk dress that I wore to the Dickens Fair, the thought of wearing silk to an outdoor summer picnic did not sound very comfortable. Instead, I decided to have a washable cotton dress in a busy print that could hide stains.IMG_6177.JPGIMG_6179.JPG

The dress is shown above without the sleeve plumpers or the petticoats properly starched, so there will be a lot more poof when I wear it! The fabric is a quilting cotton by Andover Fabrics from their Maling Road collection, shown below with one of the hidden pockets I put in the side seams.IMG_5788.JPG

Although the cotton I bought was not advertised as a reproduction print, I thought the general checkered feel of it was similar to this antique wool gown at the Victoria and Albert Museum.Dress-With-Lace-Pelerine

The cotton pleats up beautifully, as seen in my sleeves. (Since the sleeves have about a yard of fabric, deep pleats are needed to get all that fabric into the armscye. Gathering will be too bulky).IMG_6182.JPG

I have lots of details about construction, undergarments, and accessories in my post about my plaid silk gown, so I’ll just go over the things I did differently in this gown.

As before, I used the Truly Victorian TV455 1830s Romantic Era pattern to make my dress, but this time I redrafted the sleeve pattern to have a more defined difference between the upper and lower sleeve, using the Workwoman’s Guide as a reference (drawing not to scale):IMG_6428.JPG

Other changes I made to the construction (mostly to speed things up):

  • I skipped the piping because the print was so busy, and I wanted this project to be fast!
  • I used the variation of the pattern that omits the pleating at the top of the bodice because I will be outdoors and wearing a pelerine that covers the pleating anyway.
  • I did not line the sleeves this time; this reduced the bulk when pleating.
  • Rather than having an opening in the lower sleeve that closes with hooks and eyes, I just sewed the sleeve seam shut. This means that the wrist area of the sleeve is not very tightly fitted, but still looks slim enough since I have slender hands I can carefully slide in. Having the seam fully shut made construction much easier since I had no lining, and is one less thing to fuss with when dressing.
  • Last time I flat-lined my silk with an organdy interlining, then made a separate polished cotton lining. This time I skipped the lining and flat-lined my cotton print with a plain cotton interlining. Here’s a time-saving tip I posted to my Instagram stories:IMG_5757.JPG

I will be reusing the delicate cotton pelerine I made for my silk gown.IMG_6187.JPG

The yellow ribbon belt is just a placeholder; I am considering a teal or coral velvet ribbon for the sash. I also purchased a lovely carved antique abalone shell belt buckle to use with this dress. It is probably Edwardian instead of Victorian, but it has the right size and proportions.IMG_6221.JPG

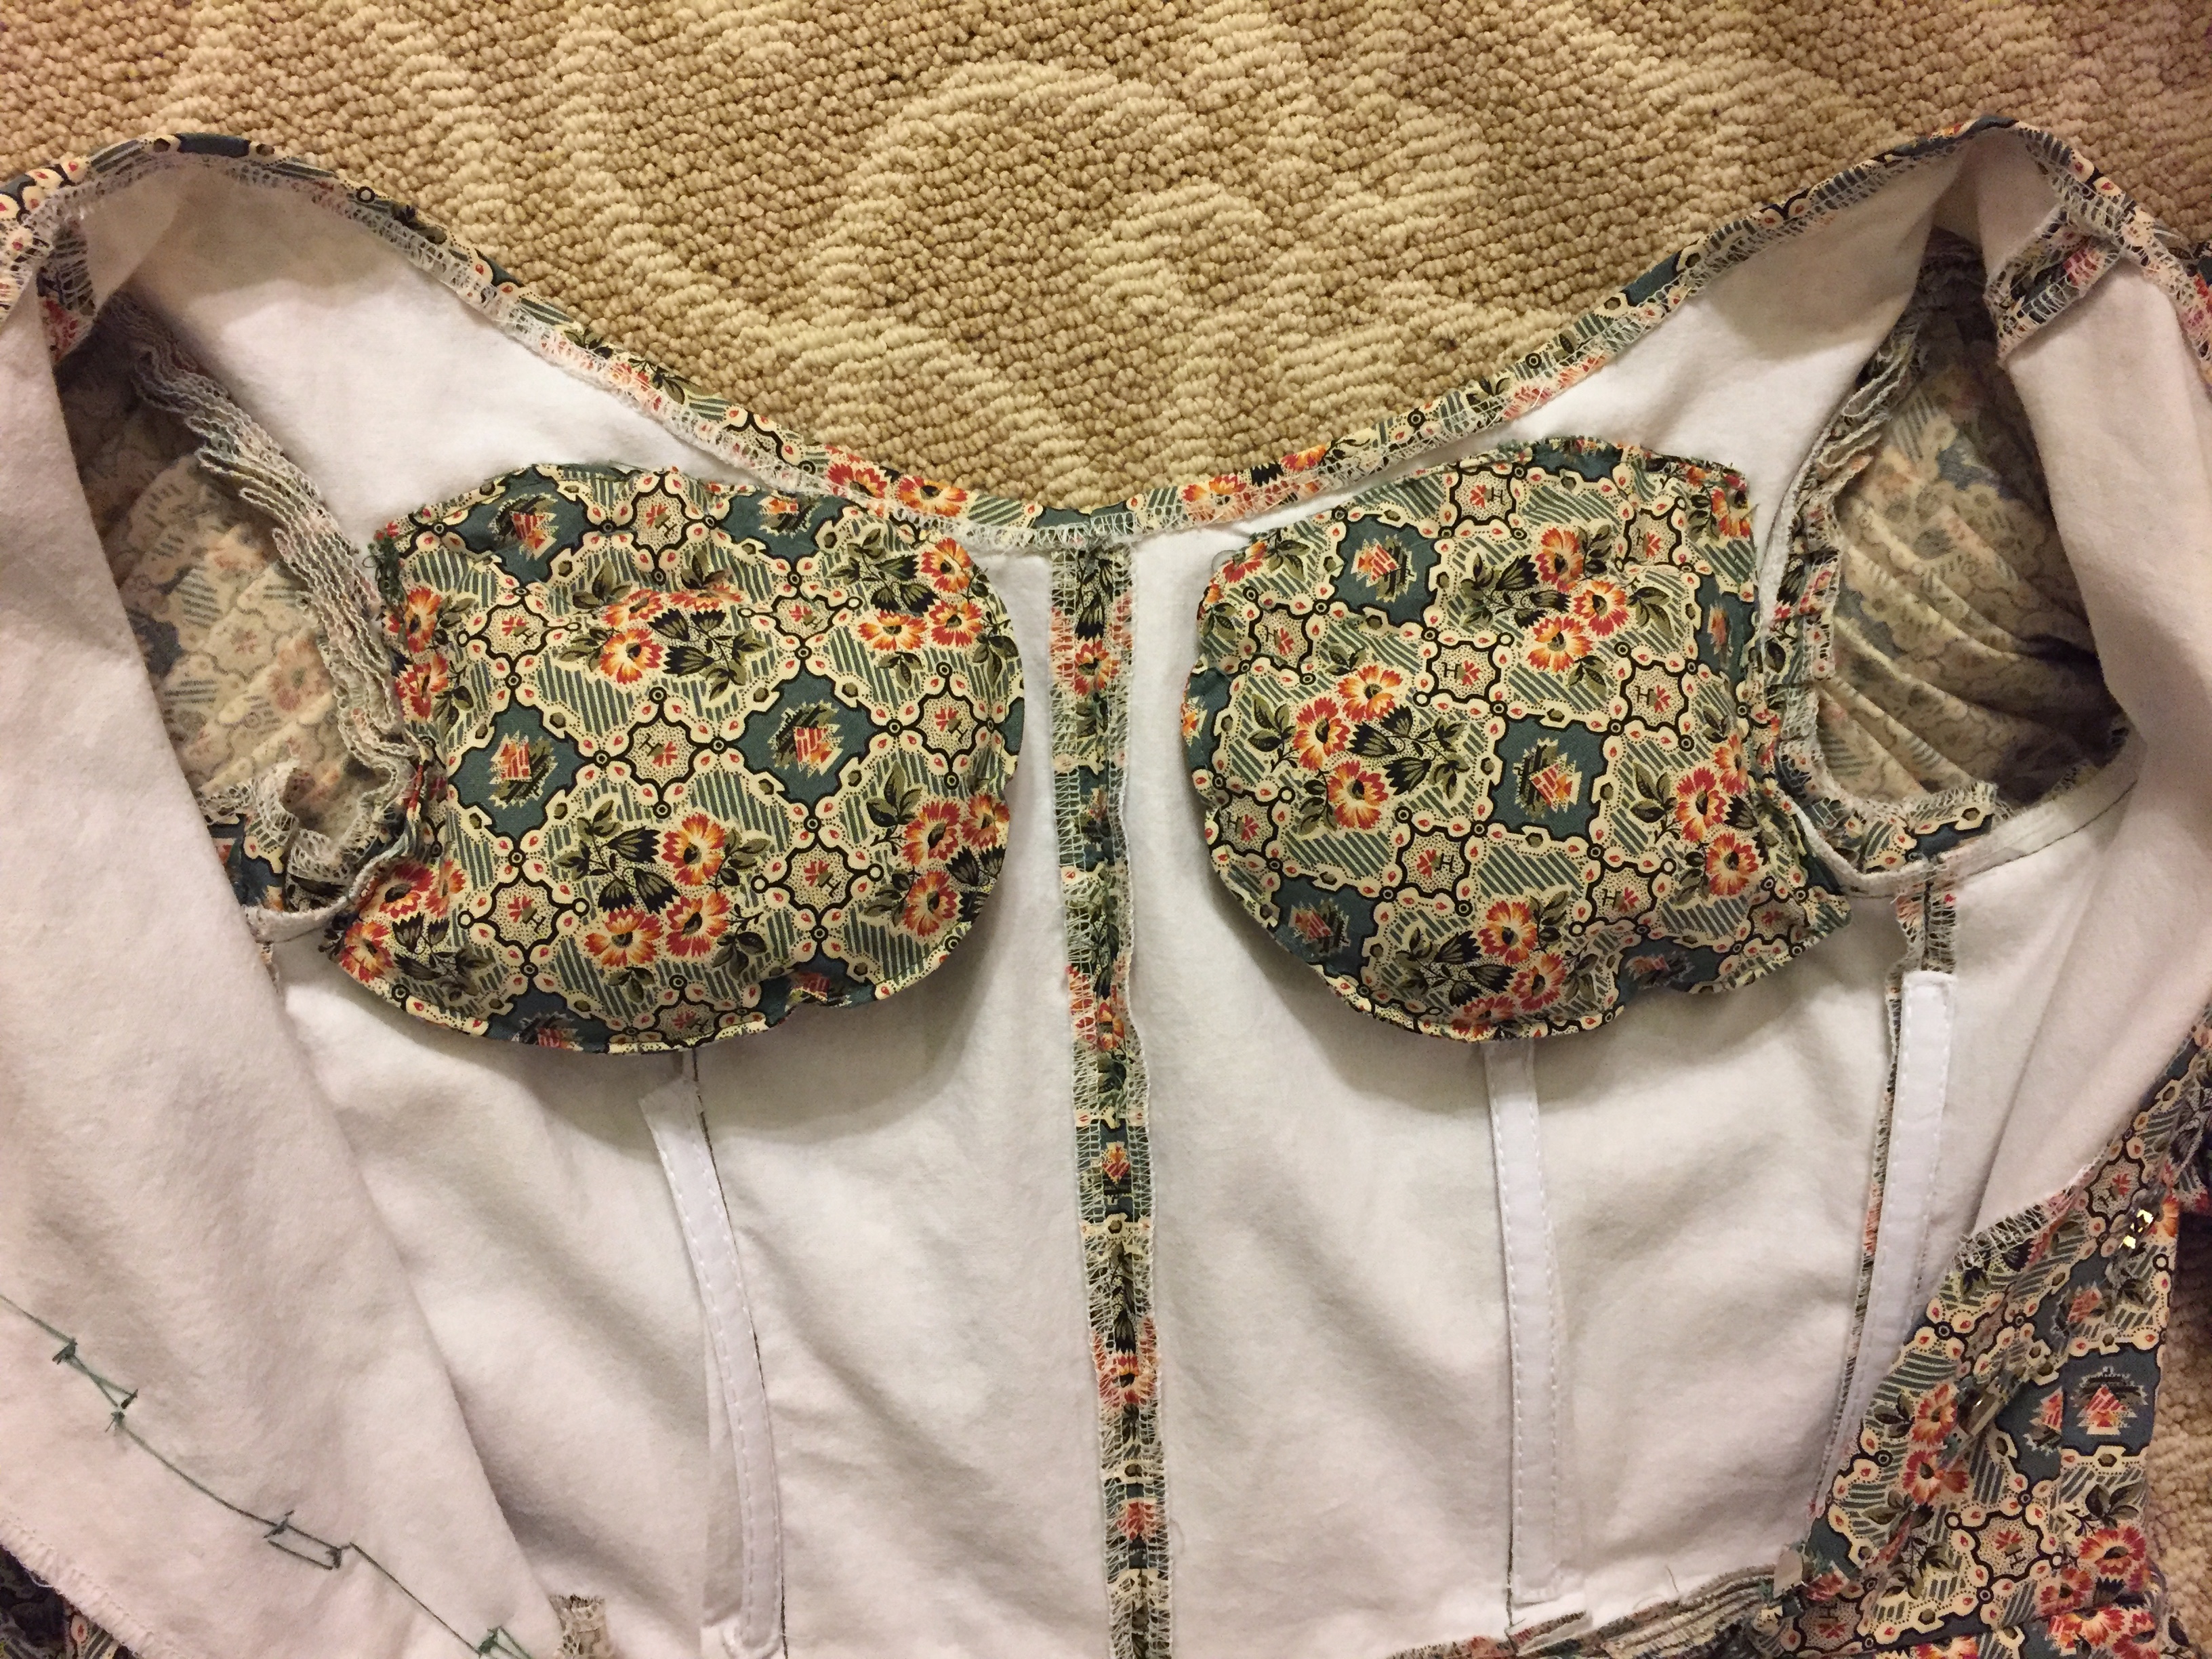
I put bust pads inside the gown, which are just cotton pouches stuffed with Poly-fil. They are not really meant to make your bust bigger, but fill out the hollow near the front of your underarm. The size, shape, and placement will depend on your body.
IMG_6401

As you can see, the neckline is just flipped down and hand-stitched into place.

Materials:

  • 8 yards of 44″ wide quilting cotton: $66.75 including shipping from eBay
  • Pattern: $0, previously used twice!
  • Bodice lining: $0 (leftover scraps from other projects)
  • Thread, hooks and eyes, Poly-fil. ~$3 (already in stash and purchased in bulk)
  • Ribbon: TBA

Not including accessories that means the dress will be around $70-75, since I already have all the undergarments, bonnet, shoes, and pelerine!

Here’s a storage tip: I now have three 1830s gowns and I don’t want to have the sleeves crushed in my packet closet. I also didn’t want to make multiple sets of sleeve plumpers. I put a plastic bag inside each sleeve and then put Poly-fil inside the bag. That meant the enormous sleeves of my 1830s dresses could muscle my other dresses in the closet out of the way.IMG_6403

IMG_6404

My event is still more than 3 months away, so I won’t be posting final worn photos for a little while, but I am glad to be done! (I don’t normally finish things this far in advance, but I wanted to make this gown while my previous 1830s dress was still fresh in my mind).IMG_6189.JPG

Gigot Girl Gang Invades Dickens Fair!

I go to the San Francisco Dickens Christmas Fair every year, but this year was especially fun because a large contingent of us went in 1830s ensembles. I’m amazed at how many beautiful and talented ladies joined in on the wackiness, and went all out with hair, bonnets, muffs, and other accessories with their big-sleeved gowns.QGIN4307

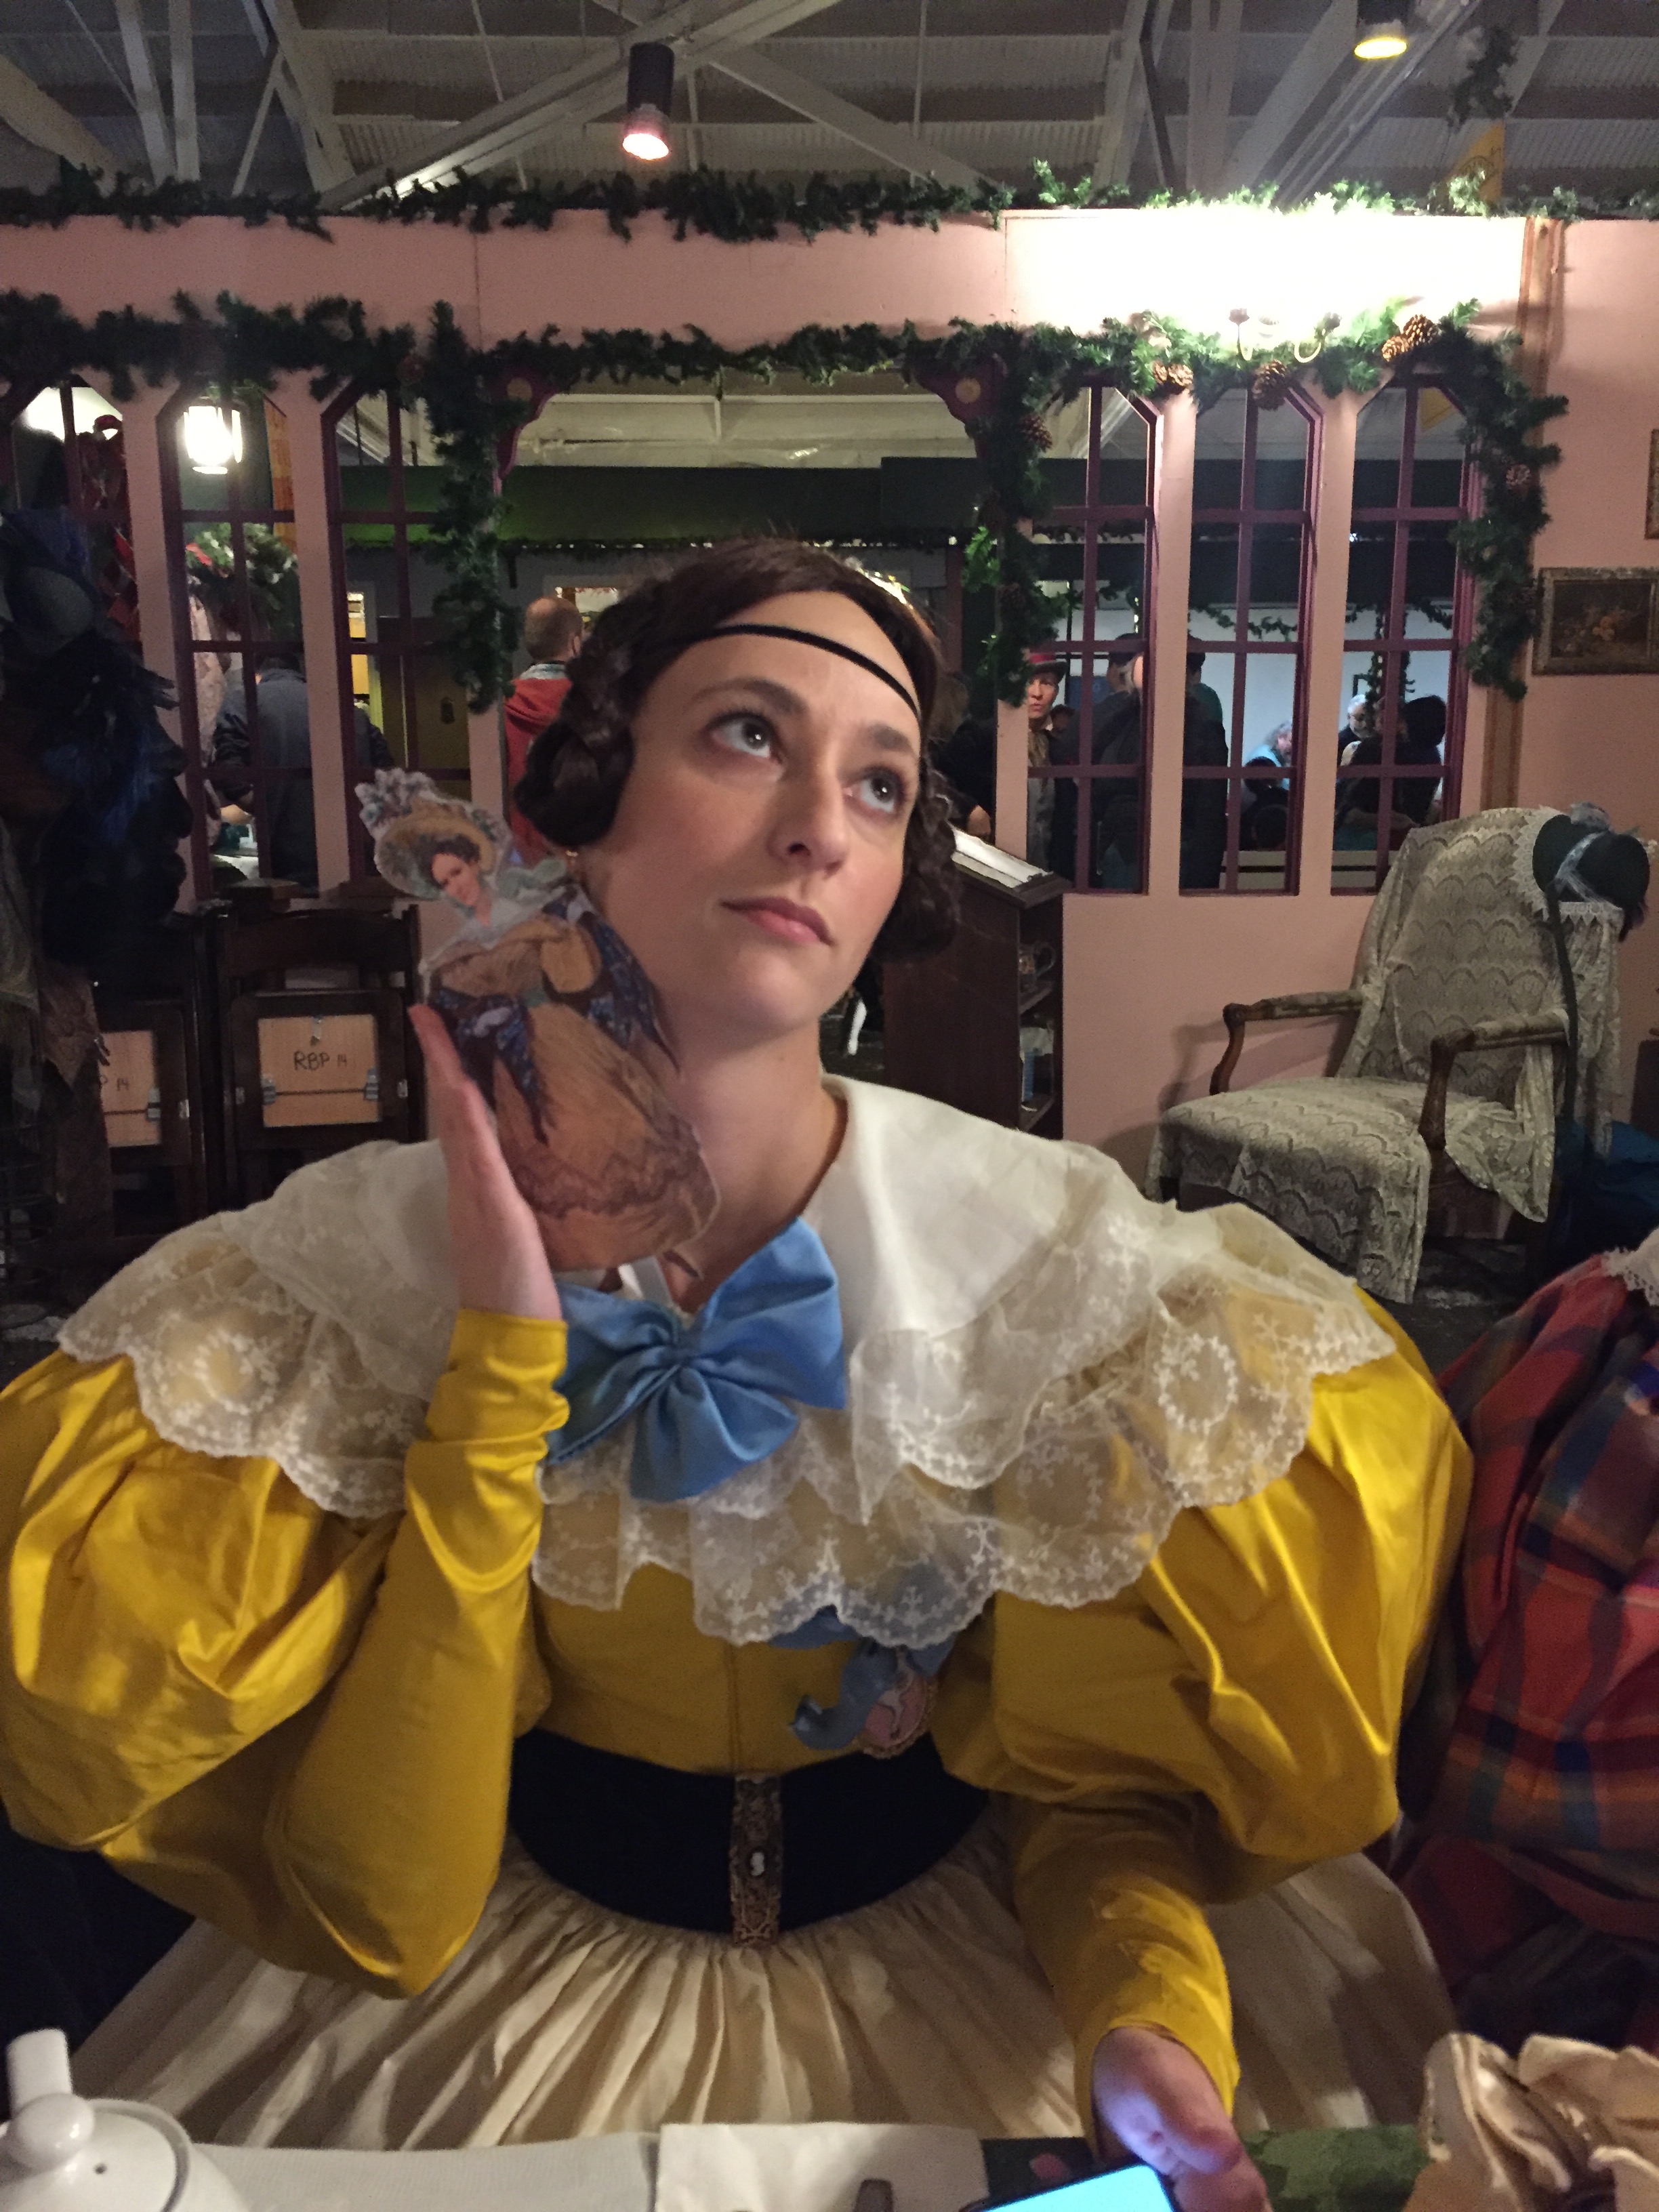
I took a quick snap in front of my house and later at Fair. My next post is going to discuss construction details, a materials list, show all the undergarments, explain the hair, and how to put together your own ensemble. For now, a few brief notes: my gown is sewn by my out of plaid silk taffeta. I am wearing Gettysburg side-lacing boots from American Duchess, earrings by The Lady Detalle, a bonnet by House of Loli that I trimmed, antique gloves, and a vintage muff. Underneath I have a linen chemise, corded stays by Redthreaded, a corded petticoat by Hand Stitches in Time, a tucked petticoat, sleeve plumpers, and stockings.

Enough chatting, you’re here to see pictures of everyone!

Nicole was beautiful in red and a sheer lace pelerine.IMG_4530

Christina had the most amazing pleated bodice hidden by her pelerine!IMG_4527

Abby was our Swedish head balls lady.

IMG_4533IMG_4538

Abby pretended to have beef with our Dane Elizabeth during the fashion contest, who had the most glorious hat.IMG_4476.JPG

Lauren was also part of the plaid contingent.IMG_4544IMG_4542IMG_4546

The American Duchess ladies made these lovely little ornaments engraved with “Gigot Girl Gang 2018” on the back and some of us wore them on our belts.IMG_4618IMG_4589

Kaila had a lovely tobacco-colored silk gown and pelerine, all hand-sewn. Her bonnet veil was just gorgeous! She won a prize in the fashion contest that we all attended as the “Luddite Fashion Society.” (Most of Dickens Fair is 1850s-1860s).IMG_4494IMG_4498

Maggie was a vision in bright yellow, with a little poppet of Cynthia that we passed around.IMG_4570.JPG

We had such a large group and everyone showed up at different times so I couldn’t get shots of everyone. Please forgive the poor lighting at Dickens; I already had to delete so many blurry and dark photos!

We had a grand time at tea.IMG_4564IMG_4557IMG_4556

And we even had an audience with the Queen, played by the beautiful Sarah that day. From left to right: Mena, Kim, Lauren, Sarah, Elizabeth, Sara, and me.IMG_4578

And here we have Sara, Mena, Elizabeth, Sarah, me, Molly, and Kim. I think Kim wins for biggest sleeves!IMG_4574

Many of us plan to wear these gowns again at Costume College in 2019. Please join us if you are interested! I will be making a post explaining how I put together my outfit, and I know American Duchess has some informative blog posts and video planned so come out and play!

More photos are in my Flickr album: https://www.flickr.com/photos/vivien_misc/albums/72157704703672744

Wedgewood Blue Gibson Girl Gown and Undergarments

I attended a dinner party on the Delta King River Boat in Sacramento. The event was hosted by the GBACG and people were encouraged to wear clothing from 1870-1900. I decided to make a Gibson Girl dress out of a Wedgwood blue silk taffeta, trimmed with white lace.IMG_2870IMG_2856

My inspiration was the famous Wedgewood pottery. IMG_1670.JPG

I have some additional appliqués I purchased that I didn’t have time to add for this event, but will for the next wearing to make it even more like pottery. IMG_2096.JPG

The bodice is made with Truly Victorian’s 1892 ball gown bodice and 1893 bell skirt patterns. I found the fit of both to be good, but the bodice is very long and I had to cut a bit from the bottom, even though I am long-waisted.IMG_2796

Some bodice in-progress photos that show the amount that needed to be trimmed:

My jewelry is by In the Long Run. My gloves are vintage and the purse is from a bridal shop. I am wearing Tissots from American Duchess.IMG_2742

I did not use the sleeve pattern that came with the bodice pattern. Instead I gathered up a rectangle of silk chiffon to make flowing sleeves.IMG_2727

The top was gathered and serged.IMG_2673

The back closes with hooks and eyes.IMG_2729.JPG

I decorated the front with a silk chiffon sash and little flowers that I put faux pearl centers in. IMG_2725

I would have liked to hem the end of the sash and add little pearls to the edge, but I was recovering from a hand injury and couldn’t do any hand-sewing, so it’s just a pouf for now. Thus I had to get creative with ways to avoid it!

Ways to save on hand-sewing:

  • I used a white silk chiffon scarf to trim the bodice, so the edges were already hemmed!
  • I serged or machine-sewed any seam I could.
  • I hemmed the skirt by machine, and then covered the machine stitches by sewing lace over it.
  • Instead of cutting a facing, I used a wide vintage rayon ribbon as a hem facing.
  • I used boning that already came with a casing, so I didn’t have to make the casing. I also had casing that had little “fins” on it so that I could machine-sew the boning onto the seam allowance of the bodice.
  • I used hook and eye tape instead of individually sewing on hooks and eyes.
  • Oh horror: I serged the bottom of the bodice, then flipped it up and held the hem in place by ironing on Stitch Witchery!

Because I flat-lined the fashion fabric to a cotton base, and I couldn’t hand-baste the pieces together there is some puckering. Although it’s not up to my “usual standards” I am still quite proud of what I was able to do with what I could, and I had fun with my friends!IMG_2848

Underneath the skirt I wore a long petticoat based on the Truly Victorian bell skirt pattern, with a big ruffle and trim attached.IMG_2162.JPG

IMG_2175

I wore a custom S-bend corset from Redthreaded, with hip pads, and a bust pad. The padding is necessary to achieve the exaggerated Gibson silhouette. I went from an 8 inch differential in my waist and hips to 13 inches, with only a 1 inch waist reduction!

IMG_E2015IMG_2016

I used the “bust improver” pattern from Wearing History, which comes in 2 sizes. I recommend it to give your girls a little extra something!Screen Shot 2018-11-04 at 8.11.32 PM.png

IMG_2708

Project costs:

  • 8 yards silk taffeta: $113.44 including tax from the LA Fabric District (I still have 3 yards left!)
  • 10 yards white veins lace: $34.01 including shipping from Aliexpress
  • 15 pairs grape leaf appliques: $36 including shipping from Aliexpress
  • bodice pattern: $10.75 from Truly Victorian (digital file)
  • skirt pattern: $0 (already used previously)
  • vintage rayon ribbon spool: $3
  • silk chiffon: $0 (gift from friend)
  • 3 yards white cotton for petticoat: $12 from eBay
  • pink trim for petticoat: $3 from garage sale
  • boning, thread, hook and eye tape, flowers, etc. from stash: ~$10

Total cost: $222.20 (plus I have a lot of silk and lace leftover I’ll probably sell to recoup some costs). Normally I don’t tally the costs until the dress is finished, and I still have to add the grape appliqués, but at this point it’s additional labor and not additional materials, so I added everything up. (When I started this blog my goal was to make things for $100 or less, and I’m seeing costs creep up because of nice materials. Hopefully my next project is a lot cheaper!)

All the hair you can see in the picture below is my own, which is currently shoulder-length. I pinned a big hair rat to the top of my head and two smaller ones on the sides, and then all the hair was pulled over the rats and pinned into place. The messy center was hidden by a faux hair bun pinned on top.IMG_2856

I’m not sure yet, but this might be a nice gala gown for Costume College 2019, when it’s all done!