Tag Archives: Cosplay

My Historical Loki Variant Cosplay (Borgias-Inspired Renaissance Dress Costume)

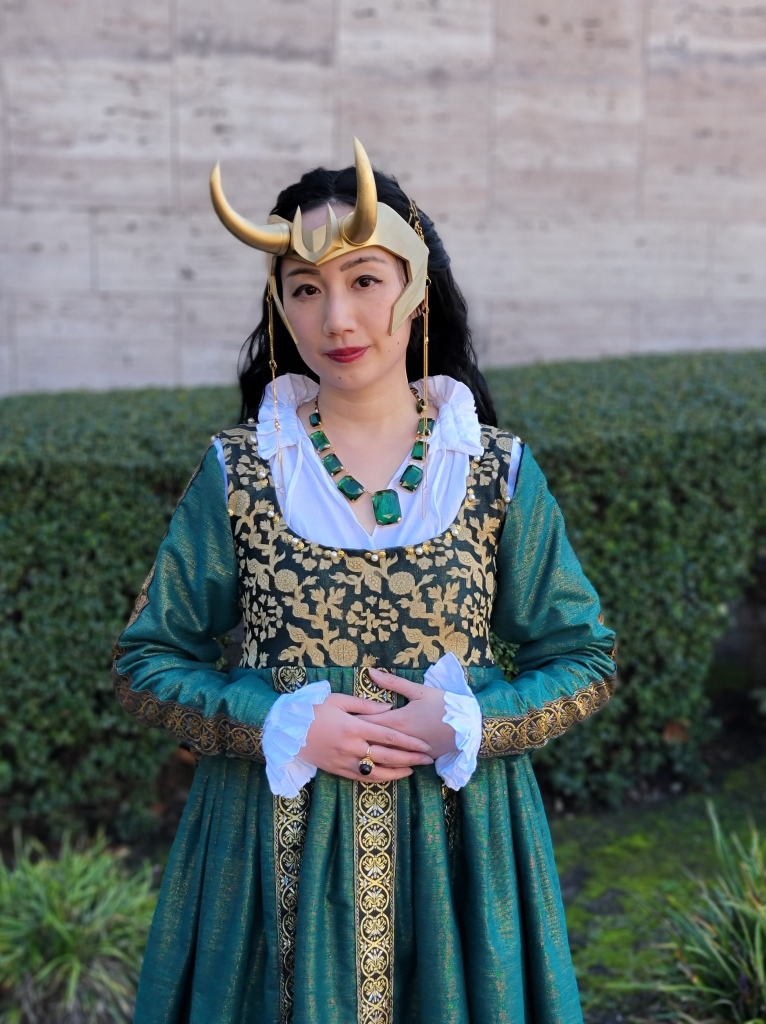
I was making a Borgias-inspired Renaissance dress and decided to lean into to the green gold color scheme and make it a historical Loki variant costume. I wanted a Renaissance gown but being shiny and pretty was more important to me than historical accuracy so this isn’t pegged to a specific decade, but rather a look inspired by both the Borgias HBO show and the character Loki from the Marvel Cinematic Universe.

The dress is made from beautiful green and gold shot raw silk suiting. The bodice uses the same fabric but with a silk/rayon organza burnout overlay, and the lining is a black cotton canvas for structure.

Rather than using a commercial pattern I Frankensteined together math and modified pattern bits from previous costumes I made. The bodice is a shorted version of the kirtle I previously made using help from the Tudor Tailor book (Amazon affiliate link). I widened the shoulder straps and added some more seam allowance but it is otherwise generally the same.

The skirt is made of pleated rectangular panels. Each of the front and back are 1.5 panels wide, with the seam hidden under the metallic jacquard trim.

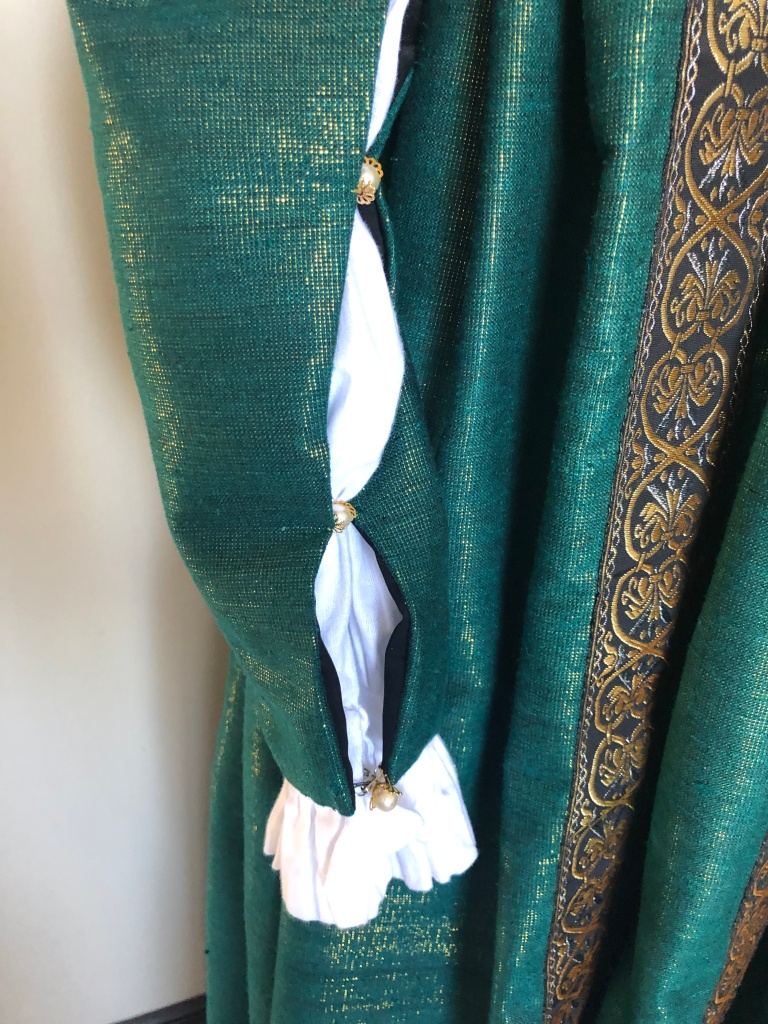
The sleeves are basic sleeve shapes but cut a little loose to allow for the chemise underneath. They are somewhat like tie-on sleeves except instead of ribbons I sewed them at the meeting points with a glass pearl and some gold bead caps.

Underneath the dress I wore a Tudor chemise because that is what I had on hand. (It was also made using a pattern from the Tudor Tailor book). However, at a later point I’d like to make a Renaissance camicia with a different neckline and much fuller sleeves to puff out through the gaps in the green sleeve.

LOKI CROWN

I bought the Loki crown as 3D printed pieces from Parton Prints on Etsy. The horns come as separate pieces for ease of shipping and I glued them on using E6000 glue. After a little sanding, I used a primer that someone recommended to me for 3D printed plastics Tamiya Gray Fine Surface Primer (Amazon affiliate link) I finished up with two coats of Rust-Oleum Metallic Spray Paint in Gold. Originally I used more E6000 to glue on a black elastic strap but decided to cut them off. Instead I used the nubs of those straps as an anchor point to sew on some gold necklace chains both as decorative dangling elements in the front and also as a visible gold band across the back to hold the crown on.

I am wearing a wavy black wig from Amazon (affiliate link) under the crown. I wish my hair was that luxurious! The necklace is a secondhand eBay find.

And here is a video of the dress in action!

I had so much fun pretending to be a villain. Here are a few of the fun TikTok videos I made as Lokizia Borgia:

  1. Transforming into Lokizia Borgia:

2. Asking you to join me in ruling the galaxy:

3. Starting my villain arc:

MATERIALS

  • 5 yards green/gold raw silk suiting from Fabricmartfabrics.com: $52.50 + $9.99 shipping (some left over)
  • 2 yards organza burnout from Fabricmartfabrics.com: $16.10 (shipped with silk suiting, a lot left over)
  • 10 yards metallic jacquard trim from Aliexpress store Lucky Zakka: $9.42
  • Thread, hooks/eyes, glass pearls, lining scraps, paint, glue, etc. from stash/left over from other projects: ~$5
  • Package of 9 mm gold-colored bead caps: $5.90 from Amazon (affiliate link); I have many left out of that 100 pack.
  • Gold chains: $0 (gifted from someone’s destash)
  • 3D printed Loki crown pieces: $32.12 including shipping from Parton Prints on Etsy

Total cost: $131.03 (with about $100 of that in the dress itself).

OTHER RESOURCES MENTIONED IN THE POST (Amazon affiliate links below):

I had a lovely time wearing this to a Sistine Chapel art exhibit with my lovely friend Sara, who took a number of the pictures in this post.

Thank you for reading!

Historical Belle: My 18th Century-Inspired Beauty and the Beast Costume

I made an 18th-century inspired mashup of Belle’s iconic yellow ballgown and her hooded winter outfit from Disney’s Beauty and the Beast.

The costume has aspects inspired by 18th century fashion but is not a historically accurate reproduction particular to a specific decade. I was heavily inspired by Brunswicks (the hooded traveling outfits) but you can also see elements from robe a la anglaise gowns, caracao jackets, and side-opening petticoats.

The yellow fabric I used is a quilted cotton harvested from a king-sized bedspread! It saved me a lot of time quilting, but the material created some challenges: I had to employ strategic cutting in order to maintain symmetry in the stitch designs in the final costume, and to keep the finished edges in the skirt, peplums, sleeves, and hood. The winter-appropriate thick cotton batting meant to avoid bulky seams I had to carefully pick out excess batting in the seam allowance of each pattern piece while maintaining (or restitching) the lines of quilting stitches. Raw edges were also serged to prevent fraying and loss of batting. Interior excess seam allowance had to be sewn down by hand since ironing was insufficient to keep seams pressed flat. In addition, the pleated areas were too thick to fit into the sewing machine and had to be stitched by hand.

However, I really like how the thickness of the material gave the garment a lot of structure, especially in the jacket peplum.

The scallops were also a feature I liked.

I lined the hood with scraps of white silk dupioni left over from a previous project. It was hand-stitched in so I could keep the scalloping on the hood.

The jacket was decorated with realistic foam roses on wired stems that I trimmed and shaped with pliers to create a base for hand-sewing onto the jacket.  Each rose is accented with red crystals I glued on individually using E6000 Fabri-Fuse glue, which I highly recommend. (This is not the regular E6000 glue. Fabri-Fuse is low-odor, dries quickly, and comes in a squeeze bottle with a sharp tip for detail work).

The yellow and white striped bows are made from vintage French ribbon with picot edging, accented with antique lace. Each sleeve has embroidered tulle lace, large red satin bows, and a rose. 

My necklace and earrings were purchased from In the Long Run Designs on Etsy. The mirror was purchased from Amazon (affiliate link).

Underneath the gown I am wearing 18th century silk and linen stays made by me.

The lace-front wig was styled by me and decorated with the same roses, crystals, and ribbon as the jacket.

The wig base is a long black wavy wig that I purchased from Amazon (affiliate link).

Pattern Info:

The outfit was a combination of self-draping and Frankensteining. The main body of the jacket and sleeves used a heavily modified version of the Period Impressions 1780 Polonaise pattern, which I previously used for my Outlander dinner party dress. However, I took out some back seams and altered the sleeves around the elbow region. The peplum was created by holding and pinning material up to the upper jacket on the dress form until I got the length and fullness I wanted.

The hood and lining are pleated in a fan shape, and the pattern was adapted from the hooded cloak pattern in Linda Baumgarten’s Costume Close-up book (Amazon affiliate link).

The hood doesn’t stand up by itself, so it’s being held up here by a piece of boning to show you the shape:

No pattern was needed for the quilted petticoat, which was constructed in the same manner as your usual 18th century petticoat with side slits. The front and back panels were pleated into twill tape that served as waistbands and ties. Because of the thickness of the material there were less pleats than usual and I left a large section of the front center unpleated to allow for the jacket to sit flat over the stomach.

Materials used:

  • BrylaneHome king-sized quilted bedspread (in “aspen gold” color): $49.90 from Amazon (affiliate link).
  • Two boxes of artificial foam roses: $17.99 each from Amazon (affiliate link)
  • Red crystals (with lots left over!): $7.59 from Amazon (affiliate link)
  • Fabri-Fuse glue: $8.00 from Amazon (affiliate link)
  • Twill tape, thread, hooks/bars, red ribbon, hair clips from stash: ~$5
  • Vintage striped ribbon: $10 (this is a guess because I don’t remember how much I paid for it from a vendor table at an event)
  • Vintage lace: $0 (gift from a friend)
  • Sleeve lace: $8.27 with tax and shipping from Wikilaces on Etsy
  • Hood lining: $0 (scraps from previous project)
  • Lace-front wig: $36.99 from Amazon (affiliate link)

Total: ~$161.73
(I’m not including the shoes or jewelry because those were items I already owned for other costuming purposes. About $40 of the total is a wig I can reuse, plus I had some left over materials, so I’m calling this project a win for my pocketbook!).

I had a lot of fun making and wearing this costume. I even entered it in my first ever cosplay contest and was delighted to be a finalist in the Cosplay with Singer contest this fall! Here’s a video of the costume in action that I made for the contest:

Enjoy this silly video of me trying to fit my large costume through a small space.

Thank you for reading!

Good Intentions Don’t Excuse Bad Behavior (Sequel to “It’s Not Necessary to Be Mean: Snark in the Costuming and Cosplay Community”)

About a year ago I wrote a blog post called “It’s Not Necessary to Be Mean: Snark in the Costuming and Cosplay Community” and was meaning to follow up with a part two post on the anniversary, before the holidays buried me. No time like the present! If you haven’t done so, please read that previous post first; it goes over some tips and general manners for both newcomers and veterans to treat themselves and each other kindly. Consider this post a slightly more advanced primer about how good intentions don’t excuse bad behavior! I hope to get people to think about what they have been doing and whether it is unintentionally unkind.

Are your “helpful” comments really helpful?

You may think you’re giving constructive criticism, but please consider carefully if it is 1) wanted by the recipient and 2) whether it could be interpreted as condescending. Here are a few comments I’ve seen that the speaker probably thought were benign or even helpful, but a newcomer or sensitive person could find very hurtful:

  • “I don’t know why you wouldn’t want to take a little extra time to look so much better by doing XYZ.”
  • “Oh yeah, I used to wear stuff like that too when I was new. You’ll learn.”
  • “I prefer to costume at a higher caliber but I guess you can do what you want.”
  • “If you care what others think you should do XYZ.”

To be clear, those can sound judgmental and are not okay to say to someone! Well, what’s okay then?

  • DO: “Do you want to know where I buy my shoes?”
  • DON’T: “Instead of boots like that, you could get accurate ones at this company.”

The first example takes into consideration what the other person wants, and gives them the option to decline. The second example assumes the other person needs and wishes to “improve” and doesn’t have health or funding issues that require them to wear certain footwear.

  • DO: “I’ve had a really good time at that particular costume event, and feel free to ask me if you have questions about going one day.”
  • DON’T: “Costume tourism is the best! You’re missing out on the most amazing experience by not doing a fully immersive week in a castle!”

The first one is a topic of conversation about one’s own experiences and is framed with an offer of help. The second makes the other person feel bad if they haven’t had the opportunity to put together a wardrobe and the financial privilege to travel.

It’s great to be helpful! But be mindful that your suggestions don’t imply that you are judging someone, or that person will be judged by others.


Don’t put yourself down.

Some of you reading this may not realize it, but there are others that look up to you. They may be brand new or established in the hobby but admire your work. Perhaps you are a friend of theirs, or someone they follow on Instagram, or write a blog they follow, but you have more influence than you know.  Many of us are our own harshest critics and may joke about our work being “trash” but others are listening. Imagine how disheartening it would be to think that something you admire and aspire to is “not good enough” for someone you see as a role model, and thus worry your role model may be judging you too. Please be kind to others by being kind to yourself first. We all start somewhere.

I understand that some people make negative comments about their own projects to avoid seeming snobby, or to keep others from making the same mistakes. There is nothing wrong with taking a compliment gracefully with a simple “Thank you.” If your goal is to be helpful, spin your self-critiques positively.

  • DO: “Oh thanks! It’s a good pattern but watch out for the fit on the collar; I found it a little tricky.”
  • DON’T: “Oh I can’t believe you like this! My collar looks horrible!”
  • DO: “I’m glad you like my cape! I was afraid it wasn’t going to turn out right because I picked a really inexpensive fur that sheds a lot.”
  • DON’T: “This cape? Ugh, it is so cheap-looking I’m putting it in the trash when I get home.”


Don’t touch people without permission.

Good intentions don’t excuse bad behavior, especially when it comes to physical contact. Wanting to compliment someone or take a closer look at their costume does not mean you can touch someone without permission. Because you are at a convention or a fellow costumer does not mean you are automatically entitled to permission. No means no!

You would think these are obvious rules, but I am listing these out because of incidents that have actually happened to me or my friends:

  • If you are allowed to touch some fabric on a person’s body, touch their arm and not their butt.
  • If you get permission to examine someone’s corsetry, do not squeeze their breast.
  • Do not approach a gentleman and try to lift his kilt.
  • If you are in a noisy area and trying to get someone’s attention, it may be appropriate to gently tap the person on the shoulder. It is definitely not appropriate to grab their wrist and pull them towards you.
  • Keep hugs (ask permission!) gentle so you don’t break anything.

Please do the following:

  • Remember to ask permission. Ask. Really, ask.
  • Ask yourself if it’s really necessary to touch a costume, prop, wig, or person to have an understanding of it.
  • Consider whether your comment is meant to make the other person feel nice about their work, or fulfill your need to get attention from them.
  • Don’t get mad when someone says no, or try to guilt them into changing their mind.
  • Don’t assume that because you saw someone else (who may be a close friend) touch a particular cosplayer that you should be allowed to as well.


Don’t talk about a stranger’s race.

I’ve sometimes encountered individuals who said things like “Oh, it’s so nice to see a POC in the hobby!” I know they mean well or are trying to demonstrate how “woke” they are, but really the message they are sending is that regardless of my friendliness or skill in costuming, the very first thing they noticed and thought was important to comment on was the color of my skin.

If a particular ethnic group is underrepresented in your circle, a great way to make them to feel welcome is to treat them like everyone else. Specifically pointing out what makes them different may alienate someone.

Don’t assume that just because someone is a POC that their costume is ethnic in some way. If you assume wrong you may make someone very uncomfortable. One year I was at a convention wearing a Game of Thrones costume, along with a dozen other women using the same pattern. I’m pretty sure not everyone was asked questions like “Is that a kimono?”  “Are you Korean?” “Is your hairstyle part of your culture?” “Are you supposed to be a geisha?”

And please never tell someone it’s “not historically accurate” for someone of their ethnicity/ gender/ disability/ age to participate in or be present at a particular event or time period. If you’re a dentist 40 hours a week and pretending to be a Civil War soldier on the weekends, you have no business telling someone who they can’t pretend to be for fun. If you’re into fantasy stuff and cool with orcs and elves but you’re weirded out by the idea of black people in medieval Europe, maybe you should find another hobby.

What if you are an organization?

Note: If you are a reenactment group, living history site, or museum you have the right (or even an obligation) to set your own rules and educate the public about historical facts. My comments are directed at casual costuming groups such as sewing clubs, cosplay conventions, theme parties, etc. to prevent feelings of exclusion and gatekeeping.

Mentor newcomers! Host workshops, have resource lists, create an online forum where they can ask questions, etc. Write out a defined non-bullying policy and make it clear that derogatory comments about a cosplayer’s body shape, culturally insensitive costumes, etc. are not permitted. Allow for beginners to explore their interest in the club without requiring costumes that require a lot of upfront investment in time and money.

Don’t have an intentional or unintentional hierarchy with “elite” club members; encourage everyone equally. For an example of doing it right: my local costume guild had a fashion show this past week. Calls for models were public and open to all skill levels; they were not just friends of the president or “the best of the best.” There were no applications, auditions, lengthy rehearsals, or onerous requirements to enter that would scare off newcomers. The models were all ages, genders, and body types, and wore self-made and store-bought costumes, or even literally artfully wrapped bedsheets, and no one was turned away. There were other activities so that the fashion show was not the main focus, and the organizers made it clear they did not want anyone to feel left out.

Depending on the size of your organization you may require more formality to herd the squirrels. But if you don’t need to, don’t add layers of complexity that scare away shy or new people.

If you are a visitor to an educationally-minded group like a living history site, do remember the distinction between trained employees/volunteers and members of the public.  If your idea of playing along is to dress up in a historical costume that is correct for the time and area that site portrays, great! That does not give you the right to shame others that don’t or make snide comments about how someone’s clothes are off by a decade.

Just remember, time travel should be fun. Enjoy and don’t take yourself too seriously.

IMG_6972.JPG

About to drop the hottest album of the 18th century.

2018 Costuming Year in Review

The past year was a rough one health-wise, so it’s a bit of surprise to me writing this post and tallying up my costumes how much I got done! That makes me optimistic for what I can achieve in 2019, even though I’m going to be reasonable in order to keep myself sane and less stressed.

I went to the Legion of Honor museum wearing my 18th century mauve silk dress in February, which I started in January.

28165039_1444739302319997_1270203275298556190_o

Photo by John Carey

My other January project was to make this steampunk belt and tea holster.IMG_6436

In March I made a Regency outfit for my husband and new dress for myself. (The pelisse and bonnet are not newly made).IMG_7449IMG_7216

At Silicon Valley Comic Con in April I premiered my Vice Admiral Holdo costume, my proudest achievement of the year! (I also joined the Rebel Legion with it!)

Business Insider Melia Robinson

Photo by Business Insider

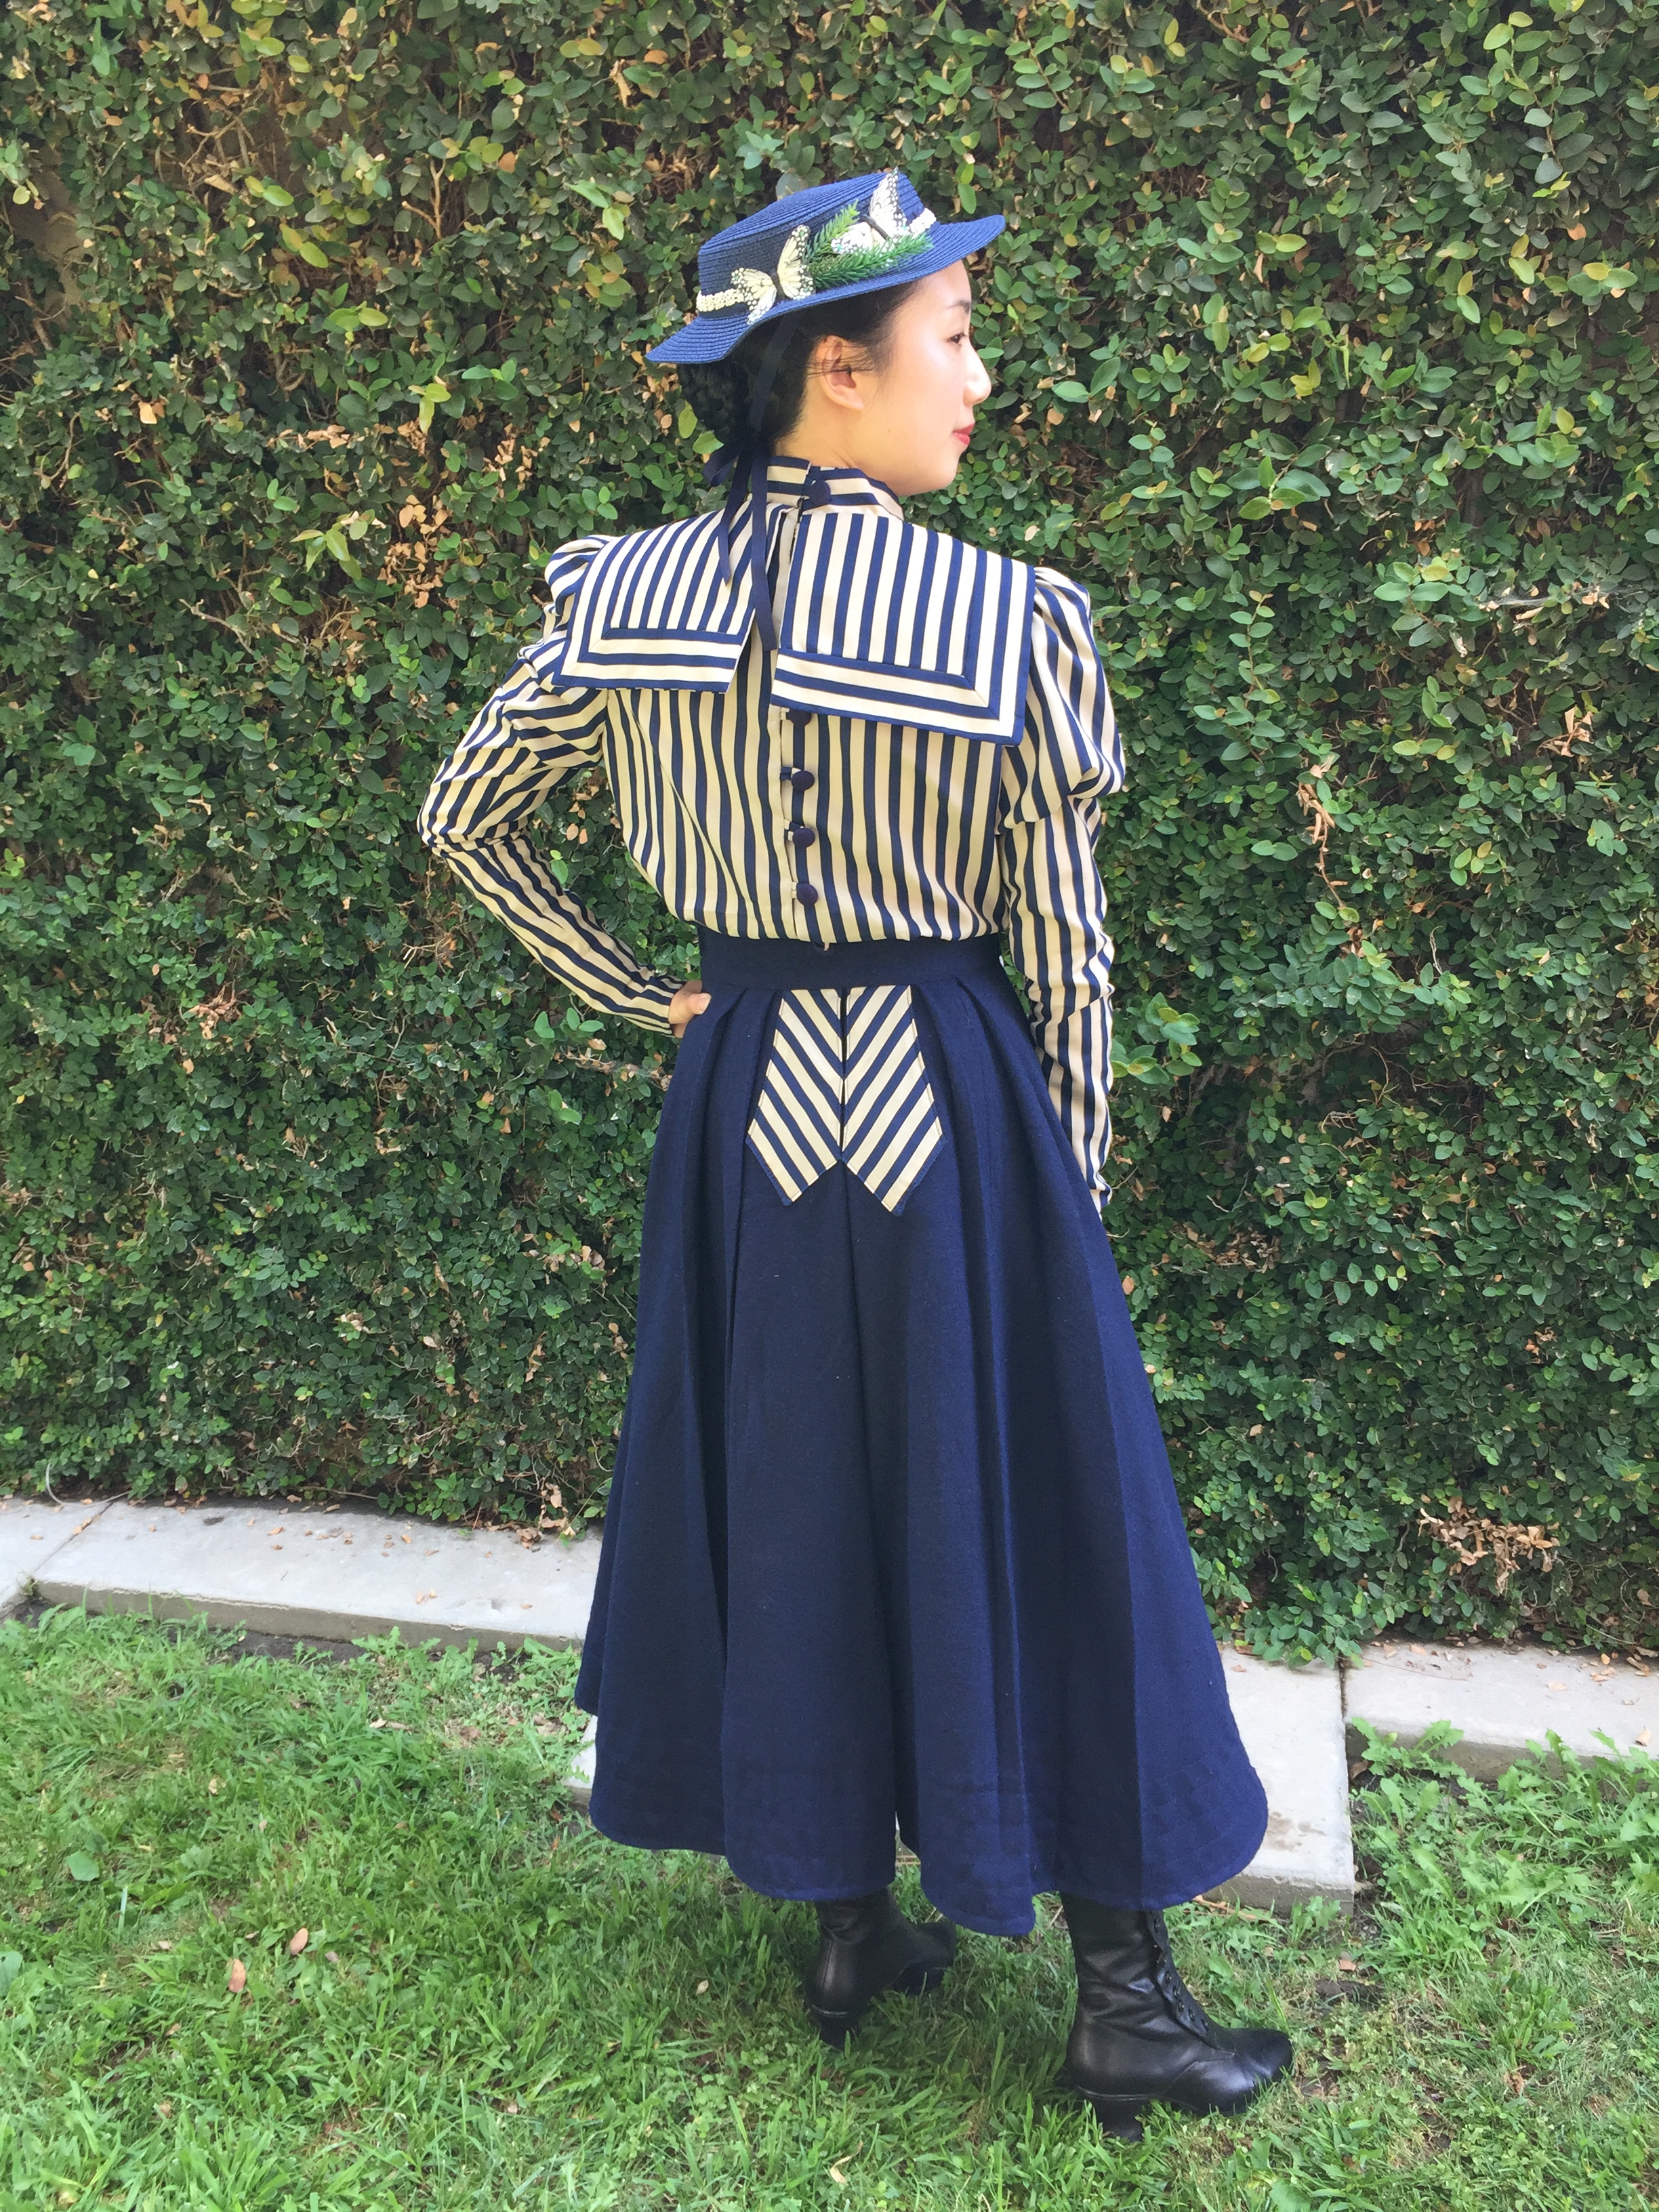
In April I wore a Victorian/Edwardian-inspired bicycling outfit to a train ride and BBQ.

NEBZ9597

Photos by Chris Wiener

May was a mermaid month, with a tail and shell bra.IMG_9098

In June I wore a vintage-style First Order Uniform, inspired by Star Wars.

43952806792_d6dd4a1810_o

Photo by Gloria Sheu

For fun, in June/July I made a medieval fantasy princess dress.EJIY8518

In July I wore Crimson Peak 2.0 (an outfit that I made in 2017 but upgraded to wear to Costume College).

44353198072_e0b45219a7_o

Photo by Gloria Sheu

It included a big lilac petticoat.C18CCFD1-8D0C-4032-9873-C16C3C447BA4

During the summer I also made myself a cotton novelty dress.IMG_0120.JPG

In October I wore this Gibson Girl dress to a GBACG event.IMG_2856

I also made a big trained petticoat for it.IMG_2162

My last big project was this 1830s Romantic day dress, worn to the Dickens Fair in December.IMG_4506

I also made a blouse using a Wearing History pattern.IMG_4738.JPG

I’m surprised at all the projects from this year and look forward to more! On the horizon I’ve got some more Star Wars outfits, an 1890s sweater, an 18th century dress, a 1920s robes de style, and a lot of vintage-style daily wear.

Costume College 2018 Outfit Recap

I went a little overboard at Costume College this year and brought 8 costumes. Originally I thought I’d just dress up for the evening events and then bring some vintage dresses for casual daywear. Then I got recruited into various group costumes and things snowballed from there . . . I’ll be following up this post with more featuring the costumes worn by the other talented individuals at Costume College, but for now, here is my parade!

At the Thursday Night Pool Party the theme was “In the Realm of the Goblin King,” so of course I had to dress as Jareth! Elizabeth was my baby Toby.IMG_0366

The boots are American Duchess Tavistocks and the blouse is a vintage Gunne Sax. Everything else was cobbled together from modern clothes.IMG_0476

On Friday I  wore my Victorian bicycling outfit with the “Adventurer’s” group of sporting ladies.IMG_0639IMG_0643IMG_0613

Friday night I wore my Crimson Peak Edith picnic outfit, along with my Elizabeth as another version of Edith, and Adrienne as our “sister-in-law” Lucille. I’ve worn this outfit before but it wasn’t fully finished then. I’ve made a number of upgrades and will be making a more detailed construction post on the blog.IMG_0674IMG_0737IMG_0735

It was a delightful surprise to even get some kudos on Instagram from Kate Hawley, costume designer for Crimson Peak!IMG_E1265

On Saturday I was a member of a surprise group of Downton Abbey maids. It was decided I was the “head maid” since I had the most lace, and our pregnant friend Christine played the part of “the fallen maid” that got a little too friendly with the young master of the house.IMG_0790IMG_0797

We passed out buttons as prizes to people who could identify us correctly. (As Asian costumers we’ve experienced people calling us by each others names at conventions for years, so we thought it’d be fun to dress alike this year). Christine also made embroidered patches for us to wear with this same design.IMG_0823

Saturday night was the grand gala! I have so many wonderful pictures for a future post, but here I am in my Vice Admiral Holdo, along with my brilliant friend Kelsey in her Queen Amidala.IMG_1017IMG_1022

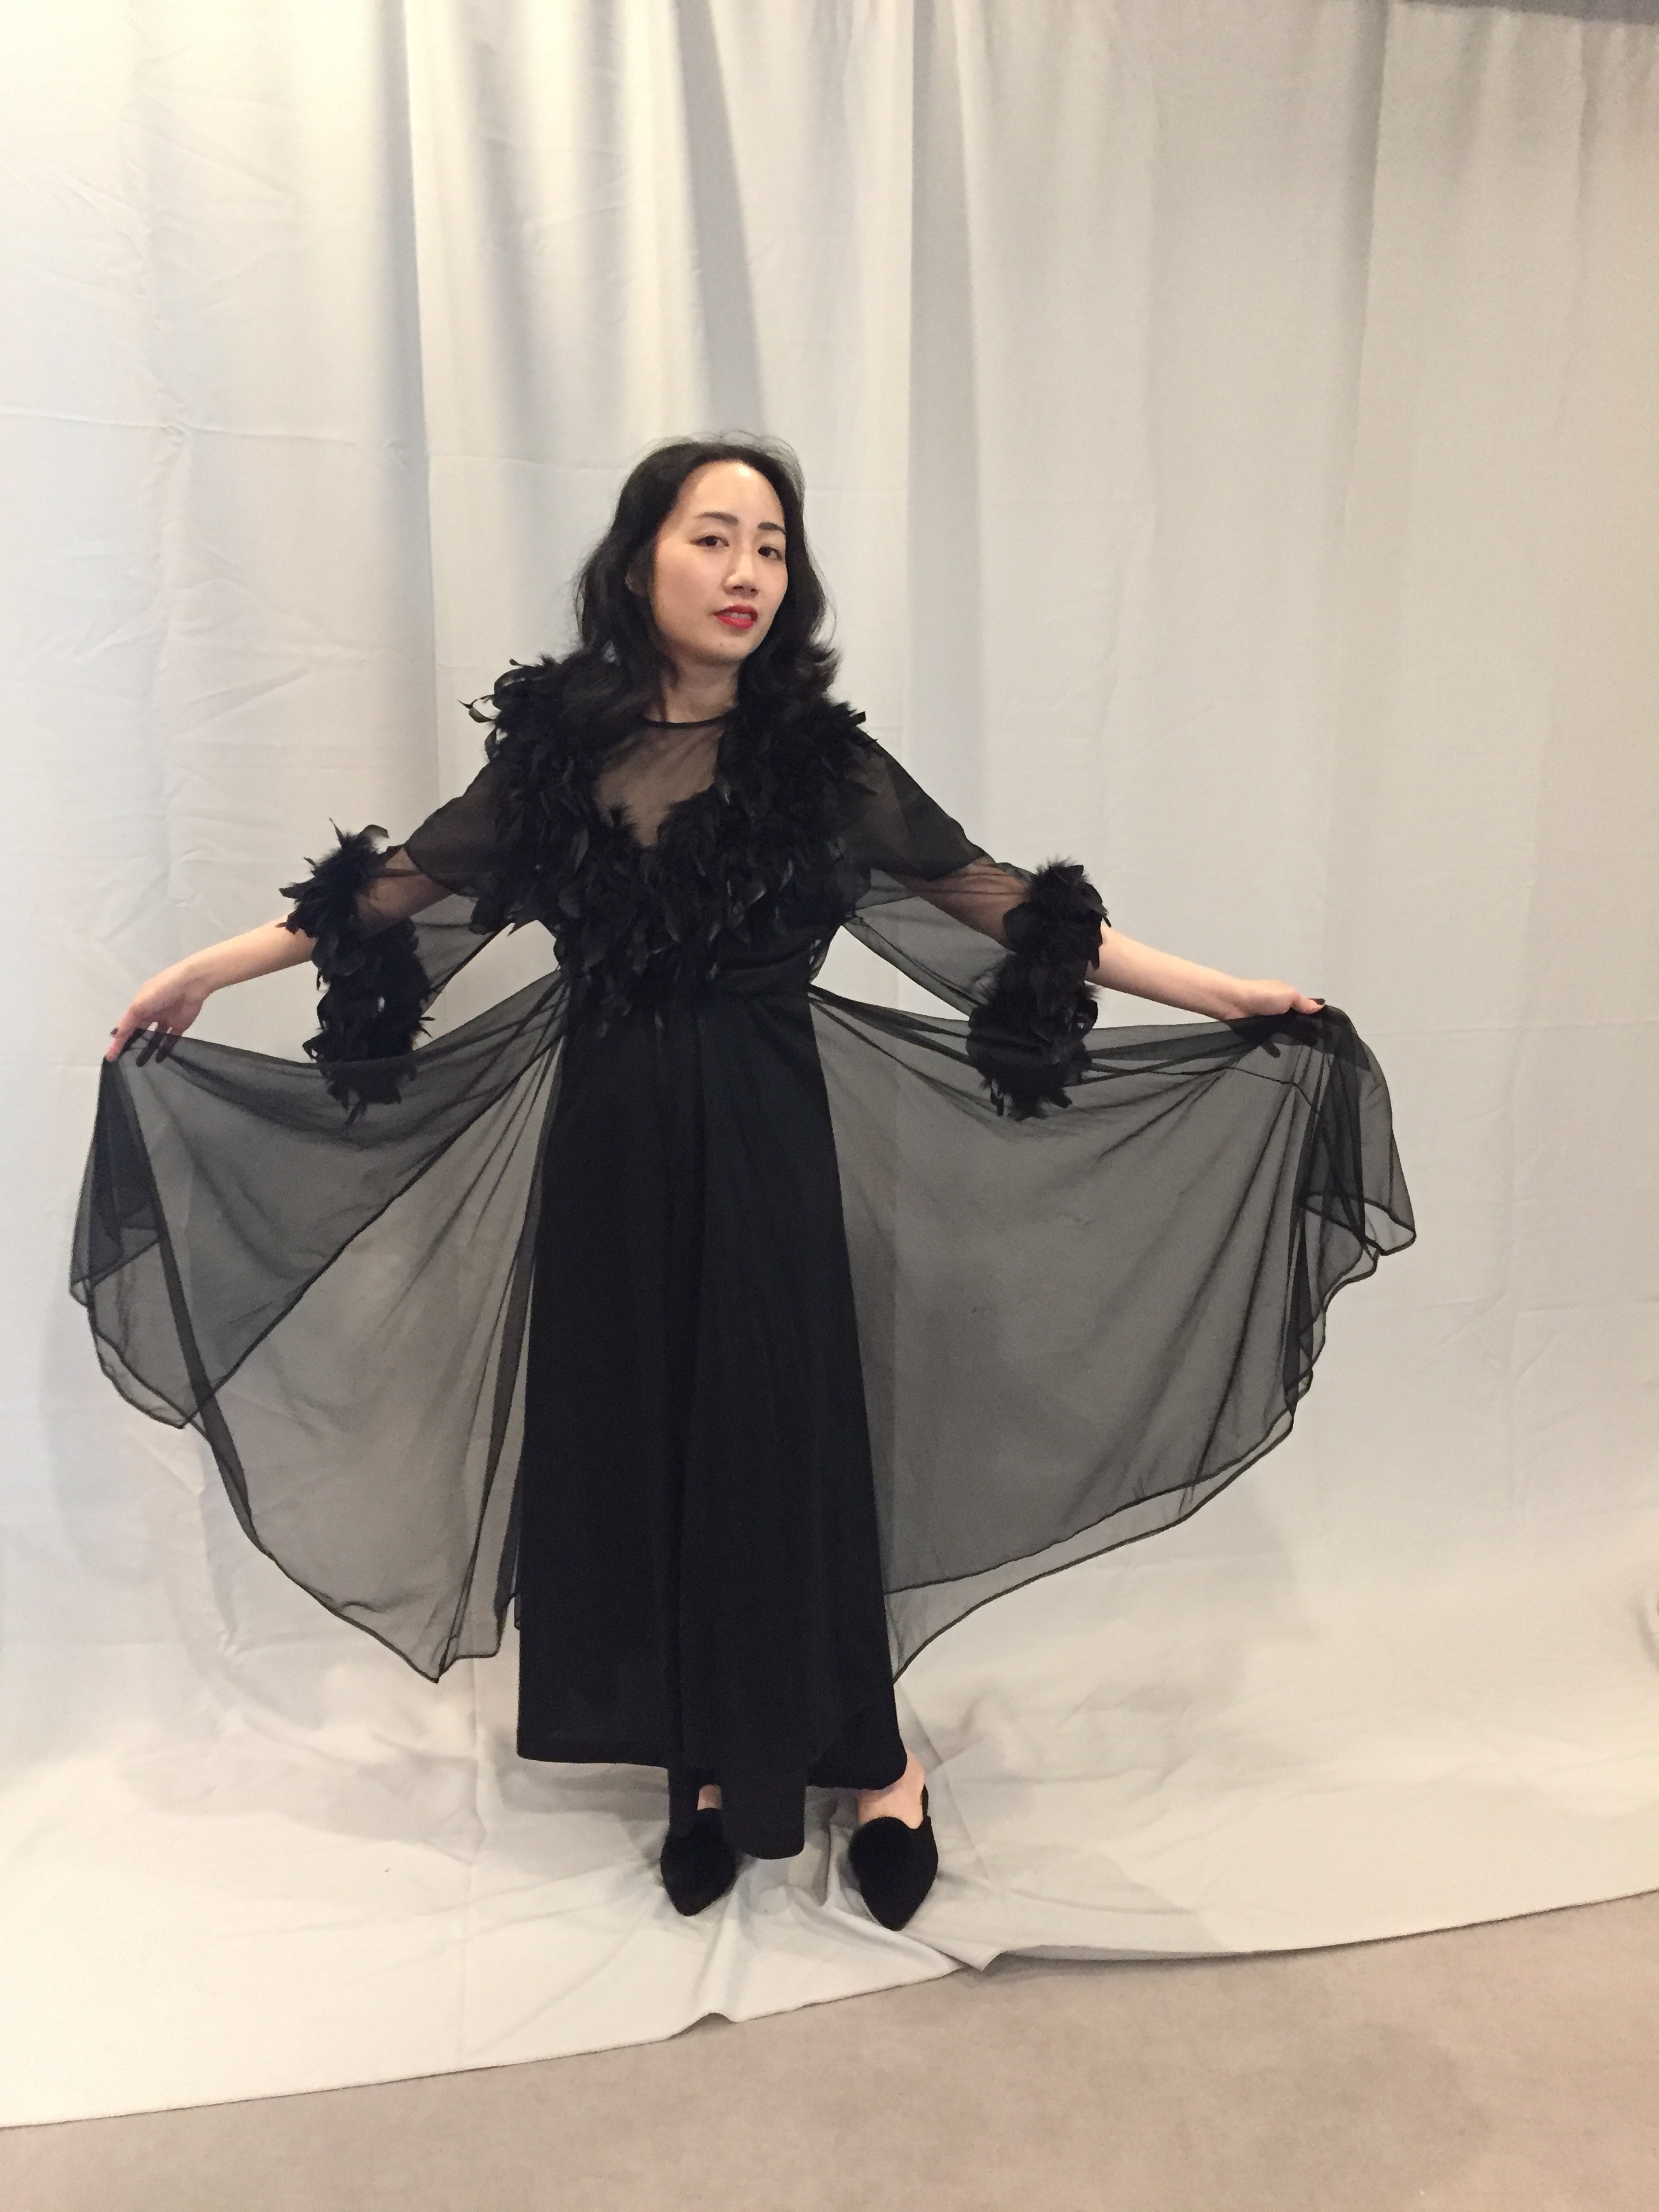
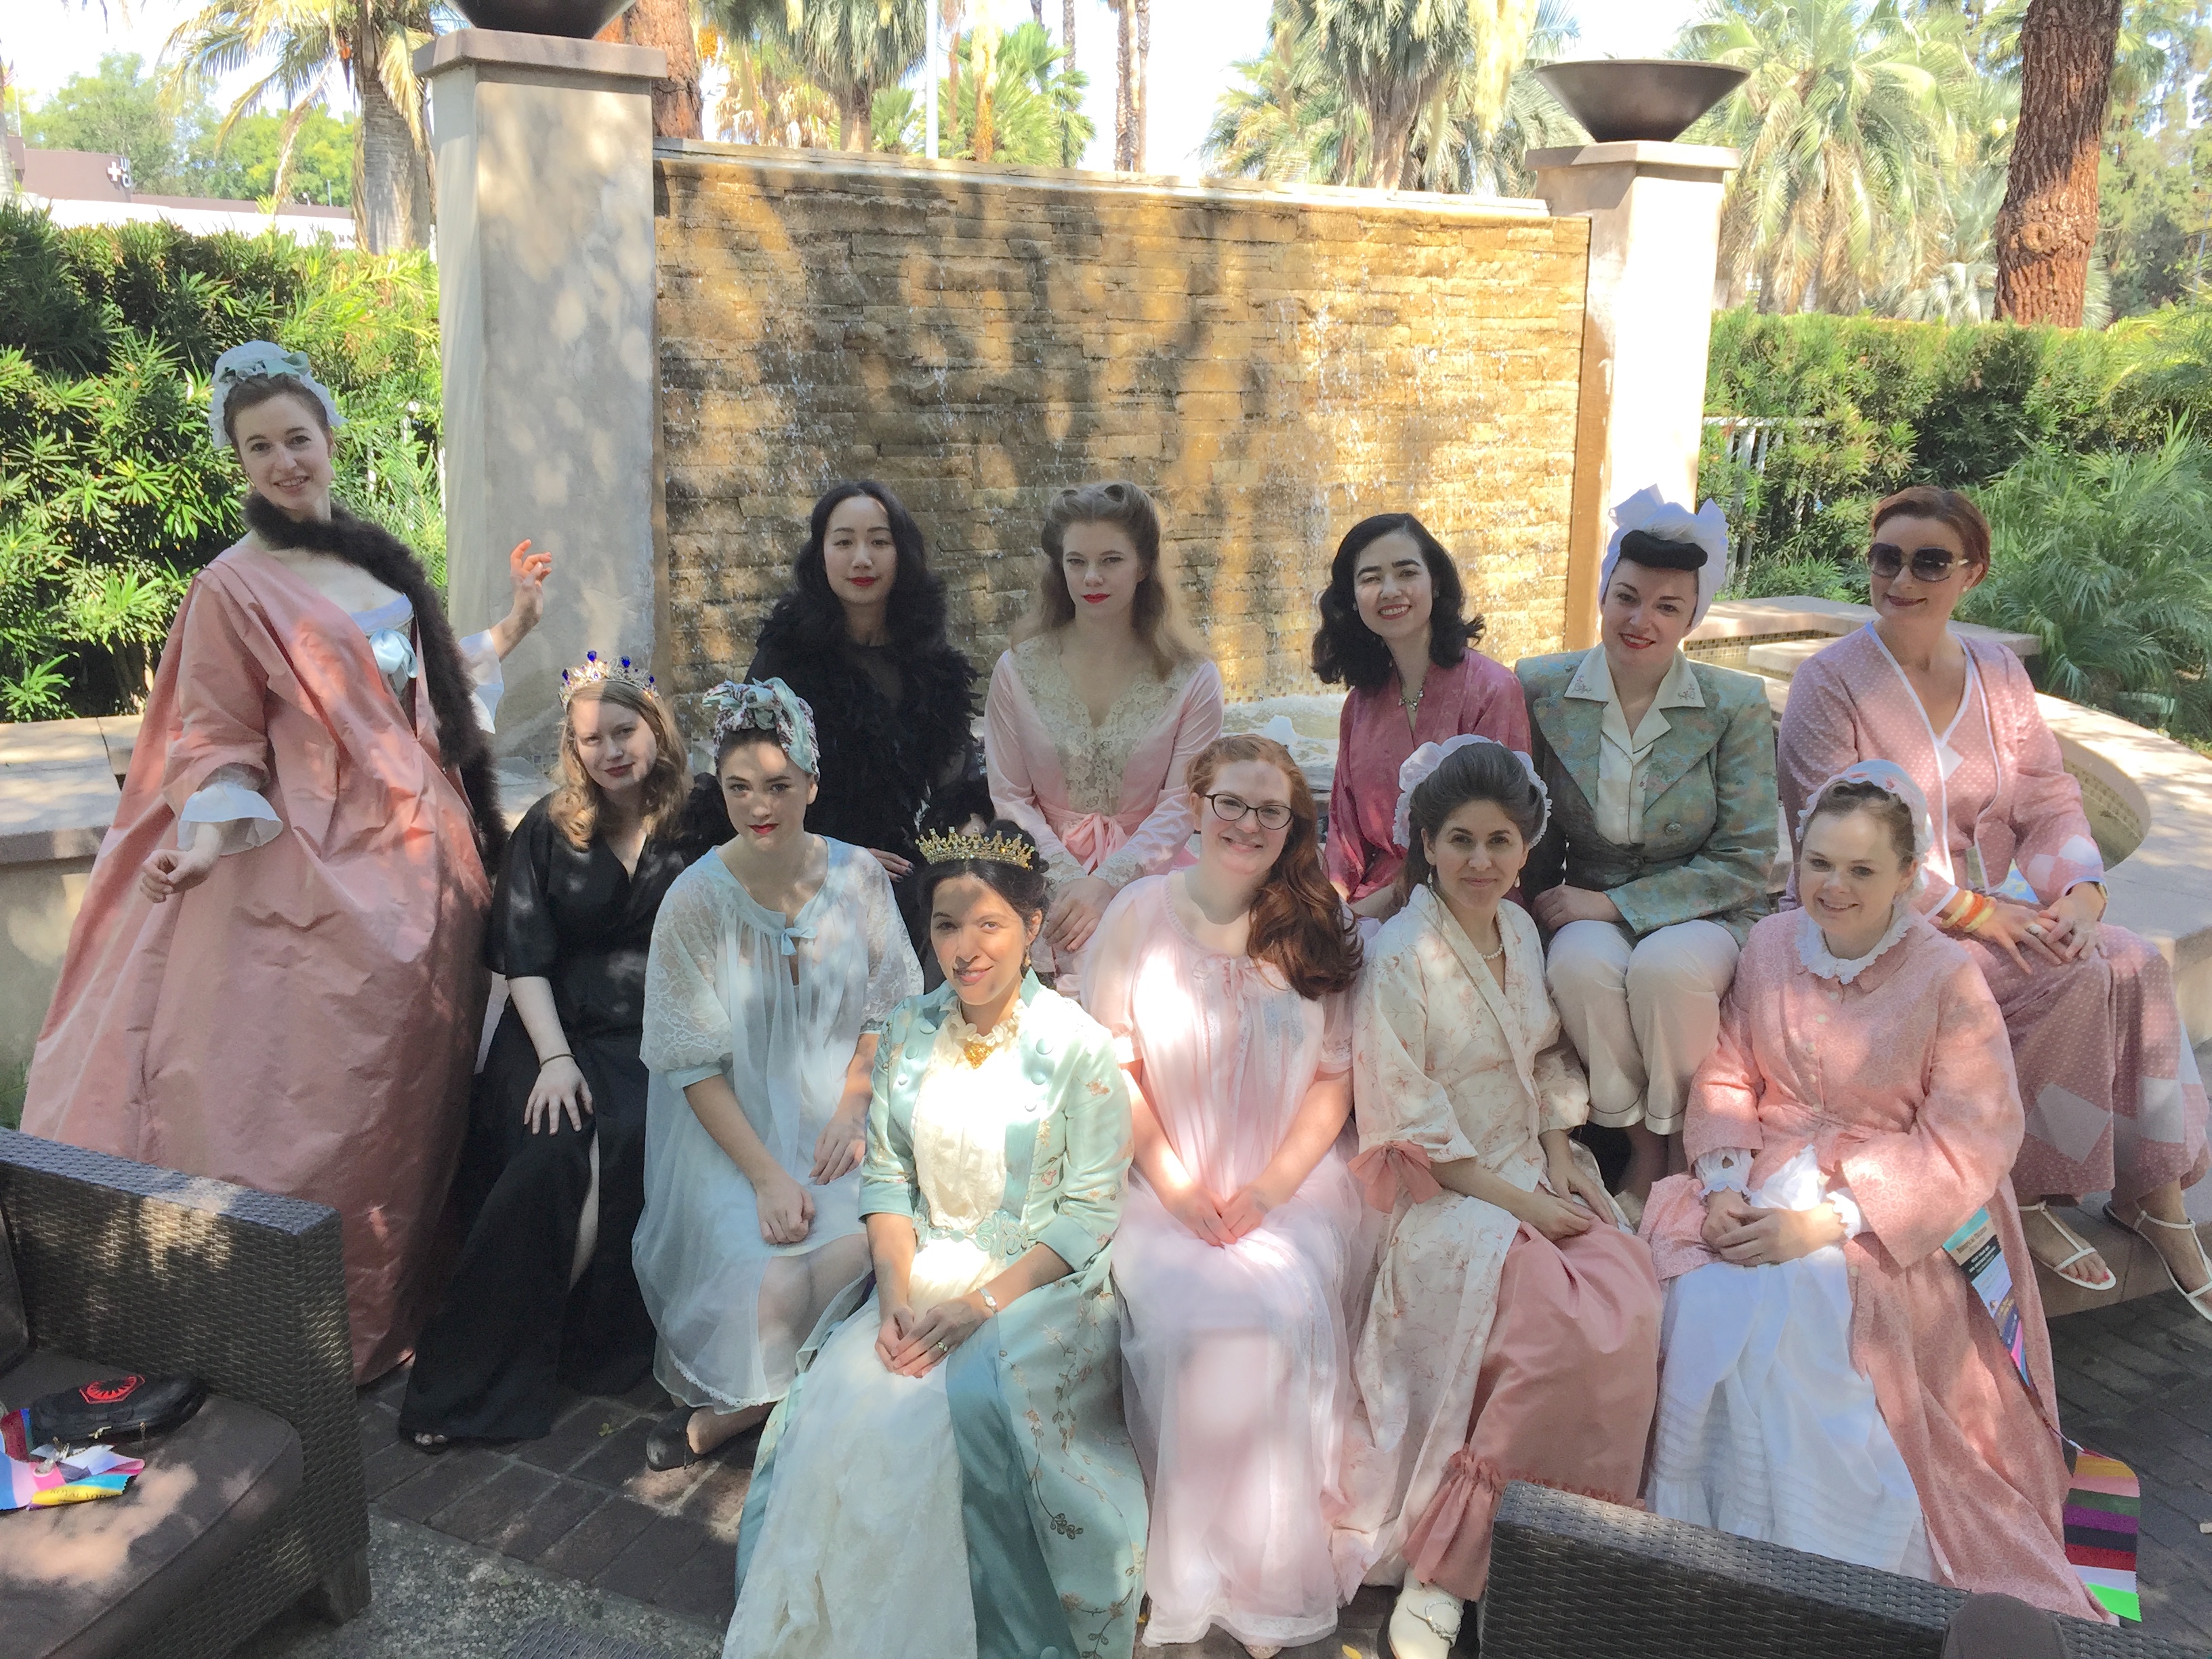
On Sunday I wore a vintage peignoir with feather trim over a black nightgown, and joined other ladies wearing their glamorous “Sunday undies.” IMG_1136IMG_1139IMG_1169

For the rest of the day on Sunday I rewore my vintage-style Star Wars First Order uniform, with a new purse and re-tailored collar. I had the privilege of a photoshoot with Gloria of In the Long Run, and here is a preview image I received. I can’t wait to see the final photos!38122893_551589561924580_164237582304018432_o.jpg

Adrienne also took this slow-motion villain cape action video. (Click on the link, not the photo). https://www.instagram.com/p/Bl2G7-vDvse/?taken-by=freshfripperyScreen Shot 2018-08-10 at 10.17.34 AM.png

For those of you keeping track, outfit #8 was a fuzzy Totoro kigurumi (which I forgot to photograph).  It was very useful during the evenings when I wanted to feel cozy. (FYI, for anyone feeling a little unease, I am an outlier that brings more costumes than average. You are absolutely not required to dress all day, every day for CoCo. Many people attend classes in jeans, and not every attends the evening social events).

I had an incredible time at Costume College! Stay tuned for more posts featuring other costumers.

Vice Admiral Amilyn Holdo Costume DIY: Patterns and Materials For Your Cosplay

Posted on

My last post showed pictures of me having a fun time dressed as Vice Admiral Amilyn Holdo from Star Wars the Last Jedi, at Silicon Valley Comic Con. As promised, here’s a compilation of my research and some tips and tricks to help you with your own costume. This is a long post; it covers fabric and colors, pattern, shoes, wig, jewelry, makeup, and more. (Please note, this is how I personally made my own Admiral Holdo cosplay; I can’t guarantee yours will be Rebel-Legion approvable).9N6A30909N6A3096
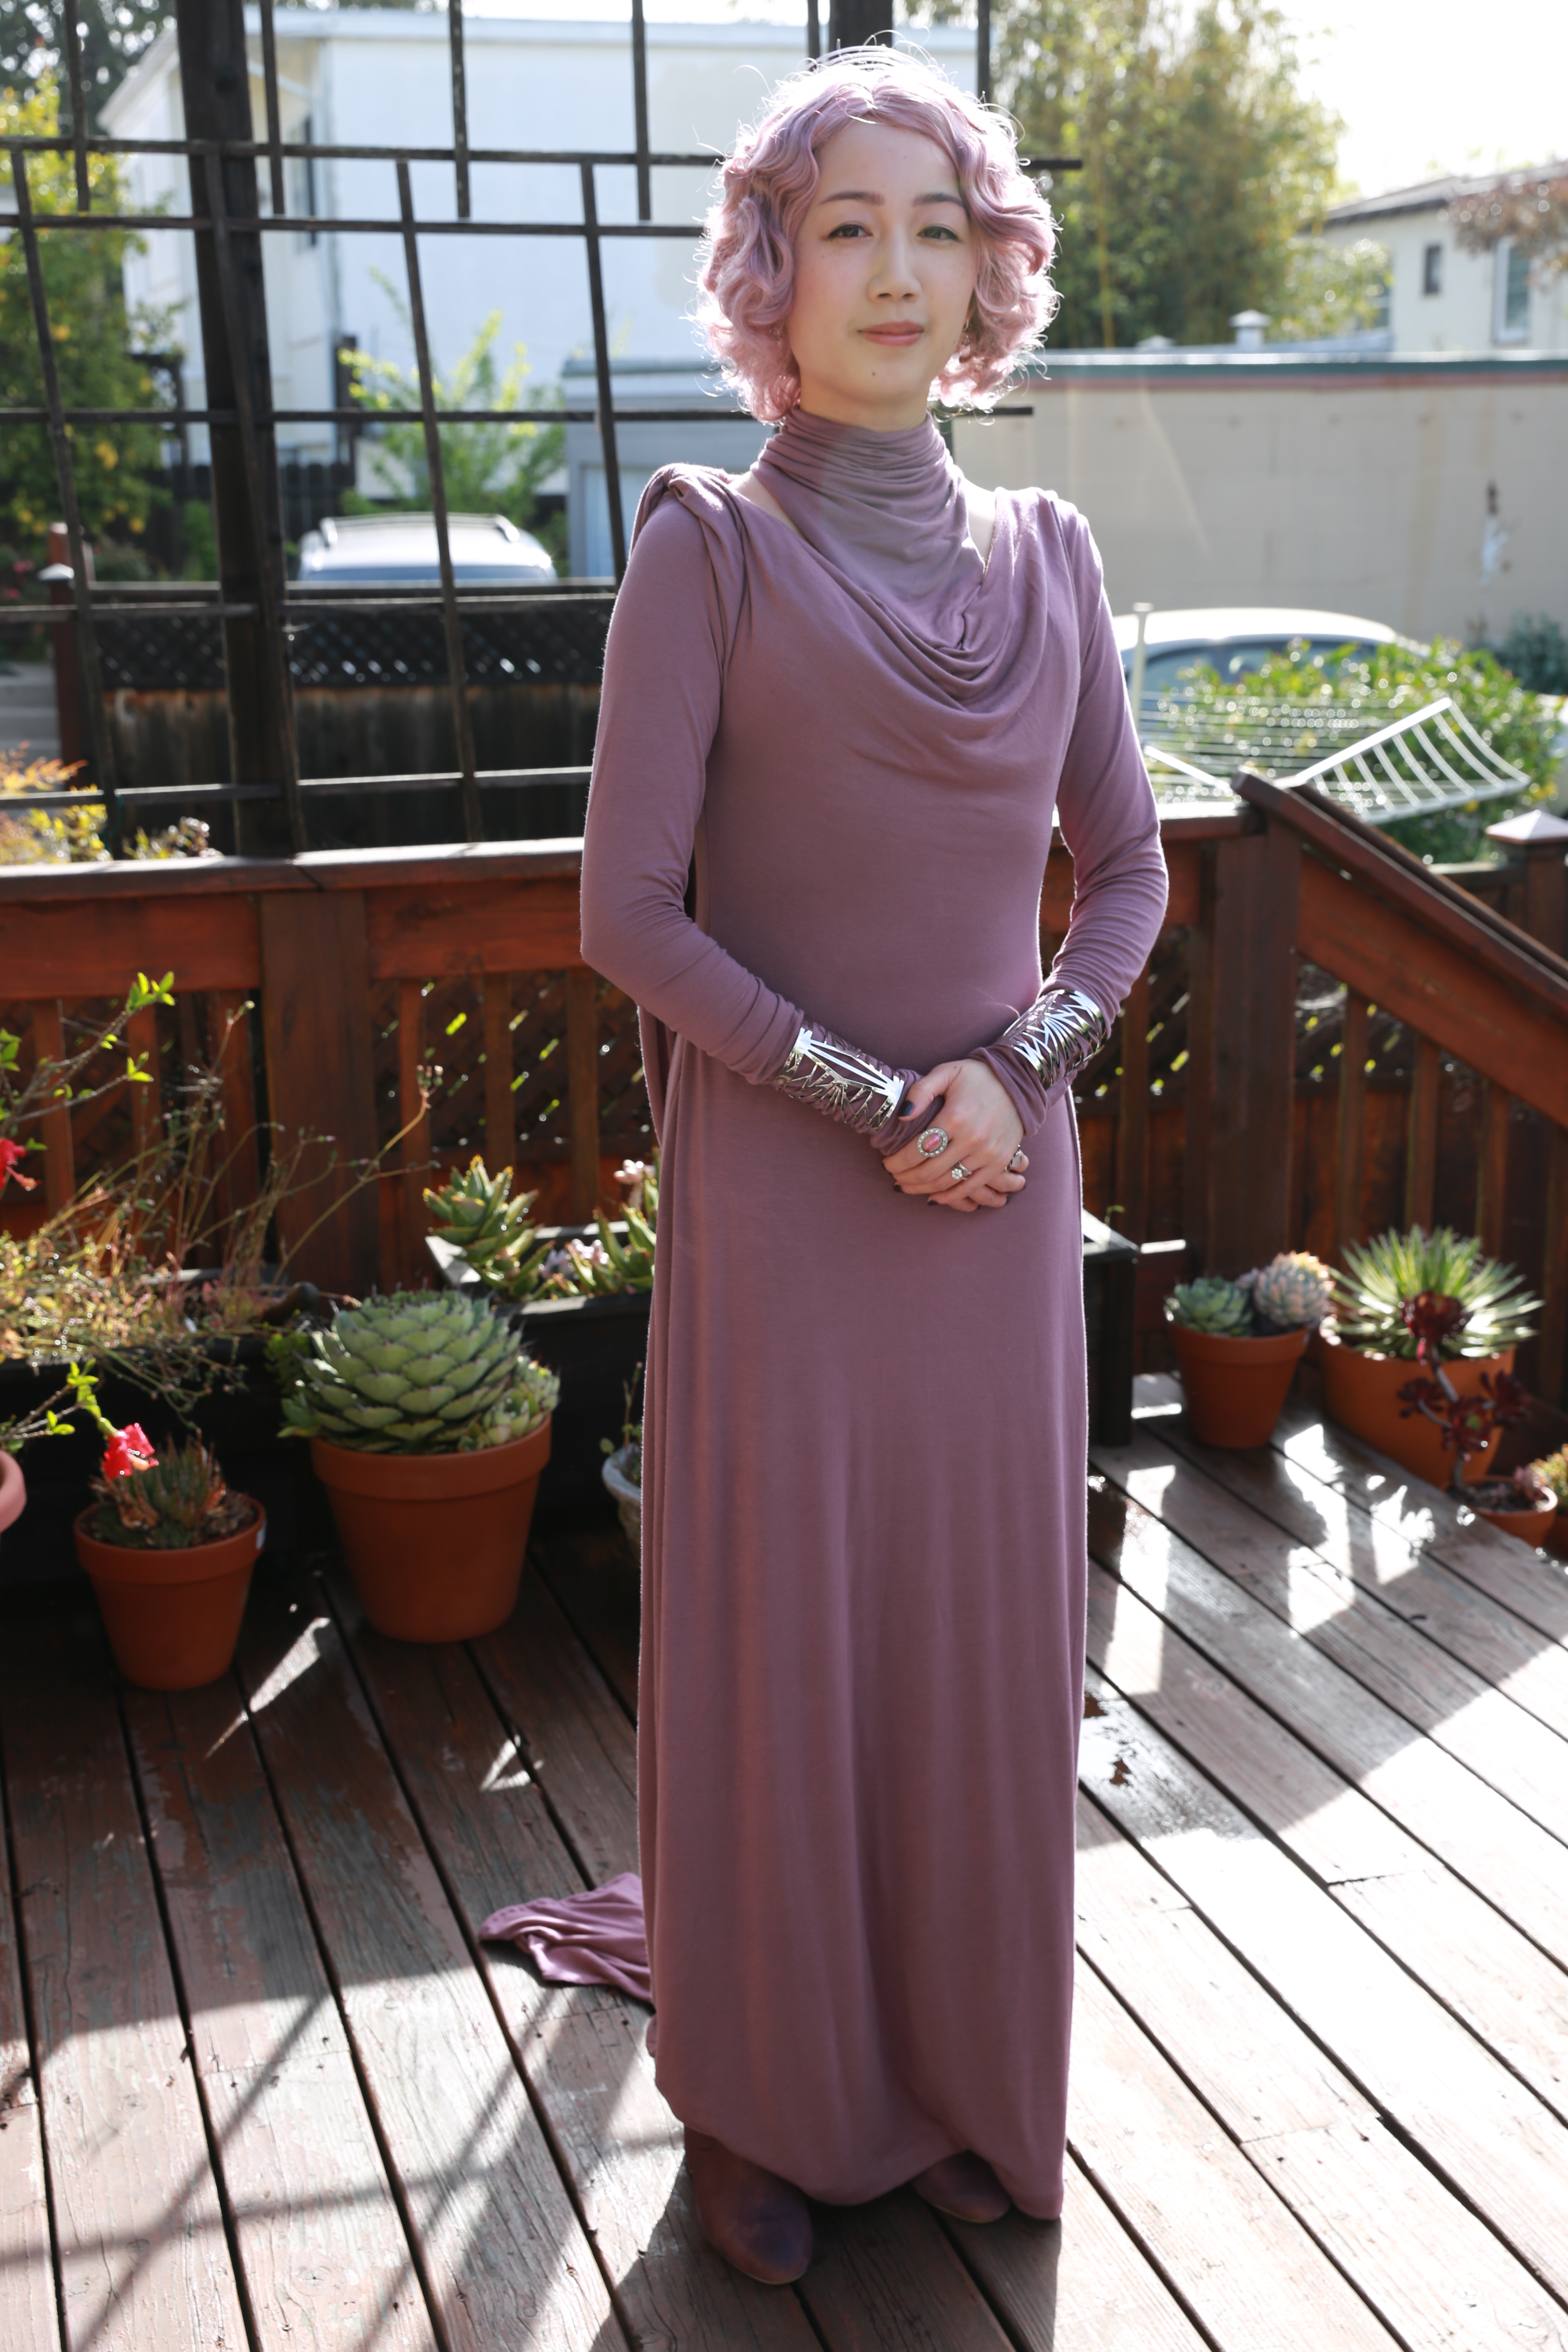
There are a lot of reference photos online, especially now that the DVD of the movie is out. I have a few important ones here in this post, but Google is your friend! The Official Rebel Legion has an excellent list of Holdo’s costume elements, so even if you are not going for RL approval, take a look at the list and the descriptions. To summarize:

  • Dress made of puce jersey or stretch fabric that drapes well
  • Fitted neck with draped front and exposed collarbones
  • Dramatic draped hood
  • Long, floor-length fabric on left shoulder
  • Long, fitted sleeves
  • Round-toe boots with chunky heel
  • Purple curly hair
  • Silver tiara
  • 2 silver cuff bracelets
  • Earrings with purple stones
  • Cluster ring
  • Ring with marbled stone

Yes, it looks like a lot, but is doable and I’ll tell you in this post where to buy all the materials you need.

FABRIC AND COLORS

Keep in mind, the Vanity Fair photo of Holdo’s costume released before the movie does a wonderful job of showing the draping, but this was styled for a photo shoot and it does not show screen accurate color or hair.IMG_6163
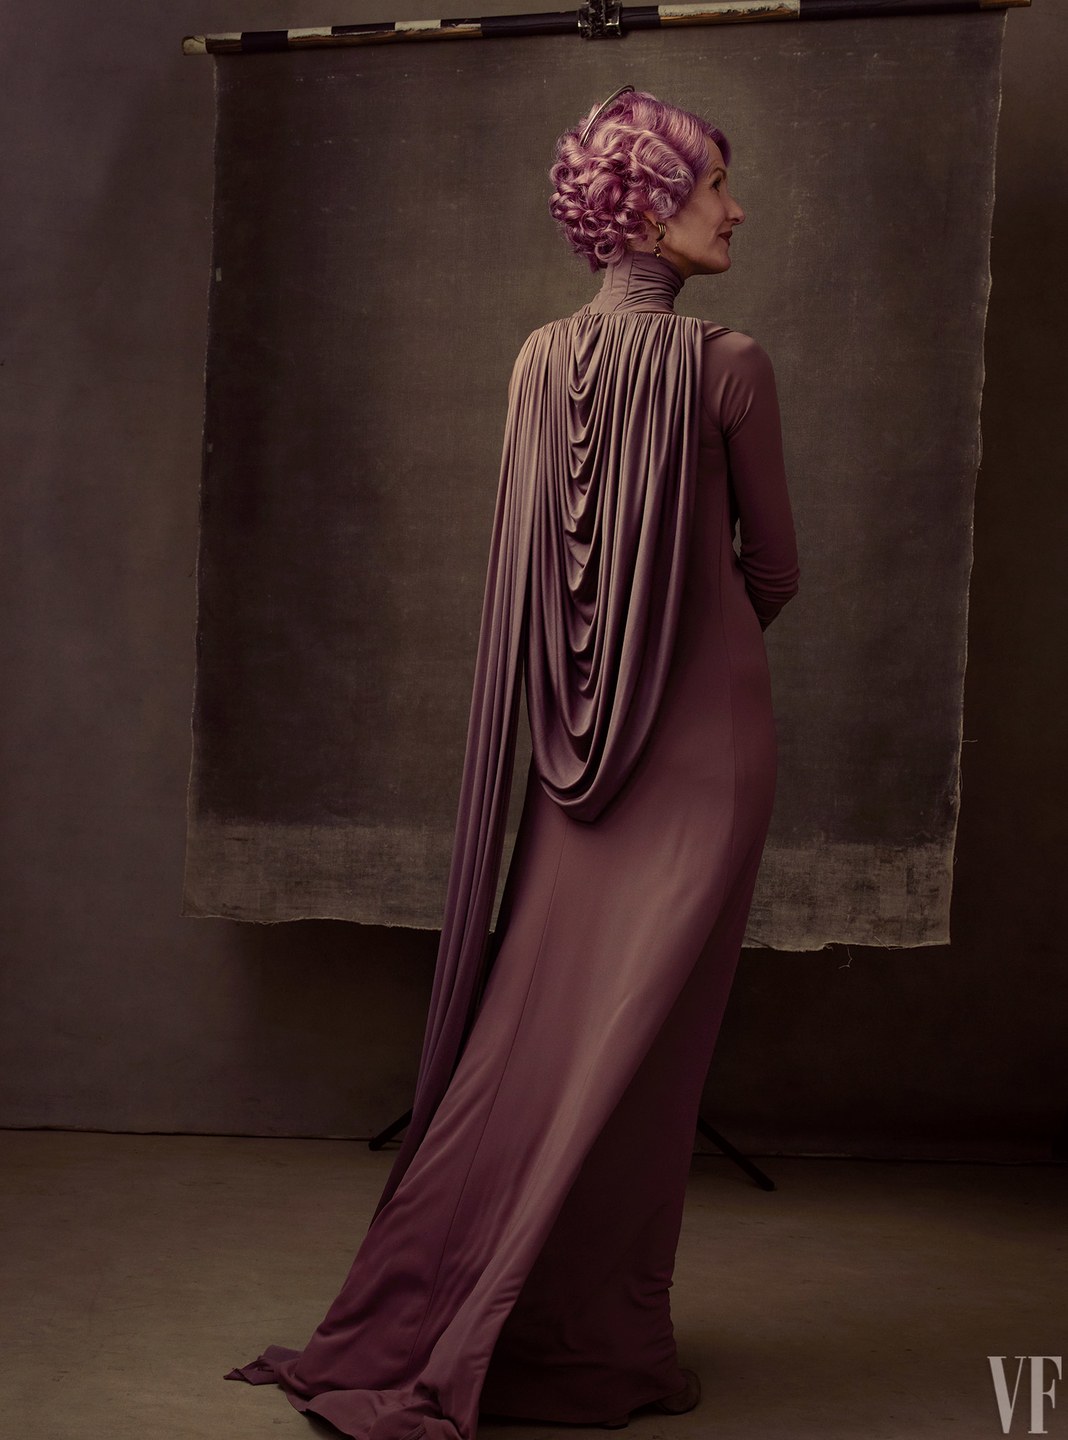
On screen, you can see that her hair has much looser waves in the front, and the color of the dress is much less purple. Depending on the scene and lighting, it appears to change color, ranging from brown to mauve. The director has said that the dress is puce, and you’ll see on the Admirals in Purple Facebook group a lot of discussion on what the color actually is and what fabrics would work. I recommend checking out that FB group regardless; it’s got a lot of great posts and advice, including a pinned post with shopping links.amilyn-holdo

My advice is to get some fabric swatches and see what looks good on your skin. If you want to be screen accurate, go puce, but not everyone can carry it off. This is my swatch card from Stylish Fabrics.  IMG_7986

My personal opinion is that “mauve pale” looks the most like the dress on screen, “mauve DK” looks most like the Vanity Fair photo, and “mauve 2017” is a compromise between the two. I looked like death in mauve pale so I used mauve 2017 for my own costume, and you can see that depending on the light it looks very different.

The fabric I bought is a rayon jersey, which is soft and stretchy, and has a nice drape. You do not need to buy rayon jersey, but your fabric cannot be stiff. It must be soft enough to give the waterfall effect on the back of the dress. The Stylish Fabrics rayon comes in several weights. I got swatches of the #406 (200 GSM), #409 (180 GSM), and #13390 (160 GSM). I purchased the 200 GSM, which is the thickest, for my entire dress and lining. Some other cosplayers have bought a thicker fabric for the main dress, and a thinner one for the hood to keep it lighter.

How much fabric to buy? I bought 11 yards, and had 2 full yards and some huge scraps left over, so 9 yards is plenty. I also self-lined the body of the dress, so if you skip that you can save a few yards.  I am 5’6″ and if you are shorter than me you can also use the width, instead of the length of the fabric and save even more. So depending on your height and whether you want a lining, you will use 6-10 yards of a 55″ fabric.

DRESS PATTERN

Given the nature of the construction of this dress, you will have to drape it, either on yourself or a dress form. This is not a project I recommend for a beginner because there’s no ready made pattern, and knits sometimes stretch and sag in unexpected ways. I having enough sewing experience to drape mine on a dress form, but if you need help getting started, Simplicity 1716 is a cowl-neck dress pattern that you can adapt by lengthening. (I haven’t used it so I can’t vouch for it, but it appears to me to be a decent base).

The hood is one giant trapezoid with pleated edges. These are the dimensions I used; if you are taller than me you will want to increase the width of the base. You can figure this out by having a friend hold a tape measure in a U shape on your back, with the ends on each shoulder and the bottom of the U just below your butt.  I am 5’6″ and a 60″ trapezoid base is perfect for me. (There’s no need to change the 12″ measurement; that creates the smallest U in the series of drapes on the hood).
IMG_E7596

The easiest way to cut a large trapezoid is to fold your fabric in half like this and cut at the diagonal.IMG_E7594

Please note, this makes for a REALLY FULL and heavy hood, and A LOT OF PLEATING. I think if I remade the dress I would not use the full width of the fabric, and have shorter diagonals. The hood would still look fine. If you are shorter than 5’6″, definitely use smaller smaller measurements than what I have diagrammed above.

I cartridge-pleated my hood. I think this makes it look neater and more even than gathering. It is time-consuming, but a good way to get a lot of fabric into a small space.IMG_7603.JPG

Have I mentioned this hood is heavy? It will want to drag and dip in weird ways, so be sure to put a strip of boning across the top to keep a nice straight line. I used a plastic cable-tie, cut to size.

The other thing you’ll want to consider to keep the hood where it should be is to have some type of internal harness. I’ve seen a few options:

  • Backpack-style straps. Run a thick piece of elastic across the top of the hood (where you have your boning), and then make loops that will go across your armpits like a backpack (but is hidden inside the dress). This is the approach used by Anachronism in Action. (You can pad the straps to make them more comfortable).
  • A front harness that is hidden below the neck drape. I haven’t tried this myself, but this is explained on Jen Eyre’s blog.
  • My own approach was to build a harness based on a T-back racerback bra. That way the weight was not only around my arms, but distributed across my chest. I got a bra with a front closure, and reinforced the elastic with a thicker kind. I also had another strip of elastic with its own closure running along the bottom of the bra for extra security. Now you’ll have support from the elastic running along the top of the hood, the elastic straps that come over your shoulders, the elastic T strap that goes down your back, and the elastic that goes around your ribcage below your bust. (Don’t pick a sports bra or a bra with wide straps; they will show because of the exposed shoulder blades on the dress).

The floor-length drape on the left shoulder is just a long rectangle, also pleated with the hood. The length will depend on your height and how much of a train you want. My width was 24.”

The sleeves are long and fitted, with a seam down the inside of the arm. If you look at this photo you will see they are actually gathered on the lower halves. nGLN19F.jpg

I constructed mine by cutting extra long sleeves and putting elastic on the inside seam of the sleeves. Stretch the elastic as you stitch it onto the lower sleeves, and when you release the elastic the sleeves will be gathered. IMG_7543.JPG

For the neck of Holdo’s gown you have a gathered high-necked collar with a long draped portion in the front. The back of the neck has 2 flat areas that are not gathered. I used a long invisible zipper down the back of the collar. The zipper was extra long so that I could pull the collar over my head after I put the dress on, and the extra length is tucked into the dress. The bottom of the front drape is attached to the dress, but the bottom of the back collar is attached to the hood using heavy-duty hooks and eyes, which are the last thing you attach when putting on the dress. (The jersey of the dress is stretchy enough that you don’t need a zipper all the way down the back of the dress, although you should still have a center back seam if you want screen accuracy). Use more hooks than you think you need! I’m going to add more for the next time I wear it so it doesn’t shift off-center again.9N6A3121.JPG

I highly recommend looking at how Anachronism In Action did her collar so you can see what the pattern shapes are. You will need to bone and/or interface the collar so that it is stiff enough to stay up.

Some other tips:

  • When you sew together the long side seams of the dress, add some twill tape, ribbon, or other similar materials to help control the fabric from stretching too much. I used 6mm Mobilon tape, a semi-transparent elastic, because I wanted a bit of stretch to remain.
  • Jersey fabric stretches enough on the straight grain; don’t cut your dress on the bias.
  • Your jersey may have a subtle direction to the weave that looks like parallel lines. If you care about having everything in the same direction, that will use more fabric than if you don’t care. (My 9 yards did include keeping everything in the same direction).

SHOES

Holdo wears boots with a chunky heel and a round toe that are a similar color to her dress. This style is not hard to find, and can be painted or dyed to match. I used the “Refresh Footwear Women’s Closed Toe Chunky Stacked Block Heel Ankle Bootie” in mauve from Amazon (affiliate link), however, there are other similar boots you can find that will work just as well.

I found the toes tight, and was able to stretch them out by putting in a shoe stretcher while using a hair dryer to warm up and soften the synthetic material. (If you get real leather shoes you don’t need to use the dryer trick to soften them before stretching).

I painted my shoes with a transparent spray paint called Tint It in plum (Amazon affiliate link). You can also get this at Michael’s, but my local store was sold out. It dries very quickly and a couple coats was good enough to turn my shoes from a pinky mauve color to a nice purple matching my fabric.IMG_8626

Use the Tint It in a well-ventilated area. Lay down newspaper and wear disposable gloves. Tape off the sole of your shoe using painter’s tape, and use a bristle brush or old toothbrush to brush the suede to distribute the color after spraying. Do this immediately, because Tint It dries fast!

WIG

I used the Arda Wigs Josephine in Dusty Rose. I’ve also seen other cosplayers use the Lavender color. Personally, I think Holdo’s hair is in between the two, and on my next wearing I might darken my wig. One way to do this is with “the Sharpie trick.” Put a purple Sharpie marker into some alcohol, let the ink dissolve, and spray it on.Screen Shot 2018-04-23 at 6.37.46 PM

The Josephine wig is finger-waved with tighter curls than you need. I relaxed the hair (especially in the front) by using a garment steamer and combing through while the wig was hot. (If you are coloring your wig, do it on a cool wig after you’re done with the steaming!) IMG_7667

If you prefer a lacefront wig, I’ve also seen the Arda Wigs Bucky Classic used with a Holdo cosplay, but it is $68 vs. $30 for the Josephine. However, you won’t have to steam out the curls.

JEWELRY

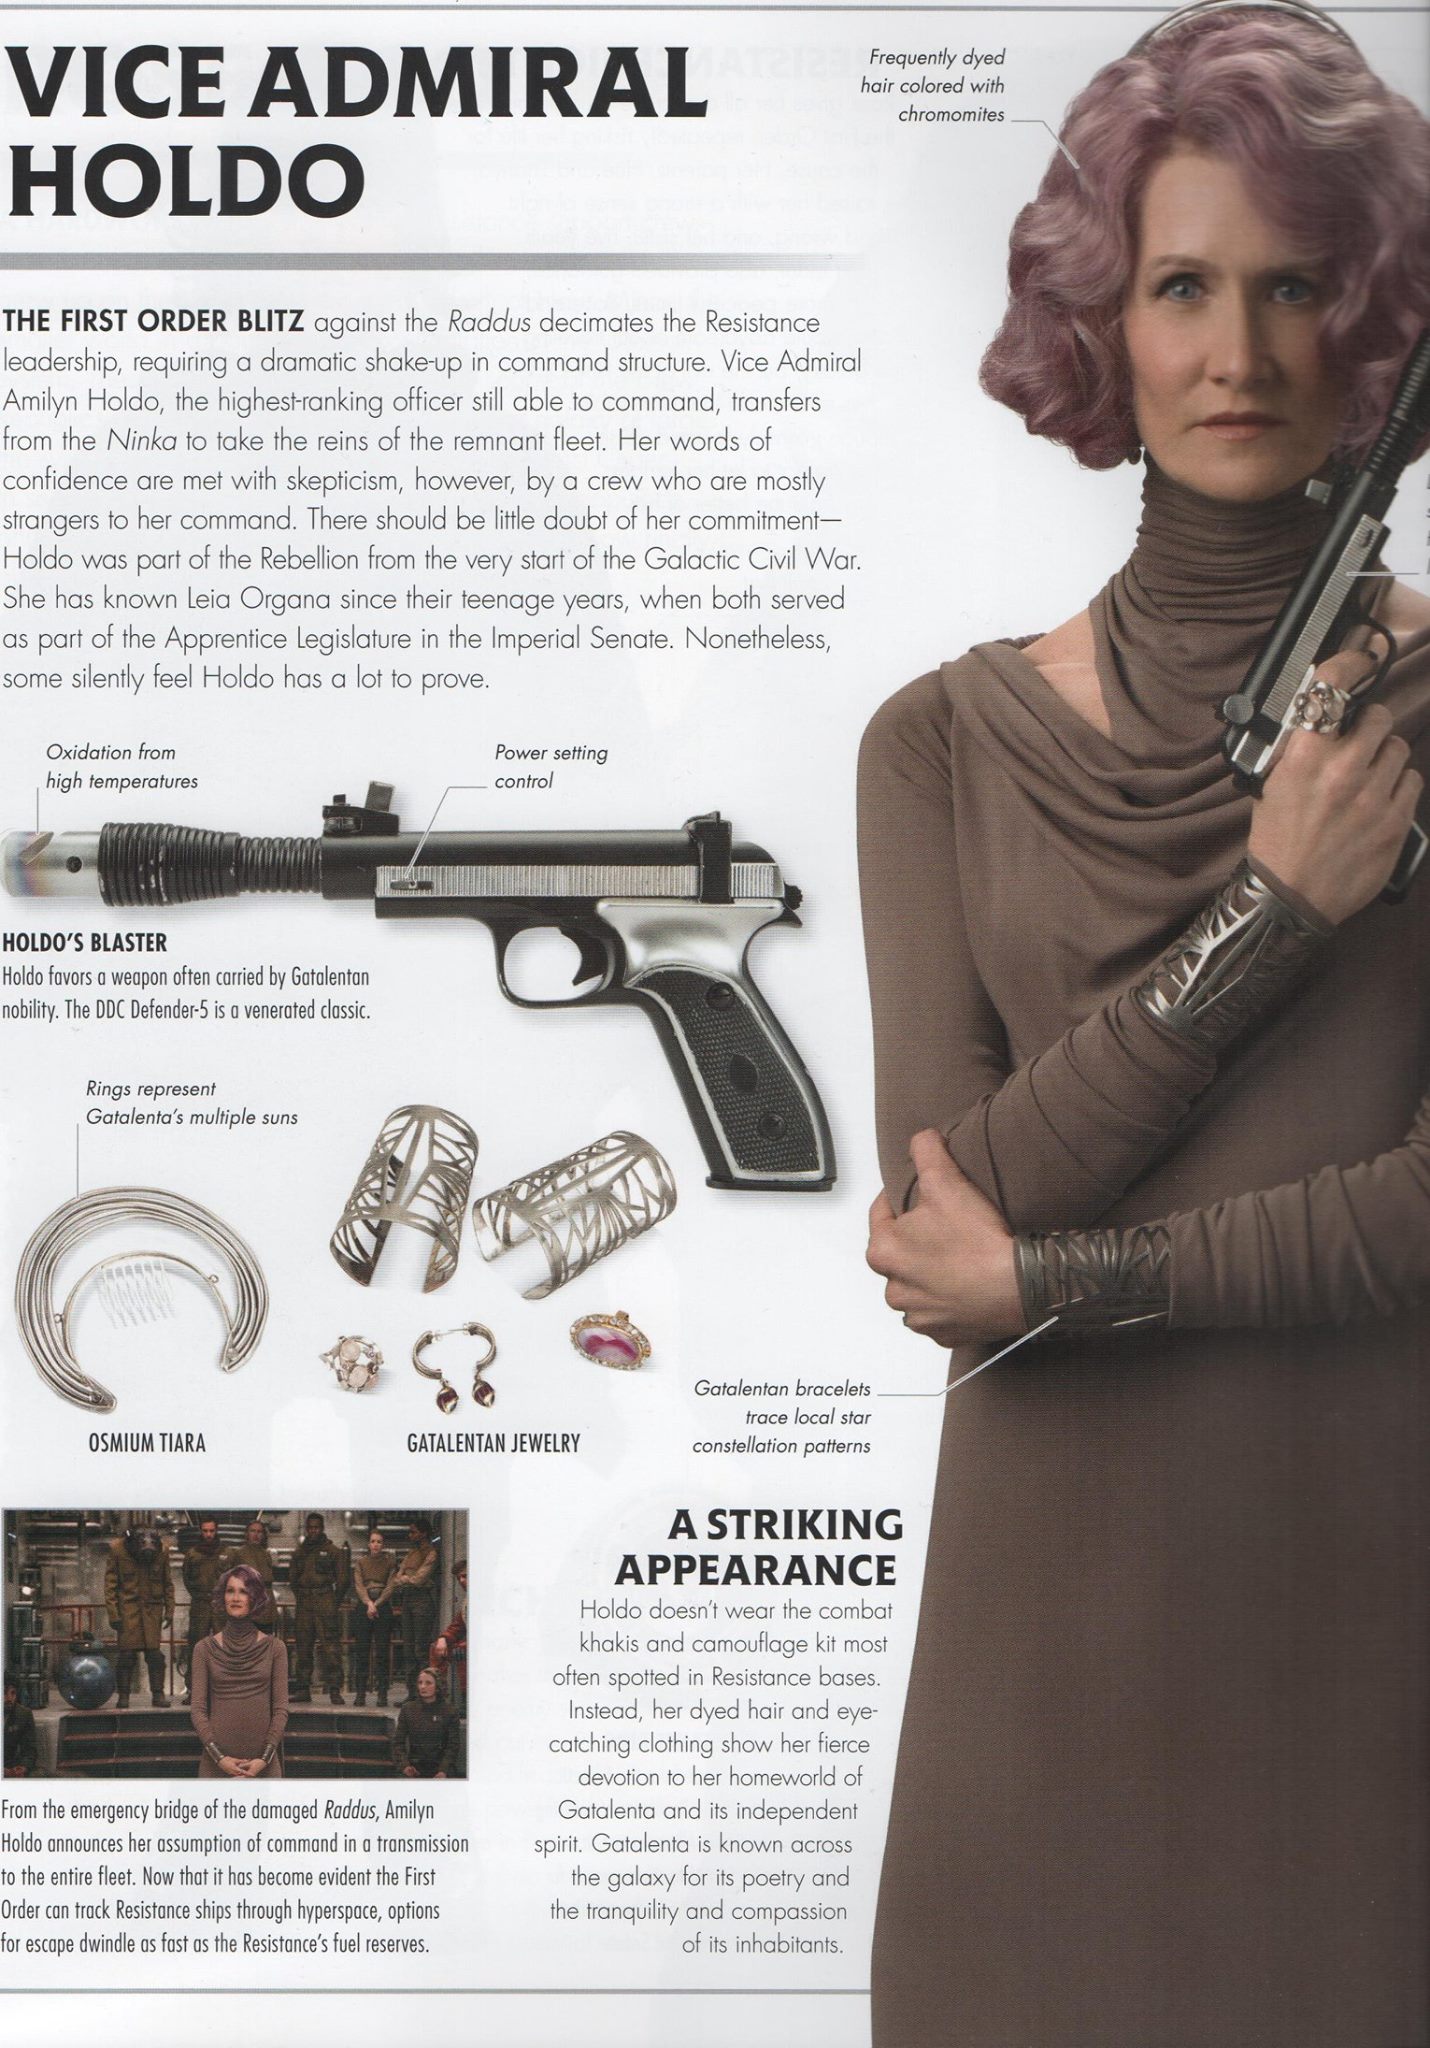
Admiral Holdo wears a lot of space jewelry. This page from the Star Wars Visual Dictionary shows her tiara, cuffs, earrings, and rings. 25587749_669110460143724_3186790248120470175_o.jpg
SILVER CUFFS

Holdo’s silver cuffs can be purchased from various vendors on eBay and Aliexpress for a few dollars each. I bought a pair each from these 2 vendors and they were exactly the same. I would recommend sanding them a bit, or lining them with some extra dress material. At the end of the day, my dress sleeves looked fuzzy from all the rubbing of the sharp edges.IMG_6153.JPG

HALO

You have several options for a halo: buy a 3D printed one from Etsy, bribe a friend with metalworking skills, solder your own, or make a decent-looking one with $3, thirty minutes, some pliers, and wire! I picked the last option. I may upgrade to a soldered one later, to be a little more screen-accurate, but the wired ends of my halo are hidden inside my wig so it doesn’t matter much.IMG_7950

I originally planned to use 1/4 inch armature wire for a thicker halo, but my local store didn’t have any, so these are the materials I ended up using: 12 gauge floral wire, 26 gauge paddle wire, and a metal hair comb. I bought the wire at Michael’s and I used one of these combs from Amazon (affiliate link), cut in half with tin snips.IMG_7951

I can’t draw, so please don’t laugh too hard, but here’s a diagram of how it was done:IMG_8814.JPG

RINGS AND EARRINGS

Holdo has a silver ring with a cluster of stones, and a gold oval ring with a marbled stone. (I don’t know why one ring is gold when all of her other accessories are silver. If the non-matching bothers your OCD self, go silver for both like I did). I haven’t found anyone selling exact reproductions, but this Google Doc from the Admirals in Purple FB page has links to a number of Amazon and eBay rings that could work.

For the oval ring you can either purchase a cats’ eye stone ring, or paint a plain stone with nail polish. Mine is painted. A tip if your rings are too big: you can put some hot glue on the inside bottom. It’s not obvious when it’s worn and it keeps your ring from slipping off.IMG_7672.JPG

The earrings are a bit trickier to find. The Rebel Legion standard is a semi-circular silver earring with dangling purple stones. I haven’t found a super close match and people seem to be modding their own earrings by adding stones to silver findings. I am using these lever back earrings (custom ordered in silver) from Etsy, because they work for both Holdo and my 18th century costumes.

BLASTER

Holdo favors a classic blaster, the DDC Defender-5. There are some nice replicas for sale, but if you are on a budget, I would get a plastic replica of Princess Leia’s blaster, Dremel off the extra length in the barrel (the skinniest part), glue the ends back together, and paint it yourself. You can get one on Amazon for about $10 (affiliate link). It’s not exactly the same, but close enough.

tumblr_p1dg5mpZ3J1u5aksho1_128071nkSIWvvXL._UX522_

MAKEUP AND MISC

Holdo wears lipstick, eyeliner, mascara, shaped brows, and nail polish. The exact products will depend on your skin tone, but here’s a few tips.

  • She has dark purple polish. I used Essie’s Smokin’ hot (Amazon affiliate link).Screen Shot 2018-05-06 at 2.23.43 PM
  • I can’t tell what color Holdo’s eyebrows are, so I’m not sure they match her hair. However, Laura Dern is a blonde with brown eyebrowns. My eyebrows are black, and I found them too stark compared to my purple wig, so I colored my brows purple. This is optional, but may be helpful to you if you are in the same situation. I covered my eyebrows with eyelid primer, filled in some spots with purple eye liner pencil, and covered the rest with purple eyeshadow. It’s subtle, but made a difference.IMG_7740.JPG

In the future, people don’t have to carry out money or keys, but in real life sometimes you need a way to carry your phone! I couldn’t add pockets to this clingy dress so I made a little drawstring bag to use at the convention. (Line yours with a non-stretchy material). I haven’t tried it myself, but I’ve also heard of others using a ladies’ stretchy lace thigh holster to hold your stuff.IMG_7682

Let’s talk storage! There are a lot of pieces associated with this costume, and I didn’t want to go hunting for all of them right before a con. I’ve found that a 23″ long (28 quart Sterilite bin) is just the right size to hold the dress, boots, wig, bag, cuffs, backup cuffs, halo, earrings, and rings. The bins are about $5 at Target and absolutely worth it to keep your stuff together. IMG_E8838.JPG

HOW MUCH WILL THIS COST?

Depending on what you buy, where you get it from, and what you already have in your stash, your costs are going to vary. However, here is what I spent to give you a general idea. (I like coupons and bargains).

  • 11 yards rayon jersey + tax + shipping, with a coupon: $63.44 from Stylish Fabrics
  • Swatch card + tax + shipping: $8.32 from Stylish Fabrics
  • Purple thread + tax, with a coupon: $3.26 from Joann Fabrics
  • Invisible zipper + shipping: $5.50 from eBay (since I couldn’t find a color match at Joann)
  • 20 yards Mobilon tape: $6 from eBay (I have a lot left over!)
  • Elastic: ~$2, from stash
  • Racerback bra: ~$15 from Target
  • Wig + tax + shipping: $35.50 from Arda Wigs
  • Silver cluster ring + shipping: $13.29 from eBay
  • Metal oval ring + shipping: $1.99 from eBay
  • Earrings + shipping: $16.94 from Etsy
  • Bracers + shipping: $5.56 from eBay
  • Shoes: $14.46 from Amazon
  • Tint-It spray: $12.08 from Amazon
  • Aluminum floral wire + tax, with coupon: $3.92 from Michael’s (I have plenty left)
  • Silver paddle wire + tax, with coupon: $2.19 from Michael’s (this will last me forever)
  • Metal comb: $1.40 from Amazon ($6.99 for a 5-pack)
  • Purple nail polish, with coupon: $3.99 from Amazon

TOTAL COST: $214.84

The fabric is relatively inexpensive, but all the extra accessories do add up! The jewelry was a chunk of my cost (~$40) because I did get some better quality items I could wear with other outfits. If you are on a budget, you may be able to get some costume pieces for less money, or find things in your stash.

If you’ve managed to read all the way to the end, thank you and congratulations! This was a long post, but I hope it will be useful to you when making your own Admiral Holdo costume. Good luck and Godspeed Rebels!amilyn-holdo

(If you’re wondering what are these affiliate links, it means I get a small percentage of any purchase you make from Amazon through these links, which I have to disclose. I don’t get any of the money from the ads WordPress runs on this site, and I’m happy to provide all my tutorials for free. The affiliate fees go towards my domain registration and hosting. Thanks!)

Vice Admiral Amilyn Holdo Cosplay at Silicon Valley Comic Con

Last weekend at Silicon Valley Comic Con I premiered my Vice Admiral Amilyn Holdo cosplay. I had a great time wearing this costume from Star Wars: The Last Jedi!

Although I’ve been planning this since last year, I only had a few weeks to sew it because I was busy with other events. I will have a follow-up post with more information about the construction, materials, tips and tricks, and a materials list, but for now here are some pictures from the event!

This was taken in the lobby of the convention center, not long after arrival.CMEY9799

However, before SVCC, my friend Chris Weiner took a few photos in his back yard with his superior camera!9N6A3090

The back drape of this dress is what made me fall in love it when I first saw a photo of Lauren Dern as Amilyn Holdo in Vanity Fair Magazine.9N6A3096

There were so many great Star Wars cosplayers at SVCC! I met Praetorian Guards, Stormtroopers, and Darth Vader!IMG_7881IMG_7957IMG_7958

I also met Kylo Ren, who bowed to his Disney overlords.

IMG_7923IMG_7924

I was delighted to meet another Holdo. Double Holdo, double trouble!IMG_7858IMG_7860

I also encountered General Hux, and we had a stare-off.IMG_7930IMG_7931

Lego Obi-Wan was a delight!IMG_7822

I even found and ate a stormtrooper macaron cookie.IMG_7740

And it was an honor to be one of the cosplays featured on Business Insider!Business Insider

Business Insider Melia Robinson

Photo by Melia Robinson of Business Insider

My friend Adrienne took this video of me so you can see how the dress moves as I twirl.

SVCC was a lot of fun; I’ll be sure to be back next year! See my Flickr album for more photos from the event.