In a few weeks I am going to an Outlander-themed dinner party hosted by my local costuming guild. I don’t subscribe to premium cable so I have never actually seen the show, just lots of pictures, but I am always a fan of dressing up and eating!
I’m aware that there are some fabulous silk dresses in the second season of the show, but I wanted something relatively quick and inexpensive, so I decided to go with a plaid 18th century dress using a pattern I’ve worked with before. (I used the Period Impressions 1770 Polonaise Pattern when I made my Ljusoga dress).
I found a decent plaid cotton from the “Wales plaid” Fabric.com collection. (I ended up purchasing it through Amazon due to a 20% off promotion and free shipping!) It was cheap enough I used the same fabric for lining the bodice and skirt. I dithered for a long time as to whether I should make the fabric out of the same fabric or make a fancy quilted one. In the end I could not find a suitable pre-quilted fabric or bedspread to repurpose, and some well-priced wool appeared on a destash group I am part of, so my decision was made.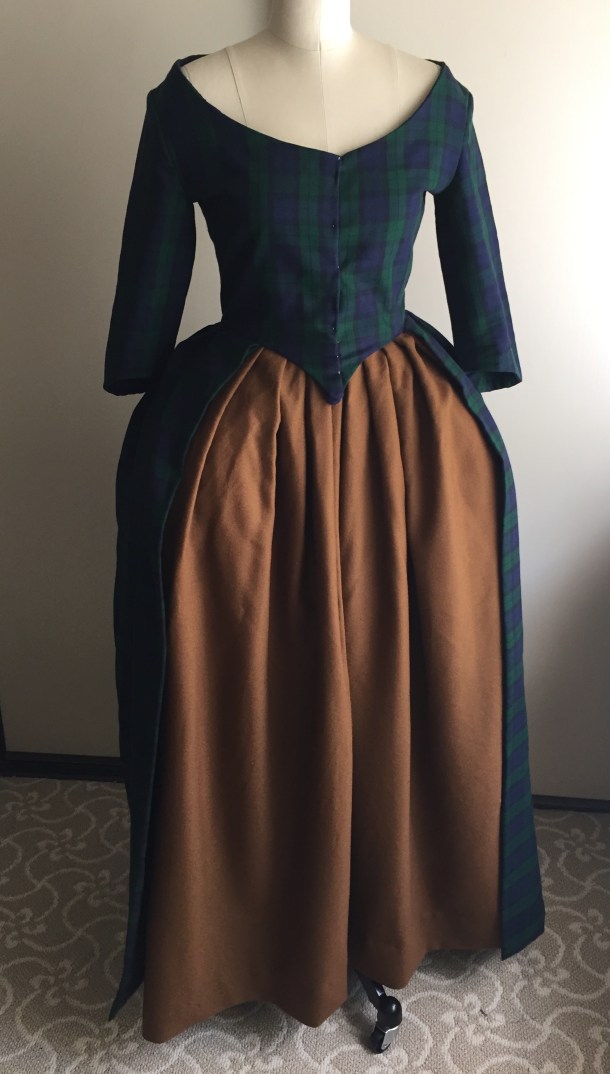
In real life the bodice fit is rather different (and much better!) because I would be wearing stays to provide a smooth front. My mannequin is not wearing stays because it does not have a compressible torso and the boobs would be in the wrong place. Right now the front is pinned with regular straight pins while I await some proper 18th century reproduction pins in the mail. 
See how the middle point of the back of the bodice rides up a little? I’ve got to adjust my underpinnings a bit to fix that, but what prevents it from flipping up all the way is a split bum pad.
My old half-moon bum pad was too small and not up to the task of the much larger faux butt I wanted for this outfit, so I made a new double bum pad. The split down the back is what gives it this particular shape. I should have curved the top edges but this was a rather quick project. It is just twin trapezoid pillows bound with a single twill tape at the top.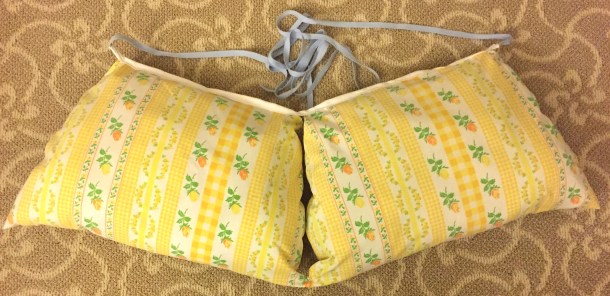
The front comes forward enough to increase my hips too. The way I constructed these bum pads is not period correct, but works for my particular body shape.
See how gloriously wide it makes the petticoat compared to my real figure?
Final project costs:
- 8 yards (45 inch wide) cotton plaid fabric: $45.31 from Amazon (affiliate link) including tax and discounts; I still have leftover fabric.
- 2.5 yards (60 inch wide) brown wool fabric: $20 plus $6.50 shipping from Facebook; Normally I use 3 yards for a petticoat but this was wide enough to do piecing in the back.
- Pattern: $0 (already used for another project)
- Bum pad fabric, stuffing, and twill tape: $0 (left overs from other projects)
Total (without notions): $71.81 (Not bad! I was originally planning $50 just for the main dress and I can reuse the petticoat for other outfits).


 12-14-19")

I haven’t been brave enough to try a plaid for this large a project, I find lining up the pattern a real pain. Do you have any tricks for matching plaids?
(My husband glanced over as I had this page open and he is blown away by the dress. We are both looking forward to more progress photos. 🙂 )
Hi Cindy, I’m glad you and your husband like it! For plaids my emphasis is on symmetry because humans are curved and plaids have straight lines, and it’s really hard to match 100%. After I cut out one pattern piece I use it to cut a mirror image of itself (such as right and left front bodice) by laying it directly on the fabric instead of continuing to use the paper pattern. If two pieces will share a seam in the finished bodice, I lay the first cut fabric piece down to determine where to line up the paper pattern piece for matching. Also, if you really can’t get something to match because of the scale of the squares, you can cut on the bias and have some pieces be diagonal and look like you are doing it intentionally as part of the design.
This seems like a really good idea! Why didn’t I think of this? Thank you for this. I am much more looking forward to my next project!
I’m glad it was helpful and good luck with your next project!
I’m super new to historic costuming and been working on an Outlander ensemble, but I have only made it through the underpinnings. Please do a post of the Outlander dinner!! I’m a really big fan of the books and show and would love to see others geek out over it. Have fune!
Hi Lexi, I will definitely do a post of the dinner when it happens in a few weeks! I am going for a more “rustic” look but I’m sure there will be some really fabulous gowns there. And bravo for making it through the underpinnings. Stays are really time-consuming!
Pingback: Outlander Dinner Party | Fresh Frippery
This is unbelievable, I’d die to have one piece like this, I love Outlander and vintage fashion in general! I sew too so now you made me lust for sewing one too! Aw
Thank you very much for your kind comments! The 18th century has many flattering silhouettes; you should definitely make one for yourself!
I’ll try!
Pingback: Historical Belle: My 18th Century-Inspired Beauty and the Beast Costume | Fresh Frippery