Blog Archives

Her Universe Fashion Show 2021 FAQ and Audience Winner “This is the Way” from the Mandalorian

Last year I had the wonderful privilege of being one of the finalists selected to be in the Her Universe Fashion Show (HUFS), and then ultimately one of the winners! The show is normally held yearly at San Diego Comic Con during the summer but the applications open up in the spring. Since this year’s show announcement is coming up, I thought this would be a good time for me to write up a post about my experience and the many questions I’ve been asked since last summer. (If you want to see the FAQ that includes what the show is, how the contest is run, any advice, etc. please see the second half of this post after my design photos). In 2021 Her Universe held a virtual show, which meant that instead of walking the stage in front of a live audience in San Diego, we submitted a lot of footage that was edited for judging purposes and streaming as part of Comic-Con at Home. My experience is a little different from the in-person show, but a lot of the information is still applicable!

(Most of the photos in this post were taken by lovely friend Natalie while assisted by my other equally lovely friend Kelsey).

For those of you that don’t know, Her Universe and the HUFS was founded by Ashley Eckstein to promote geek fashion. The HUFS is a runway show where designers submit a “geek couture” design which is high fashion inspired by a fandom. The idea is to make something that wouldn’t be out of place on a Hollywood red carpet, rather than a direct cosplay of a character. Although Star Wars, Marvel, etc. are popular inspirations each year, ideas from books, TV shows, and obscure fandoms are accepted as well.

I was selected as the audience’s choice winner, and Teighlor Johnson and Skyler Barrett and were tied for the judges’ pick in Pokemon and Queen’s Gambit-inspired designs, respectively.

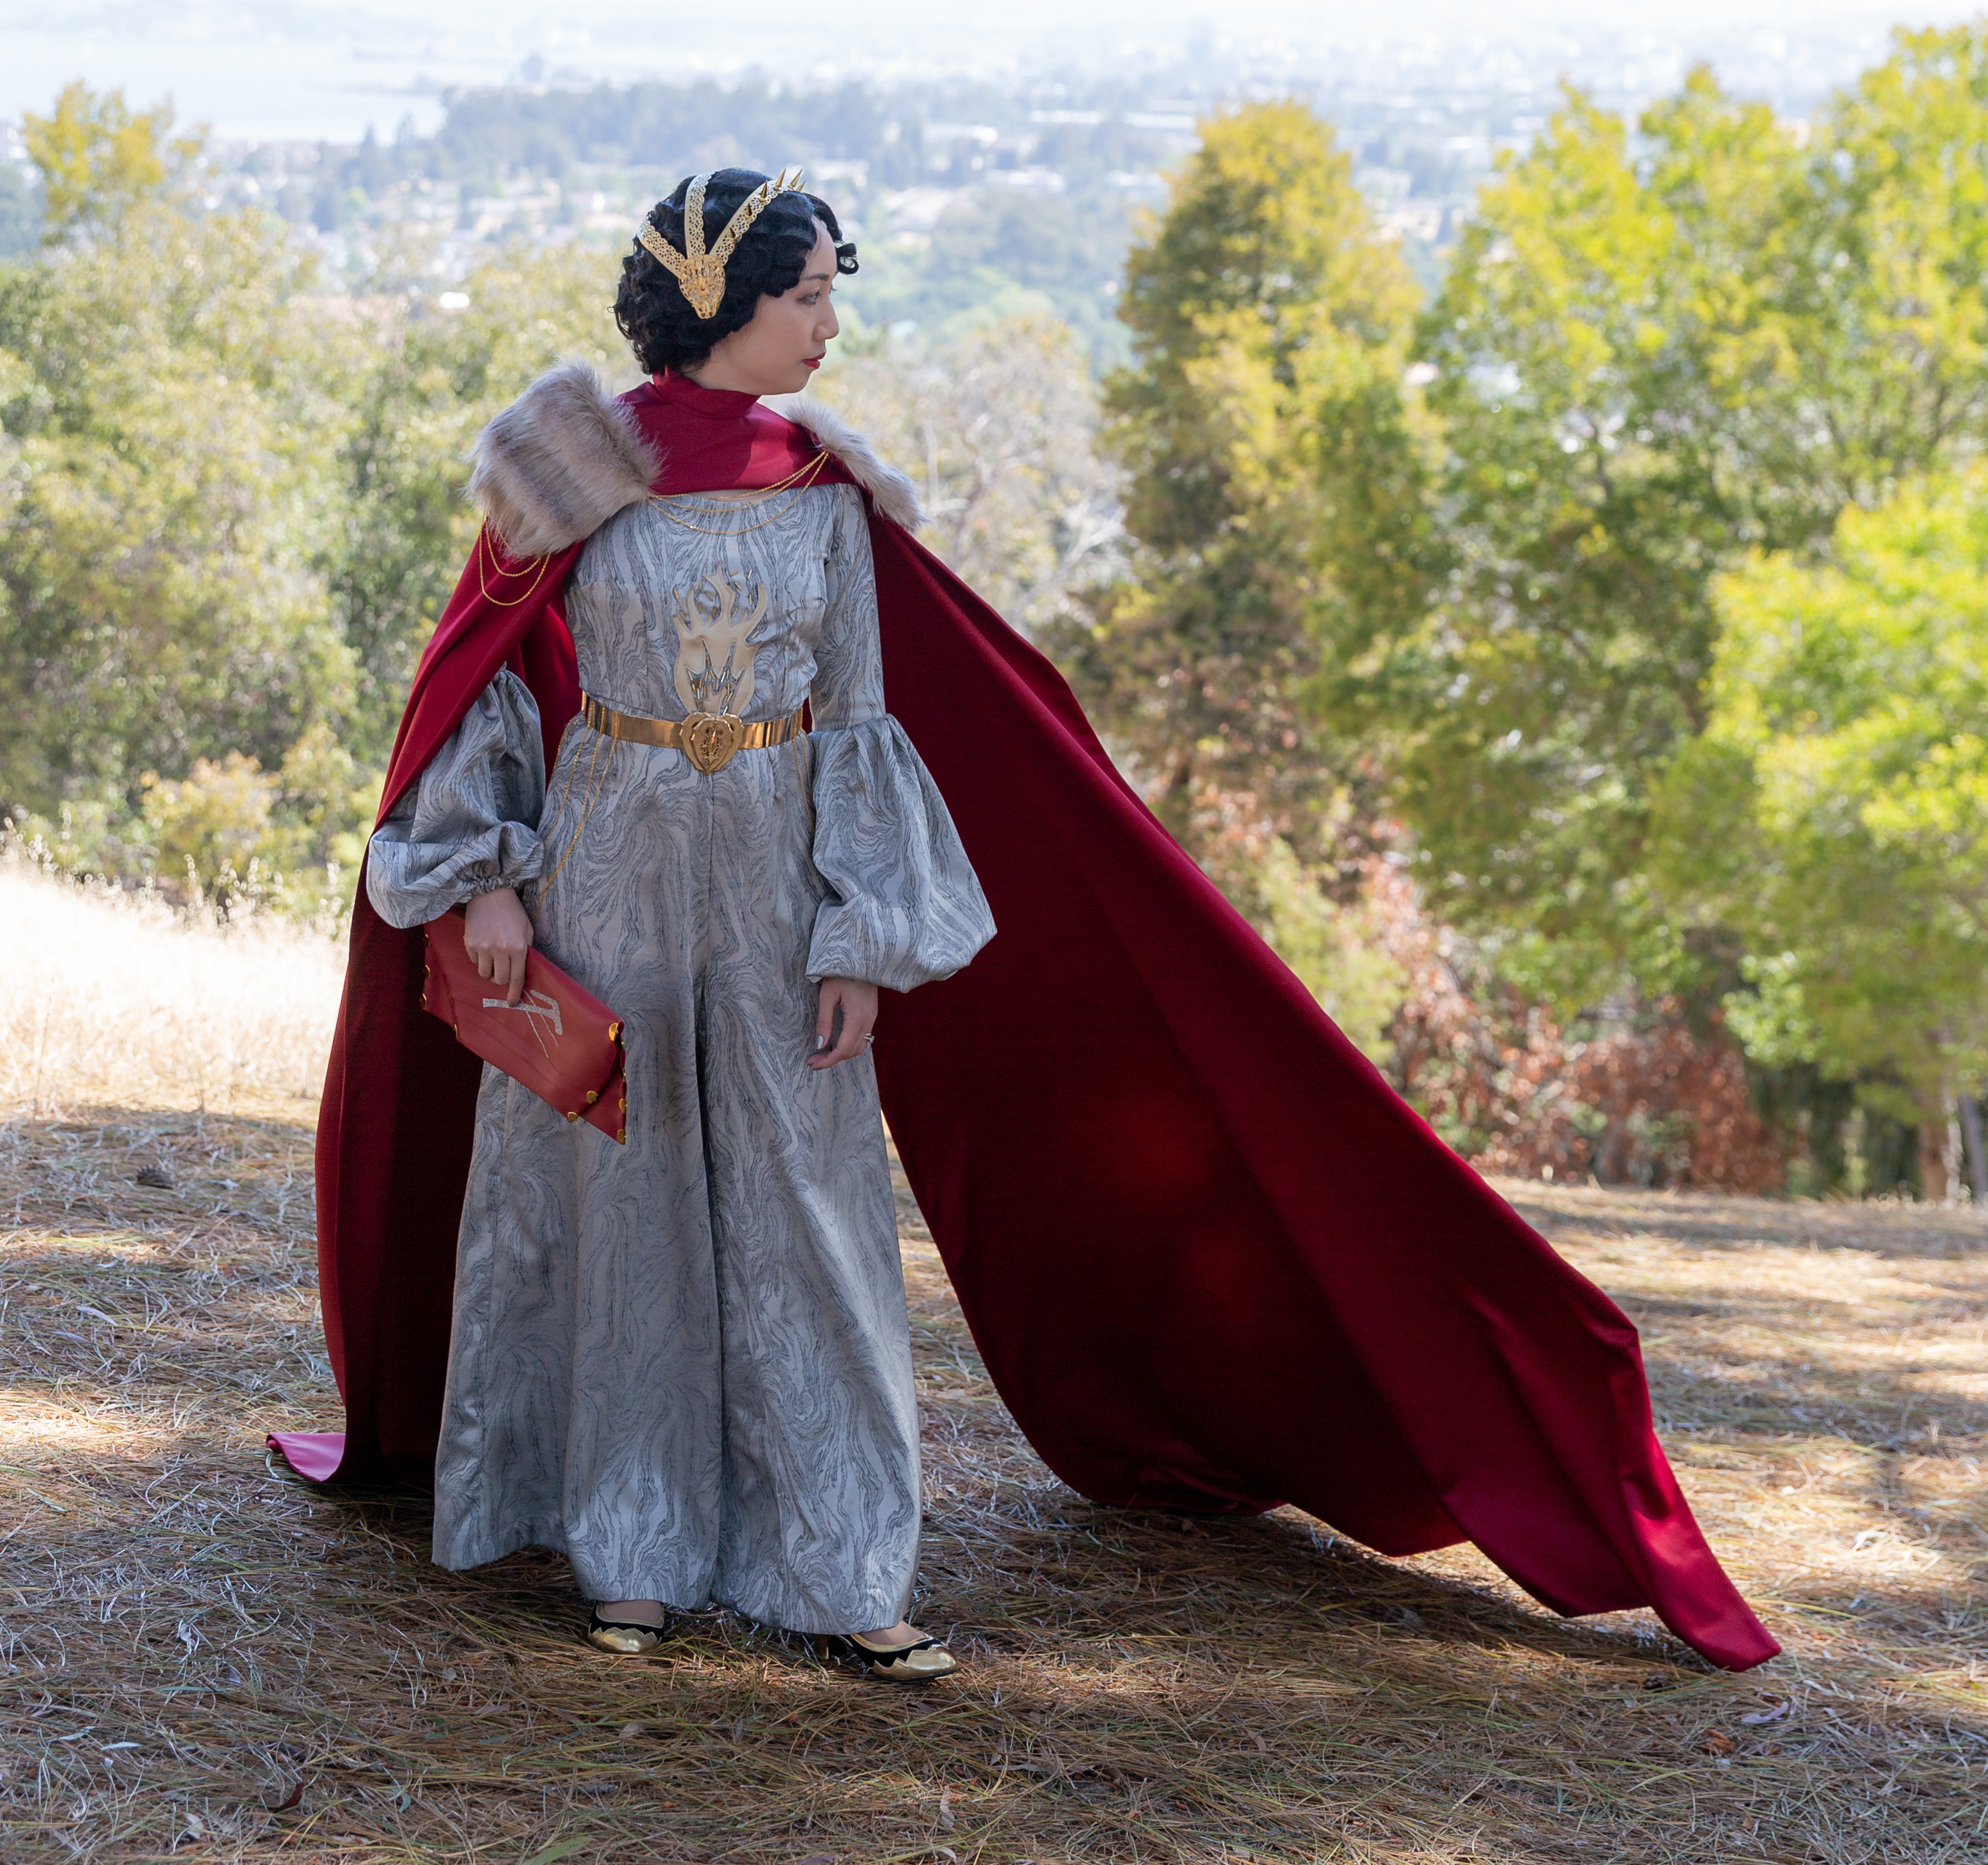
My design is called “This is the Way” and was inspired by the Armorer from Star Wars: The Mandalorian. This outfit consists of 5 pieces (a jumpsuit, a cape, a headpiece, a belt, and a purse). I have nods to her helmet in my headpiece, her fur cape in my epaulets, her tools in my appliqués, and the Beskar steel she works with in the fabric of my jumpsuit.

The jumpsuit is made of a silver and black silk and wool challis fabric woven to look like Beskar steel. The jumpsuit has super wide leg palazzo pants (with hidden pockets!) that are full enough to look like a skirt when standing still. The upper sleeves are fitted with a balloon shape in the lower sleeve, gathered into a cuff.

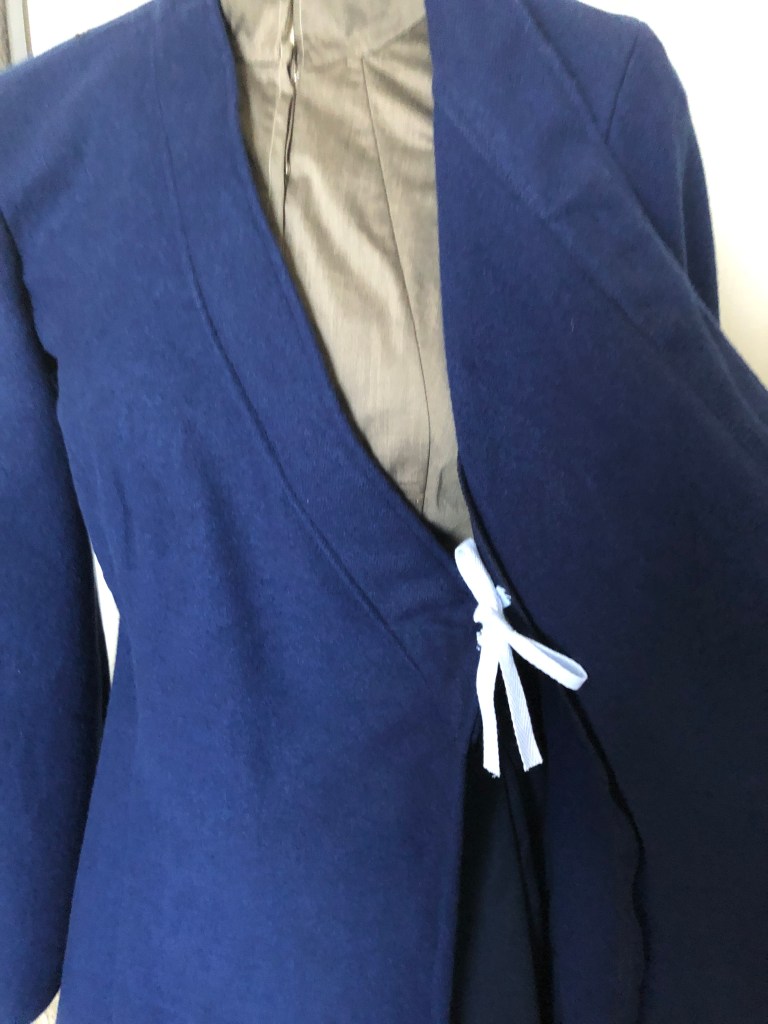
I love this fabric! Below from left to right is a dart, then an invisible zipper, then another dart. Running horizontally is a seam.

I used gold pleather to make a flame appliqué on the bodice to reference the forge where the Armorer works, and accented the appliqués with gold glass beads. The belt is a gold metal band that closes with an art nouveau clasp in the front. Gold chains hang from the belt on each hip.

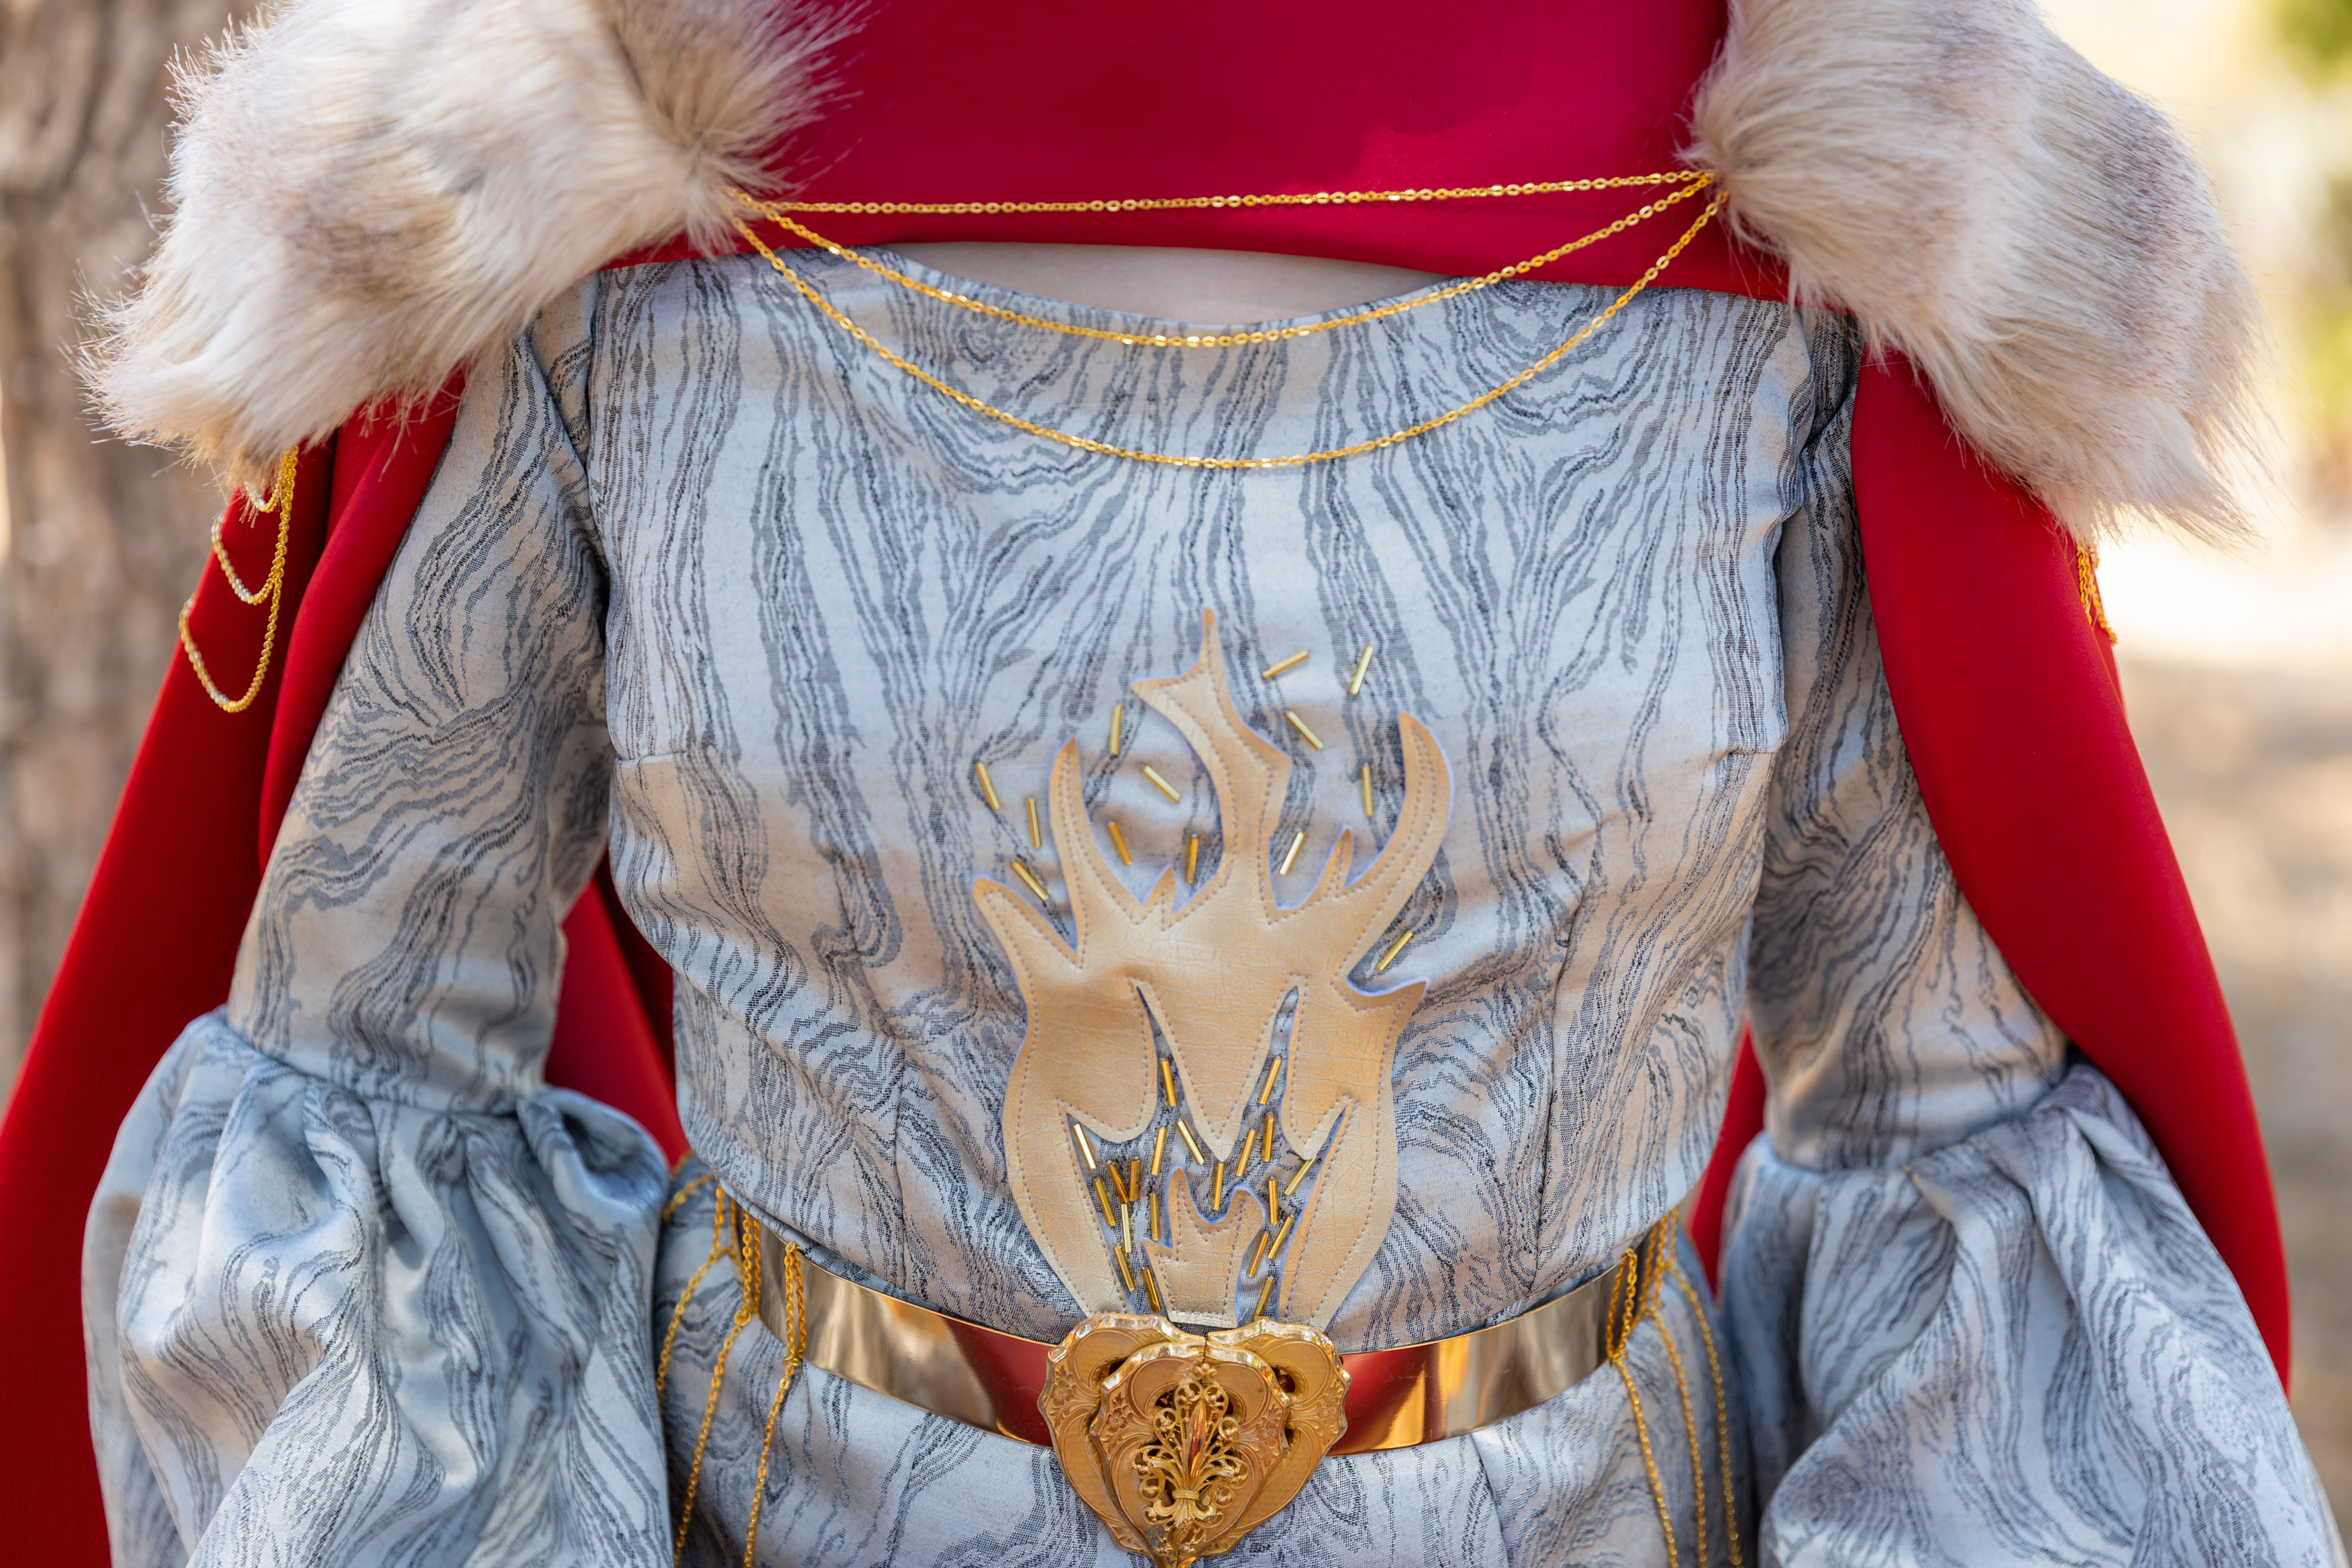
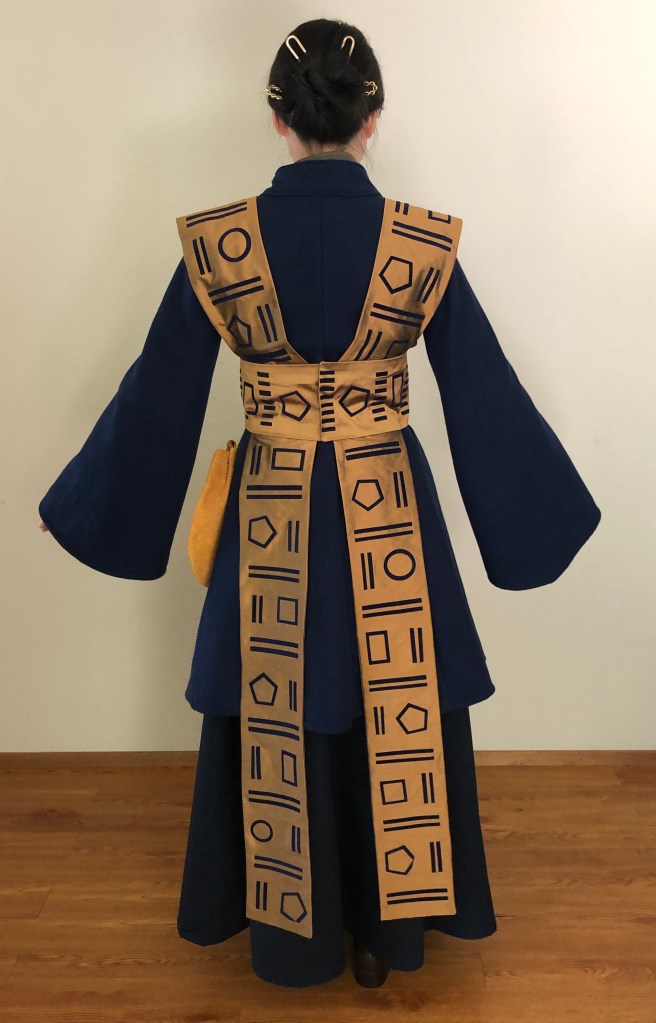
The bodice has a wide boat neck that creates a peekaboo effect combined with the high-necked red pleather backless “cape.” The brick red cape (lined in the same color) consists of a neck piece that covers the collarbone and extends to the shoulders, and long open “sleeves” that are long enough to trail on the floor, creating a train effect despite having no gown. The cape is open in the front and back so the jumpsuit is fully visible except for the shoulders, which has light brown fur epaulets on the cape. More gold chains hang from the shoulders and across the chest and back.

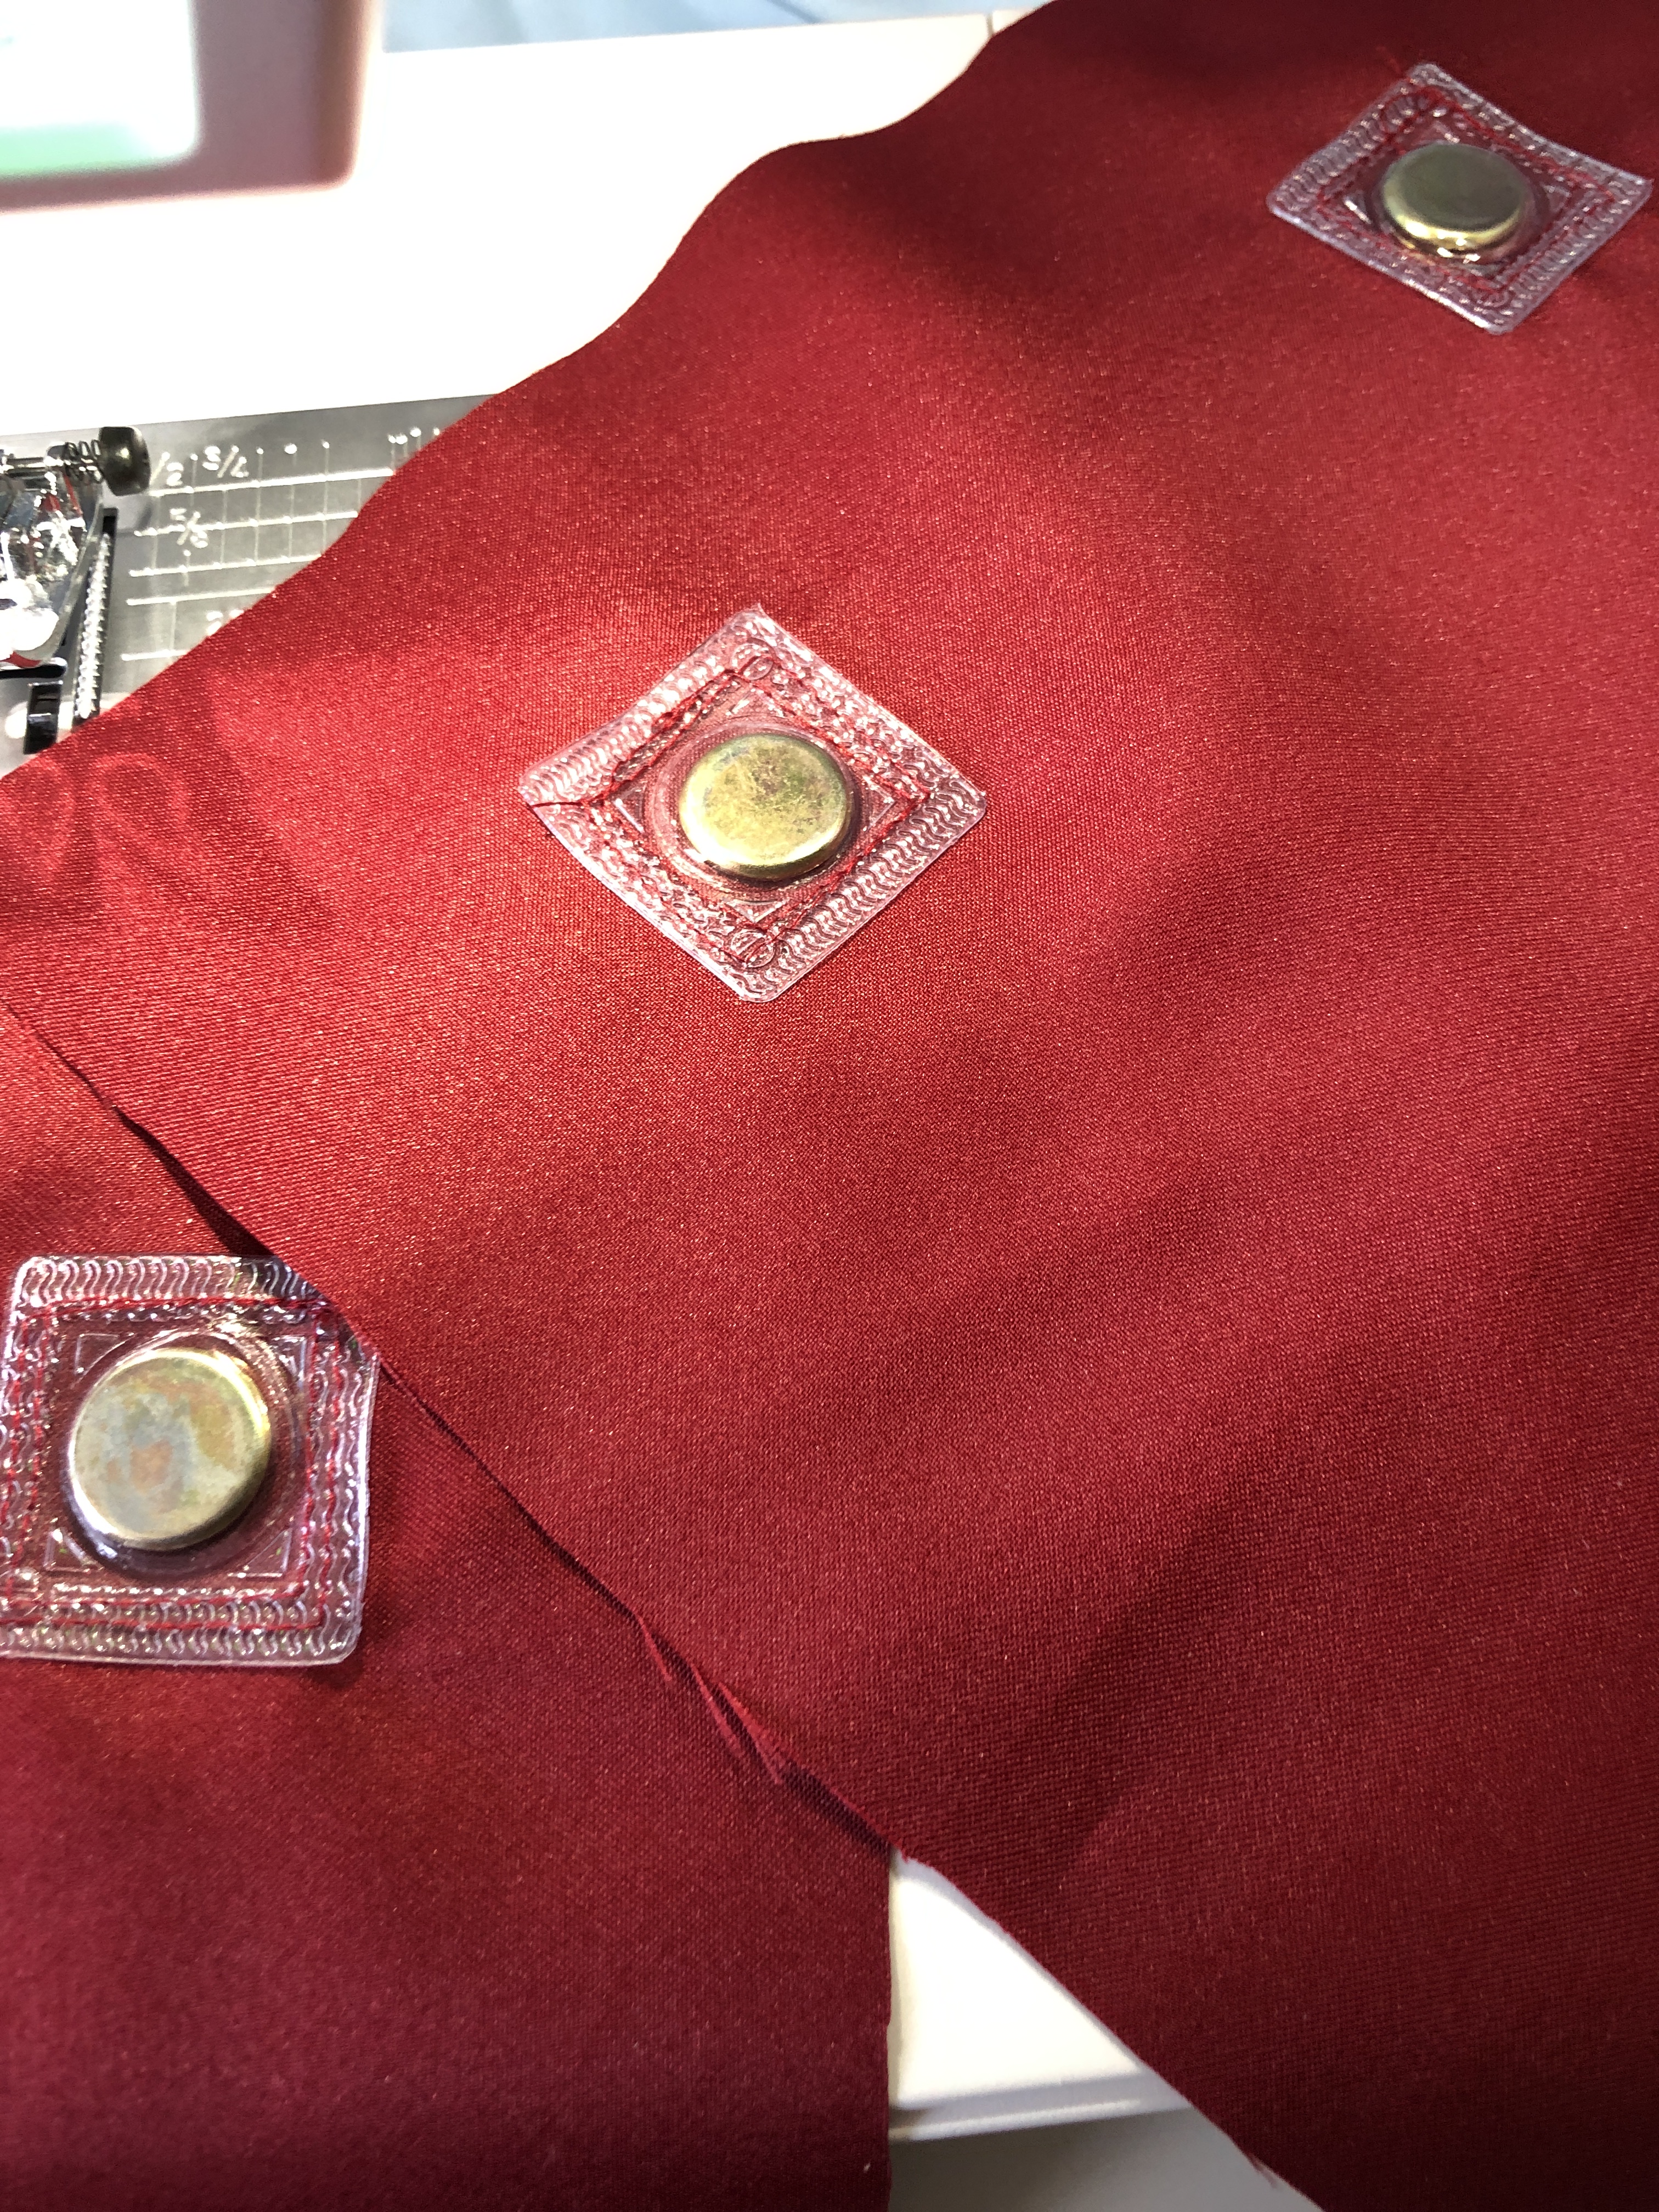
The cape closes at the neck with hidden hooks and bars. Then the epaulets and chains go on top, and I have hidden magnets sewn into the shoulders of the cape and the underside of the epaulets. The magnets I used are encased in plastic so I can sew them on. Here are some test pieces I did so you can see what they look like:

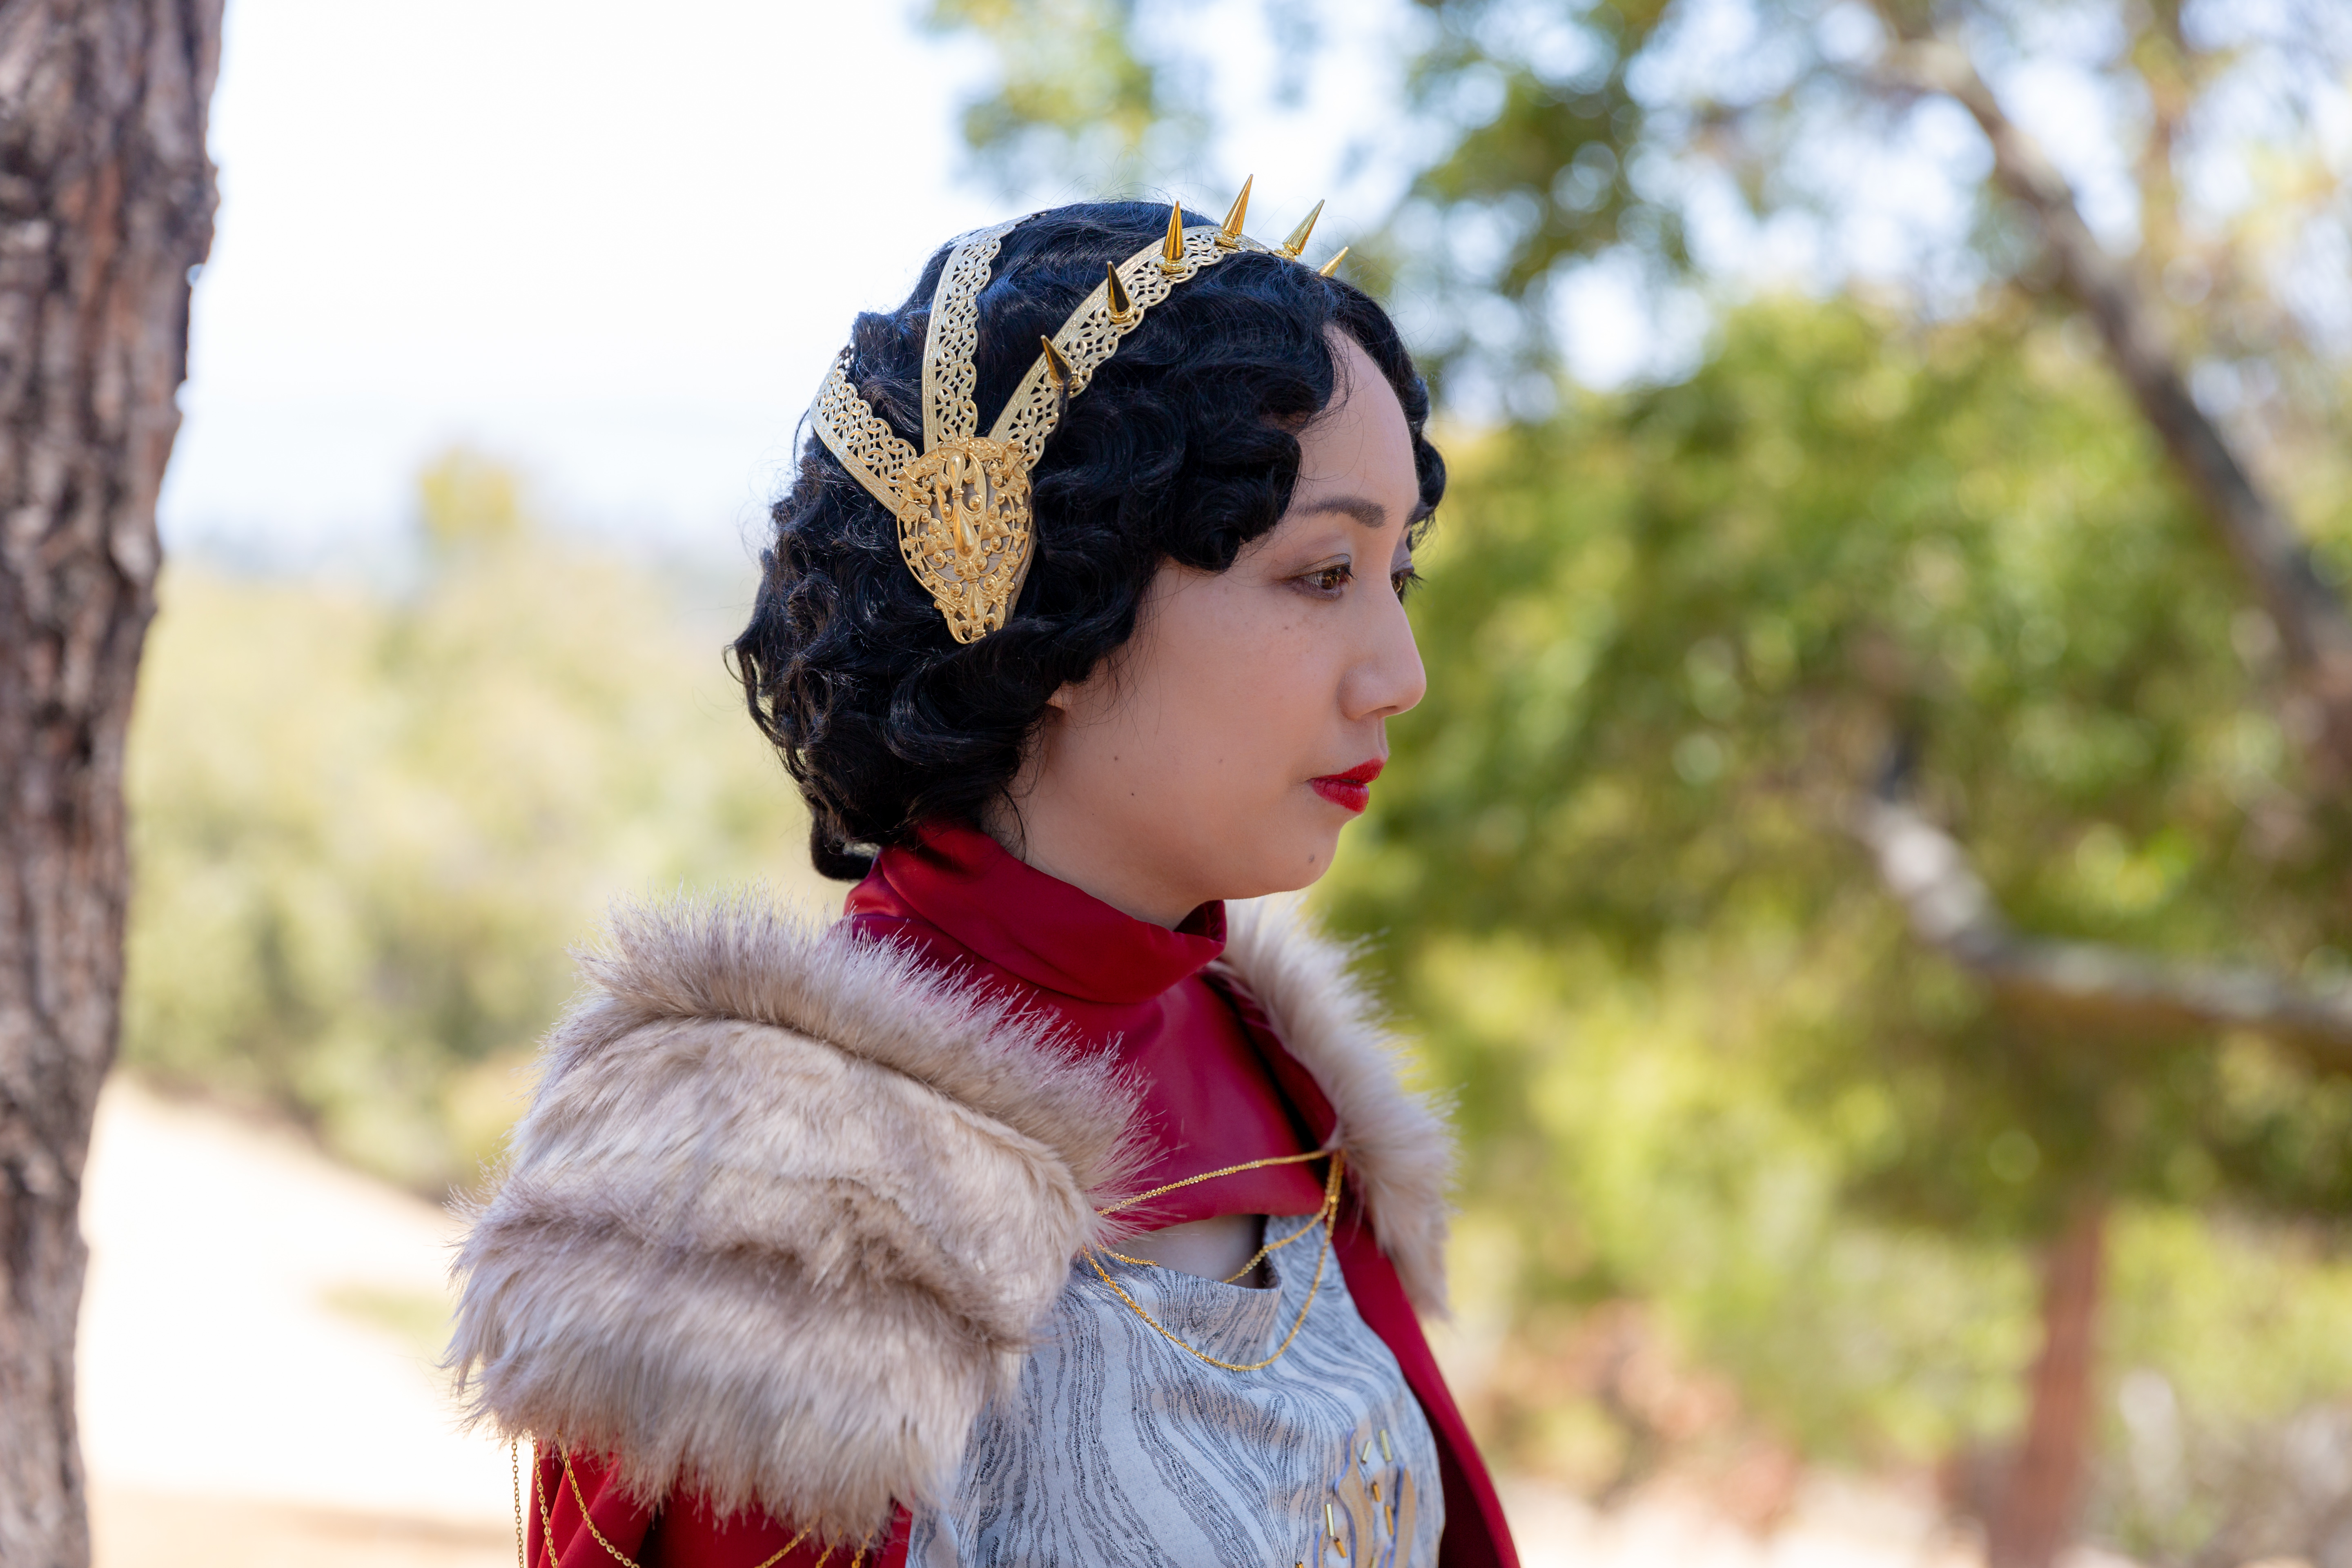
The headpiece is inspired by 1920s/1930s flapper headdresses and consists of 3 brass bands across the top of the head, attached to art nouveau style large decorative brass pieces over the ears. The front band has small golden spikes like a crown. The bands and ear pieces are wired together but the spikes are attached by drilling holes in the bands and screwing them in. I also added some gold pleather padding inside the ear pieces for comfort.

The purse is a clutch made of brick red pleather and lined in the same fabric as the cape. The purse flap is pleated like the Armorer’s apron and has her tools appliqued in silver. I created the design using my Silhouette Design Software and used glitter heat transfer vinyl.

The purse opens with a magnetic clasp and is decorated with gold metal half moons. As usual, I hand-sew in my labels.

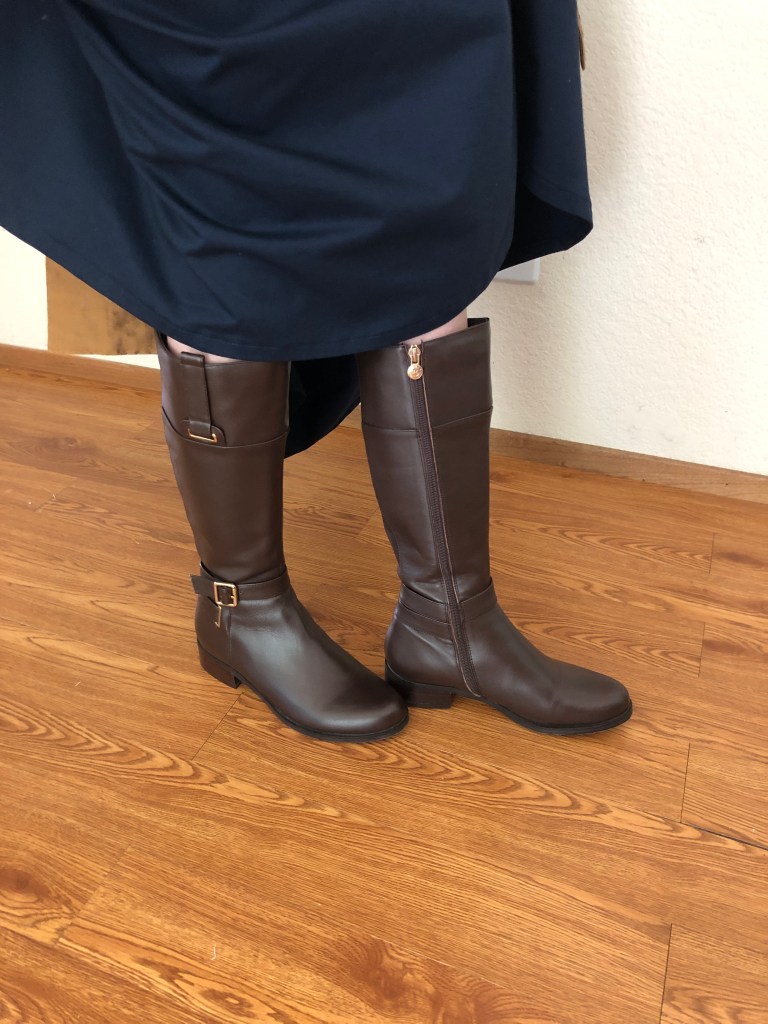
My wig is from Arda Wigs and my shoes are from Miss L Fire.

Here is a video I made showing off some close-ups, when the online voting opened.

@freshfrippery

My Armorer (Mandalorian) design for @officialheruniverse fashion show! #pose #fashion#heruniversefashionshow

♬ original sound – 𝔞𝔰𝔥𝔩𝔢𝔦𝔤𝔥 ✨

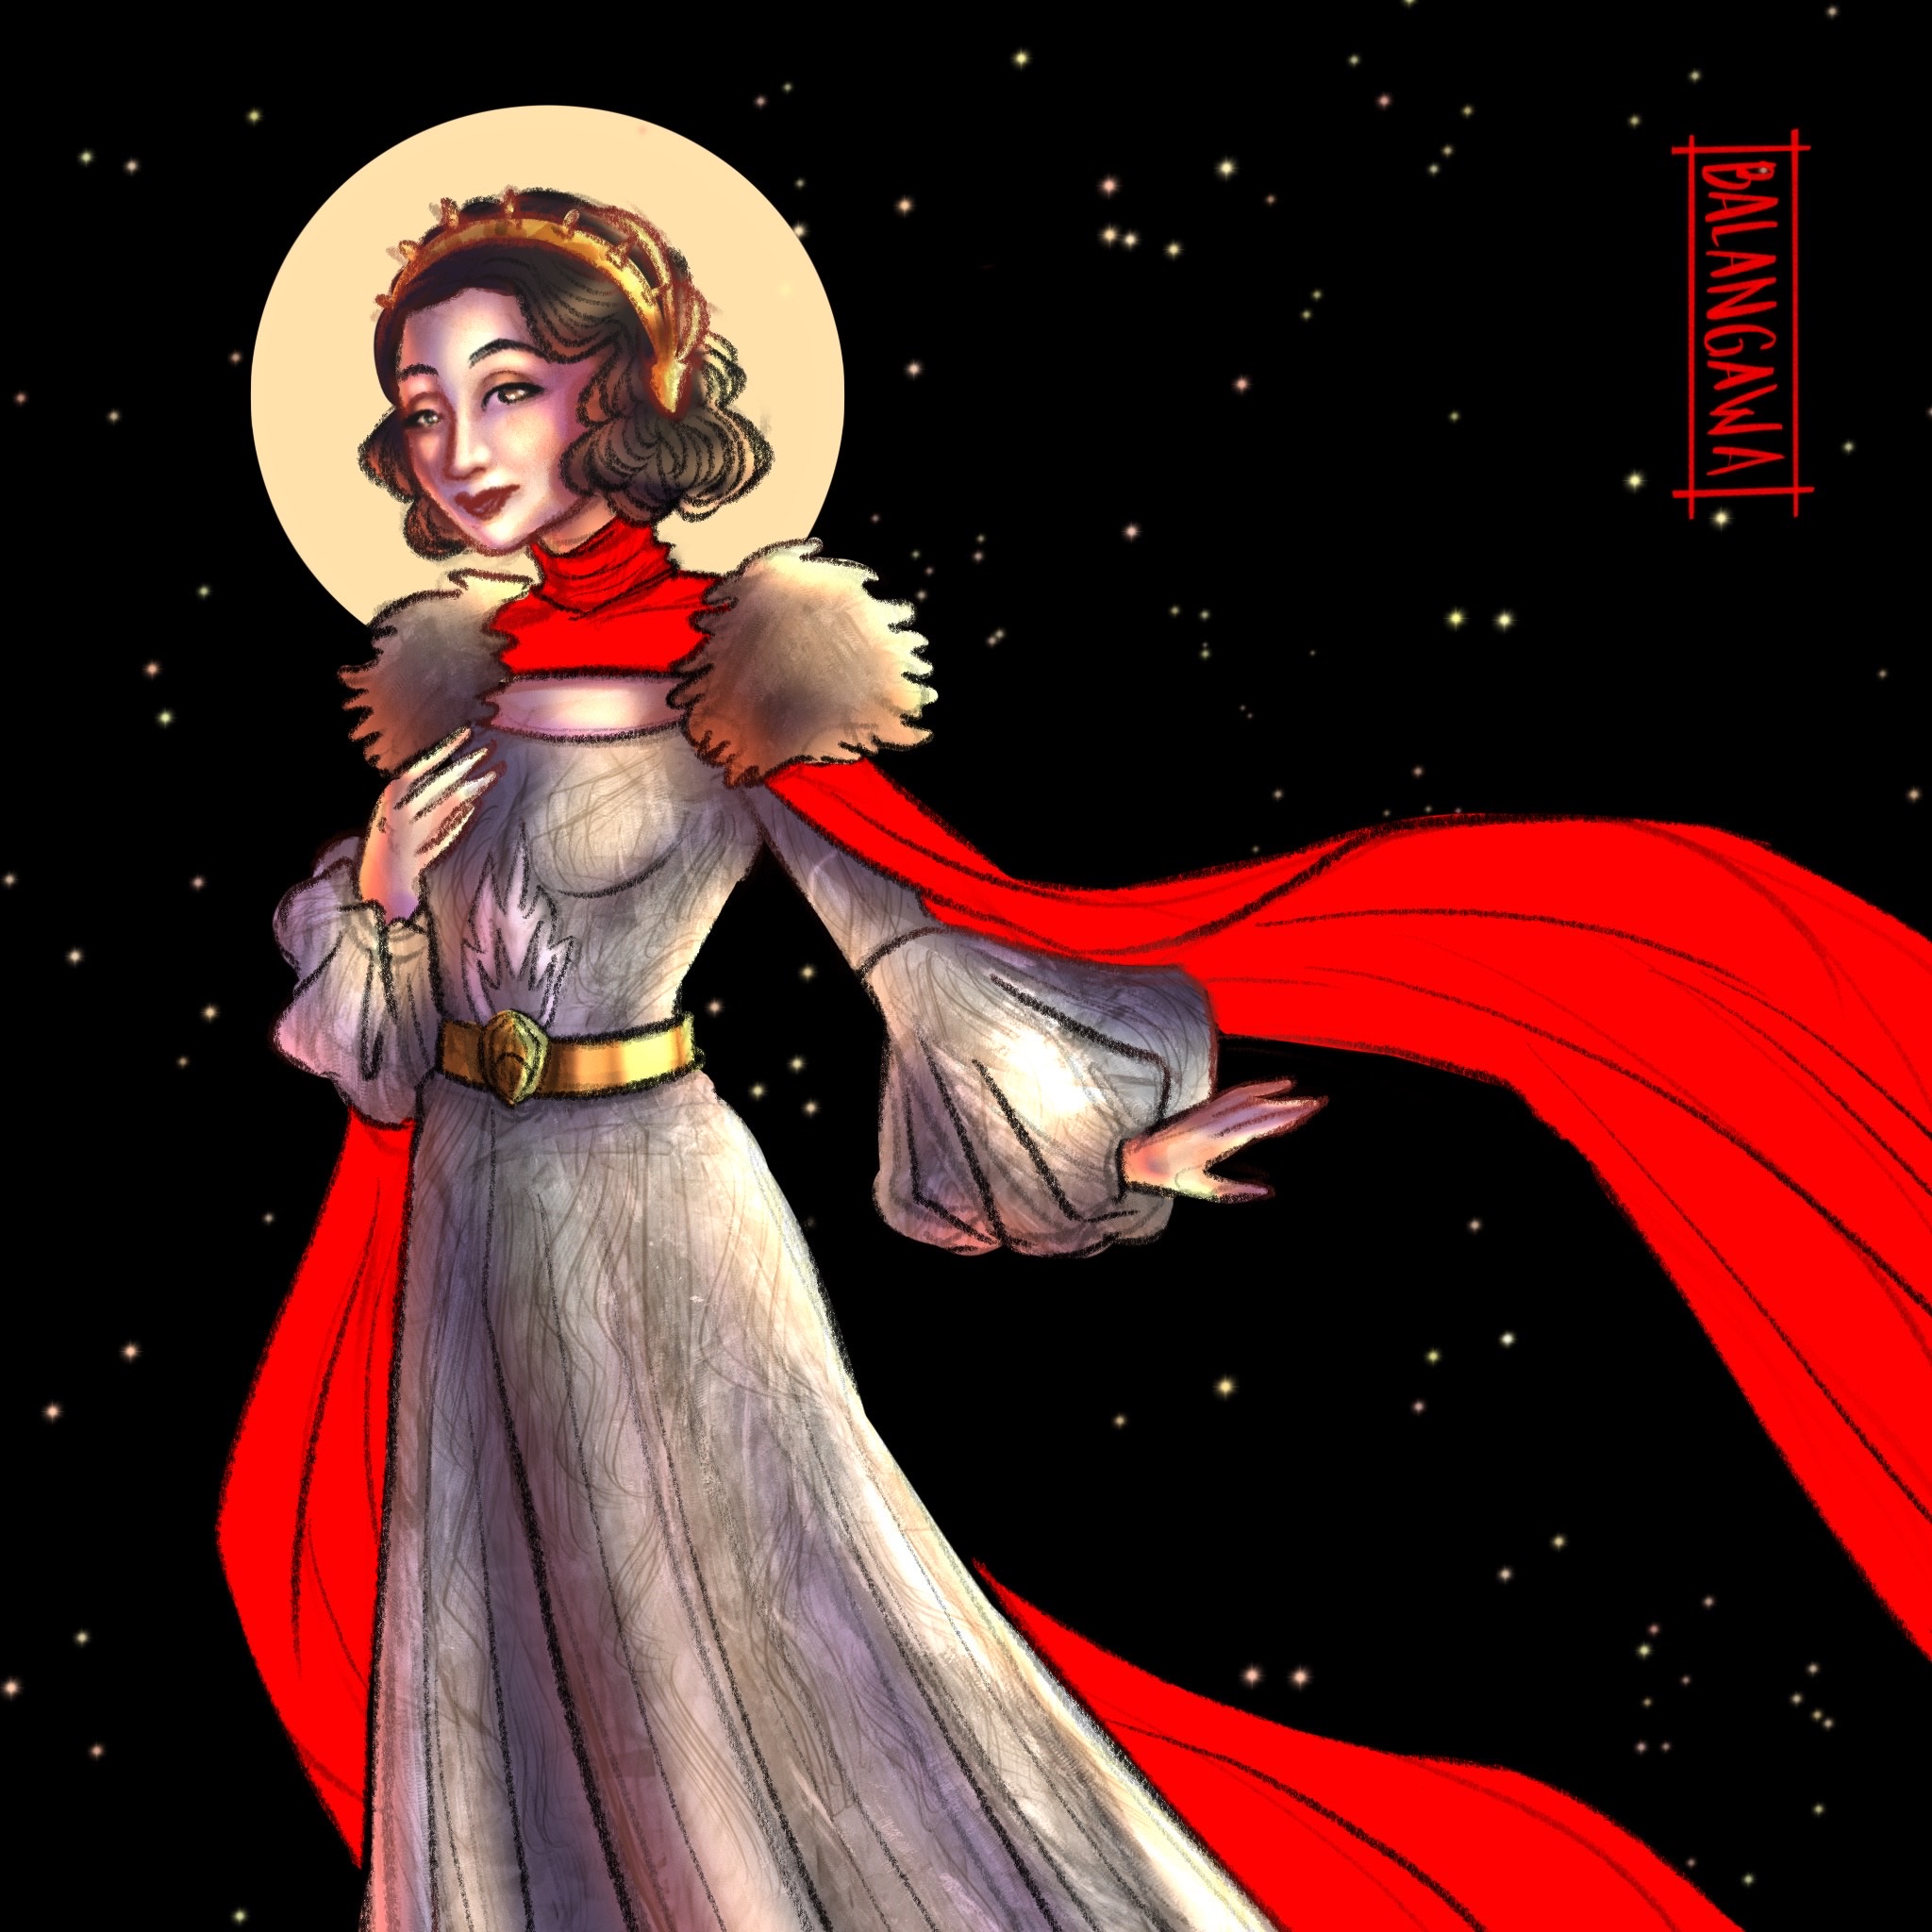
The talented artist Dani Balangawa drew this lovely portrait of my winning design and sent it to me as a surprise!

Materials sourced:

I was short on time and worldwide shipping was a little dicey at the time I was getting my materials so I bought a lot of things that I knew could get to me quickly. A lot of the items, especially the metal findings, may also be found through my usual sources of Aliexpress, eBay, and craft stores.

Thank you for reading so far! Now for the FAQ!

Where can I see examples of past Her Universe Fashion Show entries?

You can watch last year’s show on the HUFS blog, which also has links to photos from earlier shows. The site also has archives of footage from previous shows. I highly recommend you review those so you don’t inadvertently submit any similar designs.

What is the selection process like?

There is an online application where you can submit up to 3 original designs plus a written description. You will also be asked for a personal bio, info about your design/sewing experience, and some portfolio images. There may be additional questions about how you heard about the show, if you have any previous press, what you think about geek fashion, etc. You can also include links to your social media and personal website and an optional video about your designs.

Up to 25 finalists are chosen by a selection committee that consists of Ashley Eckstein and employees of Her Universe/Hot Topic. Those finalists are the ones that will appear in the HUFS during SDCC. There is one winner picked by judges at the show, and a second winner picked by audience voting. There can be more than two winners in case of a tie.

What should be in your portfolio/video?

The portfolio is a chance for you to show that you can complete your design. HU does not want to select a person who has a great sketch but doesn’t know how to sew. Your portfolio should demonstrate your skill and experience and prove you can deliver a finished item on show day. Personally I recommend submitting a collage for each image so that you can show some close-up shots of your details and accessories made, plus make sure that some of the skills and materials in your submitted designs show up in your portfolio. For example, if you submit embroidery or leatherwork you should show you have experience with embroidery or leatherwork.

The video is optional. There is a time limit of 5 minutes but it is a chance for you to talk about your designs and show off your personality or inspiration. You can hold up sketches, show off fabric swatches if you have any, etc. Not everyone submits a video with their application but I feel like it’s a great way to explain difficult concepts and convince them you should be in the show.

What is the general time line?

Generally, applications open in spring after WonderCon and the show is in July during San Diego Comic Con. In 2019 (live show) applications opened April 1 and closed April 19, notifications went to finalists on April 26, and the show was July 17. In 2021 (virtual show) applications opened March 18 and closed April 2, finalists were announced April 16, and the show aired July 23 but we had to be finished with our designs and submit photographs/videos by June 4 in order to give them time to edit the footage.

What prizes do the winners get?

The judges’ pick and the audience winner get equal prizes. Winners are invited back the following year to judge the next contest at SDCC and their travel is covered. There is also a cash prize (I’m not sure if the amount varies each year), a chance to design a collection for Her Universe/Hot Topic, and royalties from that collection.

What is the HU/HT collection? Do you get your designs reproduced or get to choose the theme?

The collection is determined by HU/HT based on their licensing agreement with an upcoming movie. The 2021 winners designed items to come out in time for the 2022 Jurassic World movie. Some past winners have designed Star Wars, Marvel, and Wonder Woman items. The collection is mean to be casual/streetwear garments and are sold online at HU and in HT shops.

Do you have to have a ticket to San Diego Comic Con to apply?

No, you do not need a SDCC ticket to participate in the show or come watch as an audience member. The HUFS is held at a hotel during SDCC, but is a separate event. Finalists in the show are also often gifted a pass to SDCC.

Do finalists have their costs covered?

No, you are responsible for buying your own materials for your design, and covering your own travel to San Diego. As stated above, you do not need to pay for a SDCC ticket. If you win and are invited back as a judge, then your travel is comped for your subsequent trip.

Is there an age limit?

You need to be at least 18 for HUFS. (One year there was an affiliated junior design contest for minors, but that was different from the main runway show). There is no upper age limit and you don’t have to be fresh out of design school. There are people in the show in their 30s and 40s, with established careers and/or kids doing this for fun.

The contest is called the HER Universe Fashion Show. Are men allowed?

Yes, male designers are allowed to participate. In past runway shows male designers submitted womenswear, but during the 2021 virtual show the finalists could also present menswear designs.

Do you have to model the clothing yourself?

No, you can have a friend model the clothing if you don’t want to wear it yourself and many designers prefer to hire a model for various reasons (runway experience, having a particular look in mind, ease of fitting, honoring a particular culture, etc.) However, many people also love modeling the clothing themselves! It is up to you.

Do you need to be a great fashion illustrator or submit professional drawings?

No, the design sketches just need to be able to convey your vision clearly to the selection committee. You are also allowed to include written descriptions and your sketch can be a collage that includes pics of fabric swatches, etc. You can also use your optional video to describe your design.

You are allowed to hire a pro artist or friend to polish up your designs, as long as all the ideas are your own. For example, maybe you’re not confident about rendering fabric or comfortable about your illustration skills, you can have someone do your final sketches, as long as they are not helping you design.

For myself, I have submitted before using my own drawings, and have also applied by having my drawings translated by costume illustrator Emily Hasty. You can see below my original sketches and notes and the professional rendering by Emily.

Here is the sketch from Emily I submitted as part of my HUFS application.

What is the “portfolio review” at WonderCon?

At WonderCon, a few months before SDCC, and before the HUFS application officially opens, the Her Universe/Hot Topic team will usually host a portfolio review at WonderCon. (This is separate from the HU panel that consists of the past year’s winners that will be judges for the year). This is a chance for aspiring applicants to have a few minutes with some HU/HT reps to get some quick feedback about their designs. This is completely optional, and is a nice bonus for anyone who’s already attending WonderCon who wants a second opinion, but is not a requirement to enter. (The HU/HT reps may or may not be the same people on the final selection committee).

Is there another place to get feedback?

There is an unofficial Facebook group called “The Workshop” that is a support group consisting of many past finalists and people who are interested in applying. It’s a friendly place to ask questions or talk about your designs.

I also highly recommend you read the fantastic blog series “So You Think You Can HUFS: An Insider Guide to the Her Universe Fashion Show” by show veteran and previous winner Kristi Siedow-Thompson. It’s full of great information.

What is the HU panel you referred to at WonderCon?

The panel consists of the previous year’s winners and gives info on the upcoming show plus a sneak peak at the HU/Hot Topic collection that is being released.

Would you recommend participating?

Absolutely! I had a wonderful experience and the people involved in the show (both organizing and participating) were lovely. The HU/HT staff provided lots of guidance, were available for questions, and were really responsive. Prior to applying for the first time I had talked to previous finalists about the general vibe to see if HUFS was something I wanted to join. Everyone I asked said that it was the type of show where people hyped each other up and helped each other backstage so please keep that atmosphere going if you participate! Since the 2021 show was virtual, we had weekly Zoom meetings hosted by HU and a private Facebook group. People were offering to help each other shop for materials in the LA Fabric District or mail spare supplies. When online voting opened the participants were encouraging their followers to check out the other finalists as well. It definitely felt more like a bunch of theatre kids banding together to put on a show rather than competitors in a pageant. I am very grateful to have been part of this experience and am looking forward to being a judge this year and cheering all of you on!

My Historical Loki Variant Cosplay (Borgias-Inspired Renaissance Dress Costume)

I was making a Borgias-inspired Renaissance dress and decided to lean into to the green gold color scheme and make it a historical Loki variant costume. I wanted a Renaissance gown but being shiny and pretty was more important to me than historical accuracy so this isn’t pegged to a specific decade, but rather a look inspired by both the Borgias HBO show and the character Loki from the Marvel Cinematic Universe.

The dress is made from beautiful green and gold shot raw silk suiting. The bodice uses the same fabric but with a silk/rayon organza burnout overlay, and the lining is a black cotton canvas for structure.

Rather than using a commercial pattern I Frankensteined together math and modified pattern bits from previous costumes I made. The bodice is a shorted version of the kirtle I previously made using help from the Tudor Tailor book (Amazon affiliate link). I widened the shoulder straps and added some more seam allowance but it is otherwise generally the same.

The skirt is made of pleated rectangular panels. Each of the front and back are 1.5 panels wide, with the seam hidden under the metallic jacquard trim.

The sleeves are basic sleeve shapes but cut a little loose to allow for the chemise underneath. They are somewhat like tie-on sleeves except instead of ribbons I sewed them at the meeting points with a glass pearl and some gold bead caps.

Underneath the dress I wore a Tudor chemise because that is what I had on hand. (It was also made using a pattern from the Tudor Tailor book). However, at a later point I’d like to make a Renaissance camicia with a different neckline and much fuller sleeves to puff out through the gaps in the green sleeve.

LOKI CROWN

I bought the Loki crown as 3D printed pieces from Parton Prints on Etsy. The horns come as separate pieces for ease of shipping and I glued them on using E6000 glue. After a little sanding, I used a primer that someone recommended to me for 3D printed plastics Tamiya Gray Fine Surface Primer (Amazon affiliate link) I finished up with two coats of Rust-Oleum Metallic Spray Paint in Gold. Originally I used more E6000 to glue on a black elastic strap but decided to cut them off. Instead I used the nubs of those straps as an anchor point to sew on some gold necklace chains both as decorative dangling elements in the front and also as a visible gold band across the back to hold the crown on.

I am wearing a wavy black wig from Amazon (affiliate link) under the crown. I wish my hair was that luxurious! The necklace is a secondhand eBay find.

And here is a video of the dress in action!

I had so much fun pretending to be a villain. Here are a few of the fun TikTok videos I made as Lokizia Borgia:

  1. Transforming into Lokizia Borgia:

2. Asking you to join me in ruling the galaxy:

3. Starting my villain arc:

MATERIALS

  • 5 yards green/gold raw silk suiting from Fabricmartfabrics.com: $52.50 + $9.99 shipping (some left over)
  • 2 yards organza burnout from Fabricmartfabrics.com: $16.10 (shipped with silk suiting, a lot left over)
  • 10 yards metallic jacquard trim from Aliexpress store Lucky Zakka: $9.42
  • Thread, hooks/eyes, glass pearls, lining scraps, paint, glue, etc. from stash/left over from other projects: ~$5
  • Package of 9 mm gold-colored bead caps: $5.90 from Amazon (affiliate link); I have many left out of that 100 pack.
  • Gold chains: $0 (gifted from someone’s destash)
  • 3D printed Loki crown pieces: $32.12 including shipping from Parton Prints on Etsy

Total cost: $131.03 (with about $100 of that in the dress itself).

OTHER RESOURCES MENTIONED IN THE POST (Amazon affiliate links below):

I had a lovely time wearing this to a Sistine Chapel art exhibit with my lovely friend Sara, who took a number of the pictures in this post.

Thank you for reading!

Elven/ Moon Goddess/ Medieval Fantasy Dress

I made this fantasy costume back at the start of the year and realized I never wrote up a post! With the 20th anniversary of the Lord of the Rings films coming up, this is a good time to finally blog about this dress with elven vibes. I had fun walking around in nature, pretending to be regal, and hope to wear it to an actual event some time!

I made the main body of the dress using an embossed navy blue velvet, and the cape is a sheer netting with silver glitter stars.

I created moon phase appliqués out of silver glitter heat transfer vinyl with my Silhouette machine to decorate the front of the dress. (If you’re not familiar with HTV, the material is on a plastic backing. You iron on the appliqué and then peel off the plastic backing, revealing your design).

@freshfrippery

How I made the moon phase decals for my moon goddess costume #learnontitkok #crafty

♬ sonido original – xsunix

I glued crystals around the moons using E6000 Fabri Fuse (which is not the same as regular E6000). I glued larger crystals onto a piece of grosgrain ribbon to make the belt.

The pattern I used is Butterick B4827. It is a princess-seamed fantasy dress and I made very few modifications. I turned the lace-up back into a zipper back, and I added the cape. The cape is a long rectangle, pleated into the back neckline, with a cut open center slit part way down the back to access the zipper.

The front of the cape is sandwiched into part of the armscye shoulder seam, with excess removed, as explained in this video.

@freshfrippery

Reply to @sunflowerstardust how I put the cape on my moon goddess dress. #sewing #costume #learnontiktok

♬ original sound – freshfrippery

I made my flower crown by spray-painting sola wood flowers with Rustoleum silver spray paint. The base of the circlet is silver floral wire, and the flowers and a necklace are attached to the base using 26 gauge wire. I also glued crystals onto the petals using E600 Fabri Fuse. This video shows the process:

I have a few scraps left of the velvet and I am planning to make a pouch for carrying items. In my haste to whip up the long seams of this dress quickly, I serged all the panels together and forgot to add pockets!

Materials used:

  • 4 yards embossed navy velvet: $52.59 including tax and shipping from Amazon. The blue is sold out but there are other colors like black and ivory still available from Amazon (affiliate link). You can also find it at Fabric.com
  • 2 meters glitter star fabric: $19.84 including shipping from Aliexpress
  • Butterick B4827: $0 (previously used for another medieval princess project). However, I originally purchased it for $7.99 from Amazon (affiliate link).
  • Crystals, glue, flowers, thread, ribbon, wire, paint, etc. were items I already owned and mostly left over from other projects, but I’d estimate if I had to go buy that all new from a craft store I’d spend ~$20.

Total cost: $72.43 out of pocket plus miscellaneous stash items.

Thank you for reading! I took these photos on a cloudy day. Maybe one day I’ll get a chance to take some atmospheric night time photos!

Historical Belle: My 18th Century-Inspired Beauty and the Beast Costume

I made an 18th-century inspired mashup of Belle’s iconic yellow ballgown and her hooded winter outfit from Disney’s Beauty and the Beast.

The costume has aspects inspired by 18th century fashion but is not a historically accurate reproduction particular to a specific decade. I was heavily inspired by Brunswicks (the hooded traveling outfits) but you can also see elements from robe a la anglaise gowns, caracao jackets, and side-opening petticoats.

The yellow fabric I used is a quilted cotton harvested from a king-sized bedspread! It saved me a lot of time quilting, but the material created some challenges: I had to employ strategic cutting in order to maintain symmetry in the stitch designs in the final costume, and to keep the finished edges in the skirt, peplums, sleeves, and hood. The winter-appropriate thick cotton batting meant to avoid bulky seams I had to carefully pick out excess batting in the seam allowance of each pattern piece while maintaining (or restitching) the lines of quilting stitches. Raw edges were also serged to prevent fraying and loss of batting. Interior excess seam allowance had to be sewn down by hand since ironing was insufficient to keep seams pressed flat. In addition, the pleated areas were too thick to fit into the sewing machine and had to be stitched by hand.

However, I really like how the thickness of the material gave the garment a lot of structure, especially in the jacket peplum.

The scallops were also a feature I liked.

I lined the hood with scraps of white silk dupioni left over from a previous project. It was hand-stitched in so I could keep the scalloping on the hood.

The jacket was decorated with realistic foam roses on wired stems that I trimmed and shaped with pliers to create a base for hand-sewing onto the jacket.  Each rose is accented with red crystals I glued on individually using E6000 Fabri-Fuse glue, which I highly recommend. (This is not the regular E6000 glue. Fabri-Fuse is low-odor, dries quickly, and comes in a squeeze bottle with a sharp tip for detail work).

The yellow and white striped bows are made from vintage French ribbon with picot edging, accented with antique lace. Each sleeve has embroidered tulle lace, large red satin bows, and a rose. 

My necklace and earrings were purchased from In the Long Run Designs on Etsy. The mirror was purchased from Amazon (affiliate link).

Underneath the gown I am wearing 18th century silk and linen stays made by me.

The lace-front wig was styled by me and decorated with the same roses, crystals, and ribbon as the jacket.

The wig base is a long black wavy wig that I purchased from Amazon (affiliate link).

Pattern Info:

The outfit was a combination of self-draping and Frankensteining. The main body of the jacket and sleeves used a heavily modified version of the Period Impressions 1780 Polonaise pattern, which I previously used for my Outlander dinner party dress. However, I took out some back seams and altered the sleeves around the elbow region. The peplum was created by holding and pinning material up to the upper jacket on the dress form until I got the length and fullness I wanted.

The hood and lining are pleated in a fan shape, and the pattern was adapted from the hooded cloak pattern in Linda Baumgarten’s Costume Close-up book (Amazon affiliate link).

The hood doesn’t stand up by itself, so it’s being held up here by a piece of boning to show you the shape:

No pattern was needed for the quilted petticoat, which was constructed in the same manner as your usual 18th century petticoat with side slits. The front and back panels were pleated into twill tape that served as waistbands and ties. Because of the thickness of the material there were less pleats than usual and I left a large section of the front center unpleated to allow for the jacket to sit flat over the stomach.

Materials used:

  • BrylaneHome king-sized quilted bedspread (in “aspen gold” color): $49.90 from Amazon (affiliate link).
  • Two boxes of artificial foam roses: $17.99 each from Amazon (affiliate link)
  • Red crystals (with lots left over!): $7.59 from Amazon (affiliate link)
  • Fabri-Fuse glue: $8.00 from Amazon (affiliate link)
  • Twill tape, thread, hooks/bars, red ribbon, hair clips from stash: ~$5
  • Vintage striped ribbon: $10 (this is a guess because I don’t remember how much I paid for it from a vendor table at an event)
  • Vintage lace: $0 (gift from a friend)
  • Sleeve lace: $8.27 with tax and shipping from Wikilaces on Etsy
  • Hood lining: $0 (scraps from previous project)
  • Lace-front wig: $36.99 from Amazon (affiliate link)

Total: ~$161.73
(I’m not including the shoes or jewelry because those were items I already owned for other costuming purposes. About $40 of the total is a wig I can reuse, plus I had some left over materials, so I’m calling this project a win for my pocketbook!).

I had a lot of fun making and wearing this costume. I even entered it in my first ever cosplay contest and was delighted to be a finalist in the Cosplay with Singer contest this fall! Here’s a video of the costume in action that I made for the contest:

Enjoy this silly video of me trying to fit my large costume through a small space.

Thank you for reading!

Jedi Librarian / Archivist Costume for Rebel Legion

I am happy to have an approved Jedi librarian/archivist costume for the Rebel Legion!

If you have not made a Jedi costume before I recommend you first read my post “DIY Generic Jedi Costume for Rebel Legion (A Head to Toe Guide)” because I use some of the same techniques referenced in this post.

I made my costume according to the Rebel Legion Jedi Librarian/ Archivist/ Historian Costume Standards but please note, I am not a RL judge and this post reflects my own experience making my costume and is not an official guide of any sort. This blog post will take you through the layers of my costume (with a dressing video at the end).

I used heavier fabrics like wool and cotton twill because I intend to use this for winter events; you’ll want to stick to cotton and linen if you plan to use it in warmer climates.

UNDER TUNIC AND SKIRT

I made the under tunic out of a poplin fabric with slight stretch. You actually don’t need a full shirt; a dickey just showing the collar is sufficient. However, for warmth and laundering reasons I wanted a full shirt.

Any mandarin-collared shirt pattern will do but I used a modified Simplicity 8768 (affiliate link), simply because I already owned the pattern. It is the top half of View A. Instead of a zipper I put snap openings down the center front. (The pattern runs large so I had room for the overlap closure).

The CRL guide requires either pants or a floor length skirt. I opted for a navy cotton twill skirt with a very full sweep. The skirt is self-drafted, but if you have basic sewing skills you can make one. Mine is made from gored panels to reduce bulk at the waist, but if your fabric is not thick you can do a simple gathered skirt. Please note that if you are planning to wear this for Saber Guild or any activity that requires stuntwork, I recommend a full circle skirt for mobility reasons. You can’t do a high kick with a narrow skirt!

I’ve also seen that some people do sew the the inner tunic and skirt together, so you don’t have to fuss with waistbands if you prefer.

OUTER TUNIC

I used the same pattern for the wool outer tunic as my linen Jedi one, except I skipped the lining. As before, I used the modified McCalls M6940 Game of Thrones pattern (affiliate link) for the body and Simplicity 8723 Harry Potter robe pattern (affiliate link)  for the sleeves so please refer to my Jedi post for full details. It is a wrap dress with princess seams to be more figure flattering.

As before, I have a hidden tie closure inside the tunic, plus hook and bar closures on the outside.

The use of a coat weight wool for my tunic means it hangs beautifully like a real coat, and will be cozy for the winter!

BELT AND TOOLS

The belt is hidden under the obi, and is only used to hold up the tools. I’ve heard that these “tools” may be keys of some sort. They are actually optional items, not required for RL approval, but I think they add something interesting to the costume and are fun to make! Since the belt is not seen, I just used a modern belt.

My tools are based on the ones that Jocasta Nu wore in the Star Wars prequels.

Since I do not own a 3D printer I made the tools using items like broken pens and other items I had around the house.

I figured out that the “syringe” looking tool is made from a dental syringe easily purchasable through Amazon (affiliate link). I removed the metal washer and top handle, added a plastic cap and metal nut on top, add then a pen part on the bottom.

The bulby thing used a wooden honey dipper (Amazon affiliate link). I drilled a hole in the top of the honey dipper, added a button cover and 2 pen parts on bottom, then added pairs of metal jump rings to the handle and top of bulb.

The stylus thing consists of 5 pieces from various pens reassembled plus half a jewelry clasp at the top.

Everything was glued together with E6000 and painted with Rub ‘n Buff. Key rings were added at the end and then I cut leather straps to hold them to the belt.

POUCH

The CRL specifies the pouch must be suede with a drawstring closure. I found a suede pouch on eBay and then modified it. I punched extra holes and moved the cord so that the pouch would be gathered in the center front similar to Jocasta’s. I also cut a leather strip (slightly wider than the ones I used for the tools) and sewed it to the back of the pouch to give it a hanging loop. I swapped the wooden bead with a different closure I had in my stash.

If you want to make your own pouch from scratch, it’s a simple U shape. This is what it originally looked like before modifications:

OBI AND TABARDS

I would say that the defining feature of the Jedi librarian are the long tabards with the geometric designs. The original ones that Jocasta had were embroidered, but I’ve also seen people use upholstery fabric that’s woven with designs, or draw them on themselves with fabric pens or paint. I opted to make my own custom fabric using navy heat transfer vinyl flocking on to of bronze silk shantung. (At the time I made my costume I had not seen anyone else in the Rebel Legion use this technique for librarians, but I was approved and the CRL is vague about how to achieve the geometric designs).

I used a Silhouette machine (like a Cricut) to cut the designs after drawing them in the software. For those of you not familiar with these machines, they look like printers but with a thin blade instead of an ink jet. After cutting you peel away the excess material, apply it to your fabric with a hot iron, then remove the clear plastic backing. I used flocked HTV so the navy blue material had a velvety texture against the bronze silk. Here’s a test piece showing you what it looks like up close.

Here are some videos of the process.

@freshfrippery

Putting flocked appliqués on my #Jedi librarian #costume for Rebel Legion. #starwars #cosplay

♬ Star Wars (Epic Main Theme) – Samuel Kim

My obi closes in the back with hidden hook and bars. To keep the tabards level I have them sewn to the obi.

As for more explanation about the pattern shape for the tabards/obi and what shapes are acceptable under RL guidelines please refer to my Generic Jedi post. A few important points:

  • There are no shoulder seams. The top portion of the tabards curve from the front to the back.
  • The tabards are angled like a Y. They will not sit right if you just try to have 2 very long rectangles. You can save fabric by hiding the seam behind the obi.
  • The exact dimensions depend on your height and size, but for me I started with a lot of 6″ x 36″ rectangles and cut off extra as needed. You will need 14 rectangles (2 top tabards, 4 bottom tabards, 1 obi, then double everything for a lining). This includes seam allowance.
  • The tabards and obi have 2 layers: sew them right sides together on the long edges and one short edge, flip right side out to sandwich the raw seams, then hem the remaining short edge to your desired length. The hemmed end hides under the obi.
  • I used silk shantung which is lightweight by itself, but got heavy enough with the addition of the appliqués. I recommend using interfacing if you use thin fabric because you will want the tabards to have a decent weight to not flap around when you walk.

To help prevent the tabards from slipping off my shoulders I have a hidden snap on each shoulder.

BOOTS

My boots are the same ones used in my Generic Jedi costume:  “Gabi” boots purchased from Slimcalfboot.com during a sale.  The CRL calls for “low-heeled and closed-toe shoes” for skirts and calf-high brown or black boots if you’re wearing pants. Zippers must be on the inside of the leg if present.

GETTING DRESSED

Finally, here is a quick video of me putting on all the layers! The 3D printed Jedi holocron is from 3D Pro Designs on Etsy. I put my hair up in a bun and have 4 vintage U-shaped hair pins sticking out.

HOW MUCH DOES IT COST?

Your cost will vary a lot depending on what materials you use. I used a lot of wool, silk, leather, and flocked HTV, which raised my costs, but I got my fabrics on sale and reused my boots, which lowered my costs. If you’re on a budget I recommend looking at upholstery or drapery fabric for materials that already come with geometric designs, and sticking to cottons for your tunics. I also got really lucky on a crazy deal for my wool, which should have been the bulk of my cost. I’m also a bargain hunter when it comes to cosplays and go looking for deals on eBay or other places instead of buying everything “new.”

Materials list:

  • Inner tunic: 2 yards of 45″ cotton poly poplin shirting ($5.36 from Fabricmartfabrics.com)
  • Outer tunic: 3 yards of 55″ wool ($16.75 from a “garage sale”)
  • Skirt: 3 yards of 62″ navy twill ($21.58 from eBay)
  • Tabards/obi: 3 yards bronze silk shantung ($41 from Fabricmart)
  • Appliques: 5 sheets flocked heat transfer vinyl: $16.25 from Amazon (affiliate link)
  • Suede pouch: $11.79 from eBay
  • Leather strips: free, from a friend
  • Belt: $5.41 from eBay
  • Dental syringe: $10.37 from Amazon (affiliate link)
  • 2 honey dippers: $6.56 from eBay (I bought 2 in case I make a mistake drilling)
  • Holocron: $27.30 from 3D Pro Designs on Etsy.
  • Thread, hooks and eyes, pens, paint, etc. from stash ~$5

    Total cost (with reused boots and lightsaber): $167.37

If you need to cut corners because of budget the tools and holocron are not needed for approval, but are fun.

Thank you for reading and May the Force Be With You!