Part one, learning from my bodice mistakes, is here. This post is about what I learned while making the skirt the wrong way.
After cutting out the skirt panels, which are really just two large rectangles, one for the front and one for the back, I folded the tops over, stitched them, and then folded them over again to enclose all raw edges. (Have you figured out yet what I did wrong?) Then I pleated them and stitched the top of the pleats in place. (Each long edge of each panel was folded in once because it was the selvage).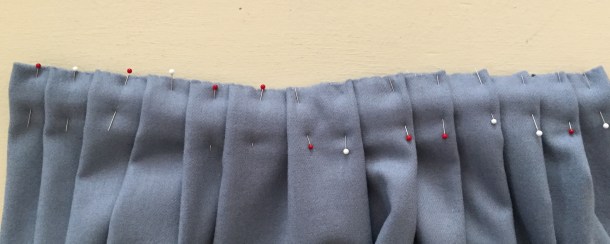
The panels were stitched together at the sides, leaving room for pocket slits. Then the pleated edge of the skirt was sewn to the bottom edge of the bodice, right sides together. (Here my sewing got very sloppy because I was making the kirtle last minute for an event). This is what the interior of the kirtle looked like: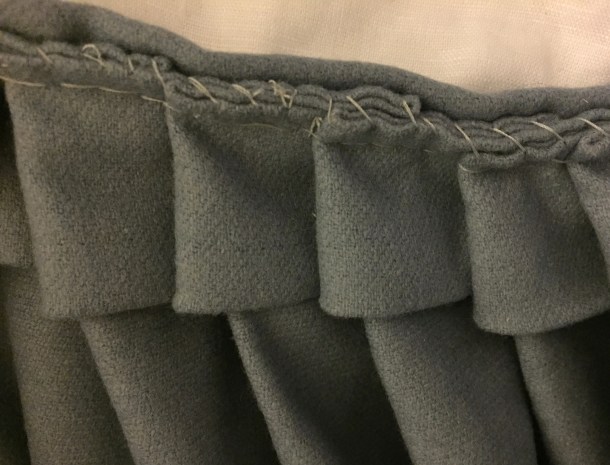
Remember from part one how I realized the worsted wool was too fine for boning, and the reed showed through? Since I had folded the tops of the pleats over twice, the extra bulk showed through on the other side! It wasn’t obvious when the skirt was on a hanger, but once I put it on my stomach pushed the pleats outward, causing a visible line on the outside where I did not want it.
I realized at that point that what I should have done was pleat the skirt panels, attach them to the bodice, then finish sewing the bodice lining over the pleats to enclose the raw edges.
I was too lazy to take it all apart due to all the hand-sewing involved, so I ended up having to unfold part of the pleats and trim off the stitched edge with scissors. Here is the inside again:
I should still trim the raw edge with pinking shears to prevent fraying, but now there is not a bulky line that shows when worn!
Then when hemming I made the mistake of just folding up the bottom a certain number of inches and stitching without pinning and putting it on before sewing because I was in a hurry and thought I had cut things pretty evenly.
Yeah, it wasn’t that even, and wool stretches. So, after my event got rained out and I couldn’t go, I put the kirtle on and had some friends help me look it over so I could re-hem it evenly.
The kirtle is now done, but I have been waiting for a sunny day to take pictures, since I haven’t had a chance to wear it out. All the pictures in this post were taken indoors, some at night, and you can see it made the wool seem like four different colors!
To wear under the kirtle, I made a smock using a pattern from the Tudor Tailor book I bought on Amazon (affiliate link). It is also awaiting proper photos. Meanwhile, here is a teaser picture!


 12-14-19")

initially doing a rolled hem would have been better – the slight bulk would have made the pleats sit nicely. but the wool shouldn’t fray much if it’s properly fullered English wool,,however if it has any synthetic content fraying could be a problem (there are some Italian who come over to england to our reeenactment markets and try to sell their wool, they say its 100 percent wool, but anyone who knows wool knows its not- you tell by touching it)
Thank you for the suggestion! The fabric is real wool so I’m not very worried about it fraying, but I like having “finished” edges.
I looked at your blog and your embroidery is amazing!
Pingback: Tudor Kirtle (Part 3): Kirtle and Smock | Fresh Frippery