Tag Archives: sewing

18th Century Half-Boned Stays (Part 5): How to Do Eyelets

My old wrist injury is acting up, so I have to take a little break from hand-sewing, but since I have a few of the eyelets done, I thought this would be a good time to show how I do them.

This is not necessarily the historically correct way, but the method I find to be sturdy and aesthetically pleasing.

Punching a hole through the fabric weakens it, so I use an awl to poke a small hole, which I widen with a pointed chopstick. I then insert an eyelet through the widened hole, and then use a table-top eyelet/grommet press to set it in place. Finally, I sew over the eyelet with a button hole stitch to make it pretty.

The picture below, from right to left shows:

  1. Mark the hole with a pencil.
  2. Poke the hole with an awl.
  3. Widen the hole with a chopstick.
  4. Insert the eyelet from the wrong side (explained below).
  5. The eyelet set in by the eyelet press.IMG_4422

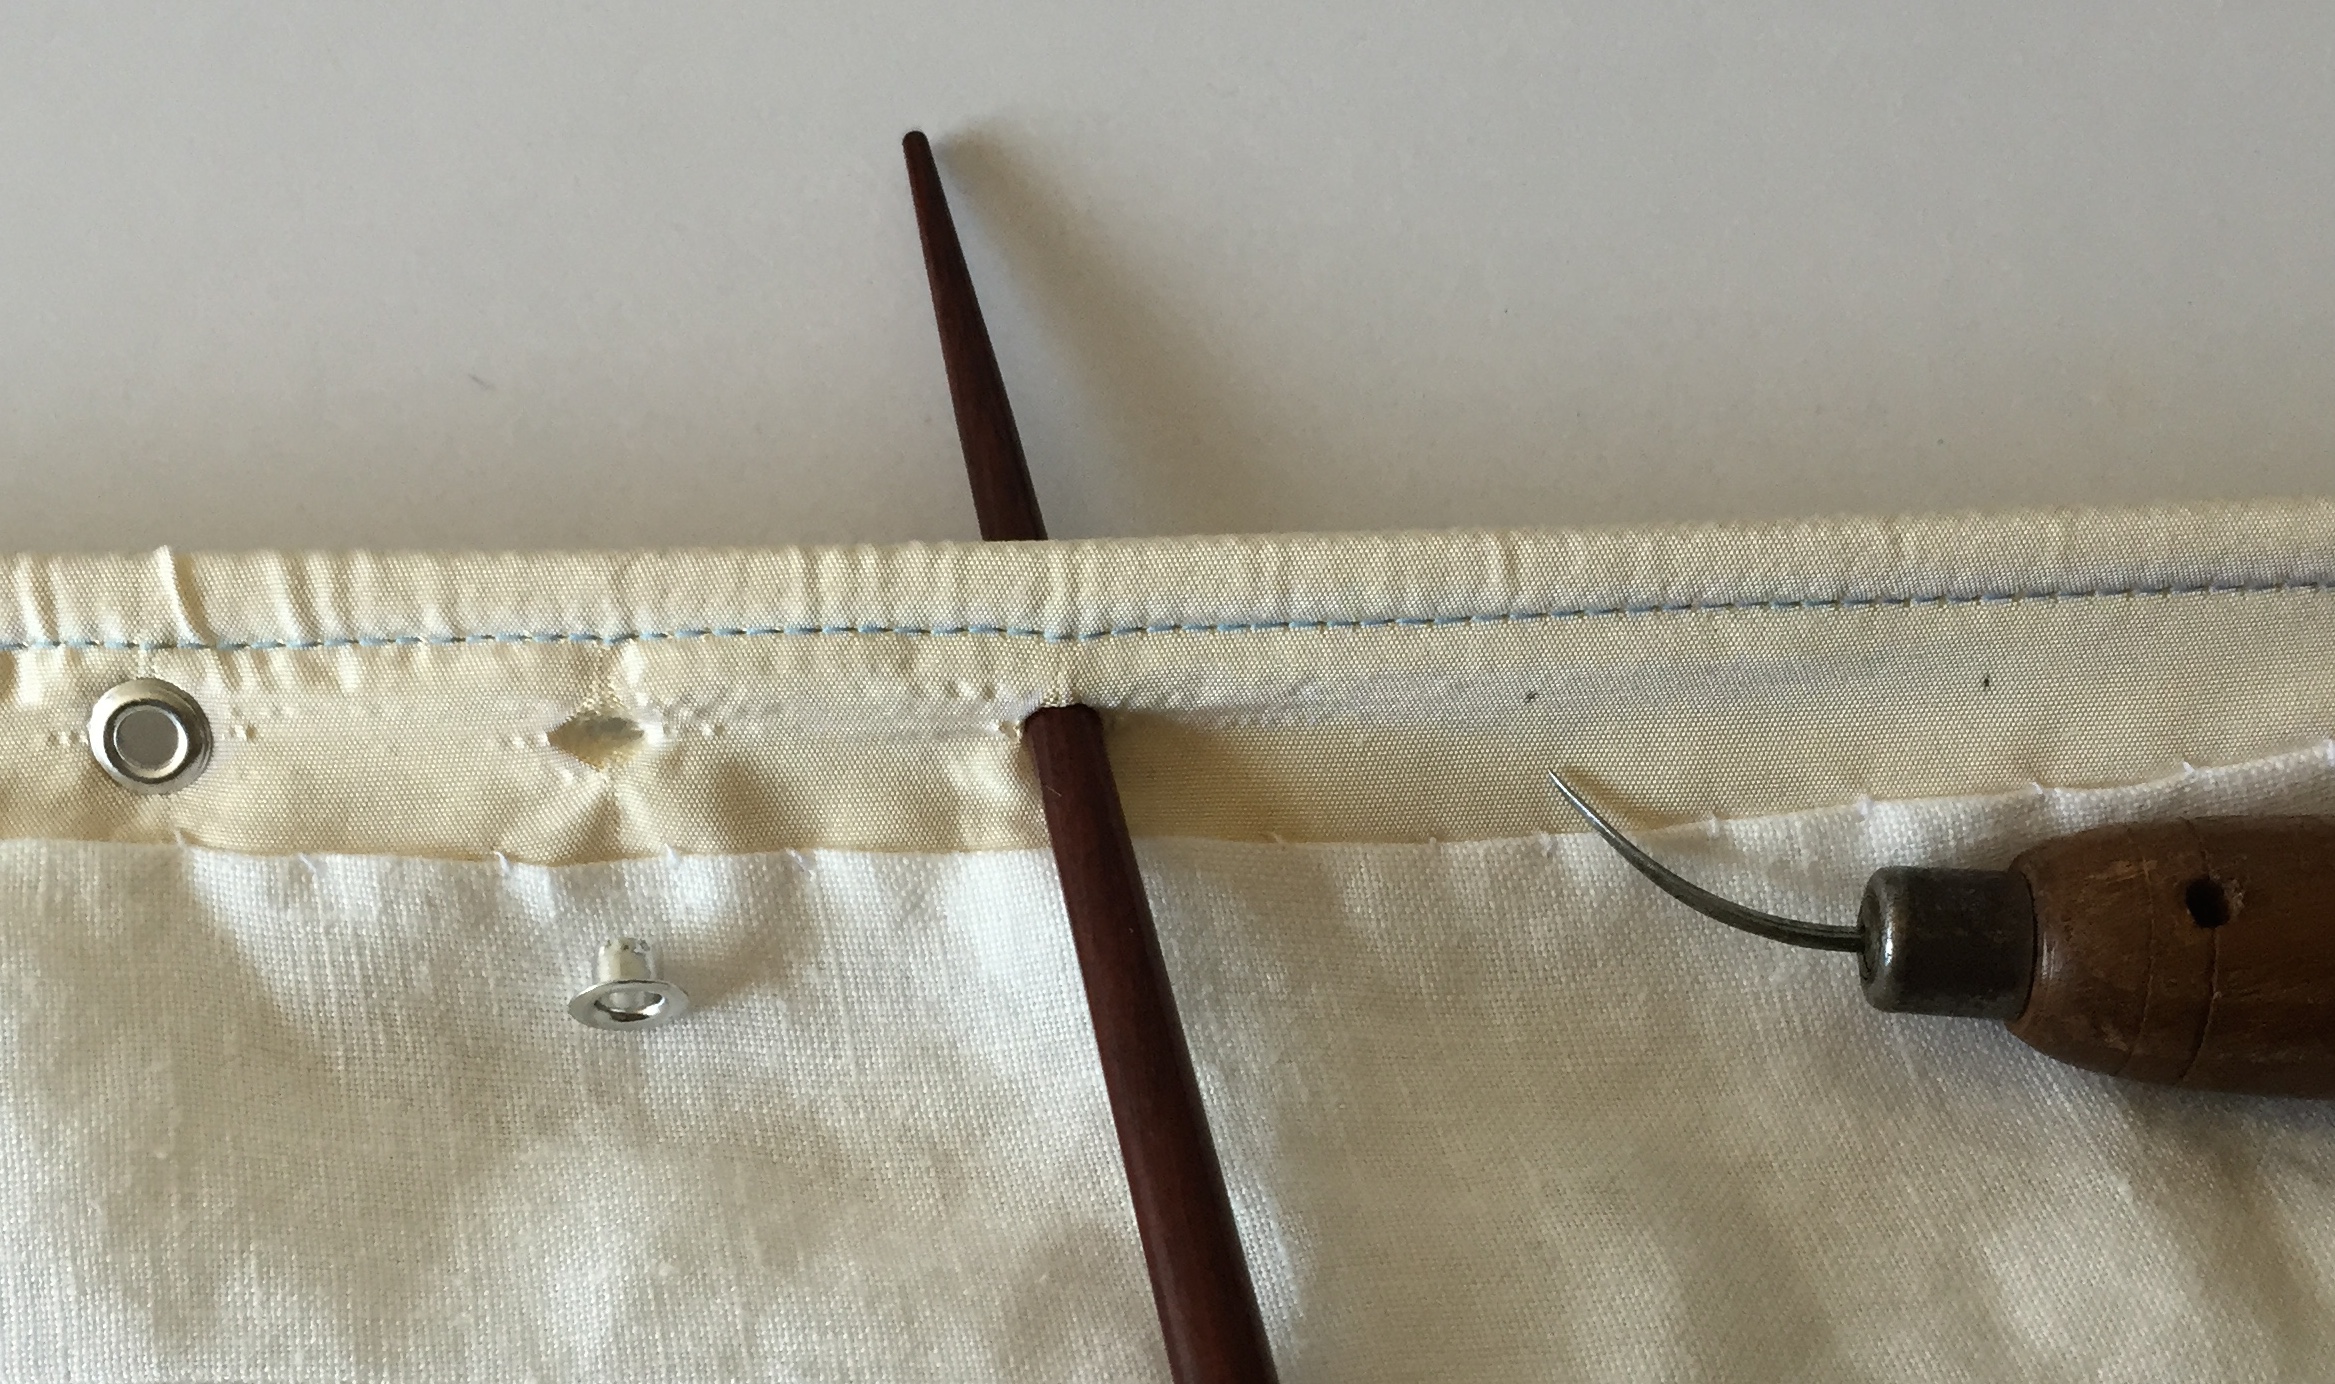
The eyelet is inserted from the lining side, with the flange remaining inside the stays. This results in the outside having a smaller surface area for you to wrap with thread. (If you are making a corset where the metal eyelets will show, you will insert the eyelet in the opposite direction, from the fashion fabric side).

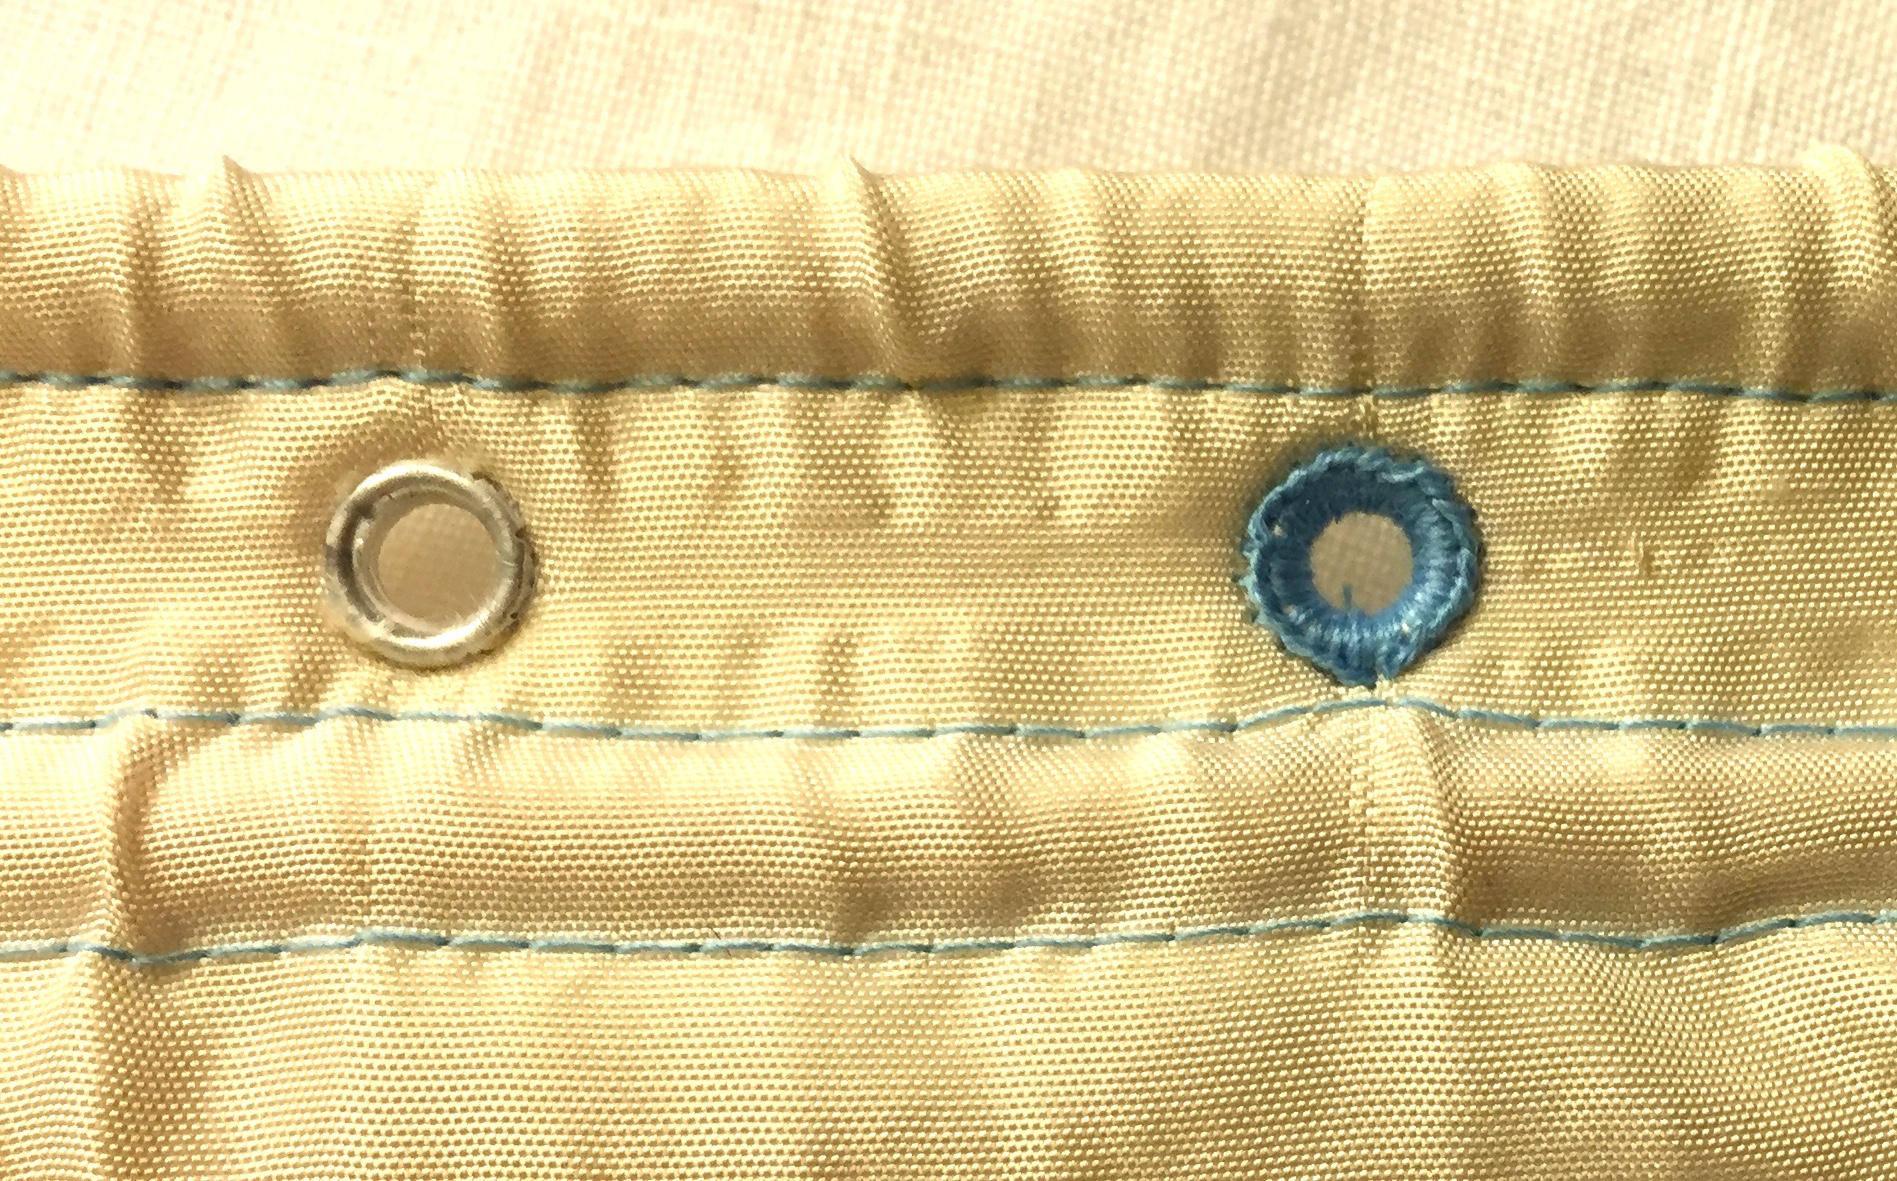
Here is a view from the other side. From left to right you have the widened hole, the eyelet inserted, and the eyelet after being pressed. (There is some puckering in my fabric because I sewed the channels a little too tight for the double reed boning).

IMG_4424
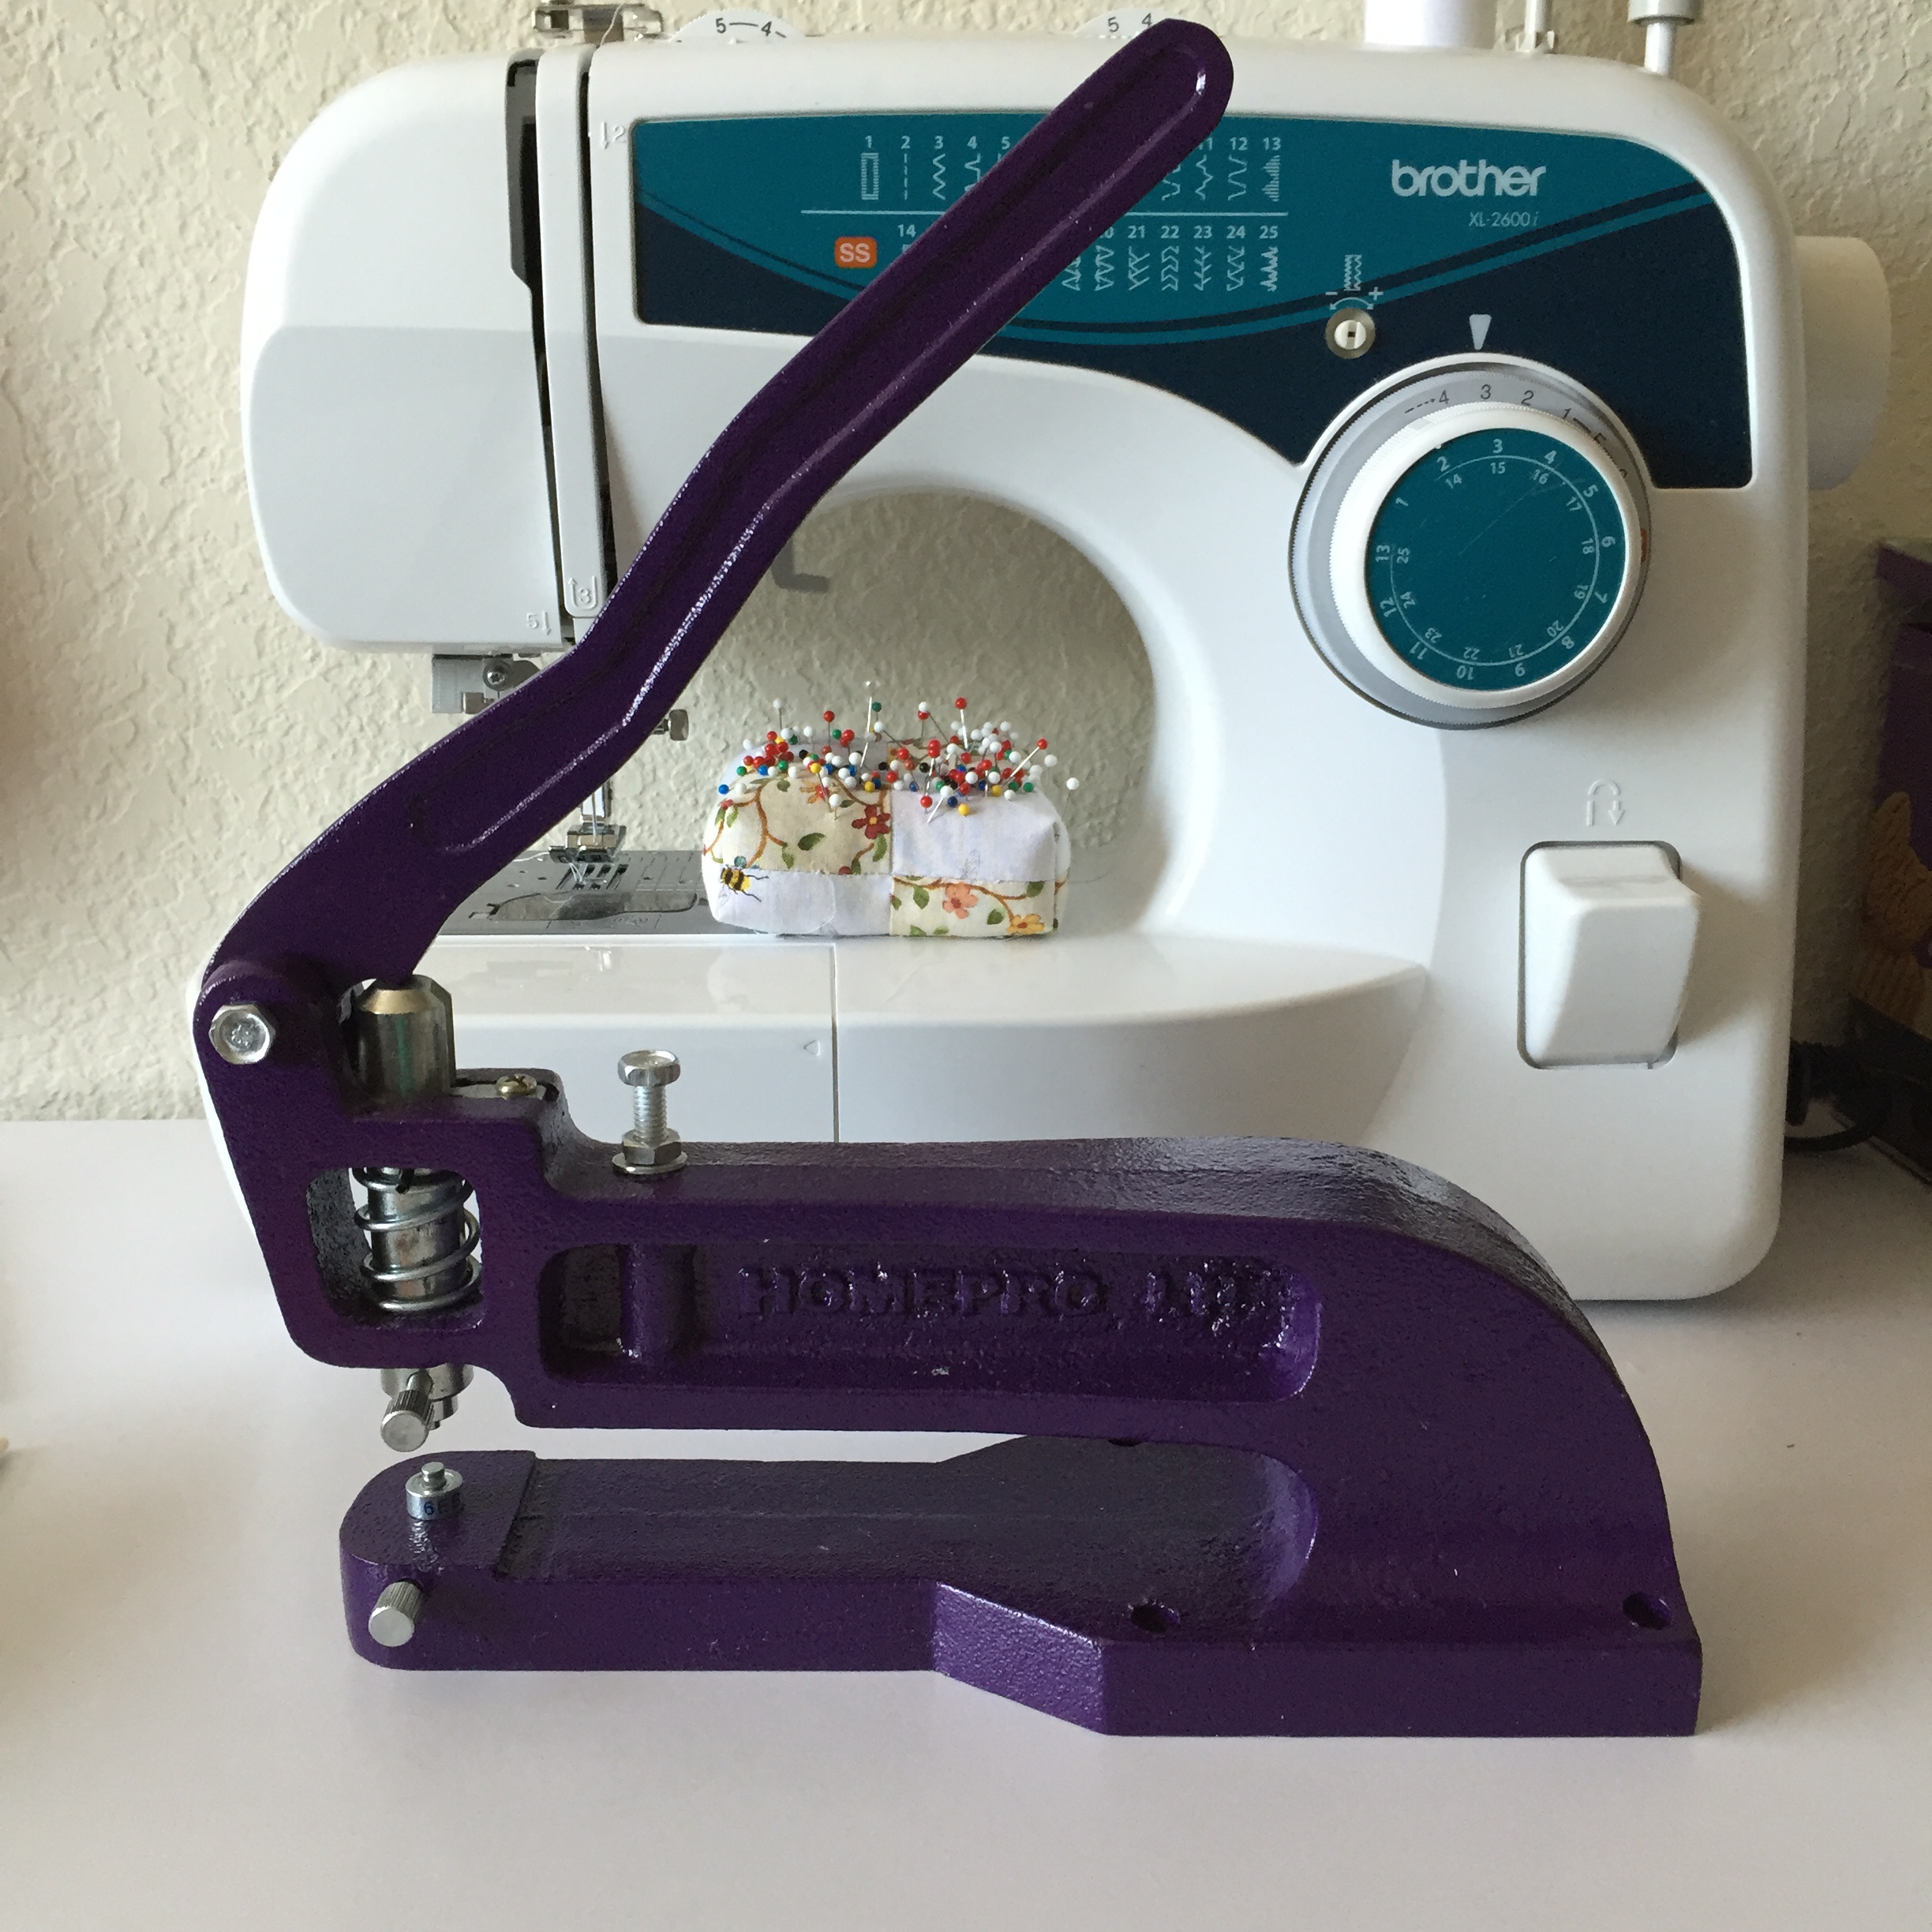
I use a Homepro eyelet setter with a size 6 die. It is quite heavy, and very easy to use. I have trouble applying enough pressure with hand-held eyelet pliers, and find using a hammer awkward, so this is a handy thing to have.

IMG_4426Use a tight blanket stitch over the eyelet to give it a finished appearance. You can use embroidery thread, or sewing thread. I used the latter, folding over a length of thread before threading the needle, resulting in a cluster of 4 threads each time. You can also just cast over with your thread, which is faster than using a blanket stitch, but I prefer the look of the latter.

IMG_4450See parts 1 and 2 and 3 and 4.

Costume College Plans and Sewing To-Do List

Posted on

Here we are in May, and I still have a long list of costumes to make. So far this year I’ve completed a Game of Thrones King’s Landing dress, an Oberyn Martell costume, my Chemise a la Reine and some accessories.  I have outfits planned for Costume College, and just for fun.

Onward!

1. I need to finish my silk stays which have been put aside a few times in favor of other projects.

2. My chemise dress needs a new white petticoat. The ones I wore with it recently were ivory, which work well with the whole ensemble, but if I want to wear the cotton chemise dress by itself I need a white petticoat.

3. For one of the days at Costume College I plan to wear a Downton Abbey Edwardian maid outfit. (It will be nice and comfortable to attend class in it!) I have the vintage laces needed for the apron and cap, but need to purchase the black dress fabric.perso_ph_gwen

4.  Another outfit planned for CoCo is a Victorian bathing suit, which I will wear for the Thursday night pool party. I have the pattern and fabric (a striped wool blend), but I need lining and trim.

b30d550ed57dec7ba89f5f4fe9ed3096

5. Just for fun, and to learn some new skills and work with new materials, I am planning to make Lady Tremaine’s outfit from the new Cinderella movie. Isn’t it so fun? I have been doing some research (for a future post!) and am in the process of accumulating fabrics for the dress. I don’t have a deadline for this outfit because I anticipate it will take a lot of work.

Lady_Tremaine_with_her_daughters

6. I recently acquired some lovely historical reproduction printed cotton fabric and plan to use it for an 1840s fan-front dress.

IMG_4194

7. The 1850s silk plaid dress from last year still needs a belt and silk undersleeves.

It’s an ambitious list; let’s see how much of it gets done for 2015!

DIY Oberyn Martell-inspired Costume

I had a number of months notice for the recent Game of Thrones wine-tasting event, so I was able to sew my dress from scratch. I had a little less notice for my husband’s outfit, since he never goes with me to costumed events, but he was swayed by the wine and cheese. Given the time crunch, I had to get creative about upcycling some items into a costume inspired by Oberyn Martell.

I chose the Prince because essentially he wears a very fancy bathrobe. That is easier to fit than some of the more tailored things worn by the other characters, and definitely a lot easier to make than armor.

martellI needed 3 main pieces: a yellow robe, orange shirt, and snakeskin belt. I decided to buy mundane clothing as a base and modify them. Given that my husband probably intended to only wear the outfit once, I did not want to put a huge amount of time and money into it.

I did not have time to go hunting in brick-and-mortar thrift stores, so I went to the world’s largest garage sale – eBay. Although most of the gold bathrobes were very thin polyester “silk” robes, or heavy terrycloth toweling robes, I got lucky and found something in between. I purchased a gold patterned satin robe that was lined with fleece (perfect for the cold wine cellars).  Here it is before I started cutting into it.

IMG_3780It was a little shinier than I wanted, but the Prince does wear some shiny things.

martell2I also purchased a men’s orange dress shirt with a standing collar, and a snakeskin-print leather belt.

(Update 10/12/15: Amazon sells the same shirt I used. Affiliate link:  Ed Garments men’s banded collar shirt in “rust” color).

The changes I made:

  1. I removed the collar and belt of the robe, and cut the neckline down to expose more chest!
  2. I put wide gold contrast bands around the opening of the robe and the cuffs using leftover taffeta from my gown.
  3. I cut off some of the orange shirt’s collar, and also widened the neckline into a V.
  4. I put skinny gold contrast bands around the opening of the shirt. Since the sleeves and bottom of the shirt were not going to show, I left all the modern plastic buttons on.
  5. I purchased iron-on embroidered patches reminiscent of the sun patches on Oberyn’s robe, and placed 10 of them down the front and on the sleeves of the robe.
  6. I sewed gold buttons onto each of the patches.

DSCN1413I originally planned on removing the cuffs and making the sleeves more fitted, in order to more closely resemble Oberyn’s robe, but my husband said he wanted to keep the cuffs and baggy sleeves. He also asked for the buttons to be on each patch, while the TV version has the metal stud embellishments on some of the embroidery only.DSCN1478 If this was a more serious costume, I think leggings and boots would have been more appropriate, but again, it didn’t make sense to buy boots for a one-time use. Besides, my husband likes to dress casually, and having him wear his own shoes and pants with a fancy robe seemed like a good compromise.

My costs went up because I had to pay shipping for everything, but if you have the time to go thrift-shop hunting you may be able to get a better deal. Nearly everything is from eBay.

  • Heavy gold robe: $19.99 + $9.50 shipping
  • 10 embroidered patches: $15.70 + $2.75 shipping
  • Orange button-down shirt: $6.00 + $3.00 shipping
  • Real leather (but faux snakeskin) belt: $5.95 + $0 shipping
  • Buttons: from the stash

Total: $62.89

Game of Thrones Kings Landing Dress

A few days ago I attended the Game of Thrones-themed Dance of Ice and Fire hosted by PEERS.

I made a dress using the McCall’s 6940 pattern, which is inspired by the wrap dresses that Cersei wears.  I am not quite finished, because I want to add more embroidery to it for when I wear it to the Game of Thrones wine-tasting hosted by the GBACG at Castello di Amorosa.

The lighting is not the best at PEERS, so forgive the darkness of the photos. I plan to use a nicer camera in a few weeks to take some more detailed pictures of the fully finished dress.

IMG_3734IMG_3717

The sleeves are quite generous! Some other guests at the party used the same pattern, and we had a lot of fun flapping them around.IMG_3721

The party was at an Elks Lodge, so the decor was quite appropriate.

IMG_3735

I made a few alterations to the pattern:
  1. The hip gores were very low (around my thighs) so I raised them to be more like the costumes on the TV show. I think I raised mine a little high; an inch lower would have been better.
  2. I added a contrast band around the neckline.
  3. I found the 3 ties used to close the wrap front a little distracting, so I used hidden ties and a belt to hold the dress shut.

Overall, it was a good pattern and I recommend it.

In a few weeks I hope to post more details about construction and close-ups! First, I need to make an Oberyn Martell costume for my husband.

Happy New Year! (and New Dress Form!)

Happy New Year everyone!

This morning the Fedex truck rolled up to my house with a present from my husband: a new dress form! I had been telling him that I was looking for a proper dress form. What I’ve been using for a while, bought years ago when I didn’t know any better, was advertised as a “dress form,” but was really a plastic mannequin with a lightly padded cover. I had to slide pins in sideways, and it did not squish like a real body. The boobs were very hard, and in an odd place. The mannequin was useful for hemming, and as a starting point for mock-ups, but I had to do a lot of fitting on myself.

Since I’ve gotten more serious about historical costuming and having underpinnings, I wanted a dress form that I could pad up, then squish down with a corset, or even maybe put bean bag boobs on. To accomplish that I needed to find a very small mannequin – smaller than me. I had looked at child-sized ones because they were flat-chested, but they were too short. I told my husband that it can be hard to find a size 0 adult dress form, but I was considering one I found on Amazon. Isn’t it nice when husbands listen, even when they’re saying they don’t know what you’re talking about?

Here she is! She’s fully-pinnable, with magnetic removable shoulders and a very heavy wheeled base. My old one was on a wooden tripod and not too stable.

IMG_3547She’s got a butt, instead of a mysterious smooth cliff.

IMG_3548

I like that there are visible seams in the linen cover, which will help me keep things straight.

IMG_3549

She’s quite an improvement over what I had before and I’m glad I get to start the new year with a nice new dress form!

1850s Plaid Silk Dress for Dickens Fair

My next big project was supposed to be a gown for the PEERS Game of Thrones ball in February, but I’ve been distracted by my 18th century stays and now, a new 1850s plaid silk dress for the Dickens Fair.

I wasn’t planning to make a new dress for the fair, but then I ran across some lovely plaid silk for a bargain price of $60 for 6 yards of 54 inch fabric! It is a dupioni and not a taffeta but it’s not too slubby, and the busy pattern and dim light of Dickens will make it look nice.

Here are a couple sneak peeks.

Cartridge pleats! The skirt has its waistband, placket, hooks and eyes, and pockets. It still needs to be hemmed and trimmed. This was my first time doing cartridge pleats. I was originally planning to knife-pleat the skirt for speed, but then was home sick for 2 days with a cold, so what else can one do when Netflix is playing?

IMG_3017The pagoda sleeves are trimmed with satin ribbon.

IMG_3021The bodice is in progress. I still need to iron flat the seams, put in darts and closures, and do a lot of finishing. Matching curved plaid that isn’t symmetrical is driving me nuts! One part of a seam will match, and another not.

IMG_3022I had to pretty much redraft the pattern I’m using (Past Patterns 702), which was not designed for someone with my shape, but I will make a more detailed review in another post.

18th Century Half-Boned Stays (Part 1)

I have decided to make some 18th century stays, in preparation for making a chemise a la reine for April 2015, as part of the same group that have been 1830s Romantics and Gibson Girls!

I am using JP Ryan’s Half-Boned Stays pattern, and planning to bone with reed cane, both of which I purchased from Wm. Booth Draper.

stays0Currently I am past the mock-up phase and have cut out my pieces, and I’m getting ready to start sewing today (unless Costume ADD strikes! I admit I have been spending a lot of time online, looking at pictures of plaid dresses).

I have heard of people making mock-ups out of cardboard, which seemed like a nifty way to save fabric and avoid boning a mockup since the cardboard was so stiff. Plus taping is much easier than sewing, right?

It was a good experiment, but it didn’t work out too well for me. I did learn a few things though for the future, although I doubt I will be repeating this:

1. Don’t use masking tape. Try duct tape; it’ll hold better.

2. Don’t use super stiff cardboard. It won’t bend to fit you, even if you have a boyish figure.

3. Use cardboard pieces large enough that you can cut the pattern pieces out with the corrugated channels in the same direction as your boning.

4. Since you are taping, not sewing, don’t forget to take out the seam allowances in the pattern when cutting out the cardboard. I ended up having to cut the pieces down a bit, which negated some of the time savings I was counting on.

Here are my cardboard stays:

stays1I couldn’t get it to conform to my body well enough to be a proper mock-up, but it did give me enough of an idea that I felt comfortable cutting out the lining and putting it together like a second mock-up.

stays2The lining is made of linen scraps left over from my 1920s Daisy Dress.

I’ve cut out the interlining, which is white cotton duck, and the cover fabric, which is a cream-colored silk taffeta. The silk is thicker and stiffer than your usual taffeta, and was a remnant, so I decided it was perfect for this project. Here are a few pieces waiting to be sewn:

stays3This is my first foray into stays and corsetry. Wish me luck!

Gatsby Picnic and the 1920s Daisy Dress

Another lovely Gatsby Summer Afternoon has come and gone! I made a new dress this year, and although I did not have the name in mind when sewing, I am now calling it the Daisy dress. It’s yellow and white, with daisy lace around the bottom, plus Daisy is a character in the Great Gatsby. I hope I am nowhere near that frivolous, though!

Here I am in front of the Dunsmuir Hellman House in Oakland, CA. The picnic is held on the lawn, but there is a tour of the house for part of the day. Lots of people also bring their lovely vintage automobiles and they are parked on the lawn to contribute to the atmosphere.  There is also a live band, dance floor, performances and contests.

IMG_2582

The shoes are American Duchess. My hat is a straw cloche that I bought from eBay and redecorated with scraps from the dress, plus a vintage flower.

IMG_2564

IMG_2643

My dress is primarily linen, with chiffon sleeves and accents of cotton, dotted net and rayon lace. I used the 1925 Zig Zag Dress pattern from Decades of Style #2502. The pattern is well-made, but perhaps runs a little large, unless you like the looser look.  I prefer something a little more fitted, so I ended up taking the bust in a few inches. The dress is made stitching all the gored skirt panels together, then edge-stitching that to the bodice.

IMG_2647

I liked how cool the linen was in the heat, but linen wrinkles like crazy! I had all the skirt trimmings but didn’t have my swatch with me when I had a impulse stop to get chiffon from the fabric store when passing by. I had to eyeball the color, then run out after a few minutes. It doesn’t look too off in the sunlight, but in indoor lighting the chiffon looks too orange.

I made a few little modifications in the pattern. I bound the neckline, then made a bow, whereas the pattern calls for a loosely-draped necktie. I also used yellow thread to make a decorative zig-zag pattern over the shirred portions near the shoulder seams.

DSCN1300

I also made some little tweaks to the sleeve pattern. I added 2 inches, since I have long arms, and used French seams. I also omitted the snaps on the cuffs, and made them a continuous band.

DSCN1315

Each year I think 1930s would be more flattering, but the 1920s shape is easier to sew. Then I sabotage myself by choosing a lot of embellishment! I spent a long time pinning and sewing down all the decorations around the waist and hem. The bottom of the skirt is decorated with pale yellow dotted netting, surrounded by triangles of bias tape. The hem is polished cotton with rayon daisy lace.

DSCN1319

As you can see here, I left the bottom layers unattached so the look wouldn’t be so flat, and so I can slip an iron underneath the netting to access the linen.

DSCN1309

I reused the slip from last year’s Gatsby dress.

DSCN1296

Dress project cost was ~$57:

  • 3 yards linen + 1 yard chiffon: $26.10
  • 10 yards bias tape: $7.49
  • Pattern: $18
  • Hem trimmings: ~$5 (the netting, polished cotton and lace all came together, and were purchased as part of a bundle with other items, so I this is an estimate).
  • Flower: 50 cents (it was part of a $3 cluster).

I’m not counting the shoes, hat and slip in the total cost.

Kathy of Stuff I Sew also made a cute sleeveless version of the dress from the same pattern. Are all these ladies lovely? Samantha is wearing a yellow vintage dress, and Amanda and Breanna made theirs. Breanna’s dress is also a Decades of Style pattern.

IMG_2642

You can see more pictures from the picnic at Flickr.

The Hopeless Romantics Invade Gaskell Ball, 1830s Style!

There were so many beautifully made gowns at Gaskell Ball. Most of us used the same pattern, but I loved all the variations in fabric choice and trimming.

We made a lovely rainbow!

Image

And had a ton of fun!

Image

Here I am with the other pale-colored ladies.

Image

Kim had such a cute doll-like shorter dress.

Image

Natalie of Frolicking Frocks looked just like a fashion plate.

Image

Breana of Mothball Fleet had such a daring and darling color combination, with perfect piping.

Image

Elizabeth had a bodice with impressive detailing, and a padded hem.

Image

Amanda’s dress looked great in motion.

Image

Samantha had such a cute bow sash.

Image

Jean-Anne went for a bold print that worked out great.

Image

Jenny looked elegant in white.

Image

Christina of The Laced Angel used an old sari, to great effect.

Image

Kathy of Stuff I Sew had an impressively smocked dress. Read the details here!

Image

Monica had charming little fans and tucks on her dress.

Image

Kaila had really lovely piping and pleats.

Image

Cassandra’s dress reminded me of a Disney princess.

Image

You’ve seen mine, so here’s a silly photo.

Image

I am looking forward to next year’s theme!

1830s Romantic Dress (Part 6): Finished Dress and Hair

Last night I had a fantastic time dressing up with a large group of other ladies wearing Romantic Era gowns (and crazy 1830s hair) at the Gaskell Ball in Oakland, CA. (I will be posting photos of everyone in my next entry!) I finished my dress with a few days to spare, but did not have time to work on the hair until the last day.

Image

(I didn’t have time to make a new petticoat, and the old one is a little longer and less poofy than I would like, but that is a project for next time).

Image

I was very pleased with the way the sheer sleeves came out. I was fretting before about how to pattern them, then went for the easiest approach. I took a yard of fabric, sliced it down the middle, French seamed the pieces to make 2 tubes, and gathered the ends into the armhole or wrist openings.

Image

The bodice is pleated and embellished with pink and green embroidered lace and little pink ribbon flowers with pearls in the centers. The back of the neckline is also pleated.

1830s bodice

The cuffs are made with the same embroidered lace I have on the bodice neckline. The waist is trimmed with a green scrap of fabric (leftover from a Titanic, and then Gatsby project). The pearl and rhinestone buckle was purchased from Britex.

Image

The hem is trimmed with embroidered tulle lace, as you previously saw.

IMG_1801

I struggled with the hair, and it is a little sloppier than I wanted, but I think it’s a decent first try. A  number of people asked me if it was my real hair!

Image

I forgot to buy a foam head, so I used a stuffed toy monkey. I bought a long black wig, and split it into 3 sections. I made 2 fat braids and pinned them into Princess Leia-style cinnamon buns.

DSCN0467

The middle section was braided and left for the moment.

I then used another large piece of fake hair that I split into 2 braids (with wire braided in). I formed pretzel loops and sewed that to the wig, and then used the little braid from the main wig to wrap around the base. I pinned a fake peony in the back, and put some little roses and butterflies into the buns.

DSCN0470

I decorated the front with a little fake bird, a birdcage and some feathers.

DSCN0474

I had a lot of fun with this project!

Final cost rundown (not including fake hair):

Silk taffeta, linen lining, hook-and-eye tape, bird, feathers, flowers, cage: from the stash

Tulle lace: $27.96

Floral lace $11.91

Organza: $3.10

Pearl buckle $9.73

Total $52.70*

*well, I did spend about $200 on silk a few years back, but we’re talking new expenses here. =)