I made this fantasy costume back at the start of the year and realized I never wrote up a post! With the 20th anniversary of the Lord of the Rings films coming up, this is a good time to finally blog about this dress with elven vibes. I had fun walking around in nature, pretending to be regal, and hope to wear it to an actual event some time!
I made the main body of the dress using an embossed navy blue velvet, and the cape is a sheer netting with silver glitter stars.
I created moon phase appliqués out of silver glitter heat transfer vinyl with my Silhouette machine to decorate the front of the dress. (If you’re not familiar with HTV, the material is on a plastic backing. You iron on the appliqué and then peel off the plastic backing, revealing your design).
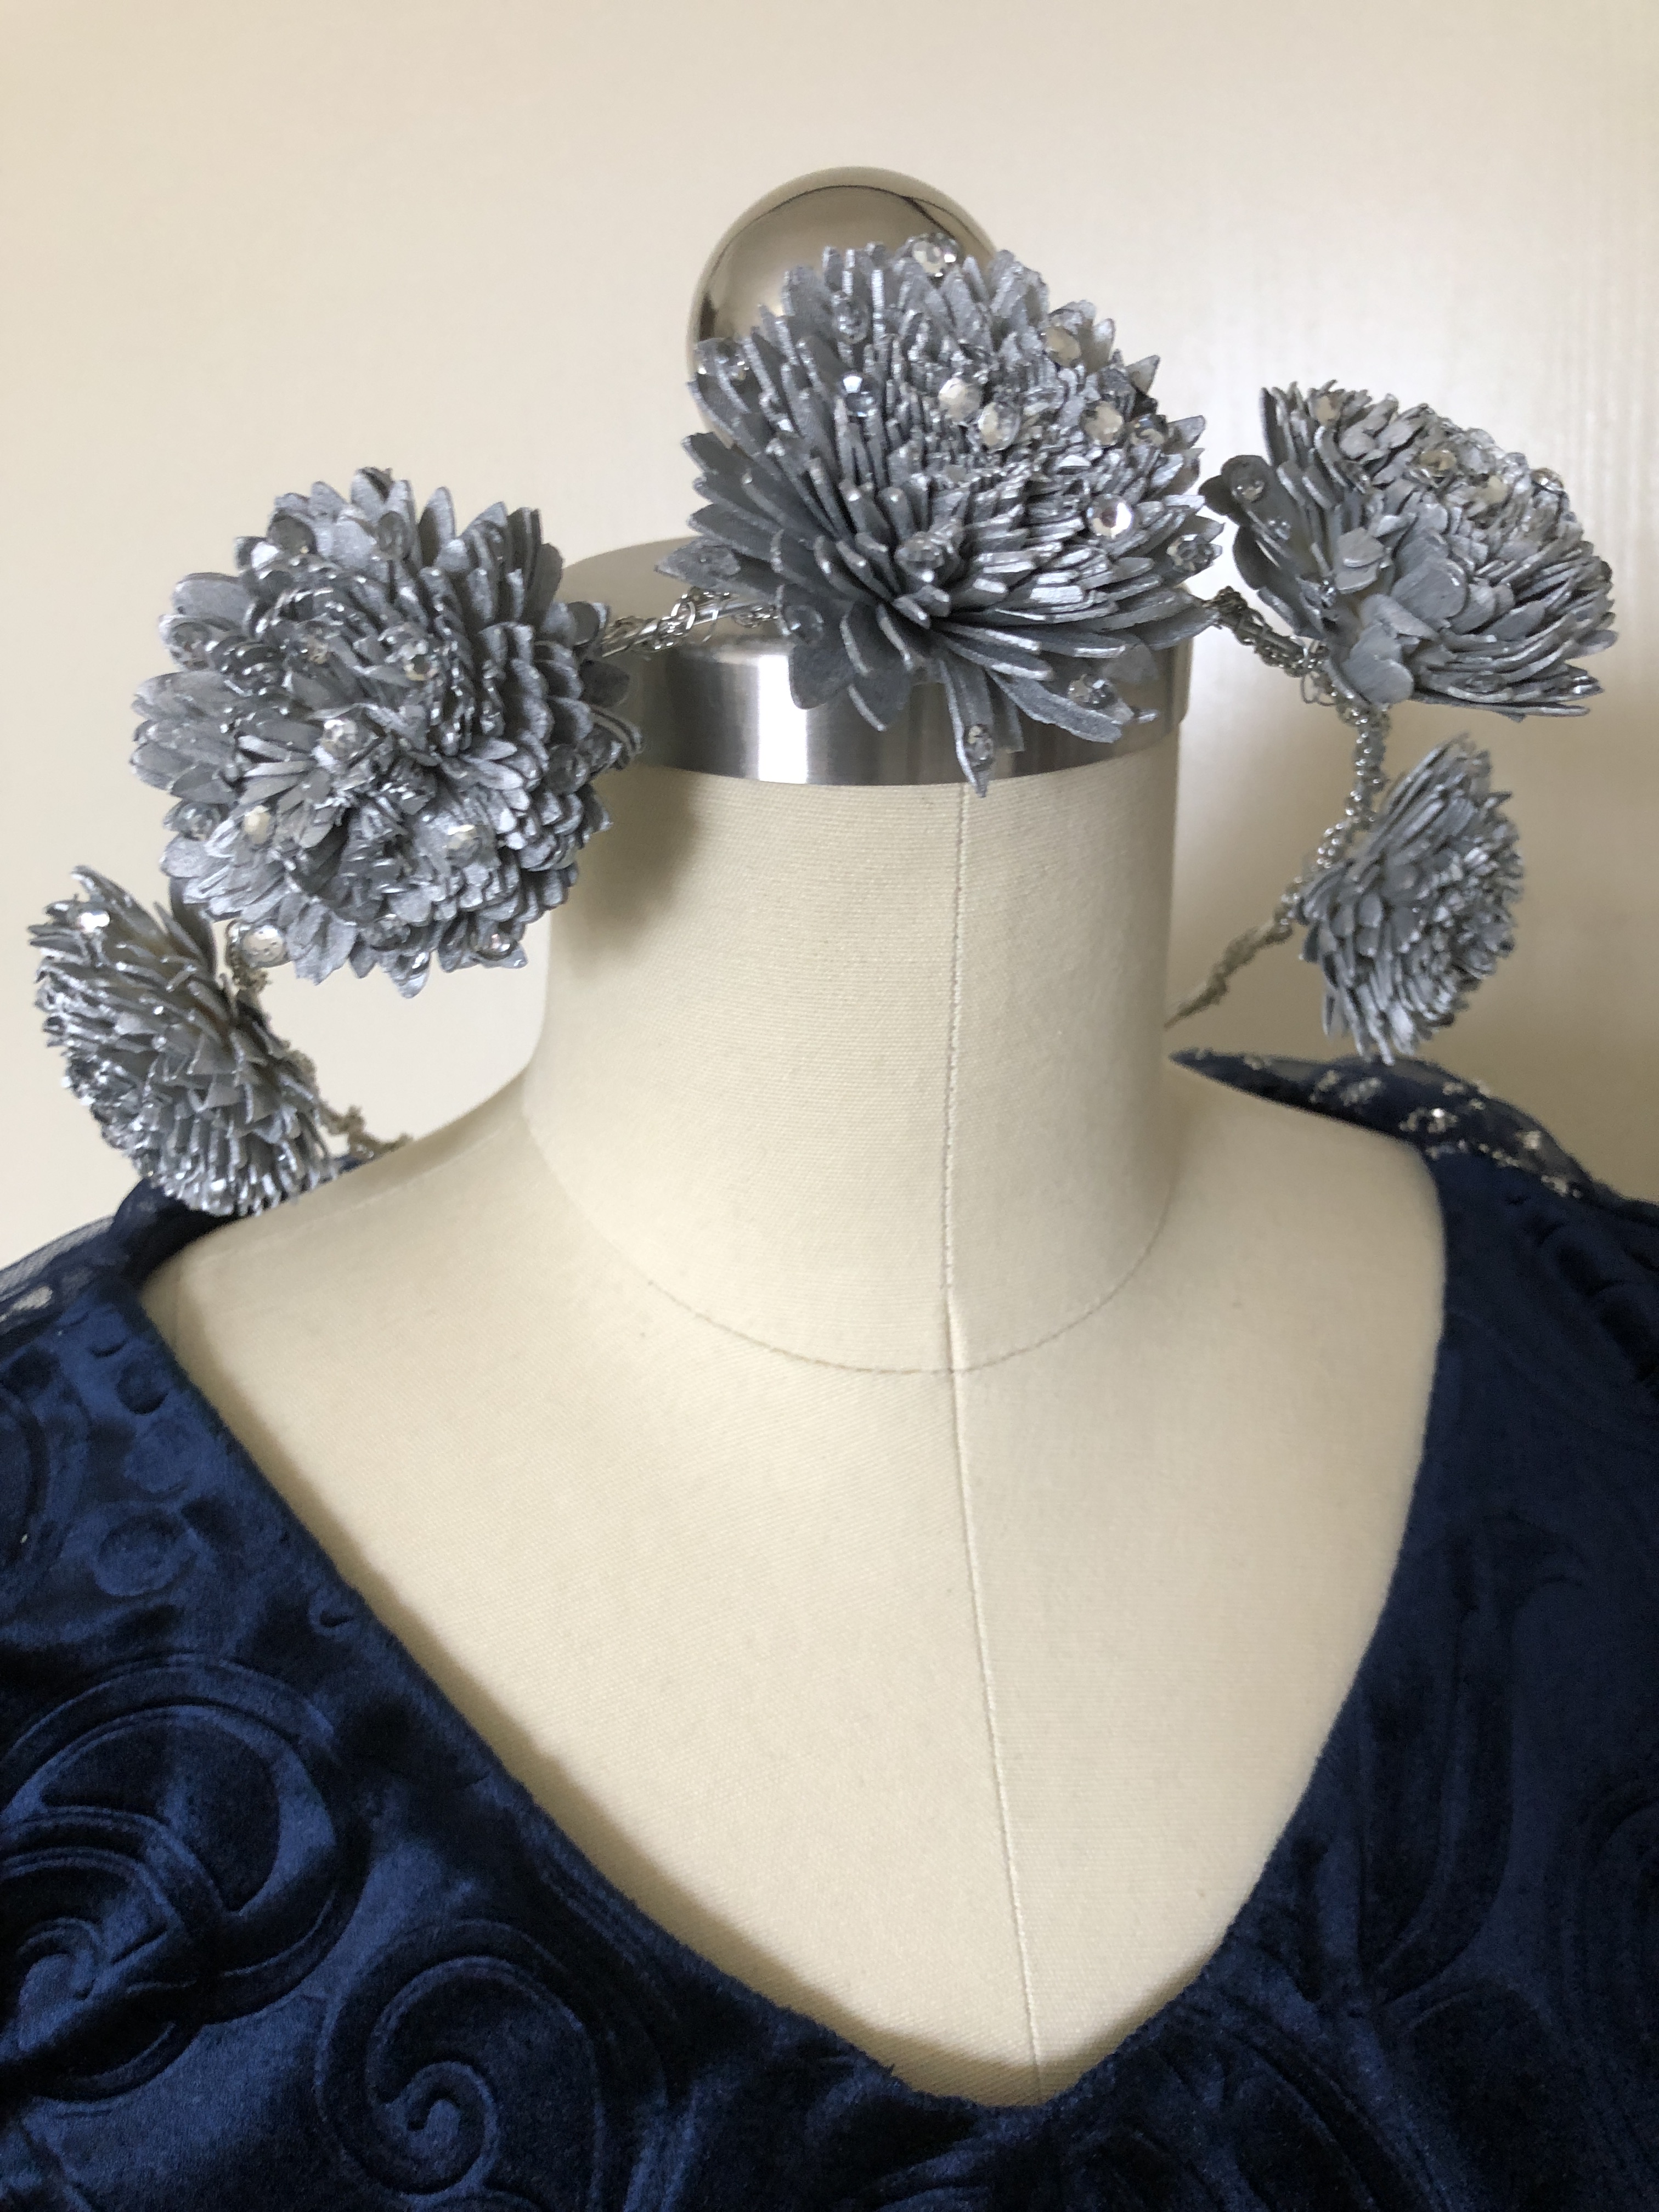
I glued crystals around the moons using E6000 Fabri Fuse (which is not the same as regular E6000). I glued larger crystals onto a piece of grosgrain ribbon to make the belt.
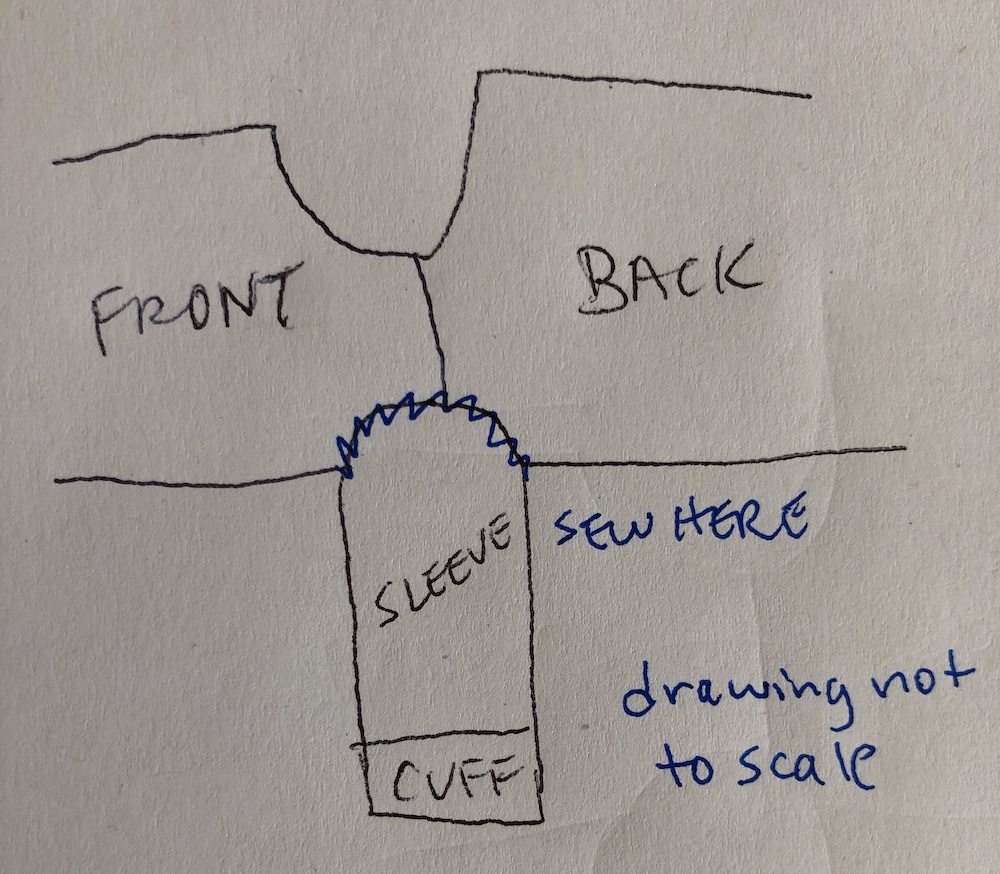
The pattern I used is Butterick B4827. It is a princess-seamed fantasy dress and I made very few modifications. I turned the lace-up back into a zipper back, and I added the cape. The cape is a long rectangle, pleated into the back neckline, with a cut open center slit part way down the back to access the zipper.
The front of the cape is sandwiched into part of the armscye shoulder seam, with excess removed, as explained in this video.
I made my flower crown by spray-painting sola wood flowers with Rustoleum silver spray paint. The base of the circlet is silver floral wire, and the flowers and a necklace are attached to the base using 26 gauge wire. I also glued crystals onto the petals using E600 Fabri Fuse. This video shows the process:
I have a few scraps left of the velvet and I am planning to make a pouch for carrying items. In my haste to whip up the long seams of this dress quickly, I serged all the panels together and forgot to add pockets!
Materials used:
4 yards embossed navy velvet: $52.59 including tax and shipping from Amazon. The blue is sold out but there are other colors like black and ivory still available from Amazon (affiliate link). You can also find it at Fabric.com
2 meters glitter star fabric: $19.84 including shipping from Aliexpress
Crystals, glue, flowers, thread, ribbon, wire, paint, etc. were items I already owned and mostly left over from other projects, but I’d estimate if I had to go buy that all new from a craft store I’d spend ~$20.
Total cost: $72.43 out of pocket plus miscellaneous stash items.
Thank you for reading! I took these photos on a cloudy day. Maybe one day I’ll get a chance to take some atmospheric night time photos!
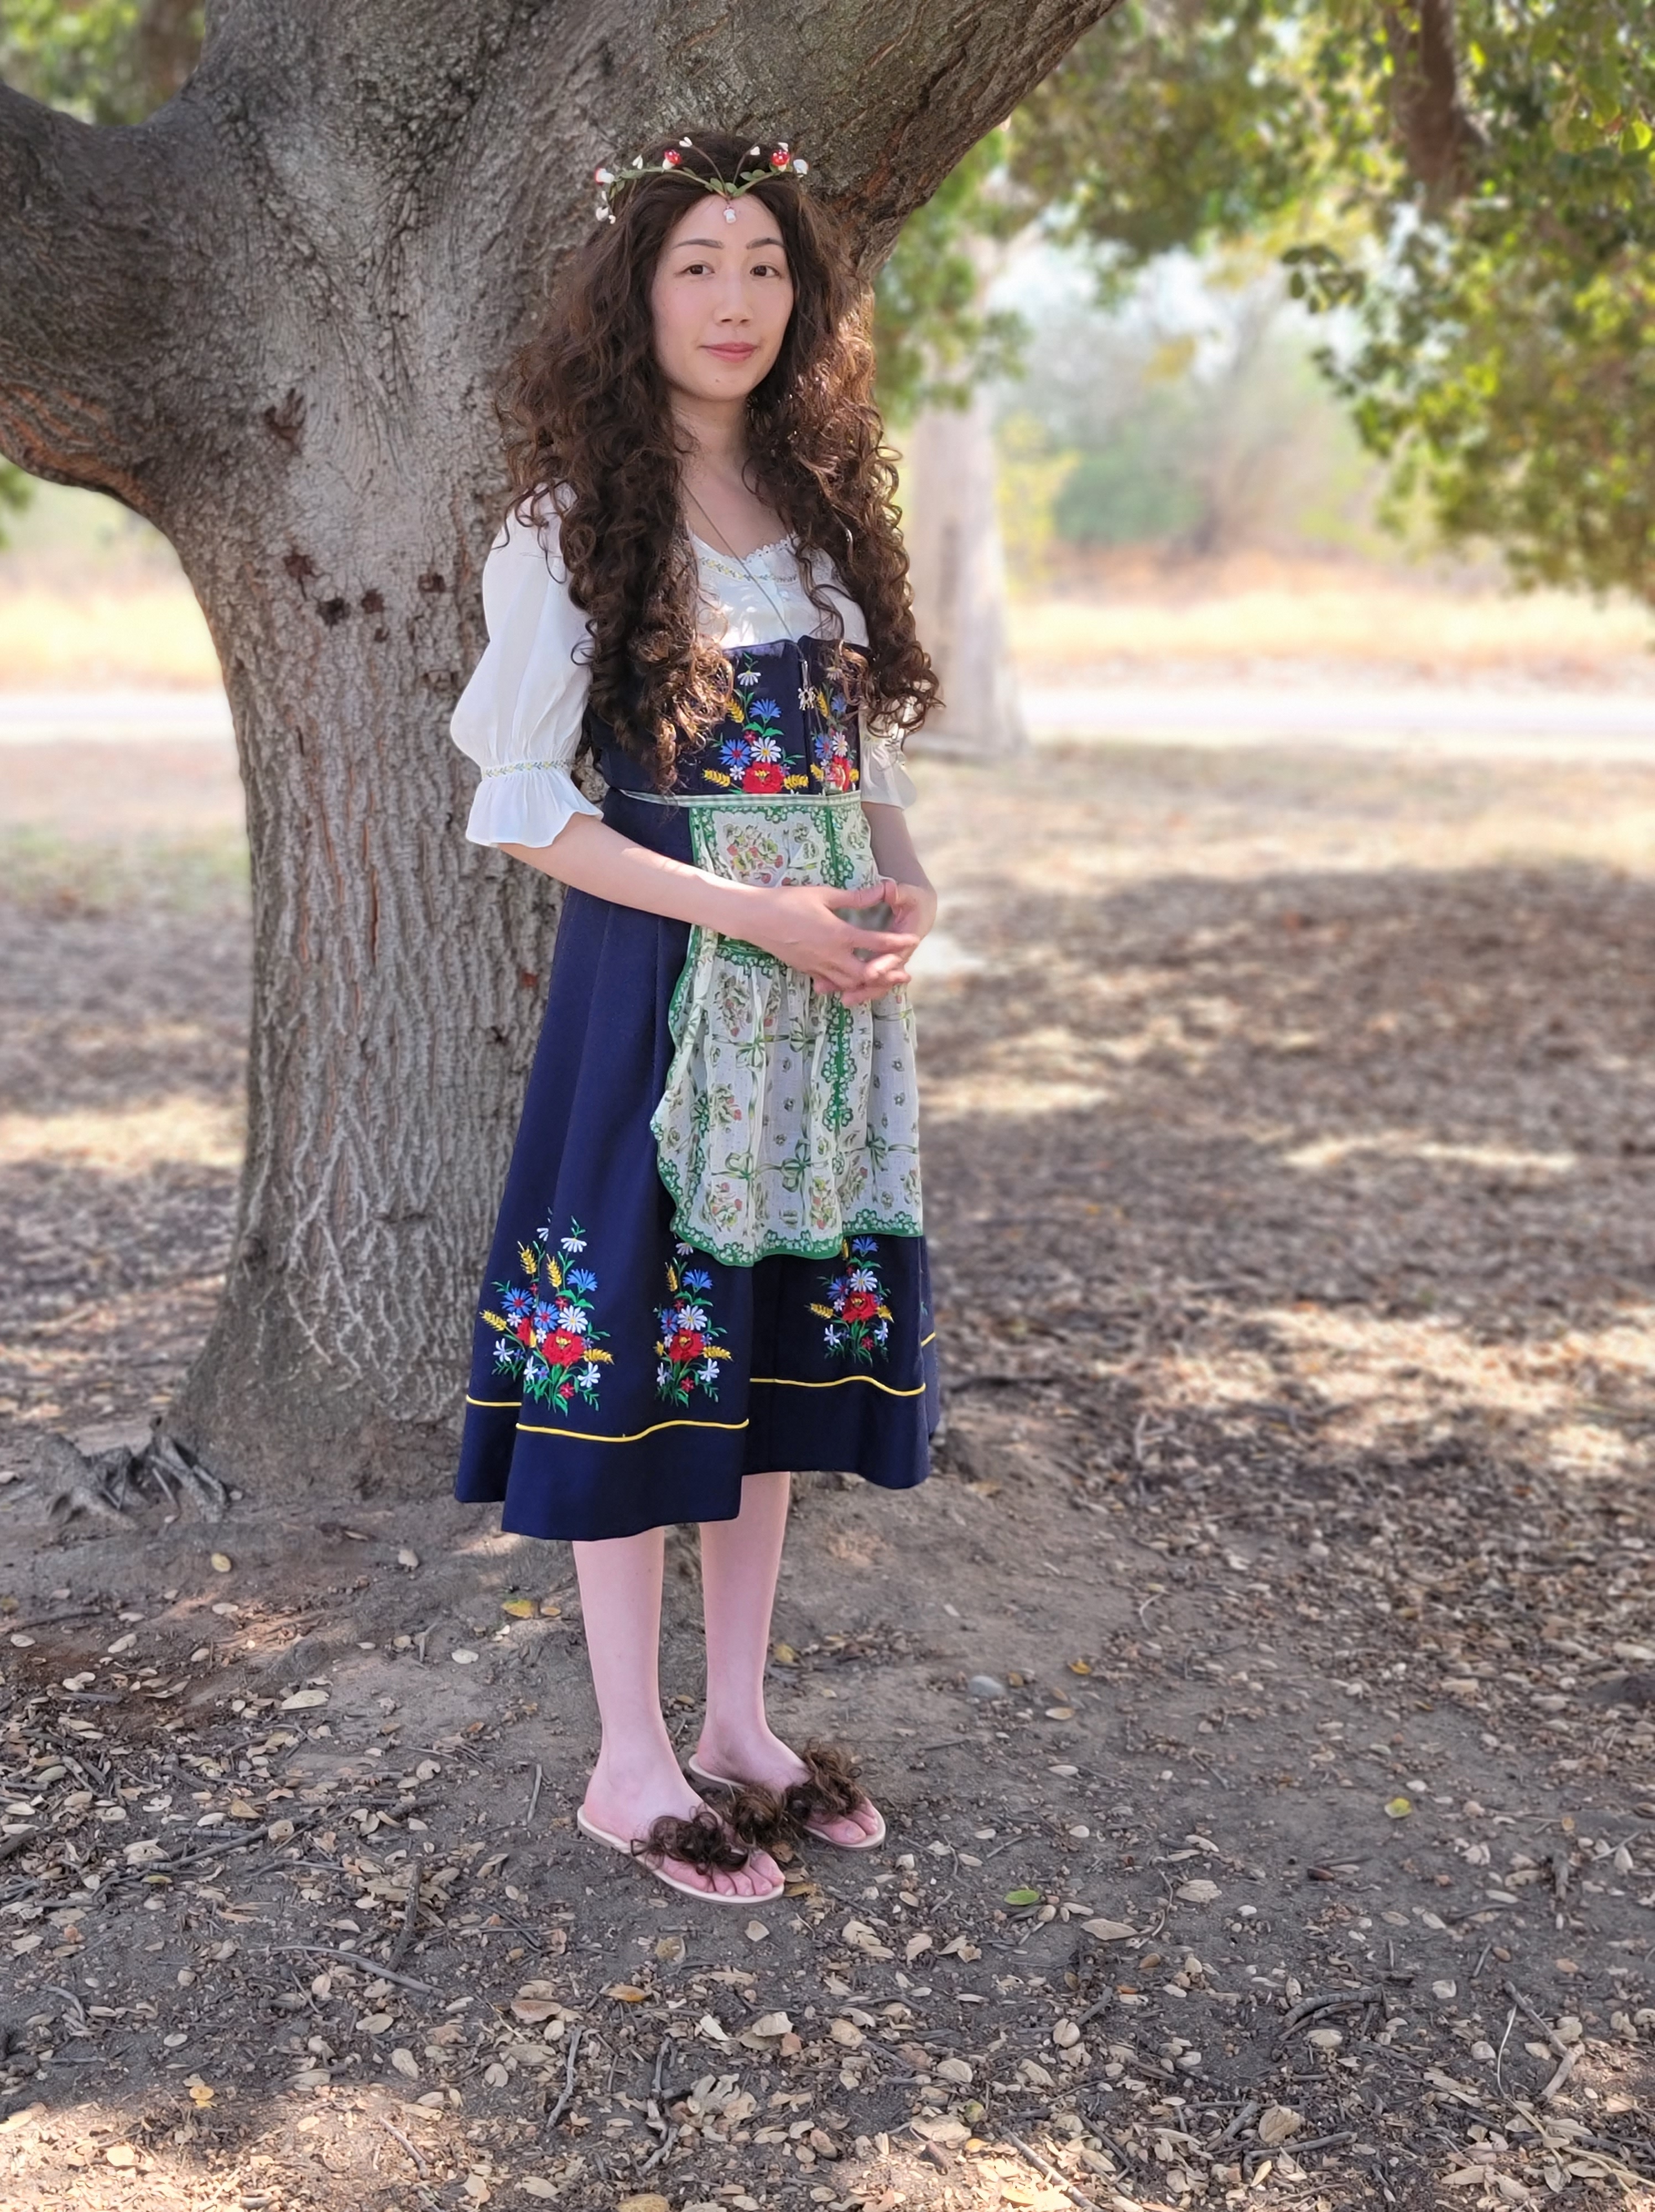
Last weekend I was invited to a hobbit picnic full of food, friends, and hairy hobbit feet! I didn’t have time to make a dress so I put together an outfit using items mostly from my closet. I’ve gotten questions about where I got my items so I will list my sources so you can put together your own hobbit costume!
My dress is an embroidered dirndl that I bought secondhand from eBay, but it was originally made by a company called Ernst Licht, an Oktoberfest/Tracht supplier.
My blouse is originally an Amazon one that I modified. It is called the “Floerns Women’s Square Neck Puff Sleeve Button Lace Elegant Top Blouse” (affiliate link). I removed the wide ruffled lace because it was a bit stiff and scratchy, and replaced it with a cheerful floral yellow trim. I used the same trim on the sleeves. (The elastic in the sleeves was a little tight so I removed some and covered it with the trim).
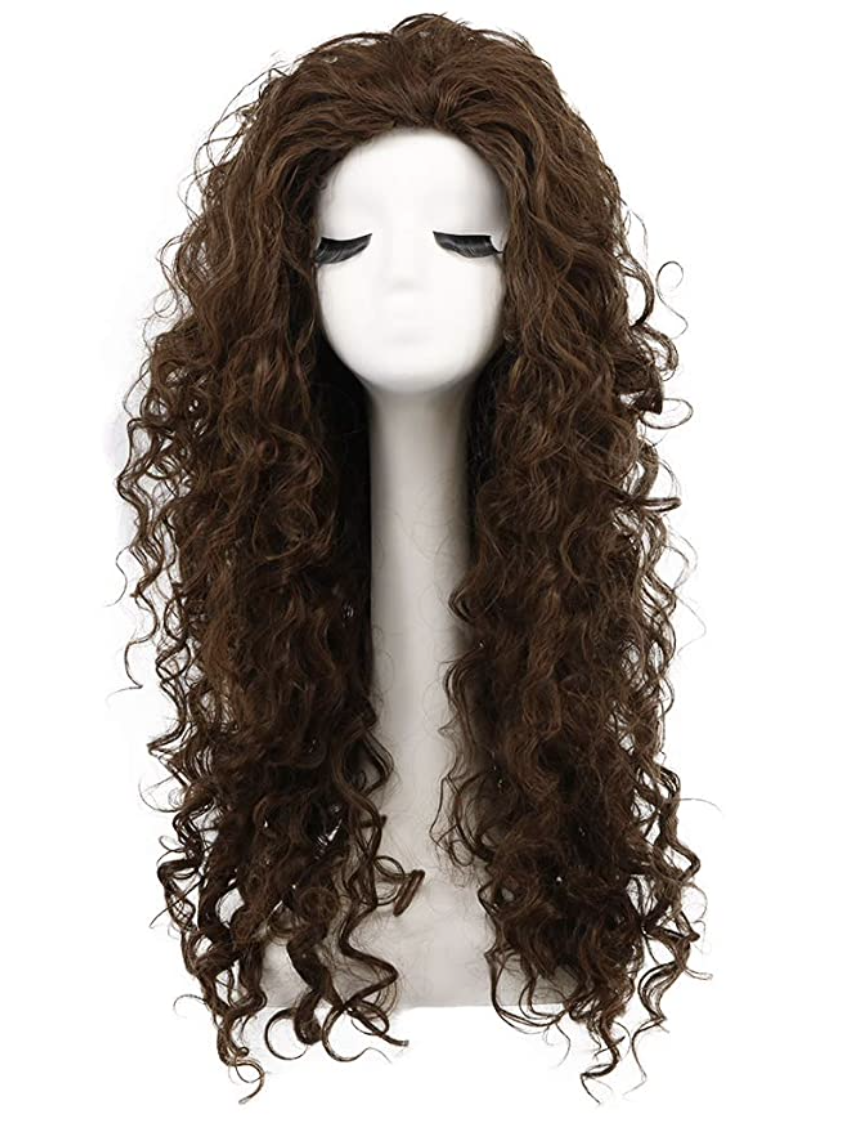
If you prefer a shorter wig with more defined curls, Arda makes a “Rosie Classic” that works well for hobbit costumes and some of my friends were wearing that wig at the picnic.
The mushroom crown was a birthday present from friends so I’m not sure where it was originally from, but if you search “mushroom tiara” on Etsy you’ll see items with a similar aesthetic.
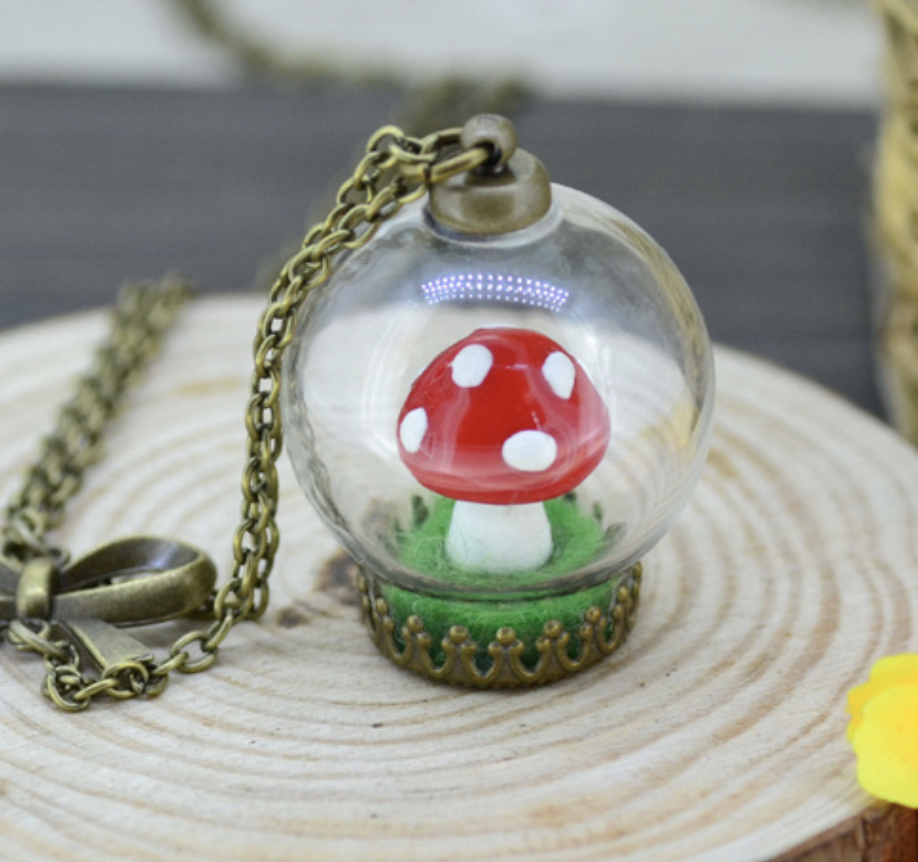
I wore a mushroom in a glass dome necklace I bought on eBay many years ago. It’s no longer available there but I’ve seen some very cute ones if you search for “mushroom terrarium necklace.”
The apron I wore is a vintage one gifted by a friend. It is made from cute printed handkerchiefs! You could make your own by sewing together some handkerchiefs, or make a simple apron by just gathering up a rectangle of colorful fabric and adding waist ties.
I hope this post was helpful to you for putting together your own hobbit costume!
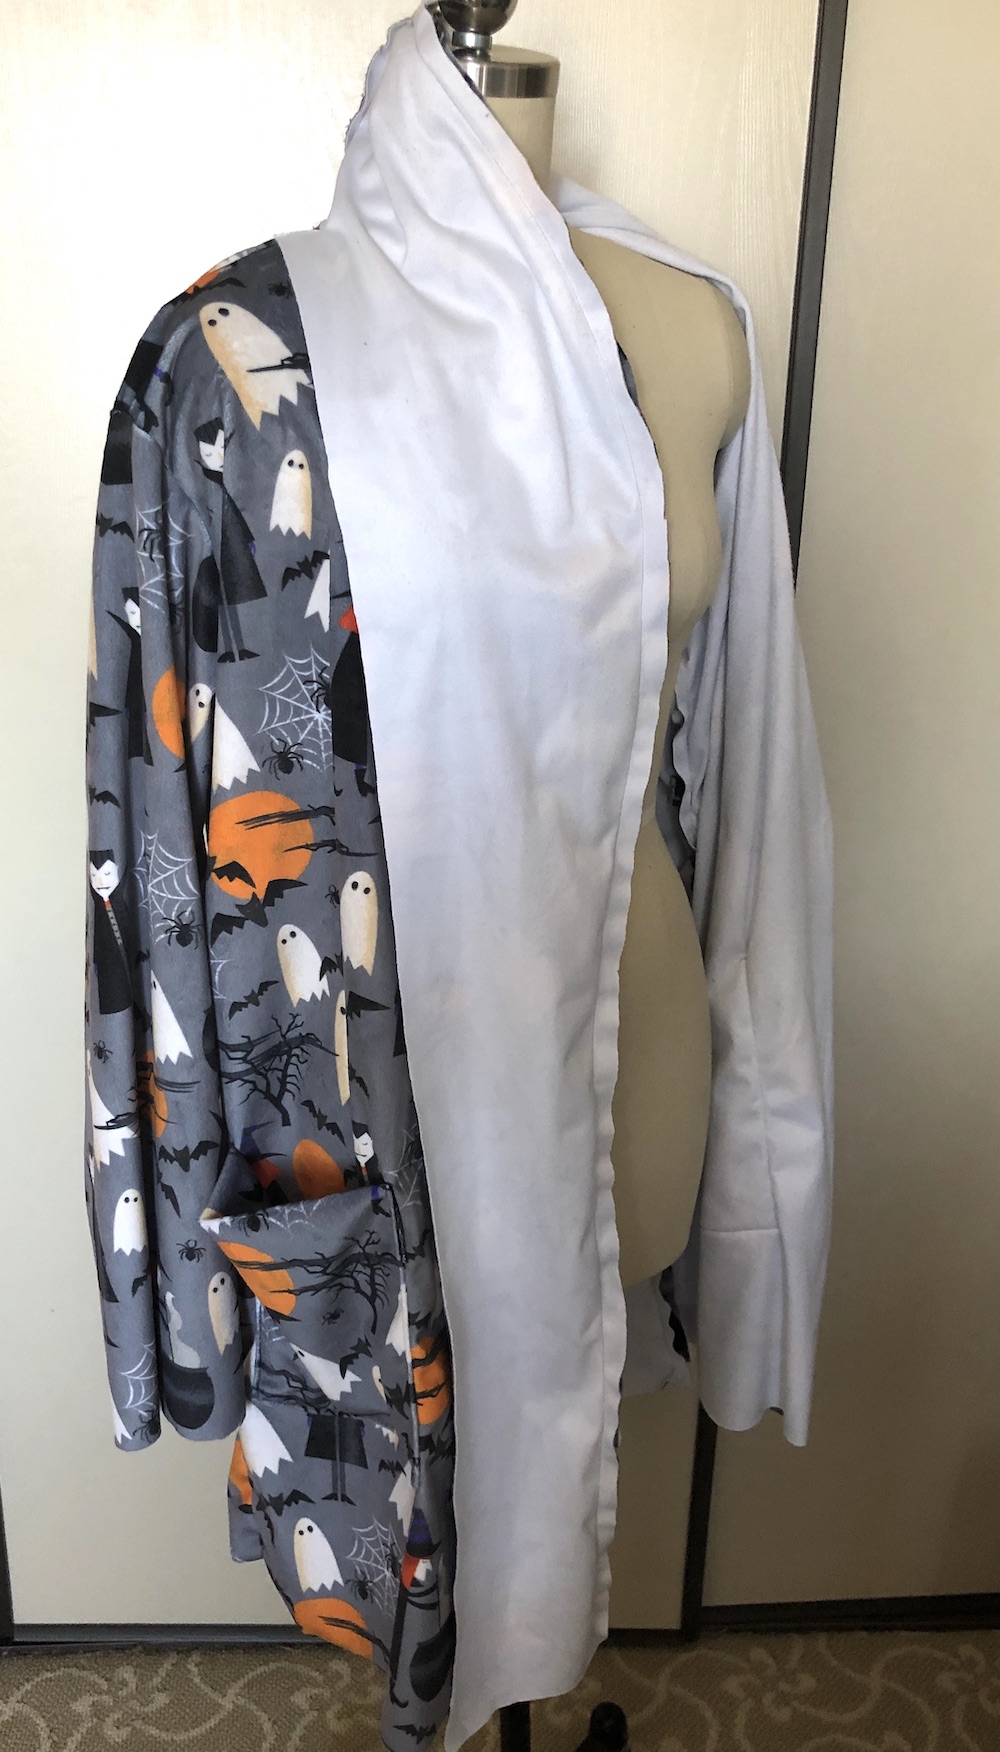
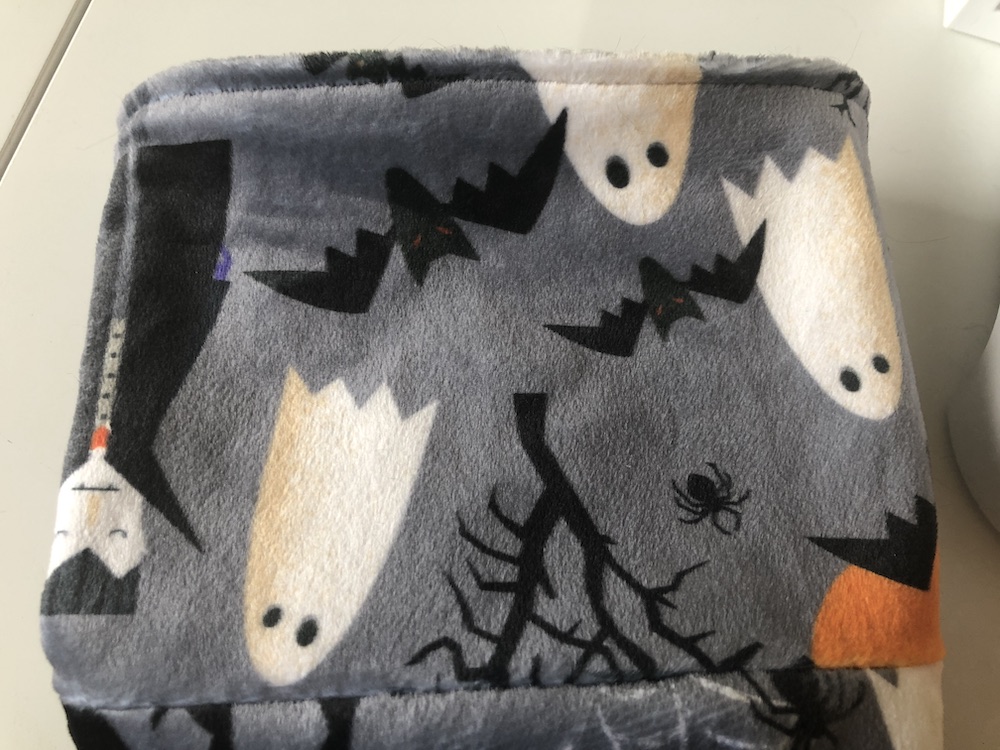
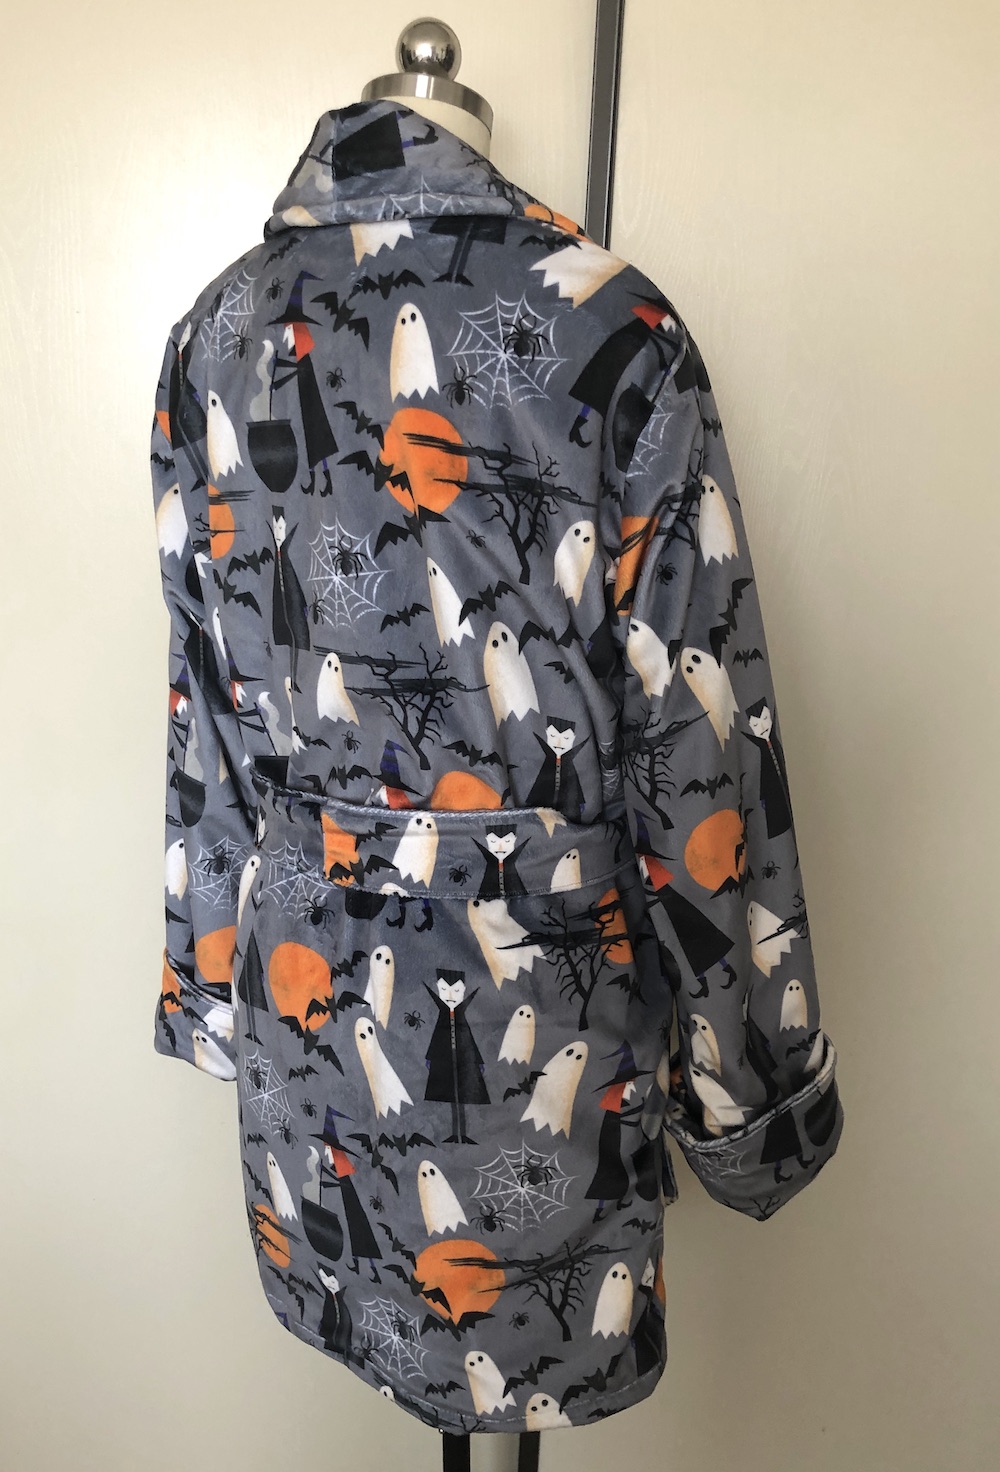
As someone who loves both fall and Halloween it is the perfect time of year for me to make a cozy robe made of super soft Cuddle minky fabric using my Janome Skyline S9. The print I chose is called “Eye of Newt” by Shannon Fabrics. A lot of robes are only a single-layer but I wanted to have mine lined with a plush fabric for extra warmth and luxury. I used “Luxe Cuddle Glacier” (a textured black minky fabric) for my lining.
Note: I am a member of the Janome Maker program and this skirt is sewn on a Janome Skyline S9. (This post is sponsored by Janome but all content and opinions are mine). All the fabric was gifted by Shannon Fabrics.
WHAT YOU WILL NEED (exact amounts depend on your measurements and the width of your fabric):
4 or more yards of 58-60 inch wide fashion fabric (minky or fleece fabric)
2 or more yards of 58-60 inch wide lining (more minky for extra softness, or a non minky fabric if you want a lighter robe)
thread, elastic, pins, scissors, chalk, etc.
PATTERN:
Any wrap robe pattern with a shawl collar can be used as a base. I adapted Butterick 6837 view A with modifications in order to turn it into a lined robe. I used this pattern because I already had it on hand from making PJ bottoms for my family, but if you use this pattern you may want to make these same changes:
Keep in mind this pattern runs large and you should size down unless you have broad shoulders or a large torso.
I added a lining, which the pattern does not include instructions for, so my construction methods are adapted for that.
I shortened the robe to make it knee-length instead of calf-length.
The belt loops and pockets are very large and the recommended placement on the pattern is too low.
Since this robe is lined, it is not necessary to cut separate collar pattern pieces because the robe fronts already have the under collar attached, and you will cut out collar facings.
CUT OUT THESE PIECES OF FABRIC:
Robe (out of your fashion fabric): 2 fronts, 1 back, 2 collar facings, 2 sleeves, 2 sleeve cuffs, 2 sleeve facings, 2 pockets, 2 belt loops, and 1 belt
Lining (out of your solid fabric): 2 fronts, 1 back, 2 sleeves
FABRIC PREP:
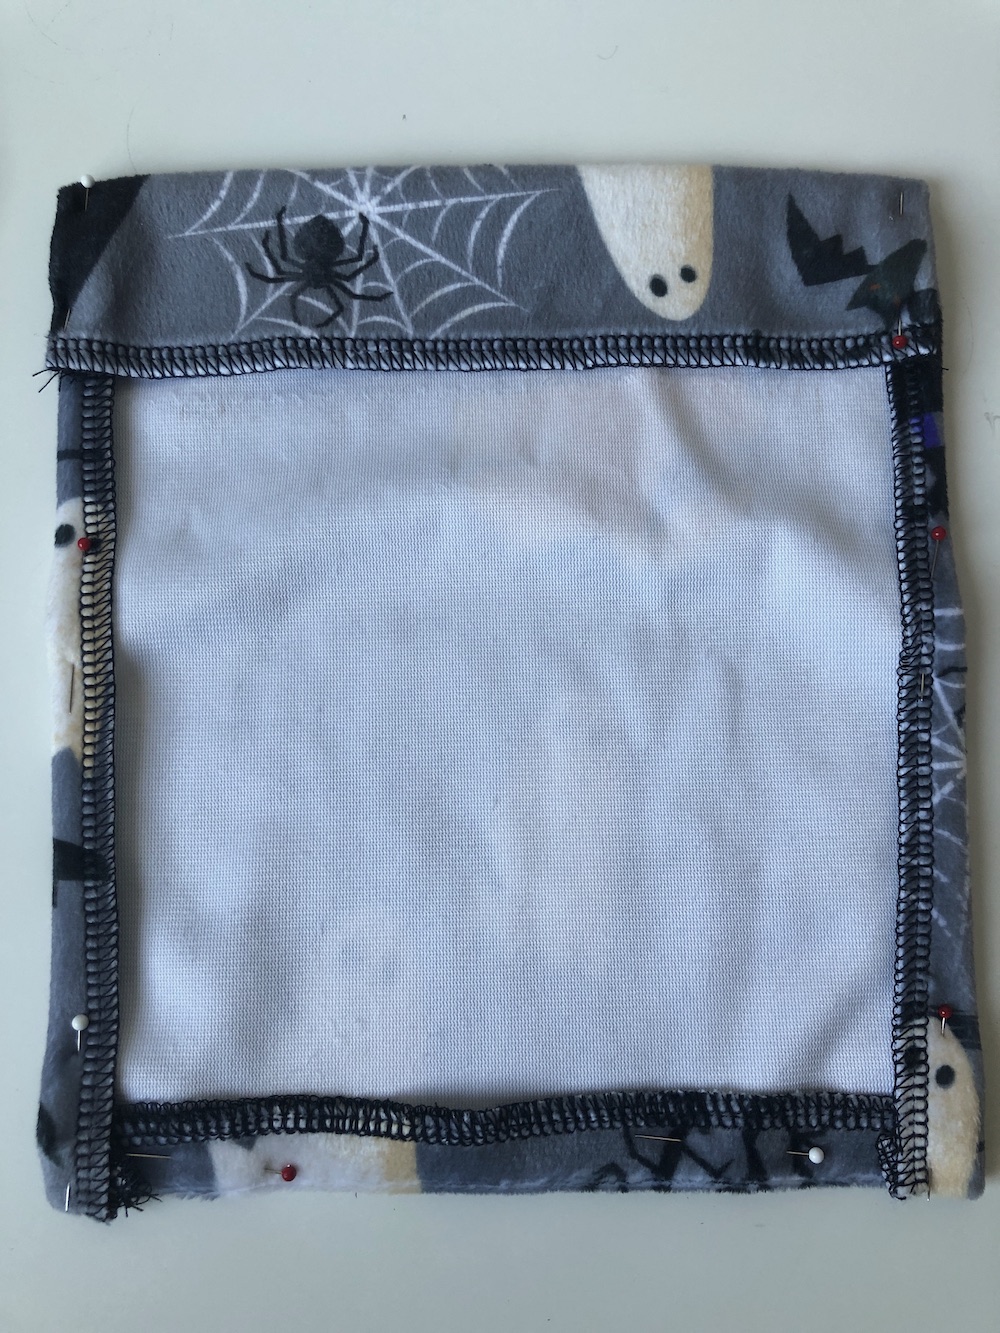
Wash and dry your fabric before cutting and sewing. (Cuddle minky can be machine-washed on gentle in cold water, and then dried on low heat). Serge all sides of the pockets. The rest of the pieces do not need to be serged because raw seams will be hidden by the lining or turned inside (like the belt).
CONSTRUCTION OF THE ROBE FASHION LAYER:
Make the belt loops by cutting out two rectangles that are 5 inches by 3 inches. You will make a tube by folding the right sides together lengthwise, stitching it down, and then turning right side out. (Alternatively you could make one long 10 inch tube and then cut it in half). Set aside.
Sew the 2 fronts to the back at the shoulder seams. Do not sew the side seams yet.
Sew one sleeve cuff to the bottom of each sleeve.
Sew the top of each sleeve to the shoulder where the front/back meets.
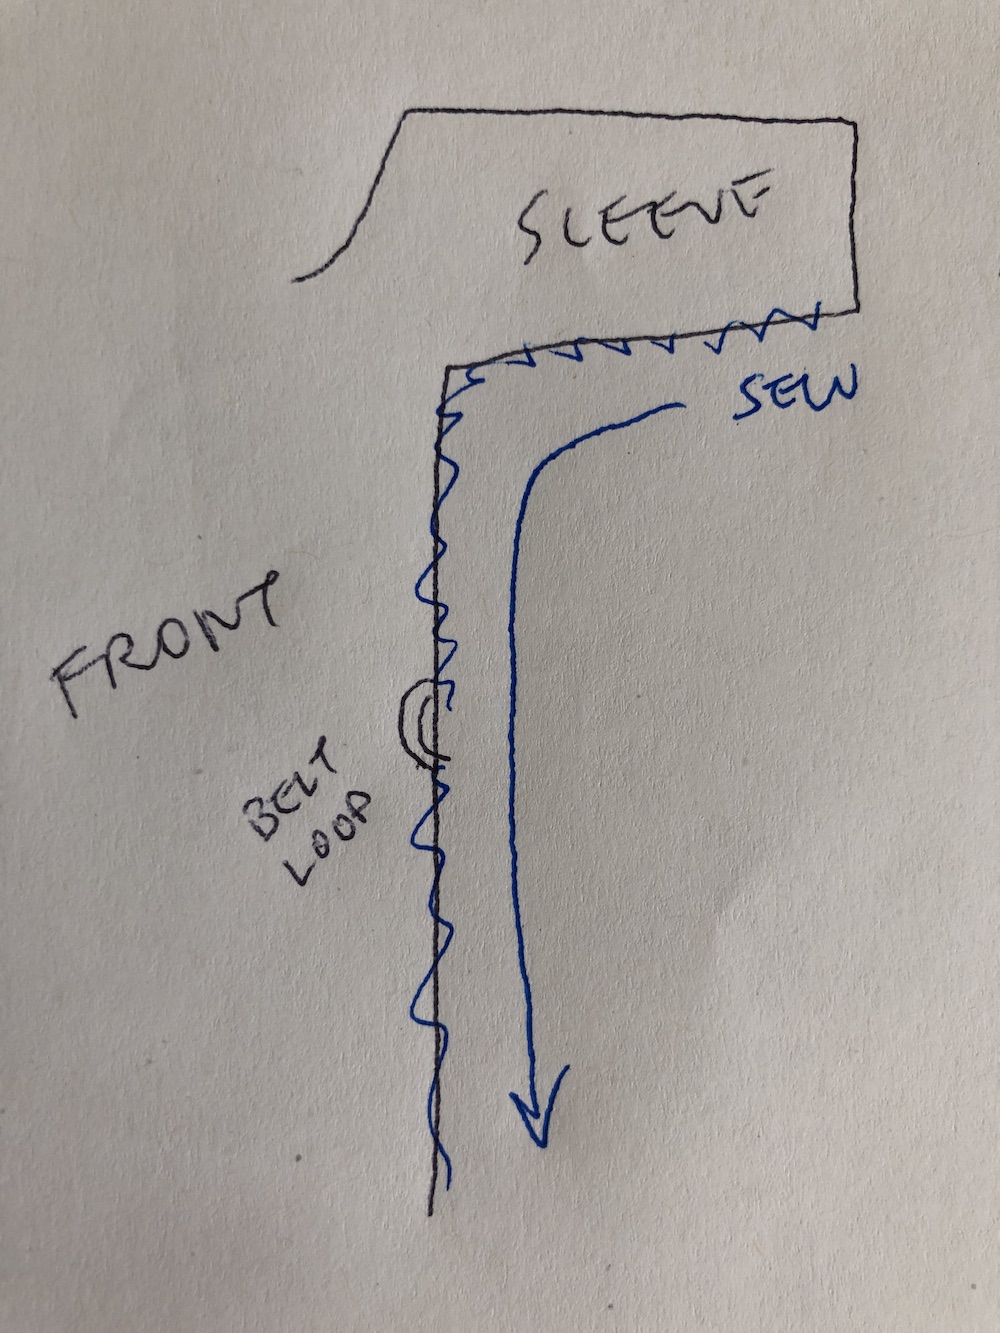
Pin the side front to the side back (right sides together). Pin belt loops at waist level, sandwiching them between the front and back, with the unfinished ends inside the robe.
Sew the sleeve seam and side seam shut as one long continuous seam, catching the belt loops as well. (The reason why you don’t assemble the sleeves and top separately and then try to sew them together is so you don’t need to carefully set the assembled sleeve into the armhole opening and try to make it fit).
To make the pockets fold all the edges of your pocket piece inwards, with the top part having a deeper fold. Pin the pocket to your robe fronts at the desired location (checking that they are at a comfortable level for your hands). Top-stitch the sides and bottom to sew the pocket into place.
Stitch the two shawl collar facings at the center back seam. Then put the curved facing edge along the curved front edge and stitch together.
To make the belt you will need to cut out a very long rectangle (78 inches x 5 inches) with diamond pointed ends. Fold the right sides together lengthwise and stitch all along the edges, leaving a 4 inch area unstitched towards the center of the belt. You will use this opening to pull the right sides out.
After the belt is right side out, fold the raw edges in and pin the opening shut. Top stitch the opening closed, and continue to top stitch the entire perimeter of the belt. This will make the belt lie flat since the fabric is puffy. (See below for a comparison).
CONSTRUCTION OF THE LINING:
The construction of the lining is very similar to that of the fashion fabric but you do not have pockets, belt loops, or the belt. You also need to note the directionality of the sleeve facing.
Sew the 2 fronts to the back at the shoulder seams. Do not sew the side seams yet.
Sew the sleeve facing to the bottom of the sleeve lining. If you have a print, sew the sleeve facing with the print upside down since it will be flipped up when the cuff is rolled.
Sew the top of each sleeve to the shoulder where the front/back meets.
Sew the sleeve seam and side seam shut as one long continuous seam (as seen in step 6 of the robe construction).
ASSEMBLY:
Put the lining inside the robe fashion layer, wrong sides together. (Put the lining sleeve into the robe sleeve).
Pin the curved edge of the lining front to the robe front, then sew them together. (Remember that the robe front is already attached to the collar facing, forming a sandwich consisting of collar facing, robe front, and lining. The right sides of the printed collar facing and fronts are together, while the wrong sides of the front and lining are together).
Flip the collar facing inside the robe, covering part of the lining. To finish the collar facing: Top stitch the outer edge of the collar facing about a half inch from the edge. Fold the raw edge of the other side under and slip stitch closed to the lining (indicated by the pins).
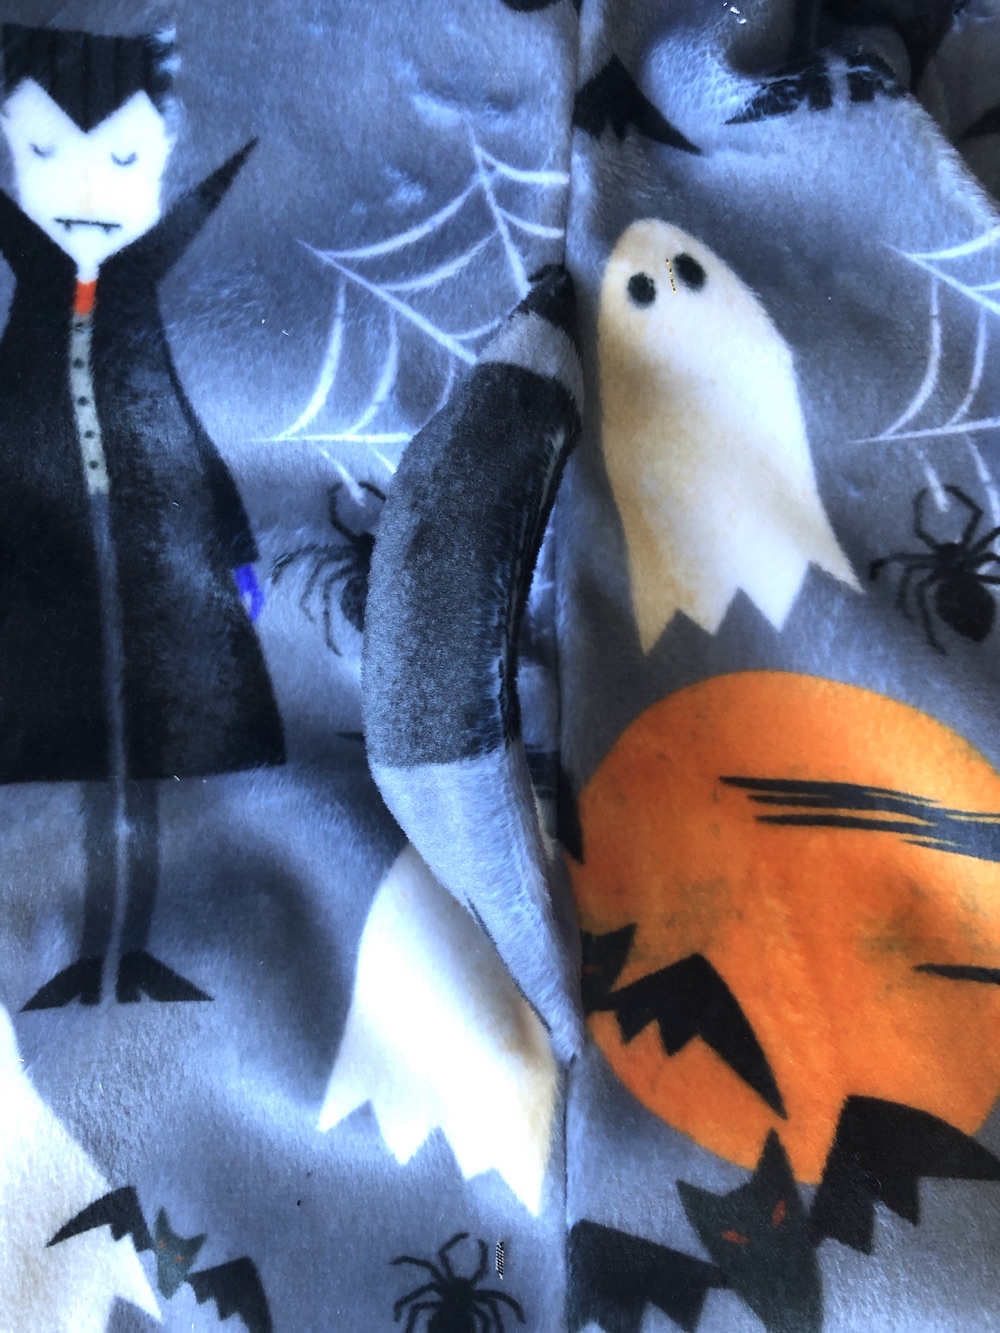
To finish the sleeve cuffs: Line up the bottom edges of the sleeve cuffs and sleeve facings and fold the raw edges of both inward. Top stitch the edge closed, then flip the finished cuff up to show off the sleeve facing.
Hem the bottom of the robe: Fold the bottom of the robe inside, covering the raw edge of the lining, then fold the robe fabric inward again to hide the raw edge. You may want to cut some excess lining before hemming to reduce bulk. Sew down the edges to finish the robe.
Put the belt through the belt loops and you have a finished robe!
Thank you again Janome and Shanon Fabrics for making this project possible! I hope everyone has a beautiful fall season!
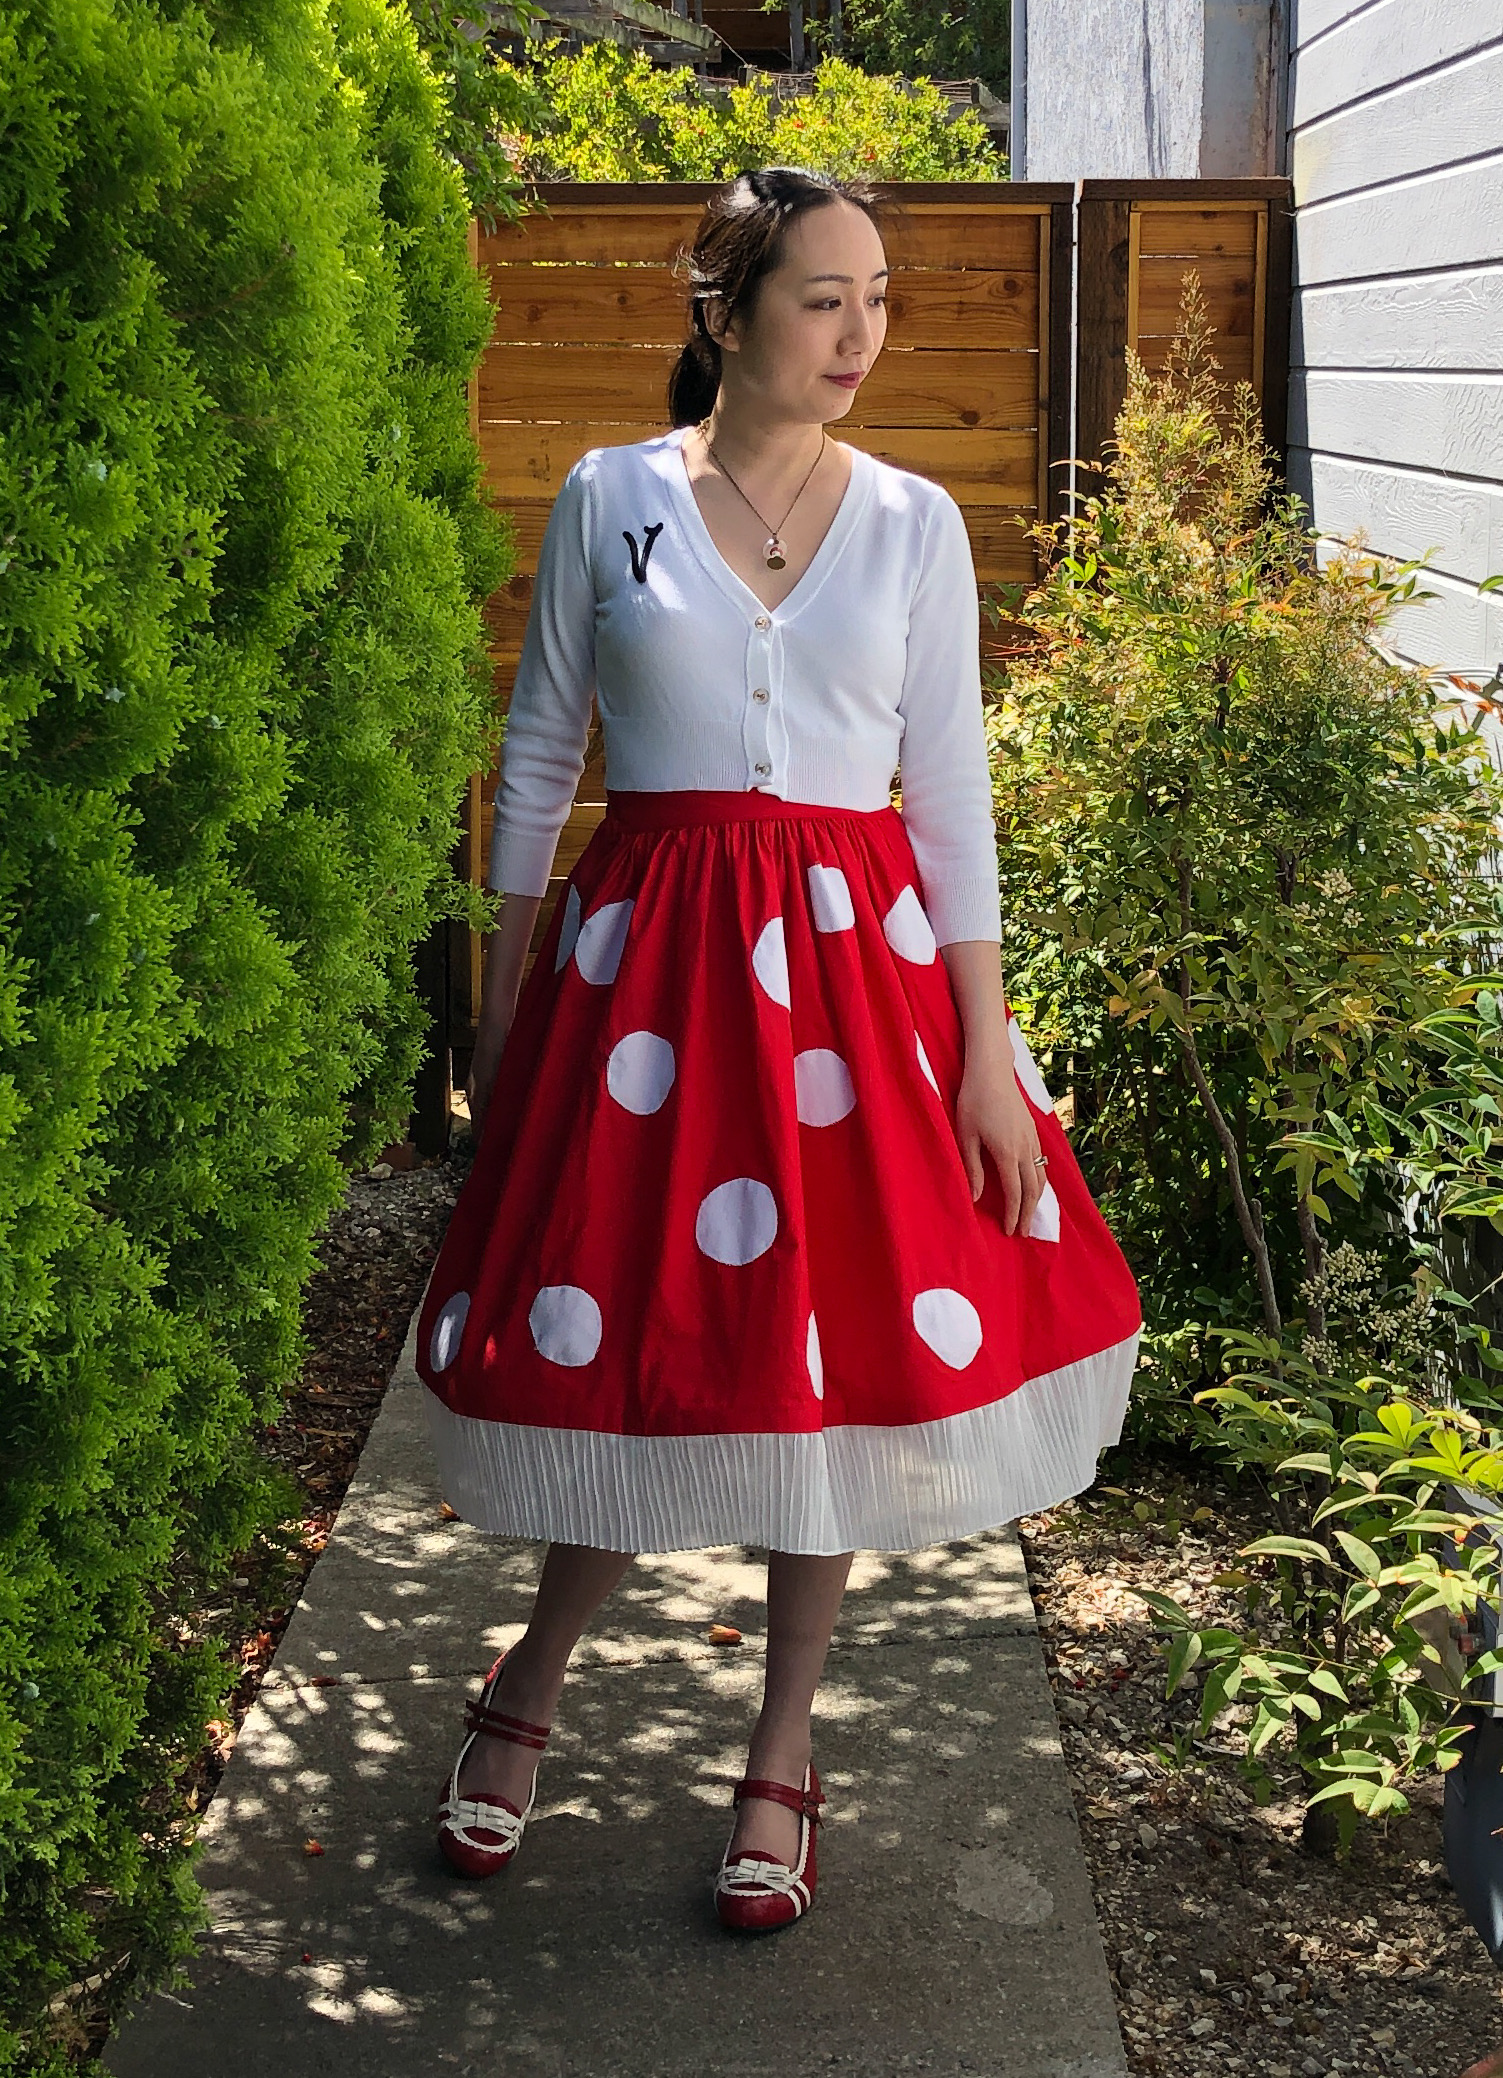
I adore the red and white toadstool mushrooms known as Amanita muscaria (aka fly agaric) and wanted to make a cute skirt inspired by them. I’ve worn it in my photos with a monogram cardigan and big fluffy petticoat for a 1950s style look, but this skirt could be styled with a romantic shirt and a flower crown for a cottage core outfit. The front half of the skirt has a flat waistband for a smooth look while the back half of the skirt has an elasticated waistband for comfort and for adjustability!
Note: I am a member of the Janome Maker program and this skirt is sewn on a Janome Skyline S9. (This post is sponsored by Janome but all content and opinions are mine).
SKILL LEVEL: Beginner/intermediate
TIME REQUIRED: 4-5 hours
WHAT YOU WILL NEED (exact amounts depend on your measurements):
2 or more yards of red cotton fabric
1 yard or various scrap pieces of white cotton fabric
3-4 yards or more of white pleated trim or lace
strip of interfacing the same size as your waistband
thread, elastic, pins, scissors, chalk, etc.
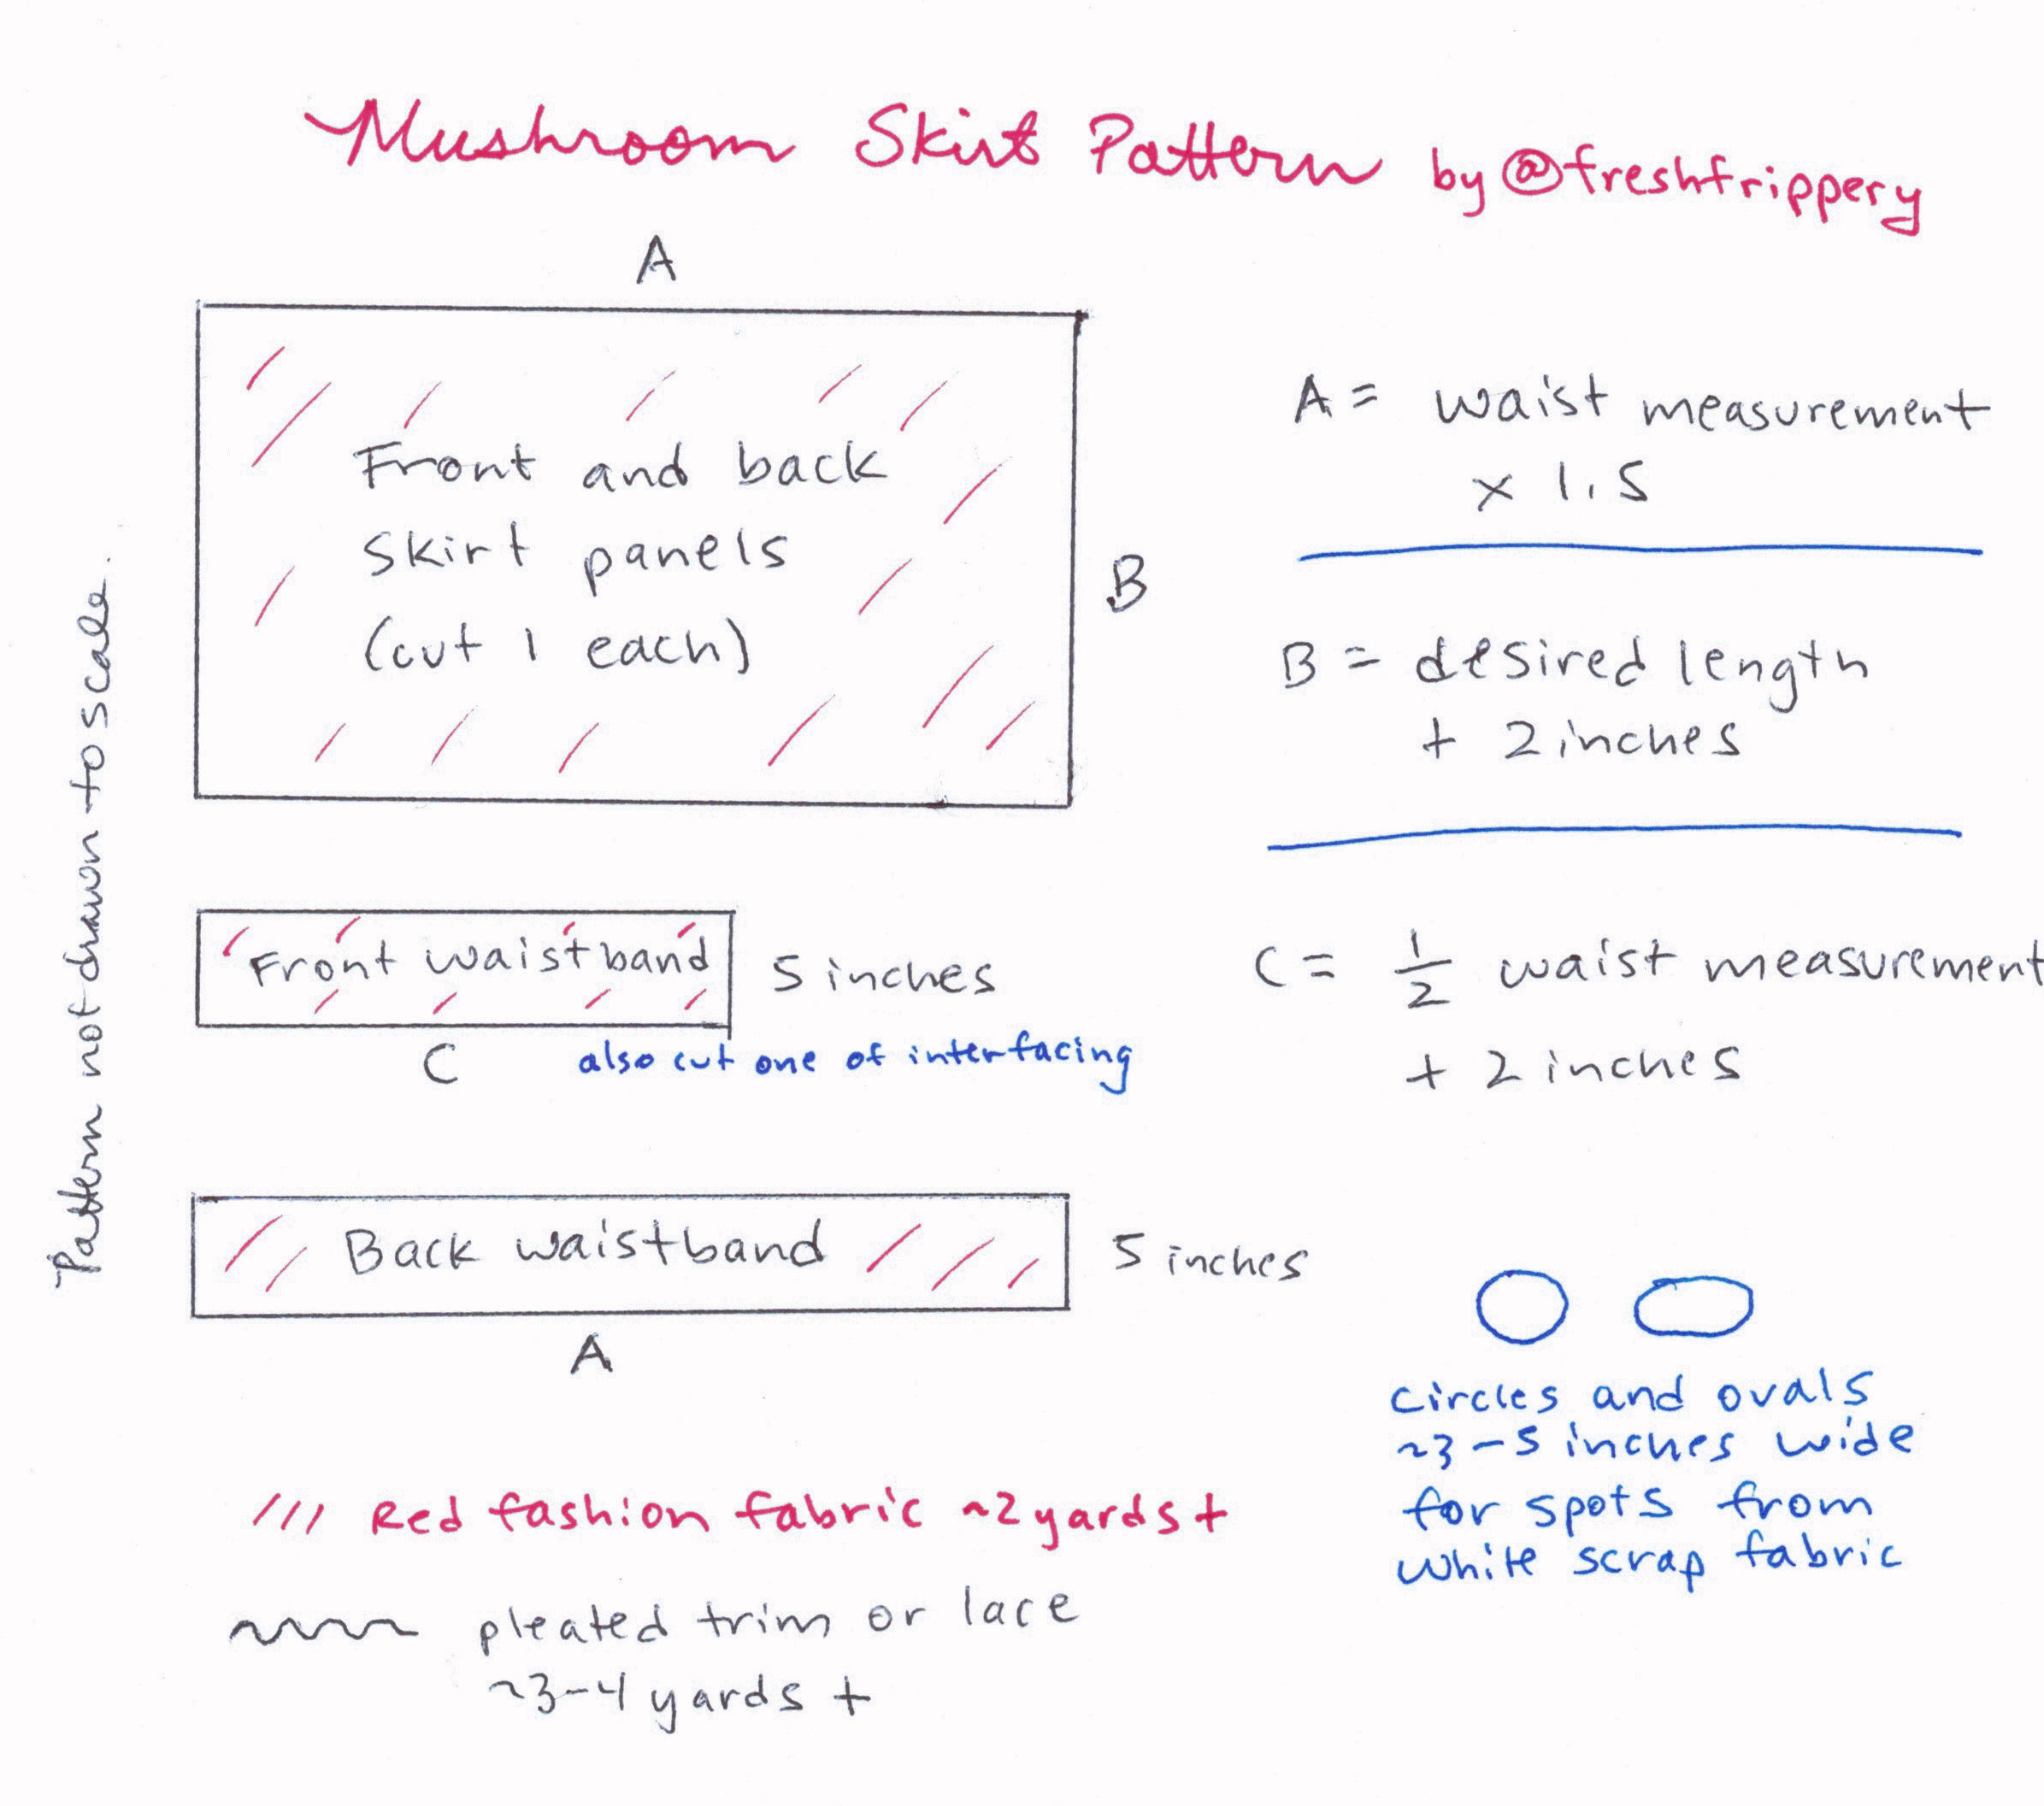
Before you begin you’ll want to take a few basic measurements: your waist circumference, and the desired length of your skirt. For the latter you’ll want to measure from the smallest part of your waist to wherever you would like the skirt to stop (above the knee, below the knee, etc.) Use the diagram below to convert those measurements into A, B, and C for the pattern pieces.
Using the pattern diagram as a guide, use chalk to mark the rectangles on red fabric. Cut out your front and back skirt panels, front waistband, and back waistband. Use the front waistband as a pattern to cut out a piece of interfacing the same size, then iron or sew the interfacing to the front waistband.
Note: the 5 inch width of the waistband pieces will result in a final 2 inch tall waistband (once it is folded over with 1/2 inch seam allowances). If you want a shorter or taller waistband you can adjust the width when cutting.
Fold the red waistband pieces in half lengthwise and iron to mark a crease down the center.
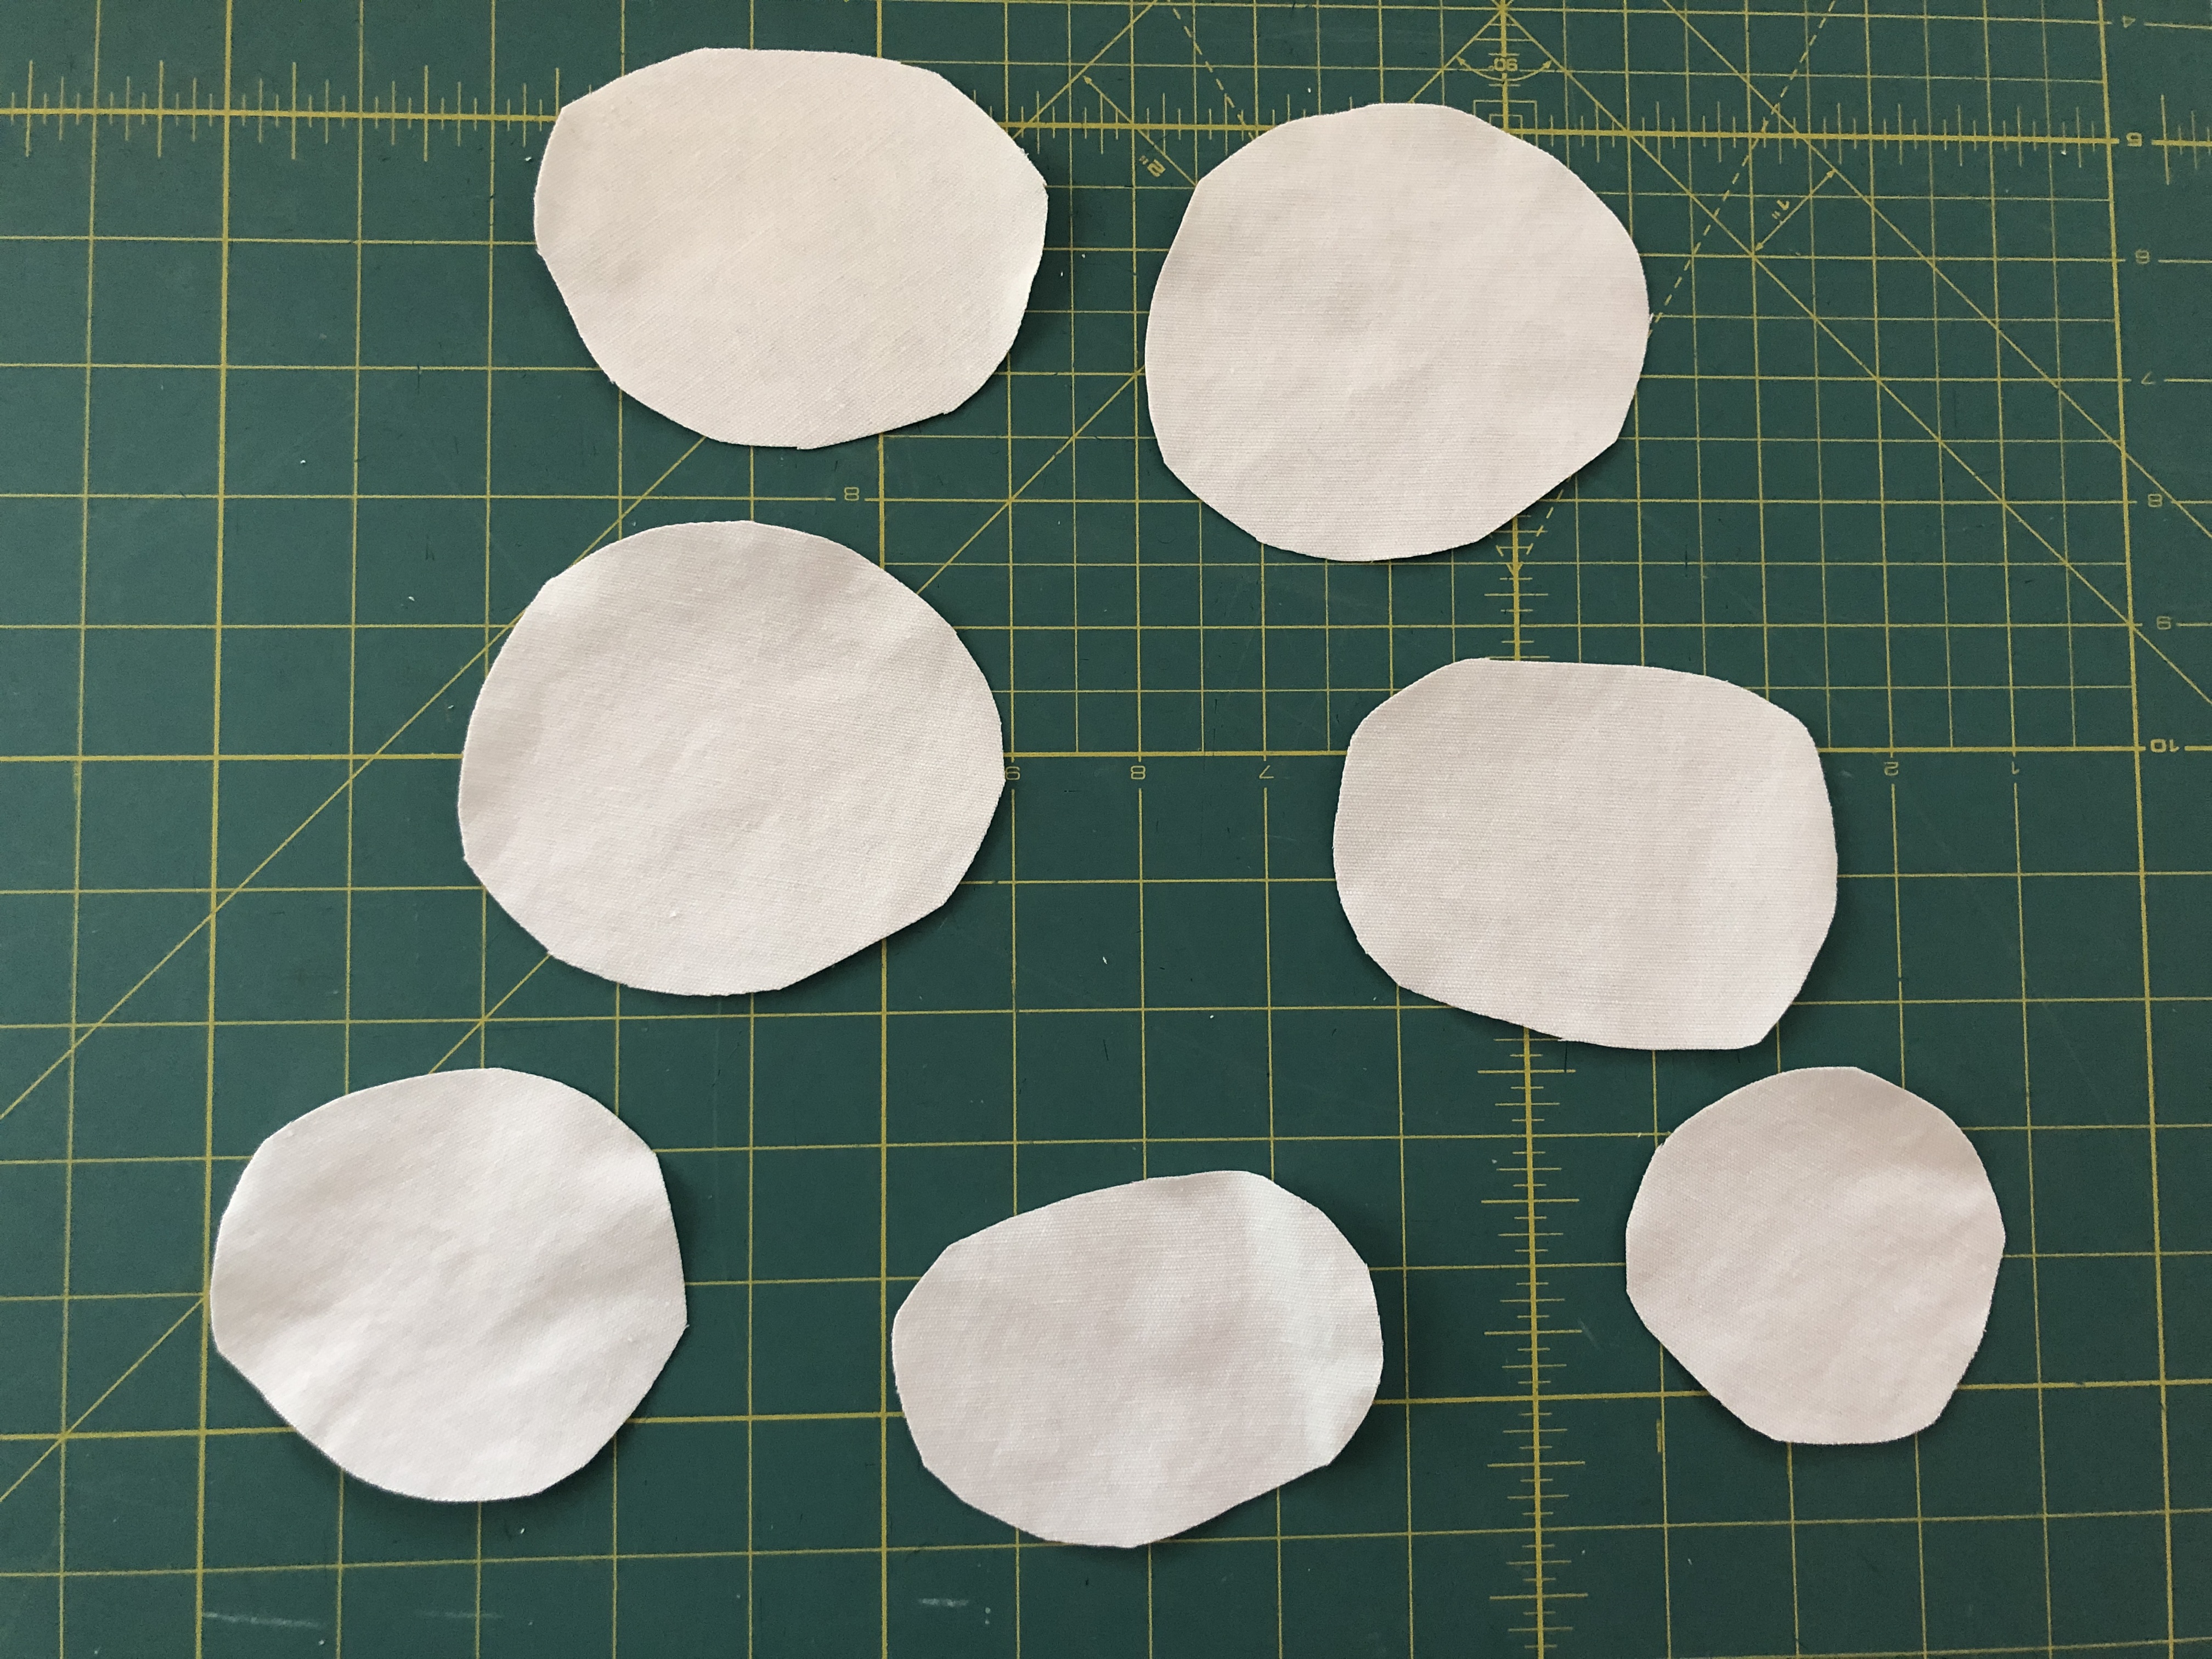
Cut circles and ovals out of your white fabric in a variety of sizes from 3-5 inches wide. These will become the mushroom spots. The number of spots depends on personal preference and the size of your spots and skirt, but for reference I have 28 total on my skirt.
Pin the mushroom spots onto both the front and back skirt panels in a scattered, random pattern. Leave enough room at the top, bottom, and sides for seam allowance and hemming. (There are half inch seam allowances on the side and top, and you will want the bottom 2 inches free).
Use your machine’s appliqué stitch (shown below on my Skyline S9) to attach all the spots to your skirt panels. (If you do not have an appliqué stitch on your machine model you can use a zigzag stitch but it is recommended you use a white fabric not prone to fraying). If you are using the appliqué stitch start with your needle just outside the mushroom spot.
Sew up the side seams and press open flat.
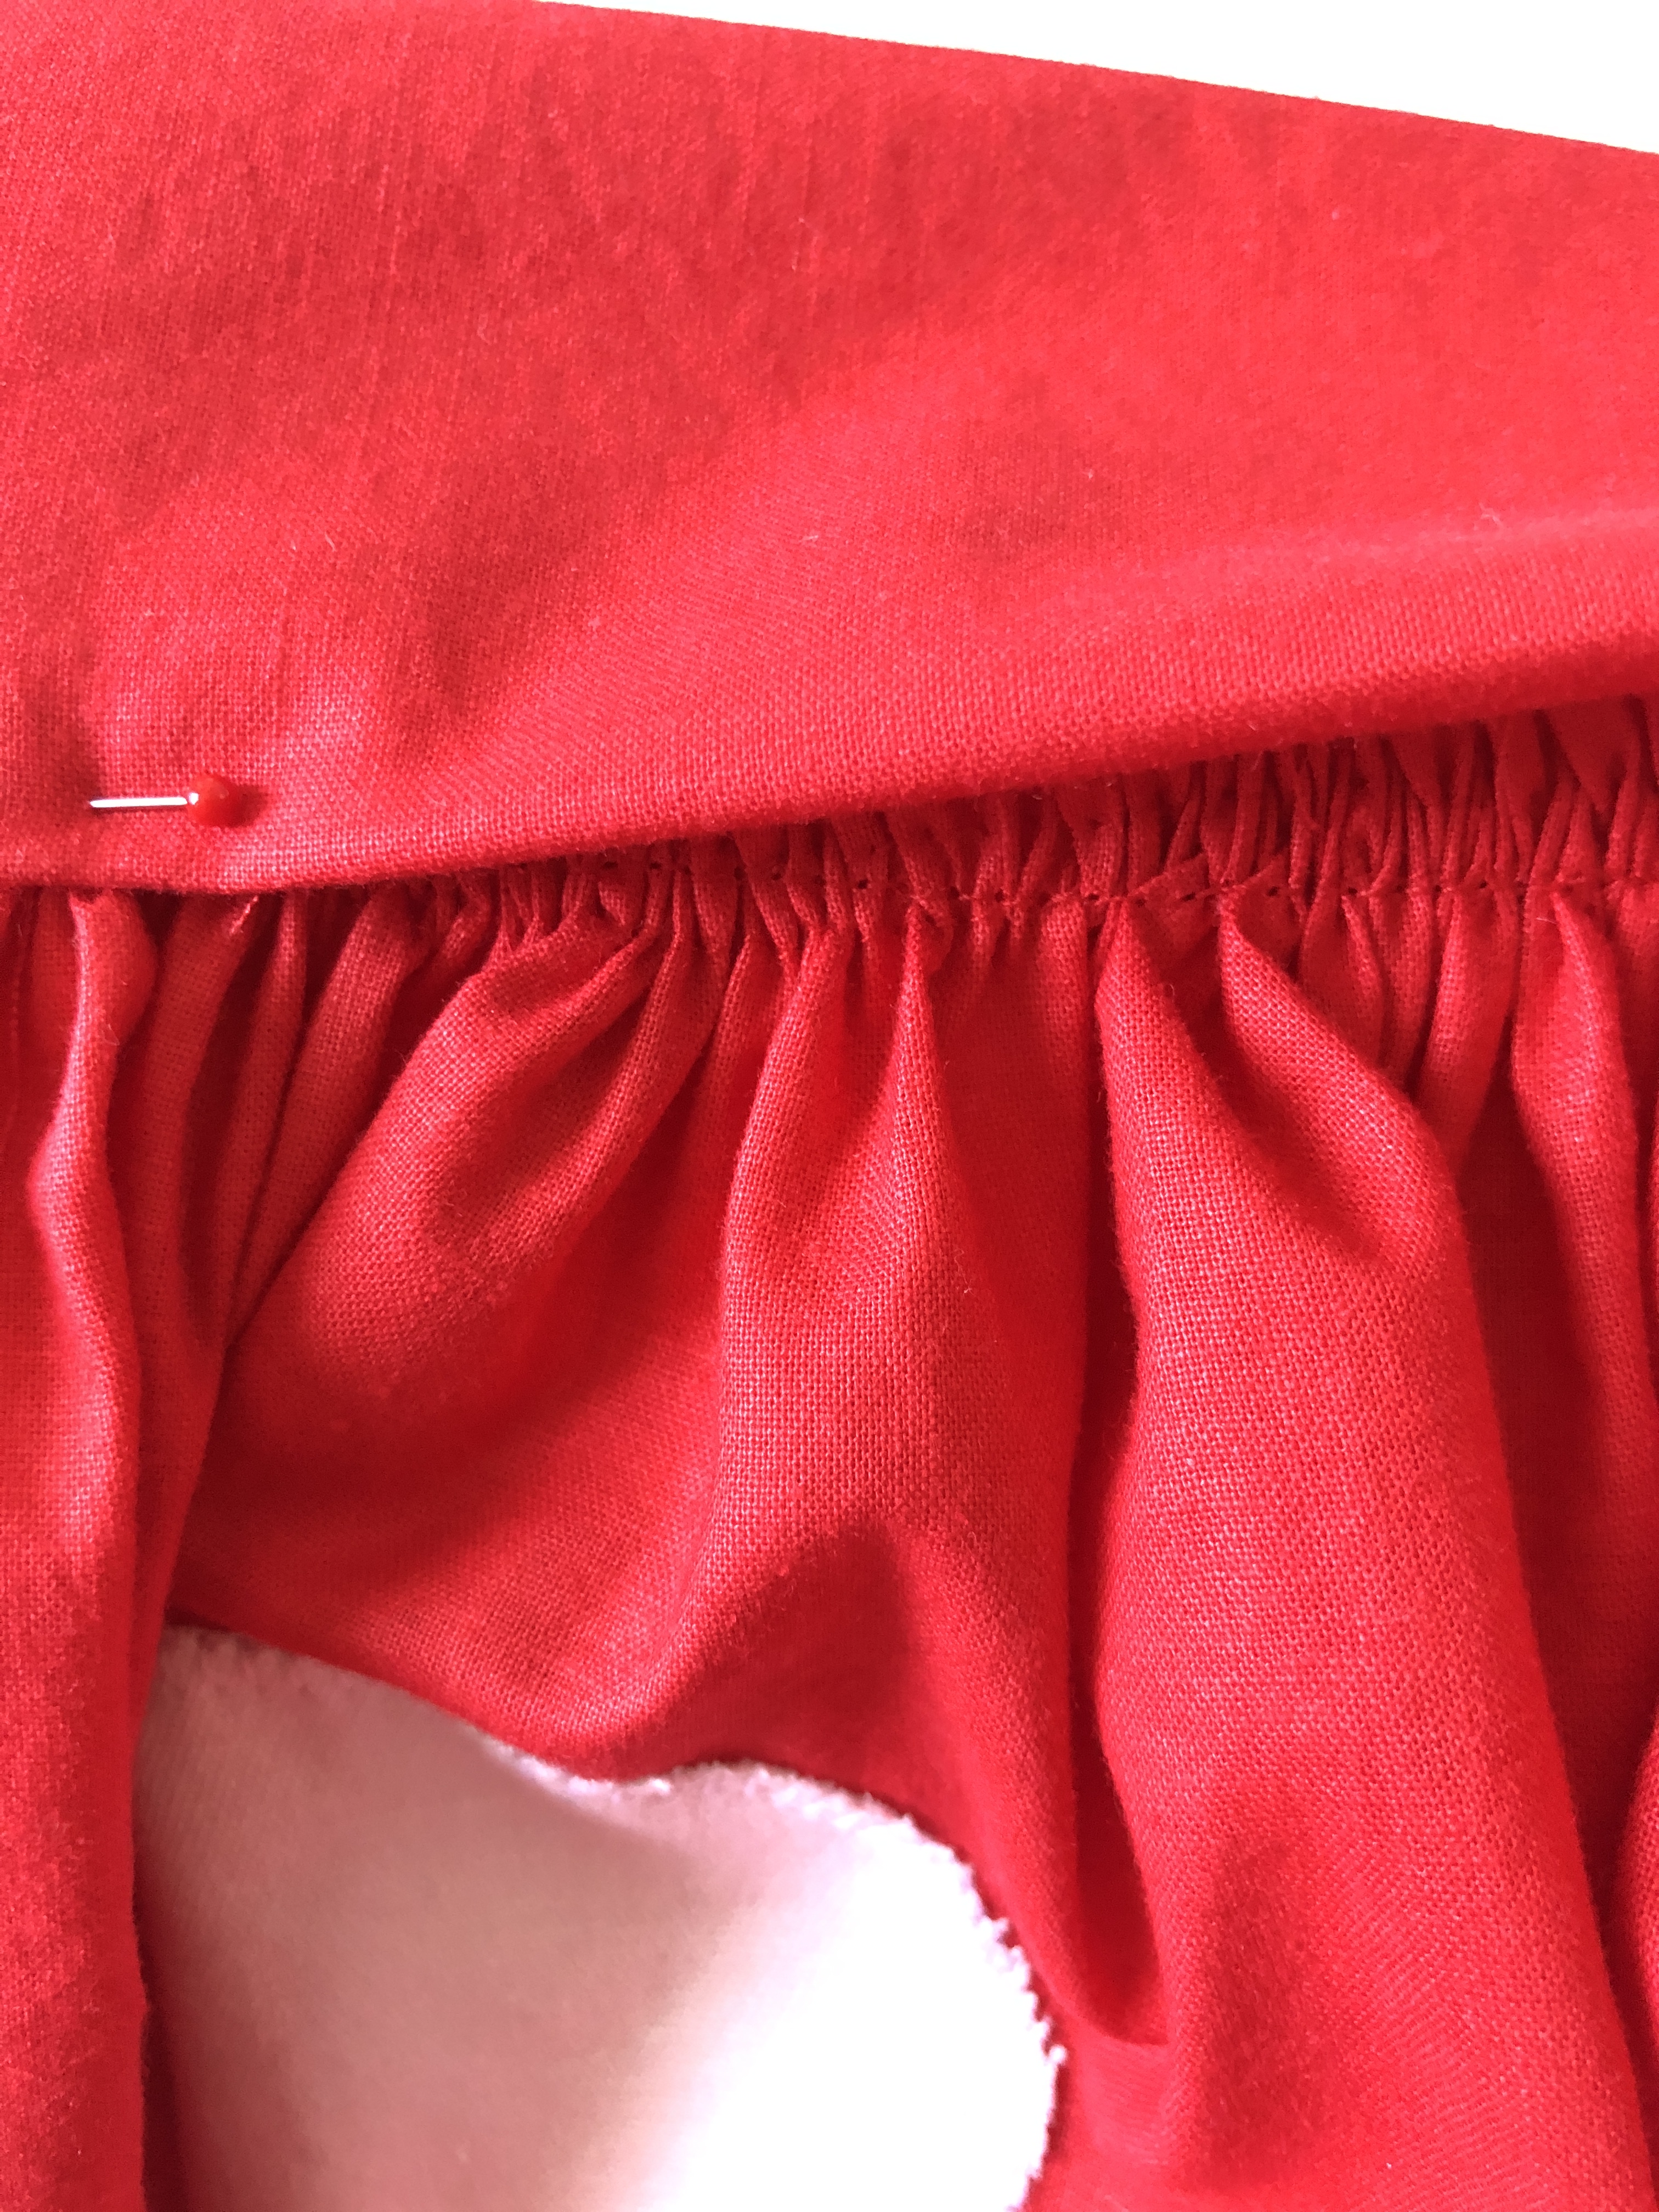
ATTACHING THE BACK WAISTBAND:
Sew the WRONG side of the back skirt panel to the RIGHT side of the back waistband with a 1/2 inch seam allowance. (This means you will start by putting one of the long edges of the waistband against the top inside edge of the skirt). You should have the ends of the waistband extend slightly past the seam. Sew down the long edge then flip up the waistband up, creating a clean finish on the inside of the skirt.
Using the ironed center crease to help you, fold half of the waistband over towards the outside of the skirt, then tuck under the seam allowance.
Pin down the edge of the waistband on the outside of the skirt and topstitch. You will now have a channel to thread your elastic through.
Cut a piece of elastic the same length as what your final back waistband will be. (This is half your waist measurement plus another inch, for 1/2 inch seam allowance on each end). I used a 1 inch wide piece of elastic to reduce bulk, but you can use up to 2 inches wide if preferred.
Insert the elastic through the back waistband channel, which will cause the waistband to gather up. (A tip: Use a safety pin to anchor one end of the elastic to the waistband so it doesn’t get lost as you use a second closed safety pin attached to the other end of the elastic to thread it through the channel).
Securely stitch down each end of the elastic inside the waistband channel.
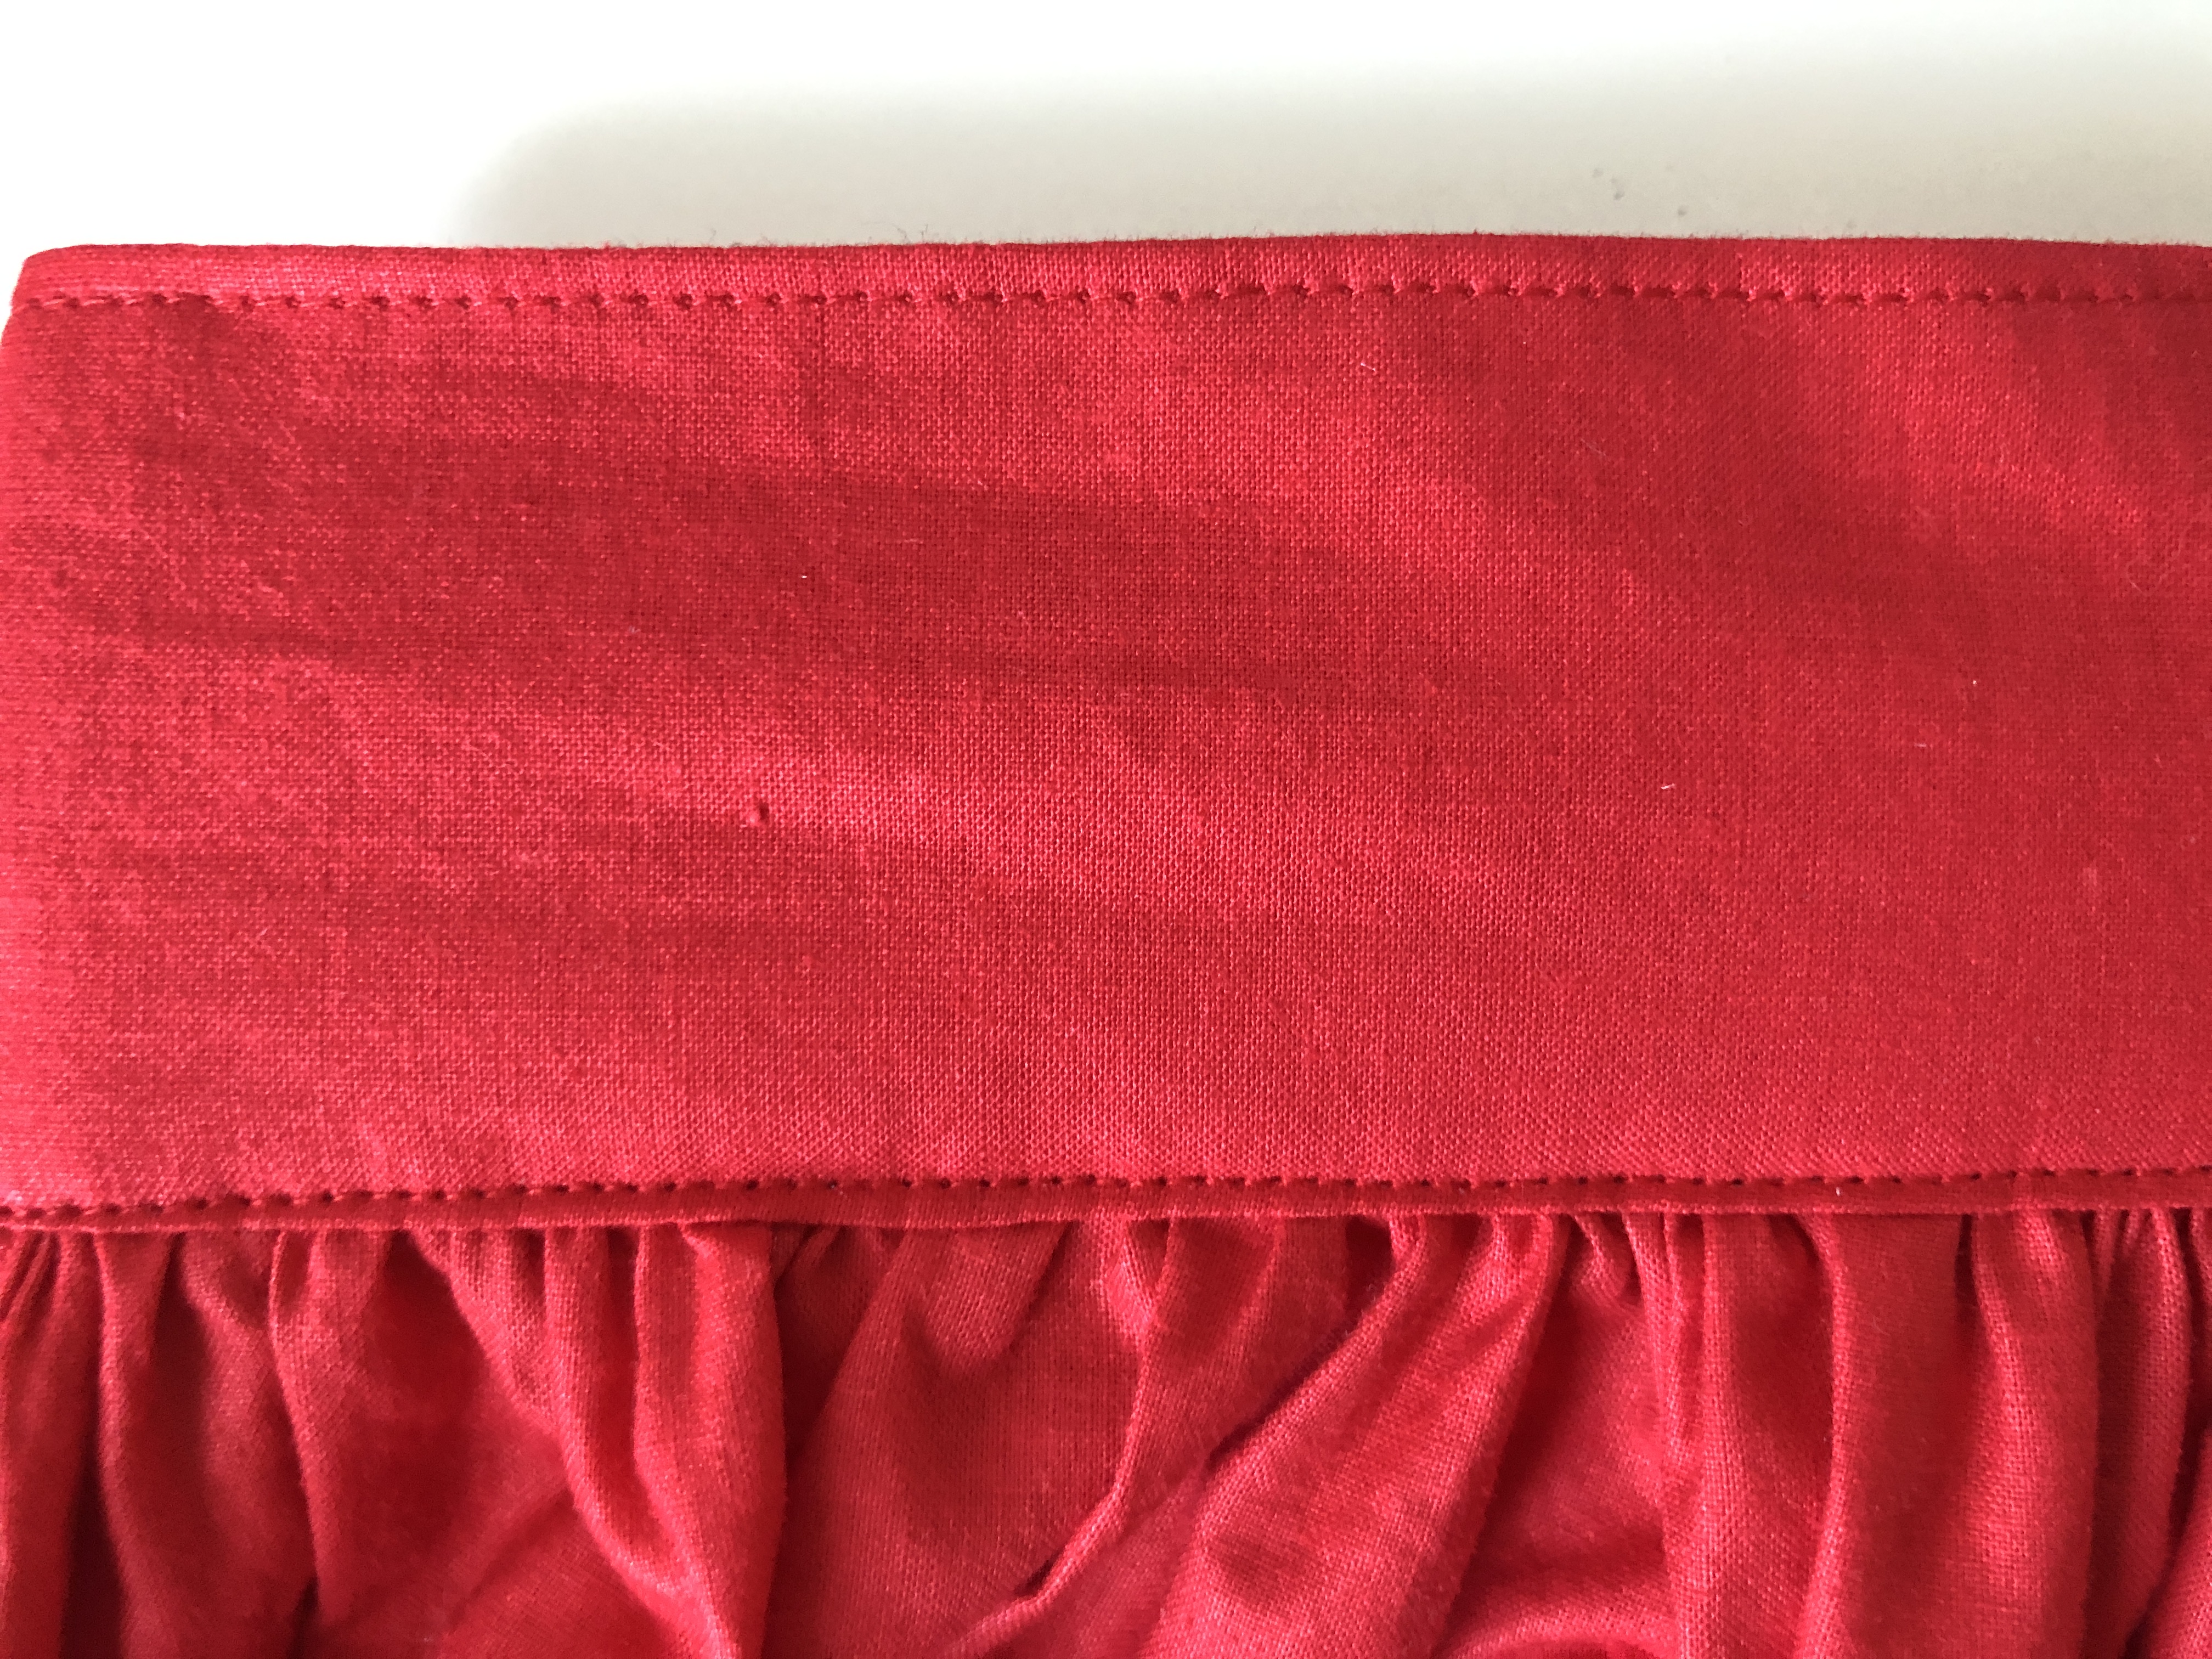
ATTACHING THE FRONT WAISTBAND:
Gather the front skirt panel across the top edge into a final width equal to half your waist size. To do this, sew 2 rows of straight stitches 1/4″ apart, then pull both threads at the same time to gather the skirt into the desired width.
Attach the front waistband in a similar manner to the back waistband by first sewing the WRONG side of the skirt panel to the RIGHT side of the waistband. Make sure the ends of the front waistband (with the seam allowance folded over) overlaps the raw edges of the back waistband. Flip up the waistband and turn your skirt over to look at the outside.
Similar to the method used for the back waistband, flip half of the front waistband over to the outside front of the skirt, tuck in the raw seam allowance, and pin down, covering the gathered portion.
Top-stitch the front waistband along the bottom edge and the sides where it meets the back waistband. Also top-stitch across the top edge of the entire top front/back waistbands of the skirt.
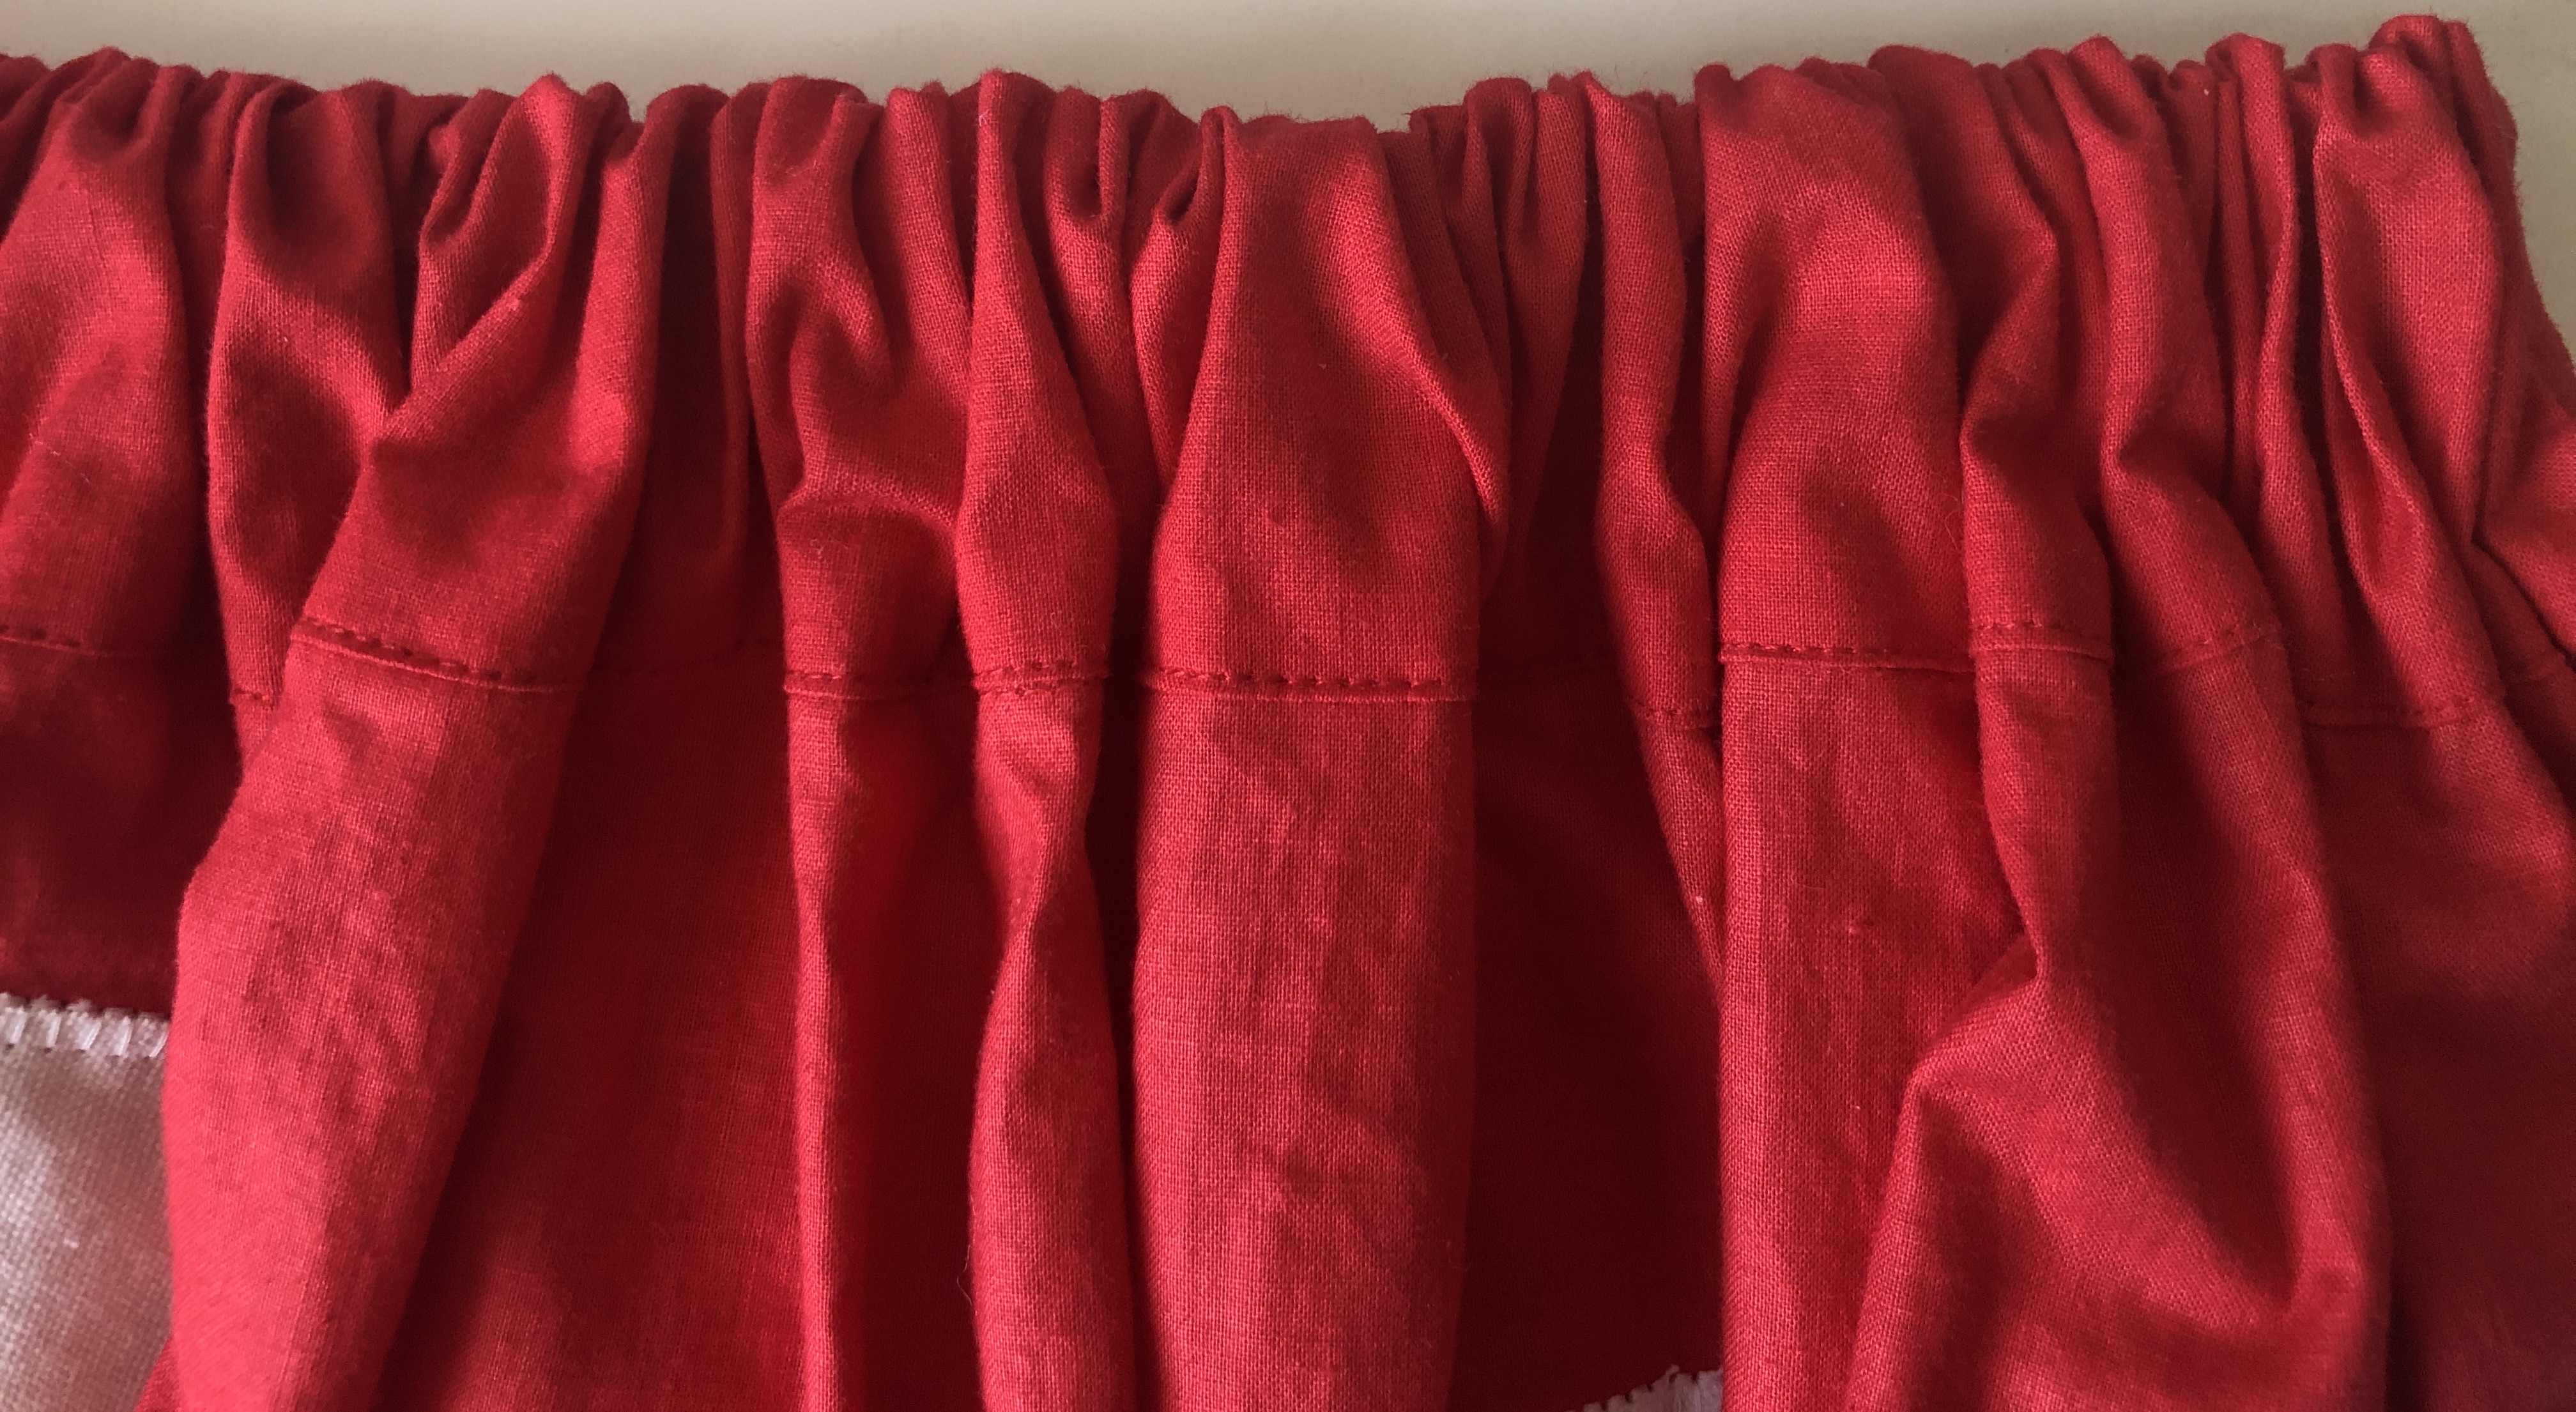
ADDING TRIM:
To mimic the gills of the mushroom you’ll want to add trim to the hem of the skirt. I’ve used a pleated chiffon trim but you can also use lace or a plain white fabric ruffle.
Measure the bottom circumference of your skirt. You will need to cut some trim the same length plus an extra inch for seam allowance. Sew the ends of the trim together to make a big circle. Pin the top edge of the trim UPSIDE DOWN to the hem of the skirt.
Remove the original pins as you fold the bottom up, then over again, to cover all raw edges and re-pin. Stitch where the pins indicate.
Press the hem flat. If your trim is sheer you’ll want to press the red fabric upwards behind the main skirt panel so that it doesn’t hang down behind the trim. (This folded hem is to add a little extra body to the hem of the skirt. If you prefer, you can also serge the trim to the skirt but should shorten the panels and trim accordingly).
Note: Originally I wrote this post in early 2020 but did not publish it. Given the global pandemic I felt it would be irresponsible to imply one should gather in groups. However, it is now 2021 and some people are making plans for the future or have been inspired by movies and TV shows to seek out like-minded individuals, and plus there are many virtual events happening as well. In addition, I’ve seen a number of people say their people skills are a bit rusty since they’ve been isolated for so long, so perhaps some reminders and tips as you plan and dream for the future might be helpful.
I and other costumers are often asked “how do I get started in historical costuming?” At first I gave out advice on beginning sewing tips and classes and where to get fabrics and patterns, but I’ve realized some people are actually asking “how do I get started in historical costuming adventures?” This post gives some advice to hopeful guests and some planning tips for both aspiring and experienced hosts.
Photo by In the Long Run Designs
How Do I Go on Costuming Adventures?
First off, I want to emphasize that you do not have to go on fancy costume trips to have a good time, and not being invited to a private event is not a reflection on you, your skill, or your worth. Although reenactment weekends, themed birthdays, cosplay balls, etc. can be quite fun, they are not necessary for you to feel like a full costumer. Some people are perfectly satisfied with making things for themselves in their own home and find the most enjoyment out of the process. Others find fulfillment out of wearing the costume to an event. Neither mindset is wrong. Please read the “Let’s talk about FOMO” section on a previous blog post.
OK, I Get It But Really Do Want to Wear Things Outside My House
To find like-minded people start your search online for local costume groups. Try Googling your city/county/state name and keywords like “costume” or “costumers.” If you’re willing to travel then expand your geographical search and include terms like “convention,” “festival,” and “fair.” You may also try “historical society,” “living history,” and “reenactment.” If you also like sci-fi and fantasy use “cosplay” and “cosplayers” in your search terms. If you enjoy story-telling and acting looking for “LARP” (live action role-playing). If there’s currently a hot new costume show you might throw that into your search. There are also lots of costuming groups on Facebook where you can find people with similar interests. You may end up finding a formal nonprofit organization or an informal Facebook group.
If you cannot find a local group perhaps you can post in an era-specific group “Hey, does anyone live in this area? I’m from ____ city and would love to go to tea with you.” Please use common sense when meeting up with strangers and also be understanding if someone nearby doesn’t want to meet up with someone they don’t know. I’ve become In Real Life friends with people that started out as online acquaintances that I later met at events, but that doesn’t mean I accept invitations from strangers who say “Here’s my phone number. Come to my house.”
If you encounter costumers “in the wild” don’t be afraid to approach them in a respectful way. If you take a tour of a historical home from a well-dressed docent, you can ask if they made their costume and have any local organizations they can recommend you join. If you spot a costumed group at a museum or park you can ask if they are part of a public club. Basic manners still apply: don’t gawk, follow them around, or make them feel unsafe.
Photo by John Carey Photographic
Have Realistic Expectations
You will not be invited to every event right away. You may find out about some events after they have passed. There is no secret formula or handshake to get into private dinners. The best way to be included is to make friends.
When you go to events make a point of introducing yourself to others; don’t always assume someone else will do it first. Before you complain about being “snubbed” please ask yourself if you put in some effort yourself and tried to reach out. Some icebreaker things you can say are:
“Did you make your costume? It’s lovely.”
“I’m not familiar with the character/cosplay you’re portraying but I’d love to hear more about it.”
“That’s a great color on you!”
“This is my first time here so if you have any tips they’d be very appreciated!”
Private events are fun but don’t forget that public events are great, too! Everyone likes to feel special, and I can understand why a private weekend getaway seems more special than a public picnic at a public park, openly advertised on FB. But please ask yourself, do you want to attend the event because it’s fun, or because it’s exclusive? And if it’s the latter, think about if you’re missing out on some great events while chasing after some other ones.
Reasonable vs. Unreasonable Requests
As a hostess and participant, I sometimes get comments and messages after I post photos on social media about an event and I’m willing to wager a lot of others do as well. If you are seeking a future invitation I cannot emphasize enough to make your correspondence extra polite since tone can be hard to gauge from text. Many people enjoy organizing events, and they are much more likely to invite you for future events if you don’t accidentally appear snide, prying, or offended:
“Wow lovely! Was this a private or public event?” vs. “Looks like another secret party for popular girls.”
“I’mthinking of renting the same venue; do you mind giving me a DM about the cost to see if it’s in my budget?” vs. “How much did everything cost?”
“Is there a club website or newsletter where I could sign up for event notifications?” vs. “How come I didn’t know about this?”
Can I Ask Though?
Others may disagree but I believe so, yes, under certain circumstances. My personal opinion is that a VERY polite, direct inquiry is ok: “Hi, my name is ____ and I am a costumer who lives in _____. I apologize if this a private event but in case it is open to others I’d like to indicate my interest in attending and making new friends.” (What is not very polite is a short “Can I come too?” because it’s not clear if you are serious or will be offended if they say no). If you have an Instagram account, blog, etc. include it. This is not to see if you’re “good enough.” Sometimes someone doesn’t recognize a name but does recognize your face, IG handle, or a costume and realizes they know you after all. Help the hostess figure out you’re a “safe” person already in the community, and not a random creep on the internet.
If you get a reply that the event is/was a birthday party for friends only and not a public festival or reoccurring guild event, then thank the person politely instead of trying to guilt them for not including you. Maybe you’ll get to know them better at another event and you may be invited next time, if you didn’t come across as entitled and unpleasant.
It’s natural to feel envious about not being able to participate in everything. But before you jump to self-doubt or accusations of elitism, ask yourself would you feel the same way if this was a t-shirt and jeans meetup at the pizza parlor? If a few people gathered at the local pub for drinks and darts, would you feel like they knew you well enough to include you just because you live in the area? If the answer is no, then there is no obligation. The answer does not change because the t-shirts got swapped for gowns.
Also remember, just because you didn’t hear about it doesn’t mean it was secret.
On the subject of asking: Aside from invitations if you have a costume question it can be fine to reach out for help (if you tried doing a little research first), but please remember that some people have businesses to run, children to care for, etc. If they have a lot of followers and get lots of messages they may not have the ability to respond to every comment. If someone can and wants to personally mentor you that is lovely, but it is not an expectation you should have of everyone. You don’t know how many other requests they get or what else is on their plate. Also remember that there are many talented people who are not “famous” who might be delighted to hear from you, or have excellent expertise in a particular area.
Photo by Lori Clayton
Is the Cost Fair?
I’ve seen people complain about ticket prices and it can be a fair criticism if a group claims to be interested in outreach but makes no effort to be accessible through member discounts, scholarships, public workshops, etc. However, ultimately the cost is up to the organizers and it rude to leave comments on the event page discussing your personal finances or calling it a scam. (It is ok to ask what perks you get for your ticket price if the event details are vague).
If the hostess wants to include the cost of professional catering in the event ticket instead of making hundreds of tea sandwiches and cookies herself or hoping she gets enough volunteers, she has the right to charge for food.
If the event is held at a historical mansion that needs a donation for its preservation efforts, it is not snobbery or greed that the cost happened to fall outside your budget.
If the event’s ticket price to a public venue is higher than the regular ticket price, consider that perks like party favors and decorations or administrative costs like PayPal fees have been included, not that a profit is being generated.
If the event includes a souvenir, drinks, etc. do not demand a prorated ticket for declining part of the package; it would be chaos for the organizers to keep track of those small details for everyone.
Tickets to Venice, renting a mansion, reserving a room at an inn, catering, etc. are not cheap. Although I believe strongly that groups should try to have some lower-priced events like picnics or casual meet-ups for recruitment purposes, they are not obligated to have every single event be budget-friendly. If once a year your guild wants to have a fancy dinner in a nice hotel that is ok. Someone wanting to splurge and treat themselves does not automatically mean they are trying to be exclusionary. Costuming is a hobby, not a necessity, and by that nature it is a luxury even if you don’t use luxury materials. (That being said, if every event, workshop, and social activity your group puts on is prohibitively expensive, I would ask you examine why that is the case and who is being left out).
Tips for Hosting an Event (and Keeping Your Sanity)
Pick a date: As host(ess), you have the privilege of picking the date. If you want to, you can pick a few dates that work for you and have people choose from them but remember you get the final say. You can do a poll or vote but trying to get a large group of people to all agree on a single date will not happen. It’s lovely to be accommodating but don’t let anyone make you feel bad for not being able to find a date where 100% of your friends can come.
Have firm RSVP dates and deadlines before the event date: In your invitation state the deadlines to RSVP, to pay for tickets, pick a meal choice, etc. It saves you a lot of stress. You don’t want to scramble for extra chairs or plead with the caterer at the last minute because a few people added themselves the morning of the event.
Limit the number of guests: You are not obligated to invite an unlimited number of guests. If you want an intimate candlelit dinner party, or prefer to not have a roommate at the Airbnb, or don’t have the time to make 40 party favors or collect ticket money from 60 people, that is your right. It is your event and you get to decide how many people you have the energy to wrangle.
There are also practical/legal considerations: Find out what your location can comfortably hold, or what the fire marshall has decided is the safe limit of people. Some venues increase the price significantly over a certain number of guests; find out the point at which “party” pricing turns into “wedding” pricing. (Don’t assume that you can just raise the price of the ticket to make up the difference; any cost increase may mean a decrease in RSVPs and you might lose money or price out people you want to include).
Be aware of your local county or venue regulations. Sometimes beverage licenses, insurance policies, or hiring a security guard is required when your guest list exceeds a certain number.
Be firm about the number of guests: If the event sells out you will probably get people pleading for an exception, complaints about “unfairness,” plans to gatecrash, or other attempts to step on your boundaries. If you keep increasing the ticket blocks you are sending the message that if someone bullies you enough they can get their way, even if it puts you at risk of burnout or fines. (Also keep in mind many people complaining about a sold out item or event do not actually end up buying anything even if offered that opportunity later. You may be putting in extra work for no additional turnout).
Make the dress code easy if you want more guests: If your goal is to welcome lots of people or make it easier on your friends, do not pick an obscure or niche era. Pick something where it’s easy to sew (Regency), or has lots of patterns (Victorian), or can be purchased online (1920s). Casual Edwardian events are also nice because it is accessible to people with limited time or skills: you can thrift a white blouse and long skirt if necessary. If you do pick a very specific theme, give people lots of advance notice to get a costume together.
No guarantee of refunds: State if someone paid for their tea or dance ticket and had to cancel, they are responsible for reselling their spot and getting their money back. If there is still a lot of time before the event you may refund on a case-by-case basis. (I like to help someone find another buyer if there’s time but I also don’t want to box myself into a situation where someone can cancel suddenly and demand a refund after I’ve already paid the restaurant or vendor).
Send out reminders: Don’t bombard invitees with messages but “Hi, tomorrow is the last day to pay before I close ticket sales” etc. is often appreciated. If your invitation is through Facebook and the guest is list is small, you may also make a post tagging individuals who RSVP’d yes but forgot to send their deposit. (I would not do this for a large event where a number of people simply clicked “interested”).
Have the guest list be viewable to guests if it’s a Facebook invitation: People can see who else is going and arrange carpools, roommates, etc. without having to bother you about it. (This does not apply to non-Facebook events like a ticketed website; participants would find it odd to have their names listed publicly).
Do events at different price points: Weekends at castles are lovely but don’t forget a picnic here and there. It’s a lower barrier to entry and great for making new friends, plus less stress for you!
Consider venues with built-in entertainment: Museums, historical homes that come with tours, amusement parks, aquariums, and plays are a great place to have a good time without you having to plan a lot of party games.
To All Aspiring Guests and Hosts:
Thank you for reading and I hope this guide was helpful to you. May the future be kind to you and we all have a chance to gather together safely again soon.
March is a little late in 2021 to do a 2020 costuming year in review, but I wanted to make sure everything I made had its own blog post you could refer back to for more detail!
I was in the mood to make something comfortable, yet luxurious for my last winter 2020 project. March may be a little late to document my last finished project of 2020 but I had a bit of of backlog to get through. My next post will be the 2020 Costuming Year in Review (finally!)
To make the Wearing History pattern suitable for PJs you’ll want to cut a larger size so that it is loose. I also cut the bottom of the sleeves a little wider. (In the original you have tapered sleeves and buttons at the cuffs and I didn’t want that for PJs). I didn’t have any buttons that were right so I used snap closures. (In the original pattern the front closes with a placket and hooks and eyes, so you’ll want to add a little extra fabric for the overlap if you use buttons or snaps). I also added some black lace appliqués to the shoulders.
I purchased 4 yards of 53″ wide purple silk satin and had enough left over to cut out a camisole and still have a large remnant piece. I bought the satin on eBay but the last time I checked the seller seems to not be around anymore.
I wore black bedroom slippers with a big fuzzy pompom for a fun touch.
This was a fun project to round out 2020. It was nice to have something that was both glamorous and comfortable!
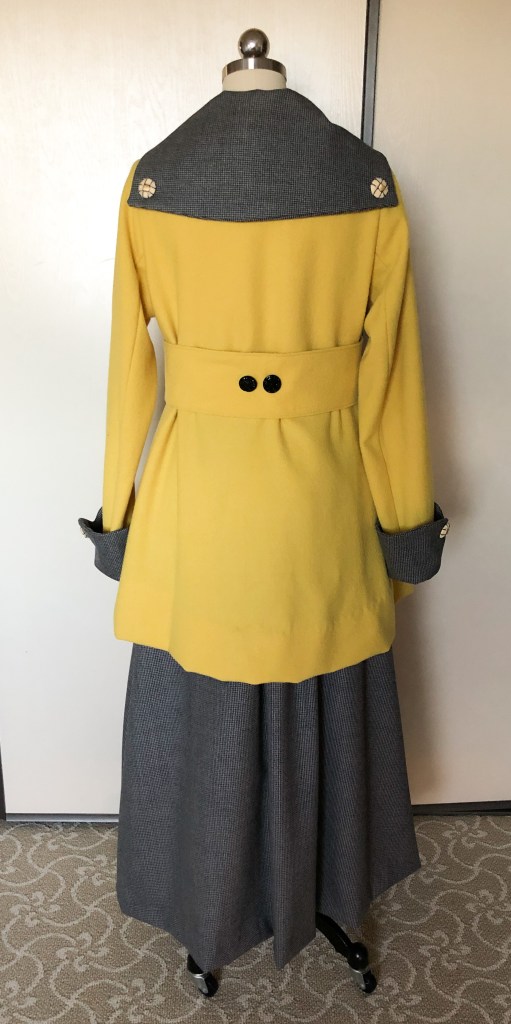
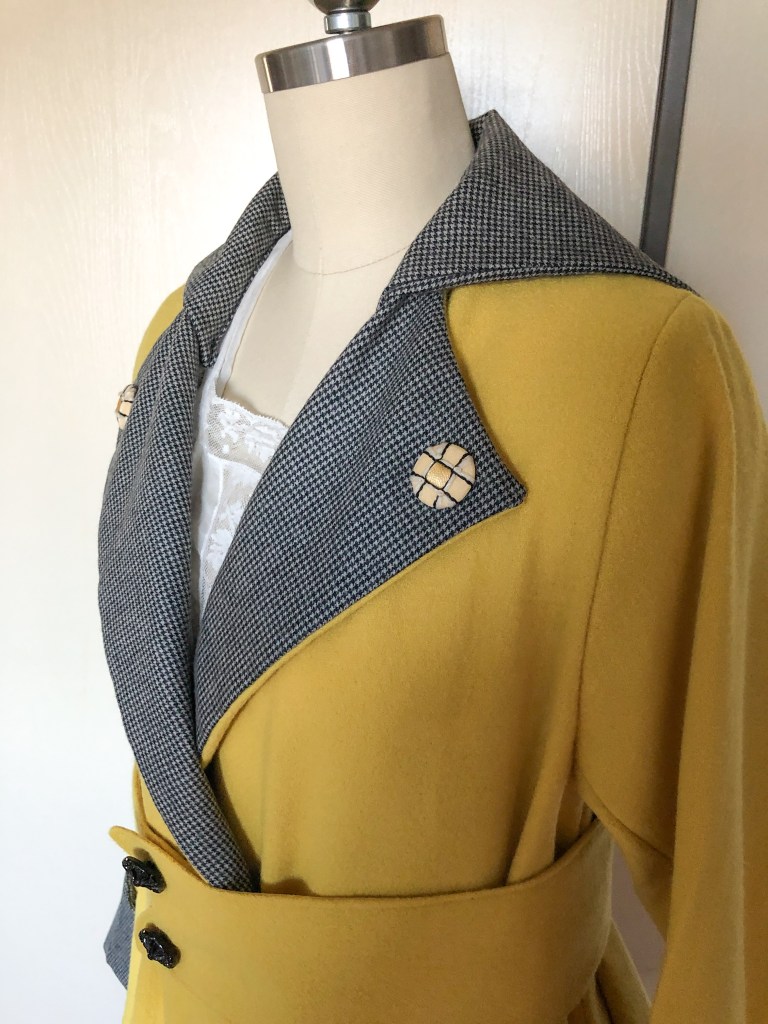
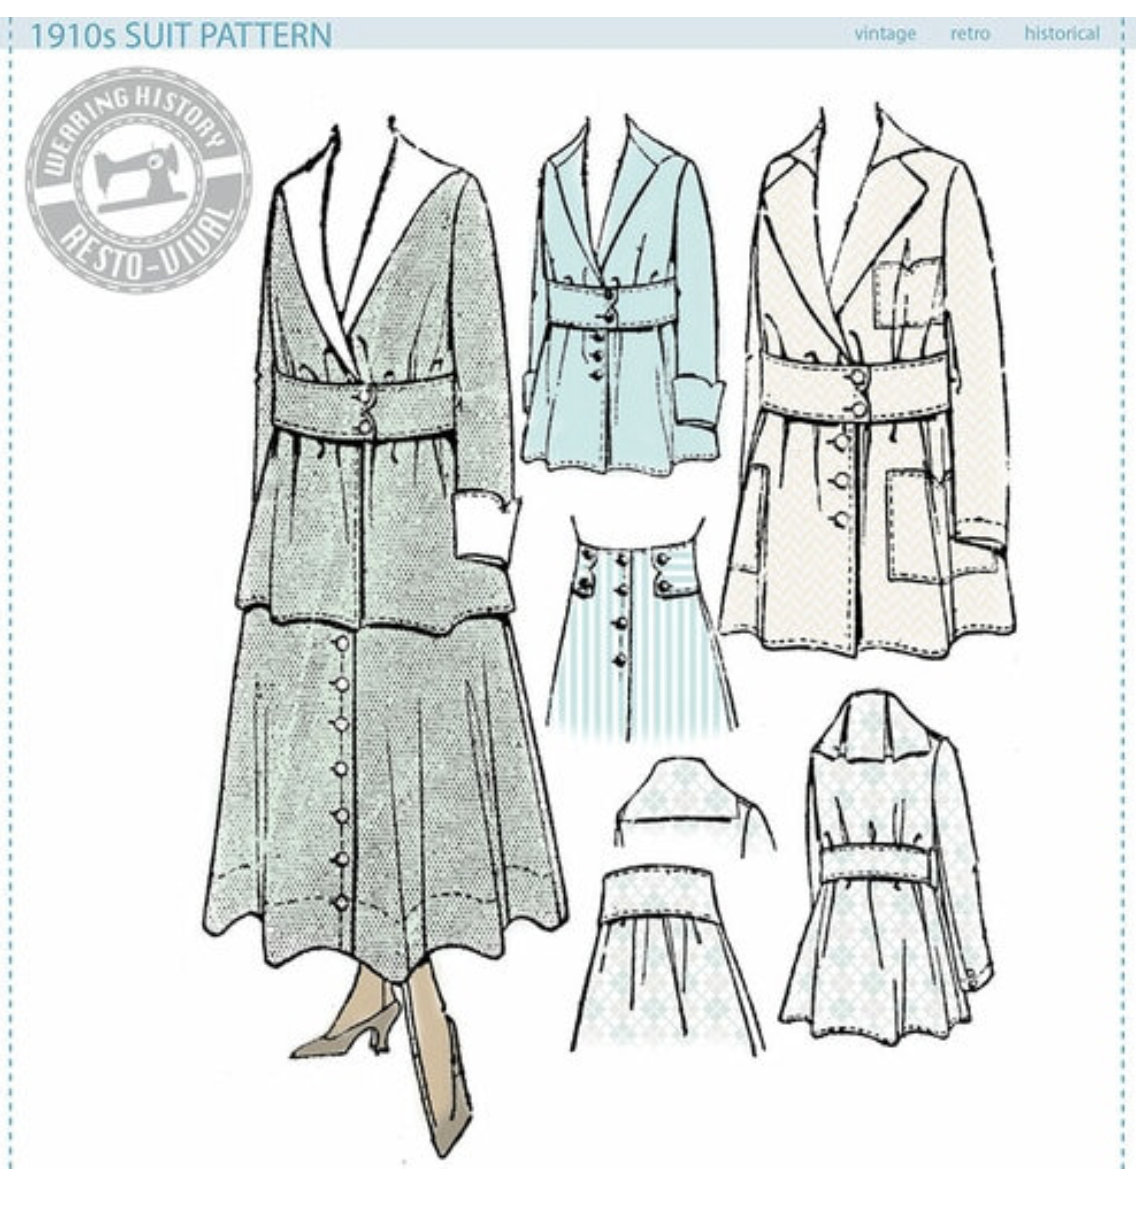
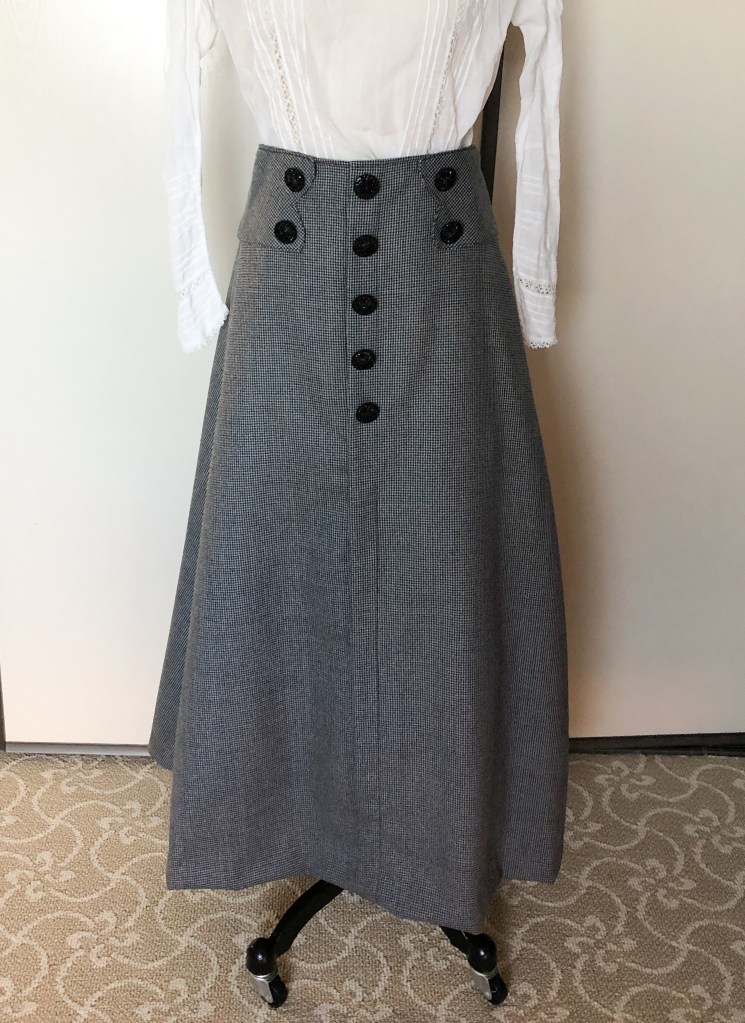
I liked the big lapels, sailor collar, and tulip-shaped pockets and cuffs.
I used a gray and black houndstooth wool for the skirt and accents and a yellow wool for the jacket. The black buttons are vintage Czech glass buttons and the the yellow ones are vintage handmade.
There are different options for collars and pockets in this pattern.
The skirt is made according to the construction methods of the era where there’s an internal waistband that actually holds the skirt up. The waistband you see on the outside is attached at the top but not at the bottom, allowing for the gathers in the back of the skirt to hang loosely.
I made myself a matching hat which was pretty easy! The base of the hat used the same pattern as the jacket belt. I wrapped it around my head at a jaunty angle and pinned it to fit. The center of the hat is just a giant pleated rosette with a pompom hiding the center hole.
I’m afraid I took my photos while it was getting dark quickly during winter, so they are a bit grainy.
Some sizing notes: This is based on an antique pattern from the period.
The original skirt is quite long (great for tall people) but WH includes a cutting line if you want a shorter version of the skirt. I am 5’6″ and cut the shorter version.
The shoulders of the jacket are rather broad. I had to take in the shoulders a little bit to reduce the width.
The jacket is very full and loose but this is intentional. Shaping is done by the belt. You do not need to cut a smaller size; it is supposed to be a bit tent-like. (For security I have some hidden snaps in the jacket and hooks and bars in the belt).
Materials:
3 yards gray/black houndstooth wool: $31.50 plus tax and shipping from Fabricmartfabrics
Pattern from Wearing History: $28 plus tax and shipping
4 yards yellow wool: $65 including tax and shipping from a FB destash group
Vintage yellow buttons: $6 + tax from a marketplace
Vintage Czech glass buttons: from eBay; I’ve had them for years and don’t remember how much I paid
Thread, snaps, etc. from stash
I’m not quite sure of the total cost because items 1 and 2 had shipping bundled with other items; I don’t have receipts for everything, and I have leftover wool in both colors, but I hope this gives you an approximate idea of what it will cost you to make your own. Thank you for reading!
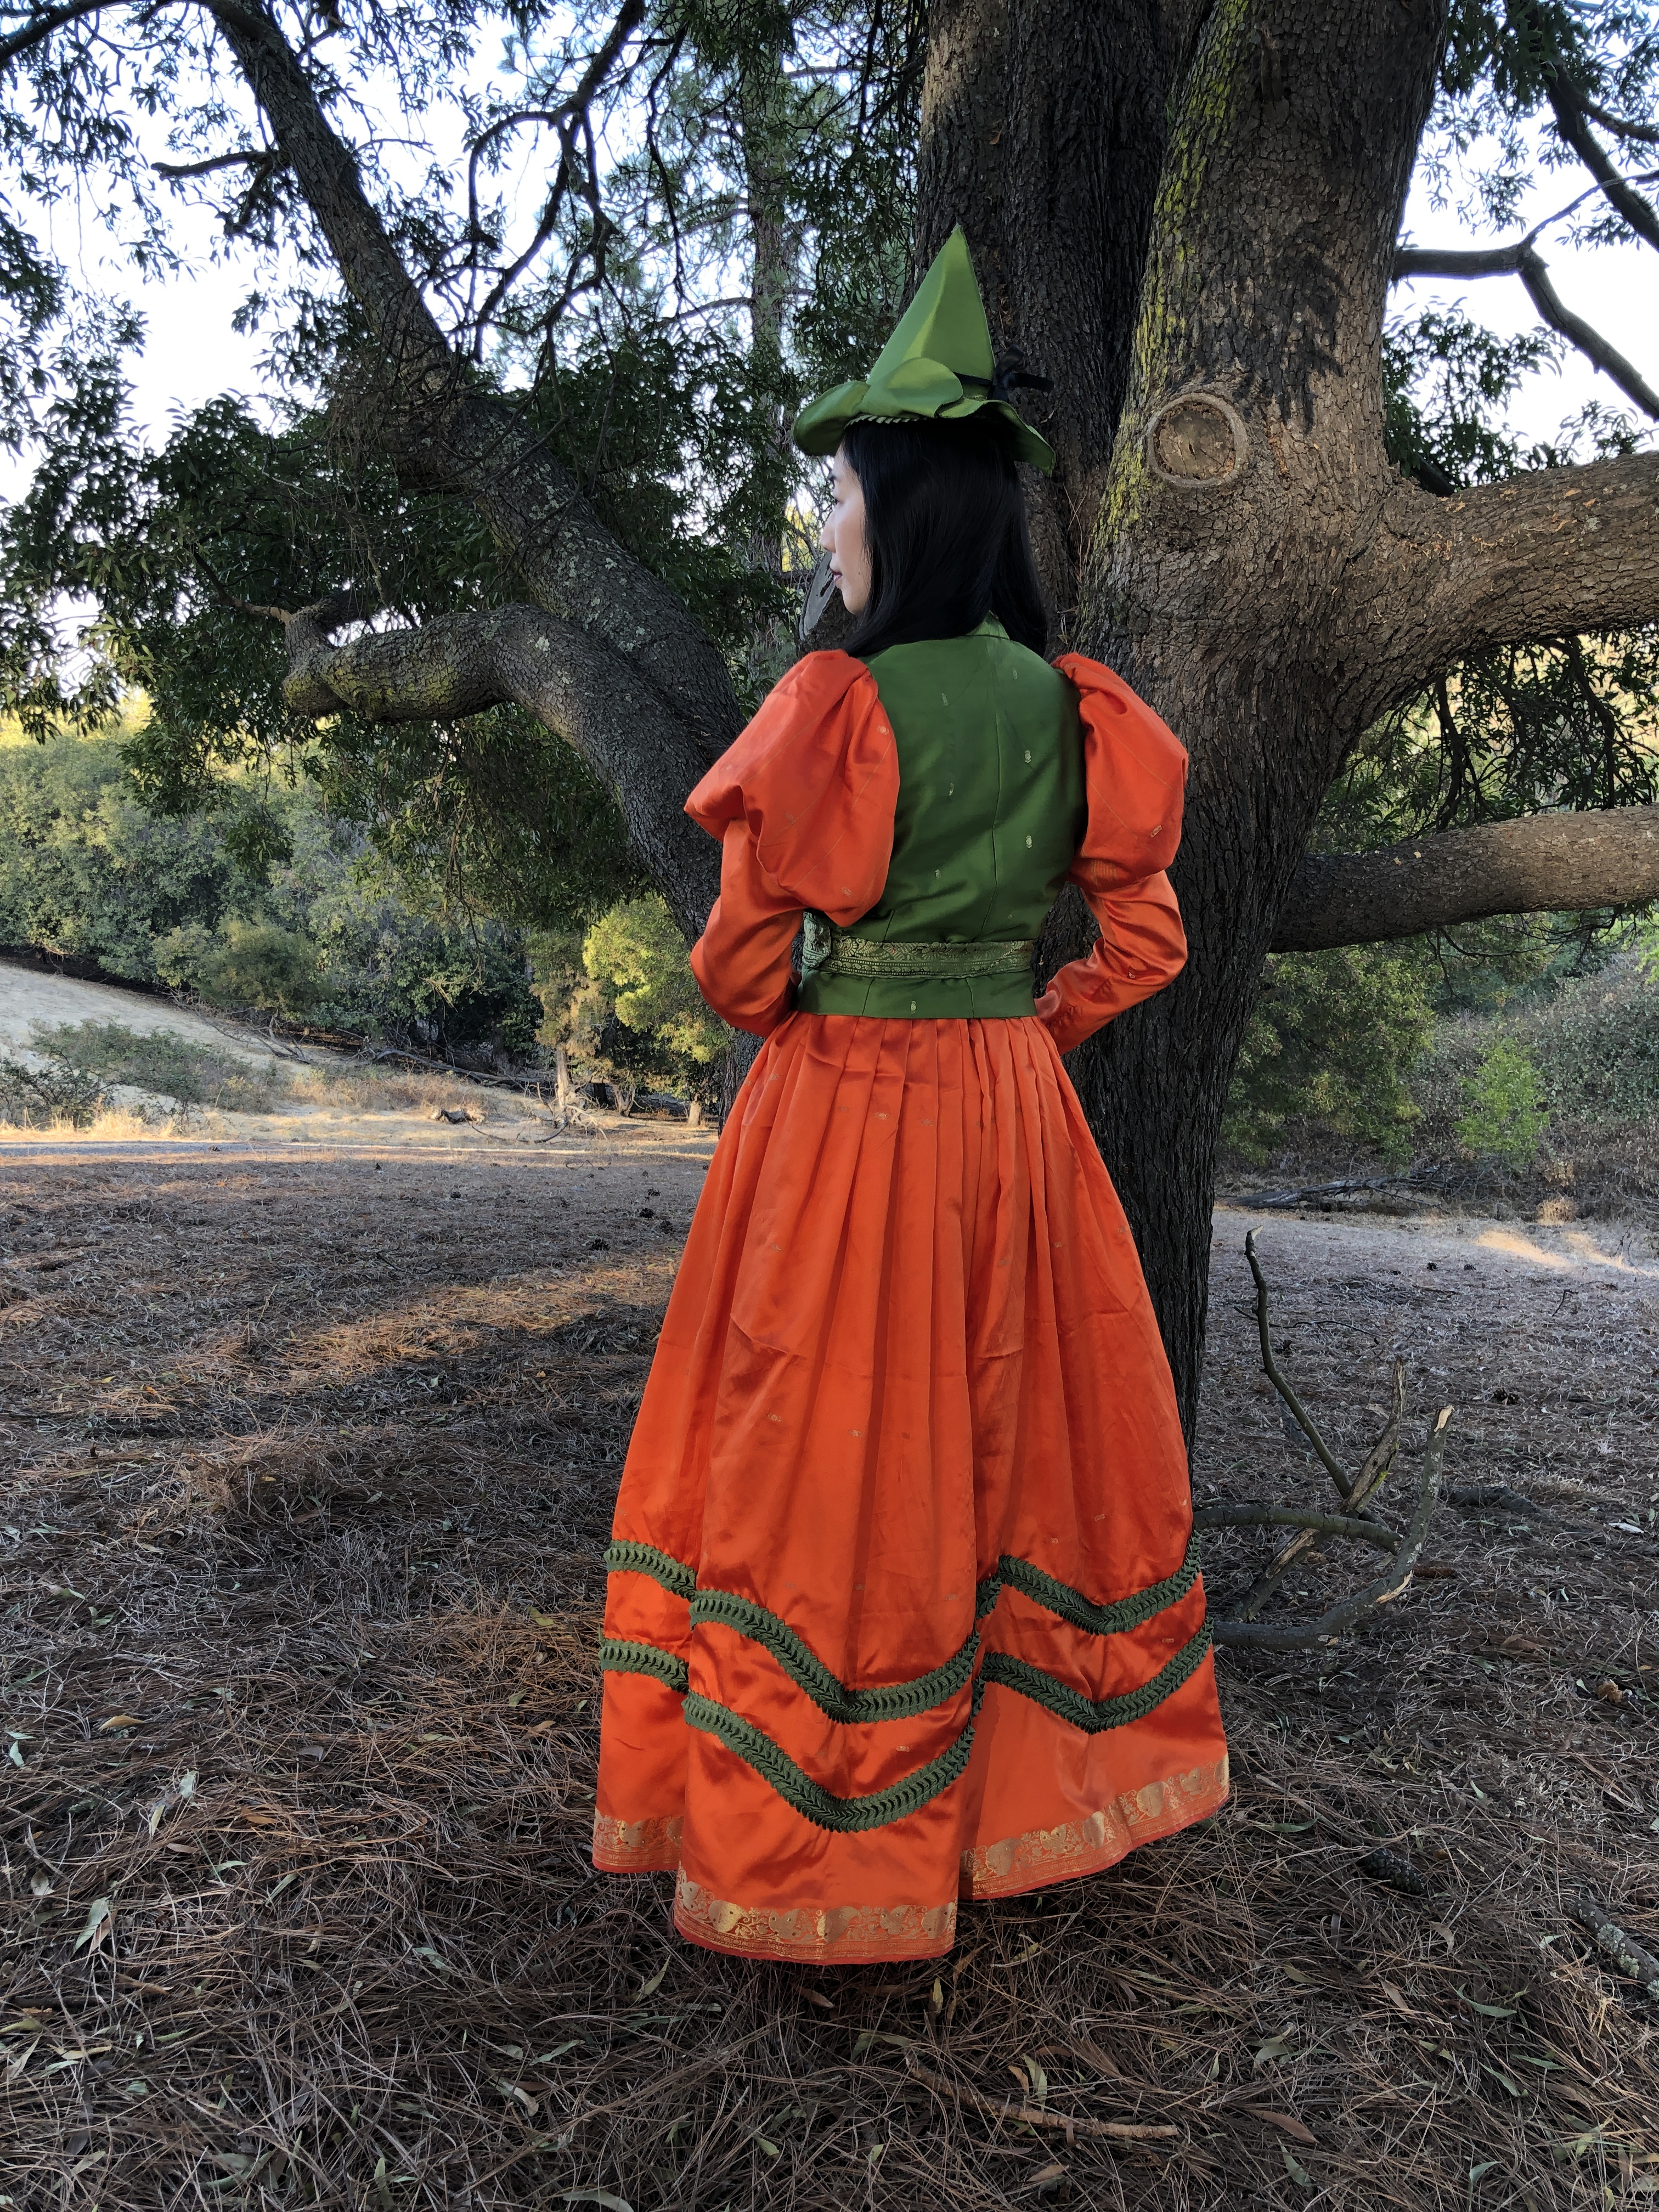
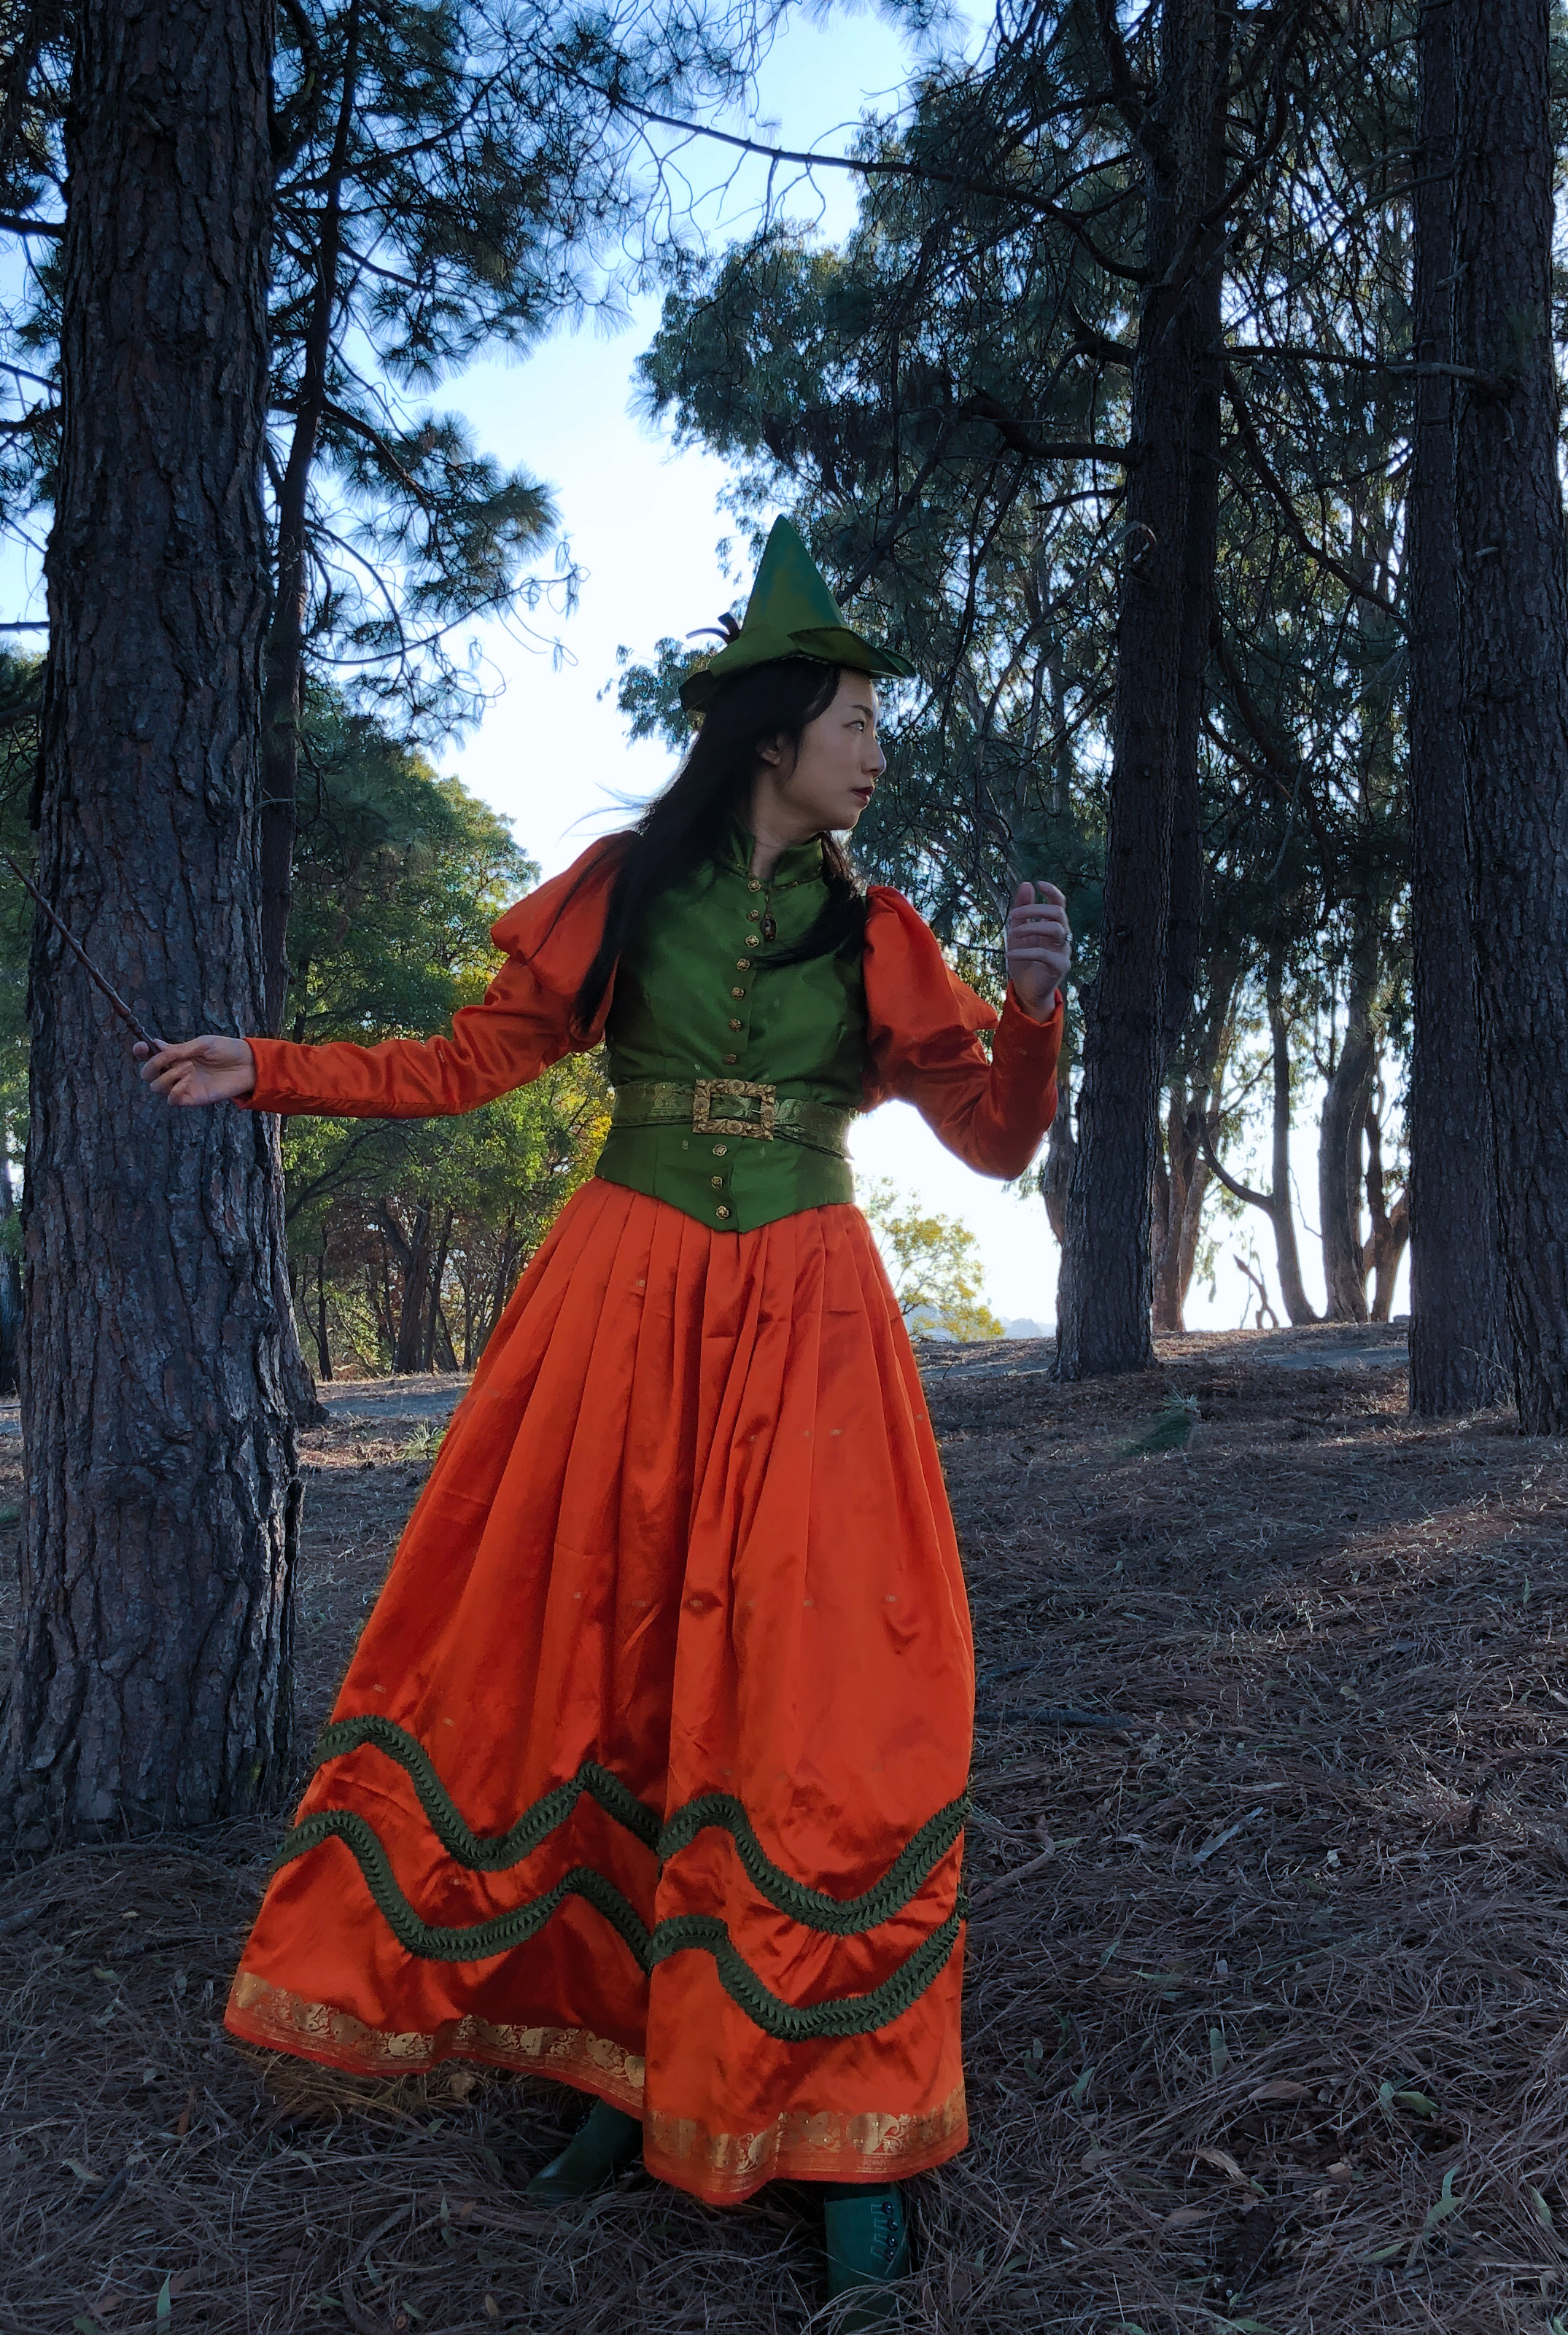
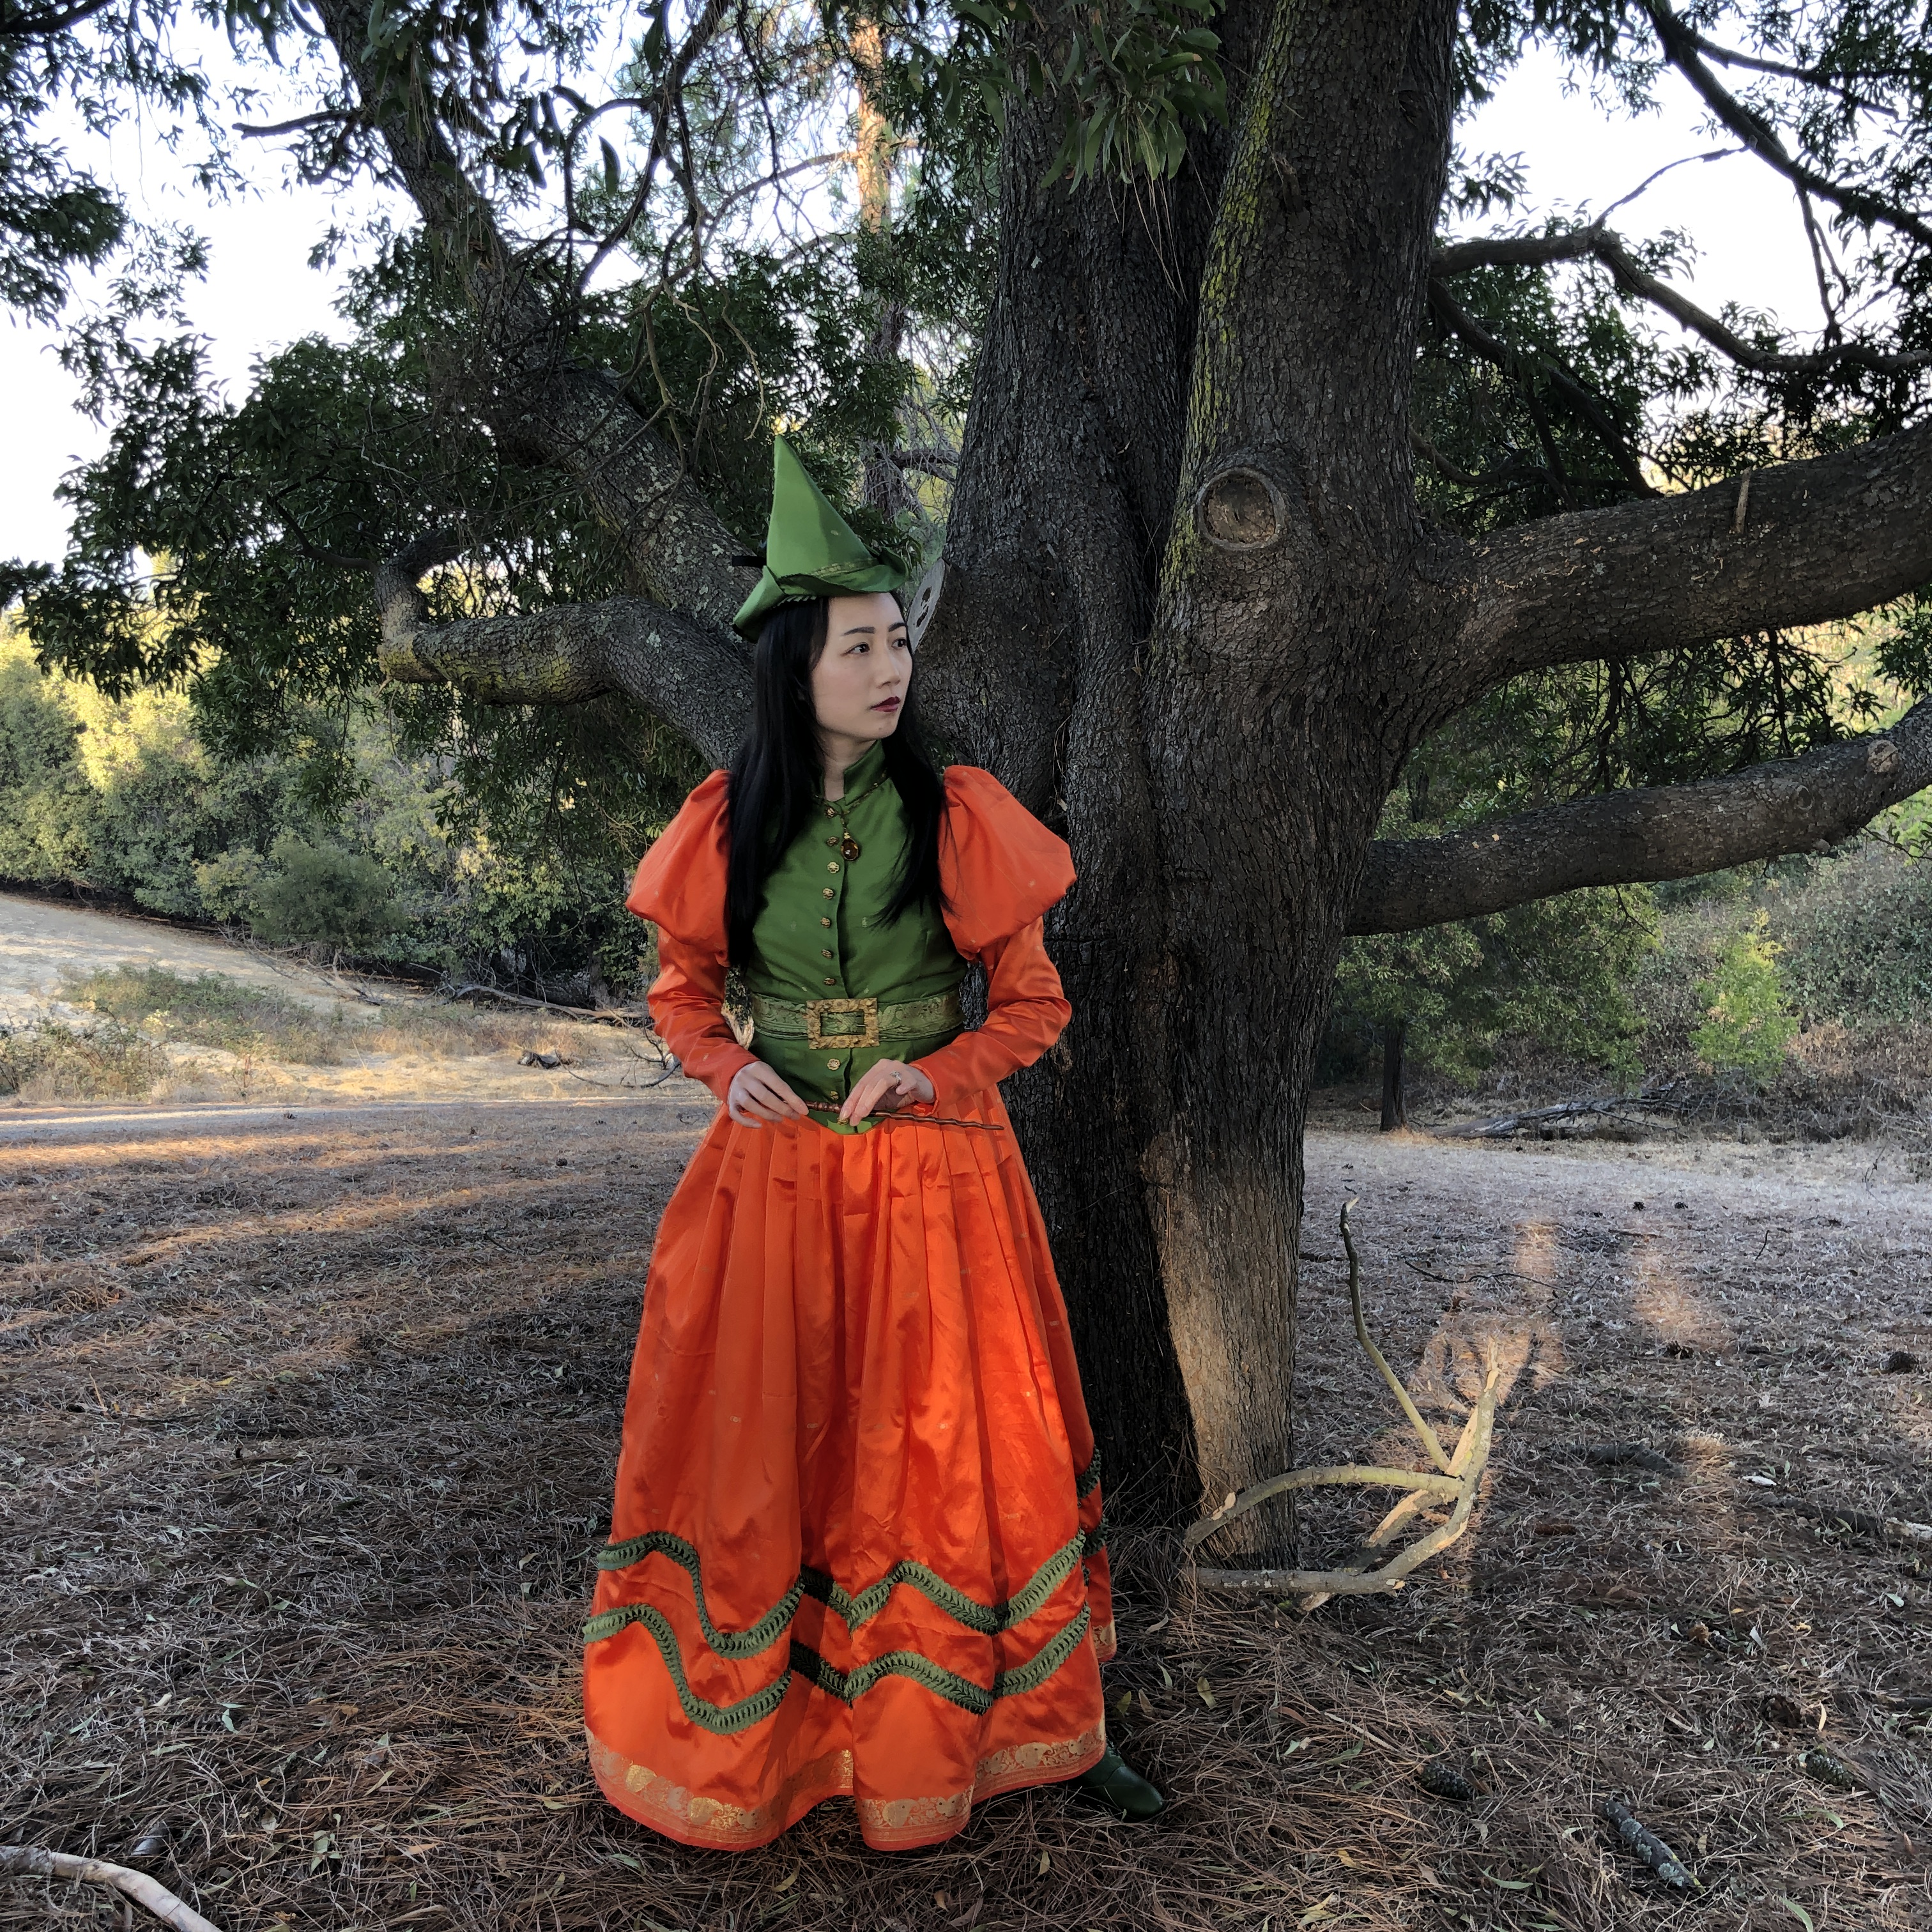
For Halloween I made myself a Victorian/Edwardian-inspired mashup witch costume. I got large amounts of sari fabrics rather cheaply from a local person after they were used as party decorations, and even after distributing most of it to friends I still had a lot left over, and decided they were perfect for a bright Halloween witch. Since this was a costume I didn’t worry about combining details from various decades.
The skirt is a basic pleated two-panel skirt with seams on the sides. One seam has a pocket and the other has an invisible zipper. Since the sari is thin and I had so much of it I flat-lined it with more of the same.
The blouse and vest patterns are both from Black Snail Patterns on Etsy. They are the 1890s Late Victorian Day Blouse/Bodice and 1890s Edwardian Ladies’ Vest. Because this was meant to be a Halloween costume I took a “theatrical” approach to the construction and skipped a lot of the detailed and historically accurate instructions in the patterns such as creating facings, boning, etc. so I cannot comment on those. As usual, I did find the pattern pieces to be well-drafted and needed very little adjustment. My biggest cheat is I sewed the sleeves from the blouse pattern directly to the vest to make one garment. This saved me a lot of time, and also made the costume less warm with less layers!
Instead of making lots of buttonholes for my small gold buttons I did hidden hooks and bars down the front of the bodice and the buttons are decorative.
The belt is made from a scrap of the green sari fabric, paired with a vintage belt buckle. The buckle is actually plastic painted gold but looks pretty good from a distance!
The green pleated grosgrain trim was purchased pre-made from Amazon (affiliate link) and comes in other colors. I used the olive color this time but you may recognize that I used a baby blue version for my pink striped bustle dress!
The hat was made using my own pattern for a Professor McGonagall-inspired deerstalker witch hat, and you can find the instructions on a previous post.
I’m afraid I didn’t do a great job tracking the yardage since I had basically unlimited fabric, but I would estimate that I used 3 orange saris (since everything was 2 layers) and one green one. The saris I got were used and pre-cut and were 3-5 meters each. Thus, my rough estimates for project costs are as follows:
4 saris: ~$20 (yeah I got a great deal!)
25 yard roll of pleated grosgrain trim: $9.50 from Amazon, and I have a lot left. (The trim usually runs about $40 a roll but I’ve bought other colors through random price drops).
Gold buttons: free from a friend
Vintage buckle: ~$10? (I don’t remember).
Thread, hooks and eyes, collar interfacing, lining: ~$5 (stash and scraps from other projects)
Bodice pattern: $8.60
Vest pattern: $7.37
Printing costs: $5.56 plus shipping (I had my A0 patterns printed by PDFplotting.com and the shipping was bundled with other things)
Total: ~$45 for materials and ~$25 for patterns I will reuse
Some final thoughts:
This project was all polyester. The fabric was pretty enough it didn’t “matter” if it was silk and I hope this a reminder that costumes don’t need to be expensive.
Did you notice that I pleated the front of the skirt differently than I did the back? I didn’t until I put the waistband and zipper on, and I didn’t care to redo it! Here’s a reminder that maybe “mistakes” aren’t really that big of a deal and probably most people won’t notice.
I did some cheats to simplify construction. What works for you is what works for you, whether it is historically accurate, historically appropriate, historically adequate, or historically adjacent!
Thank you for reading!
My necklace is antique glass and brass from the 1930s and my shoes are from American Duchess.
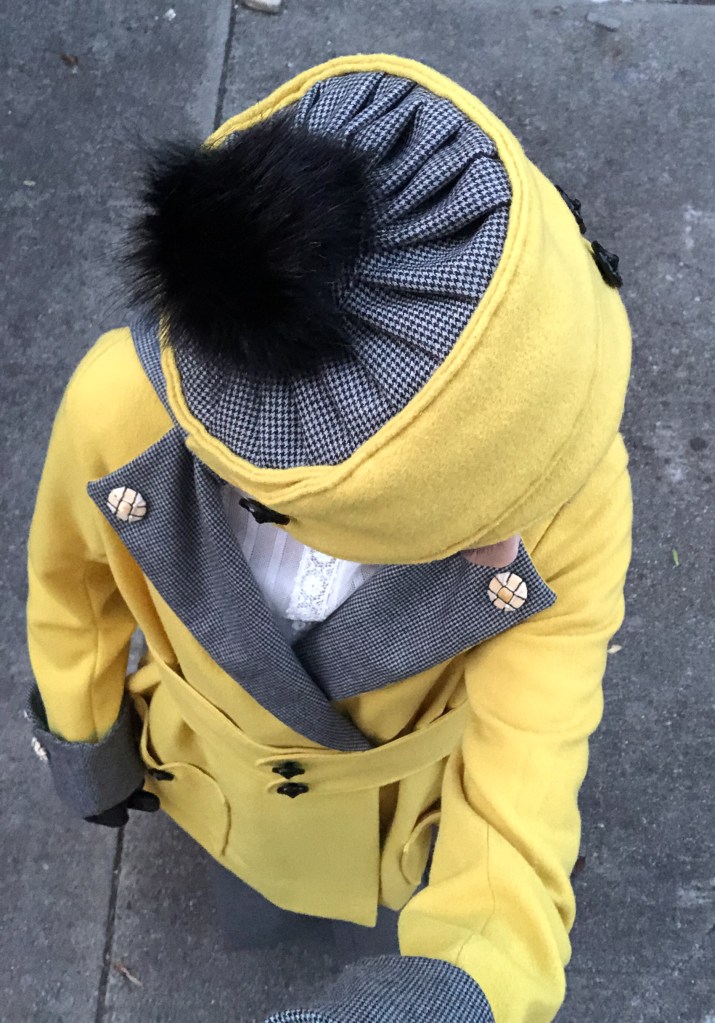
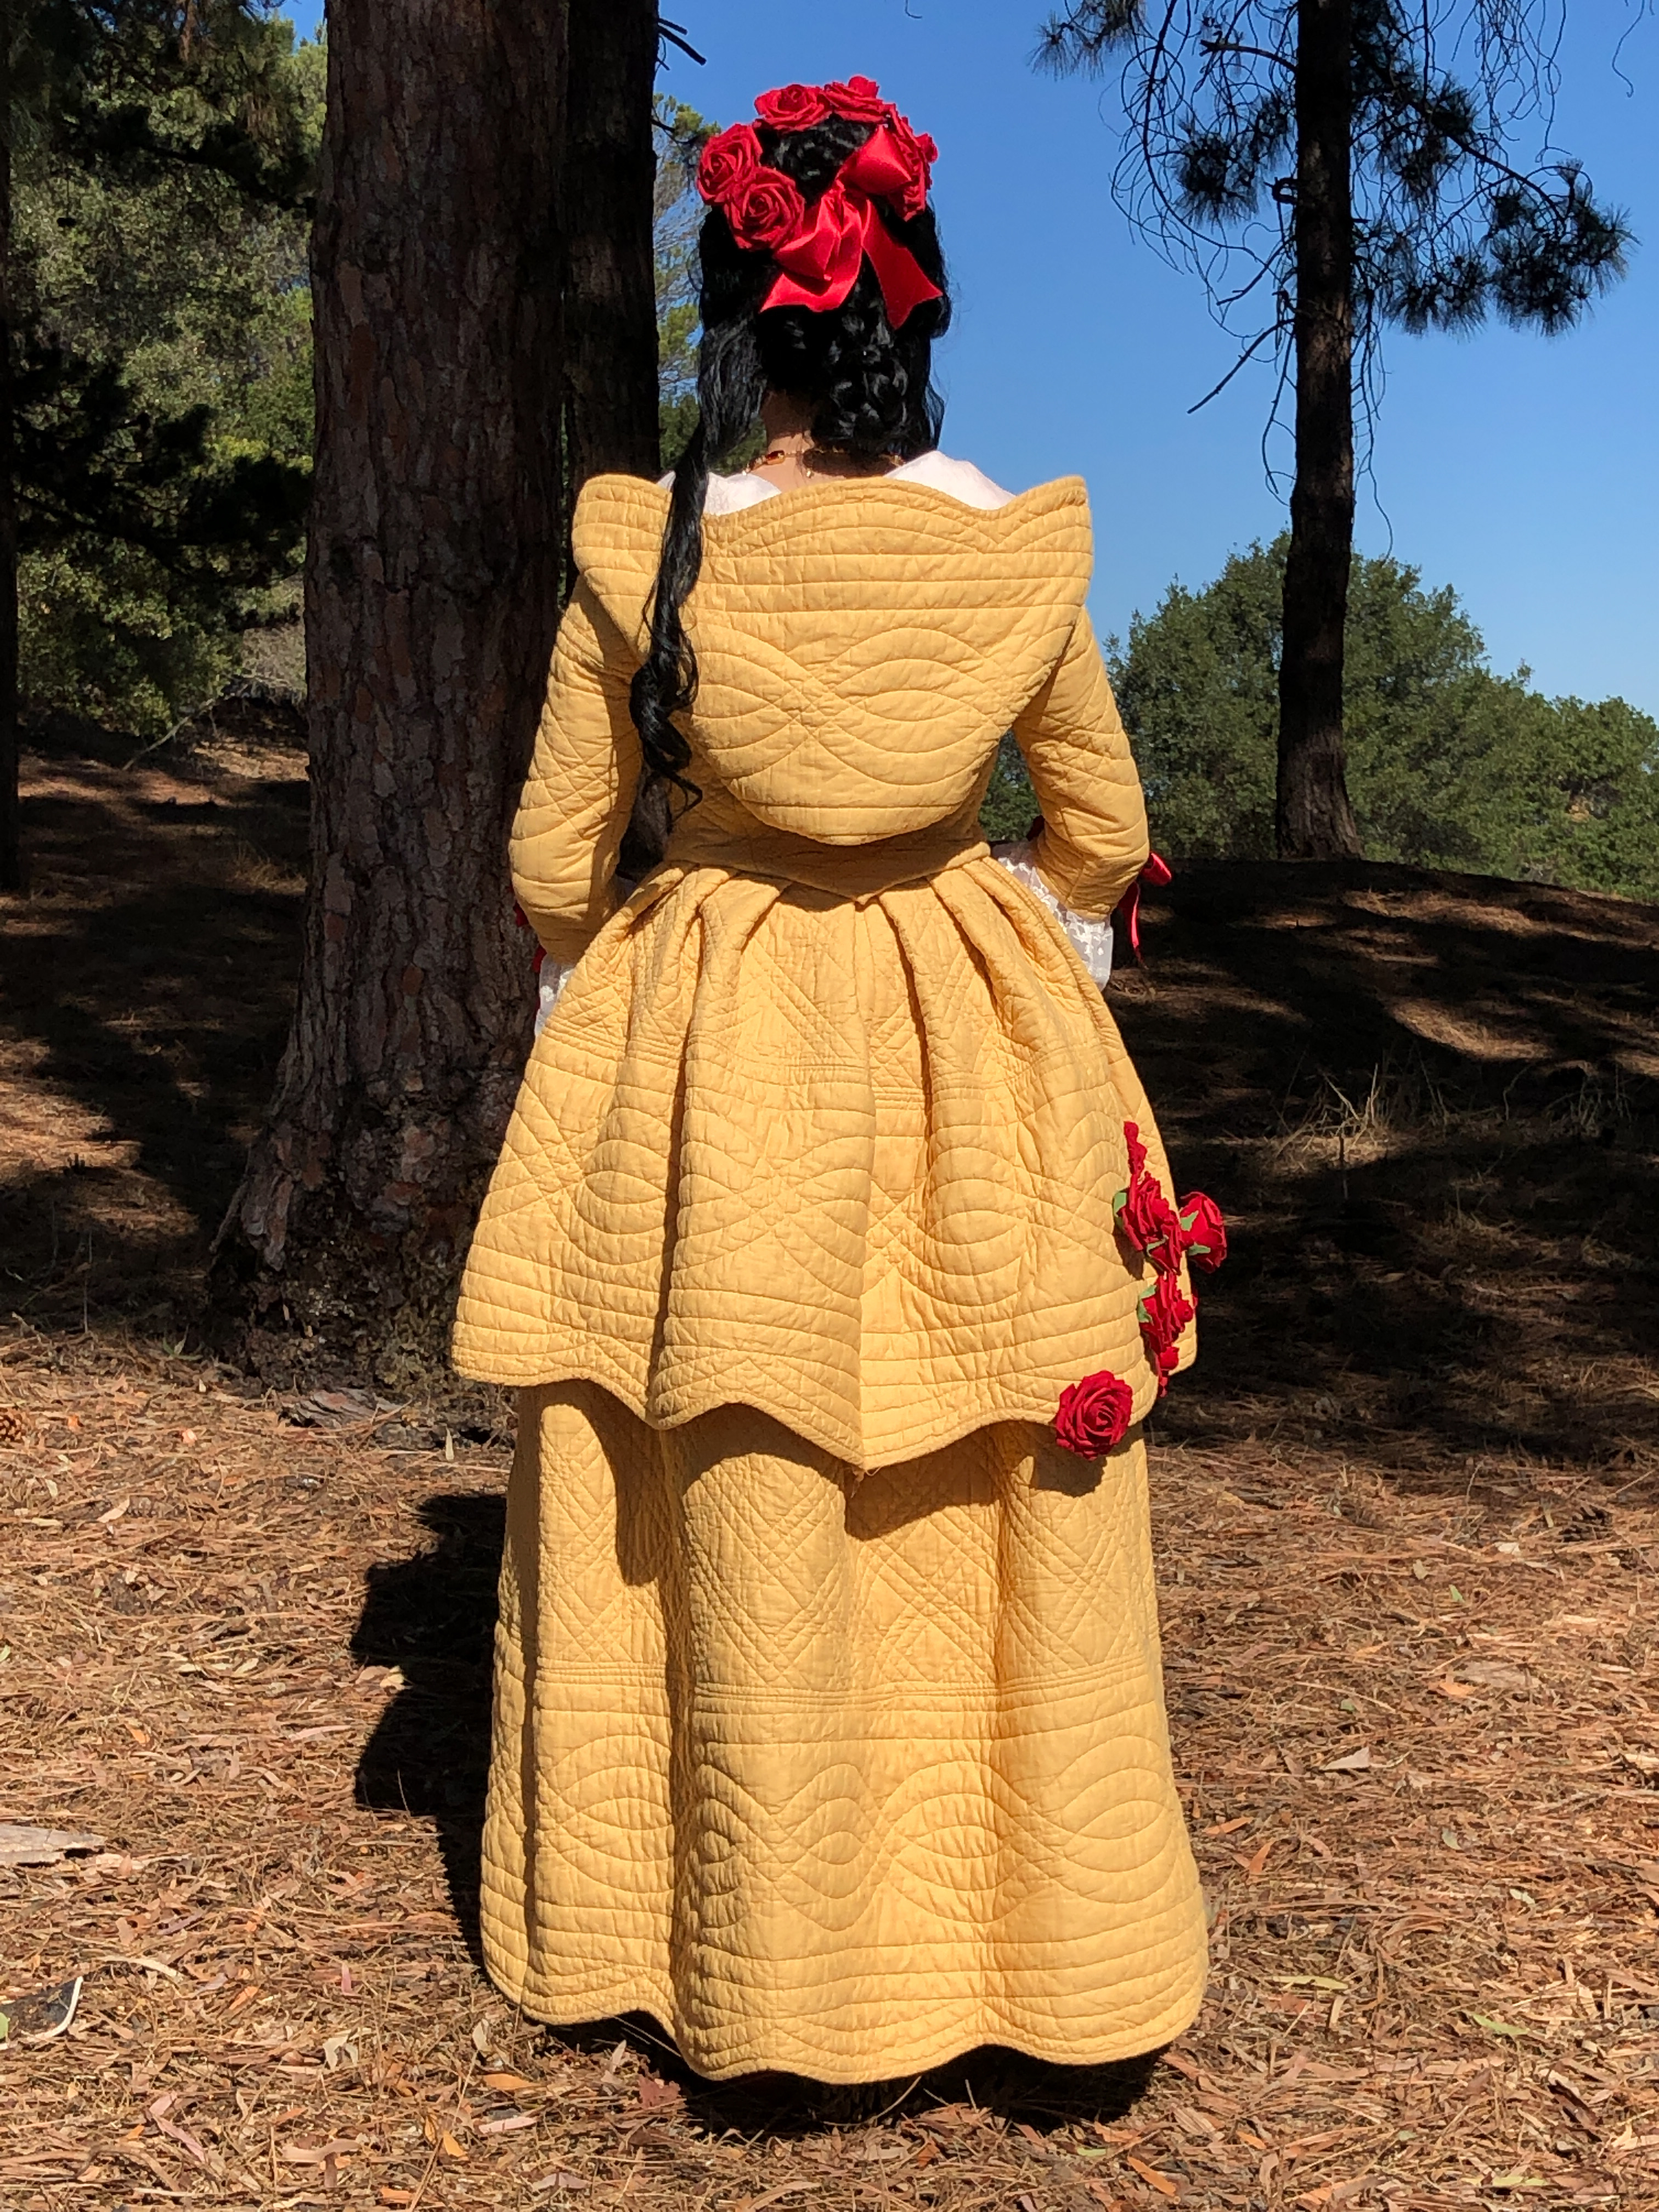
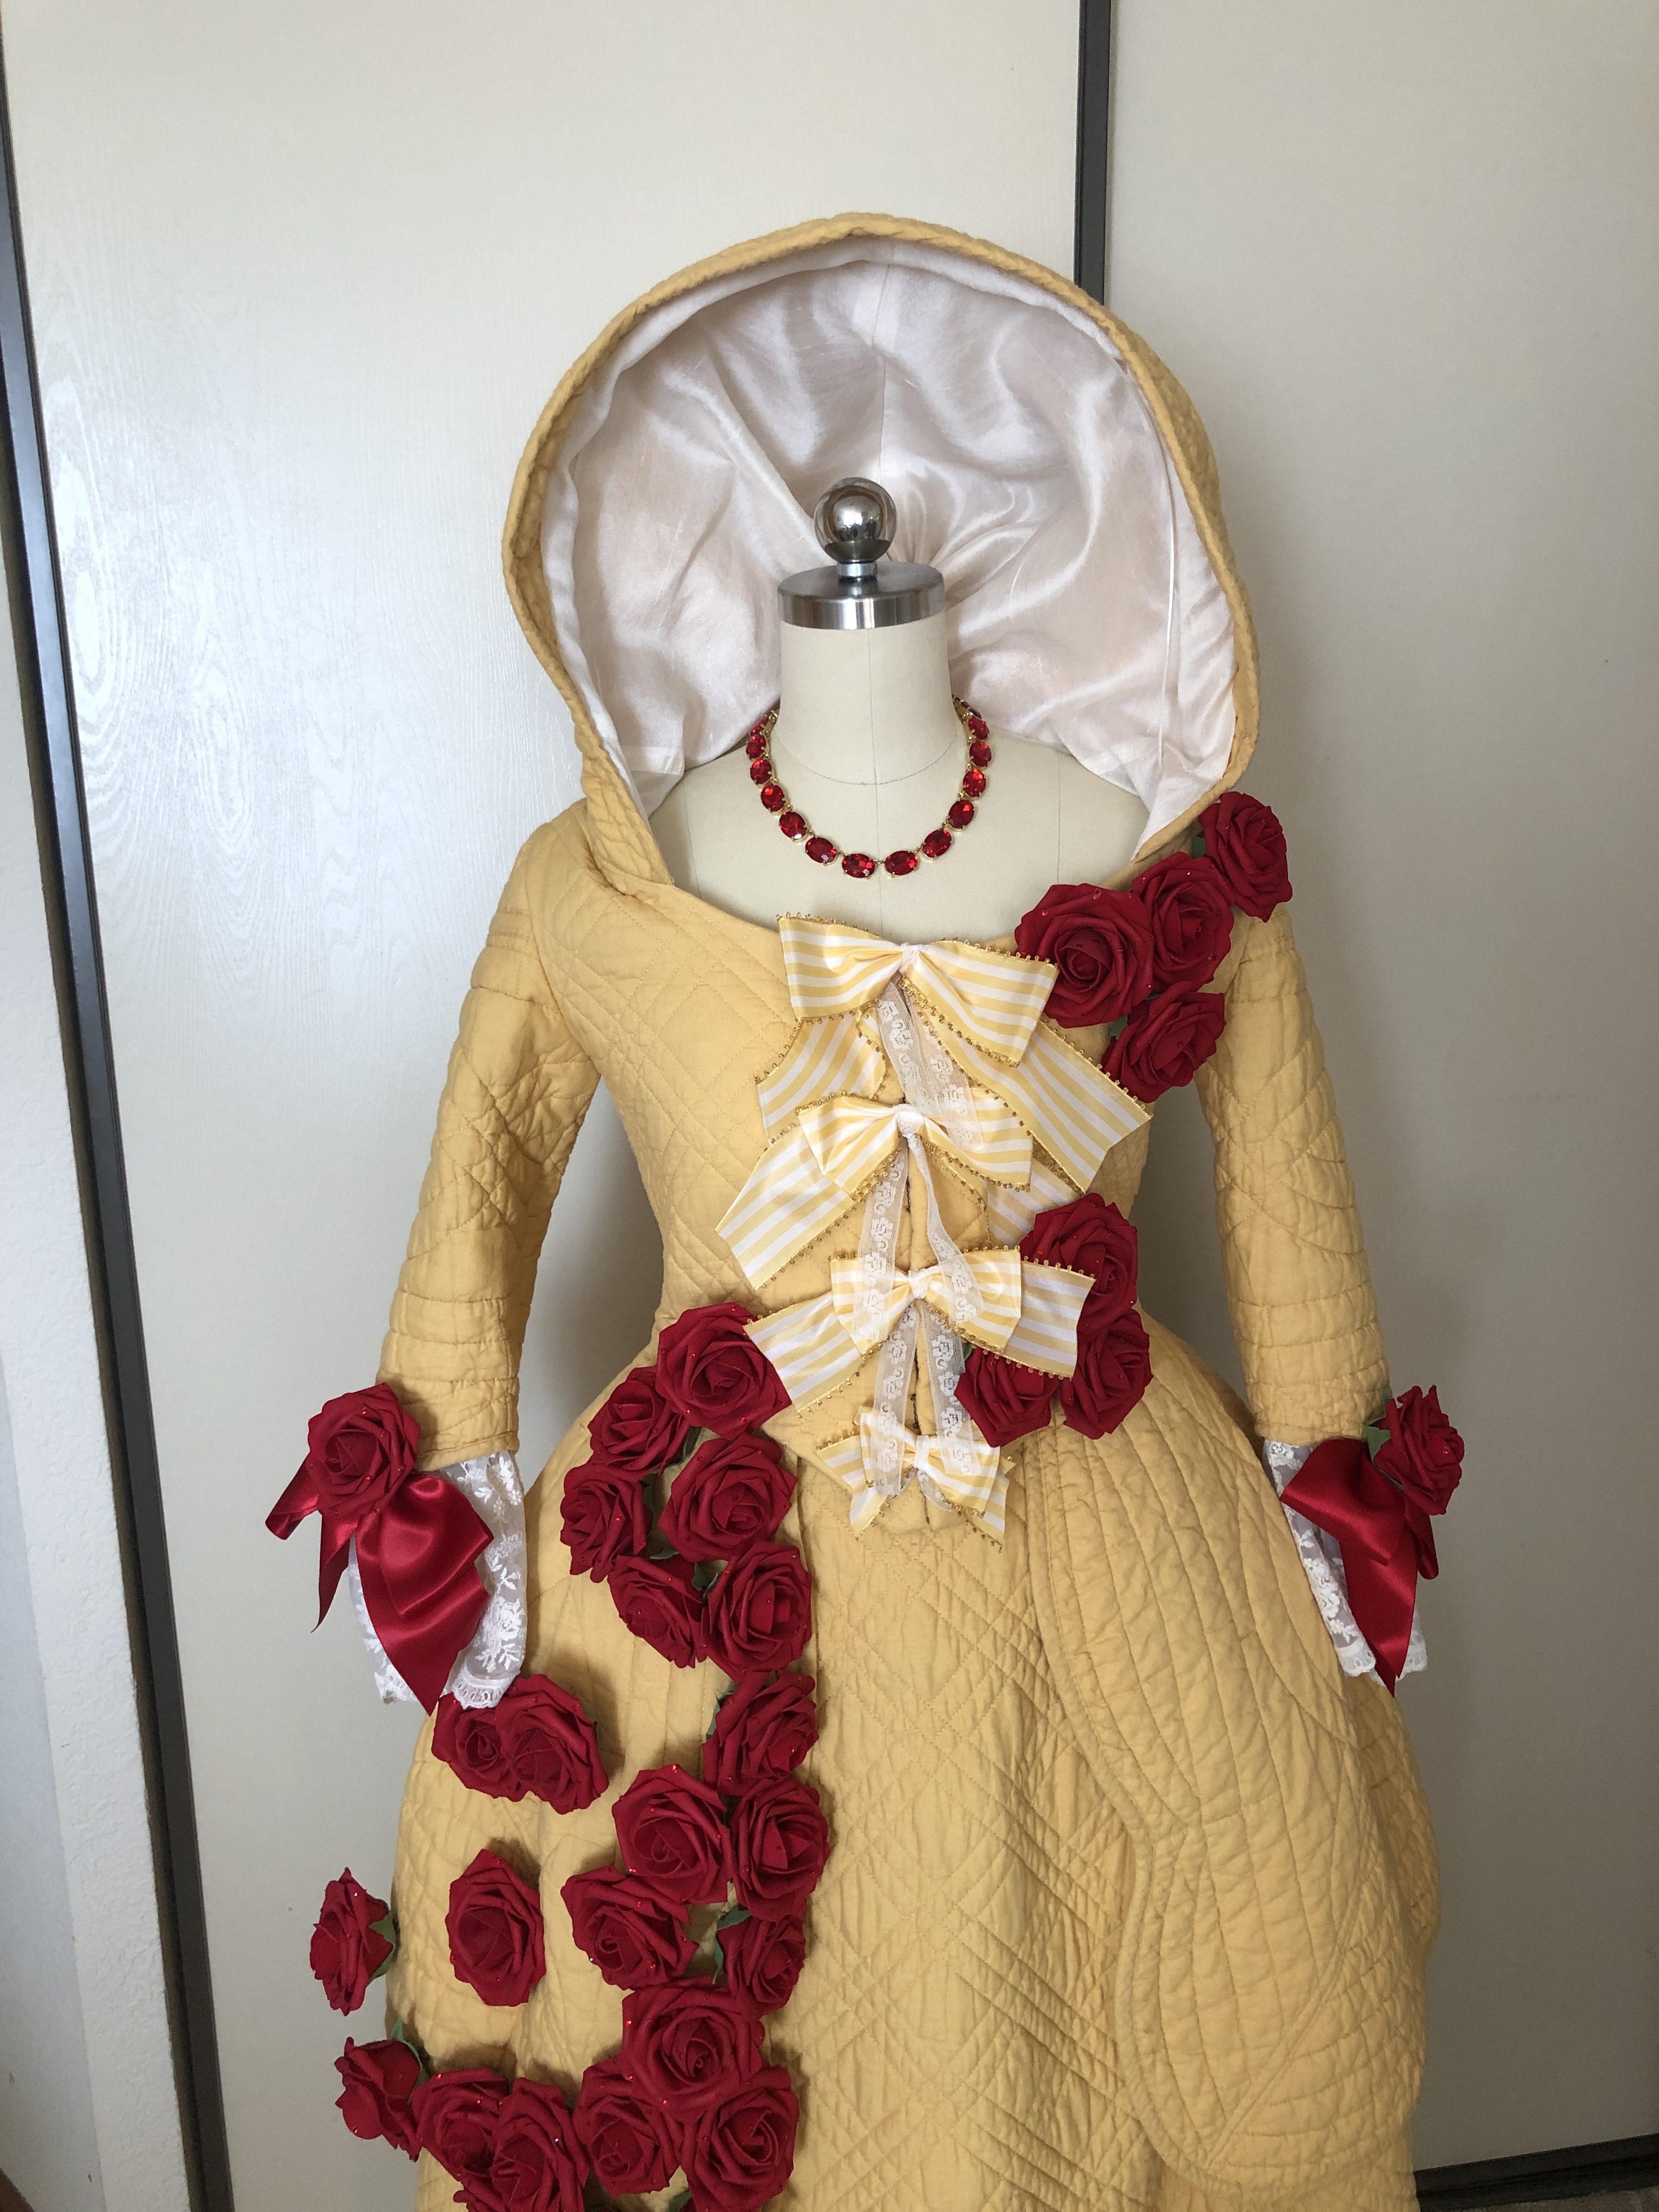
I made an 18th-century inspired mashup of Belle’s iconic yellow ballgown and her hooded winter outfit from Disney’s Beauty and the Beast.
The costume has aspects inspired by 18th century fashion but is not a historically accurate reproduction particular to a specific decade. I was heavily inspired by Brunswicks (the hooded traveling outfits) but you can also see elements from robe a la anglaise gowns, caracao jackets, and side-opening petticoats.
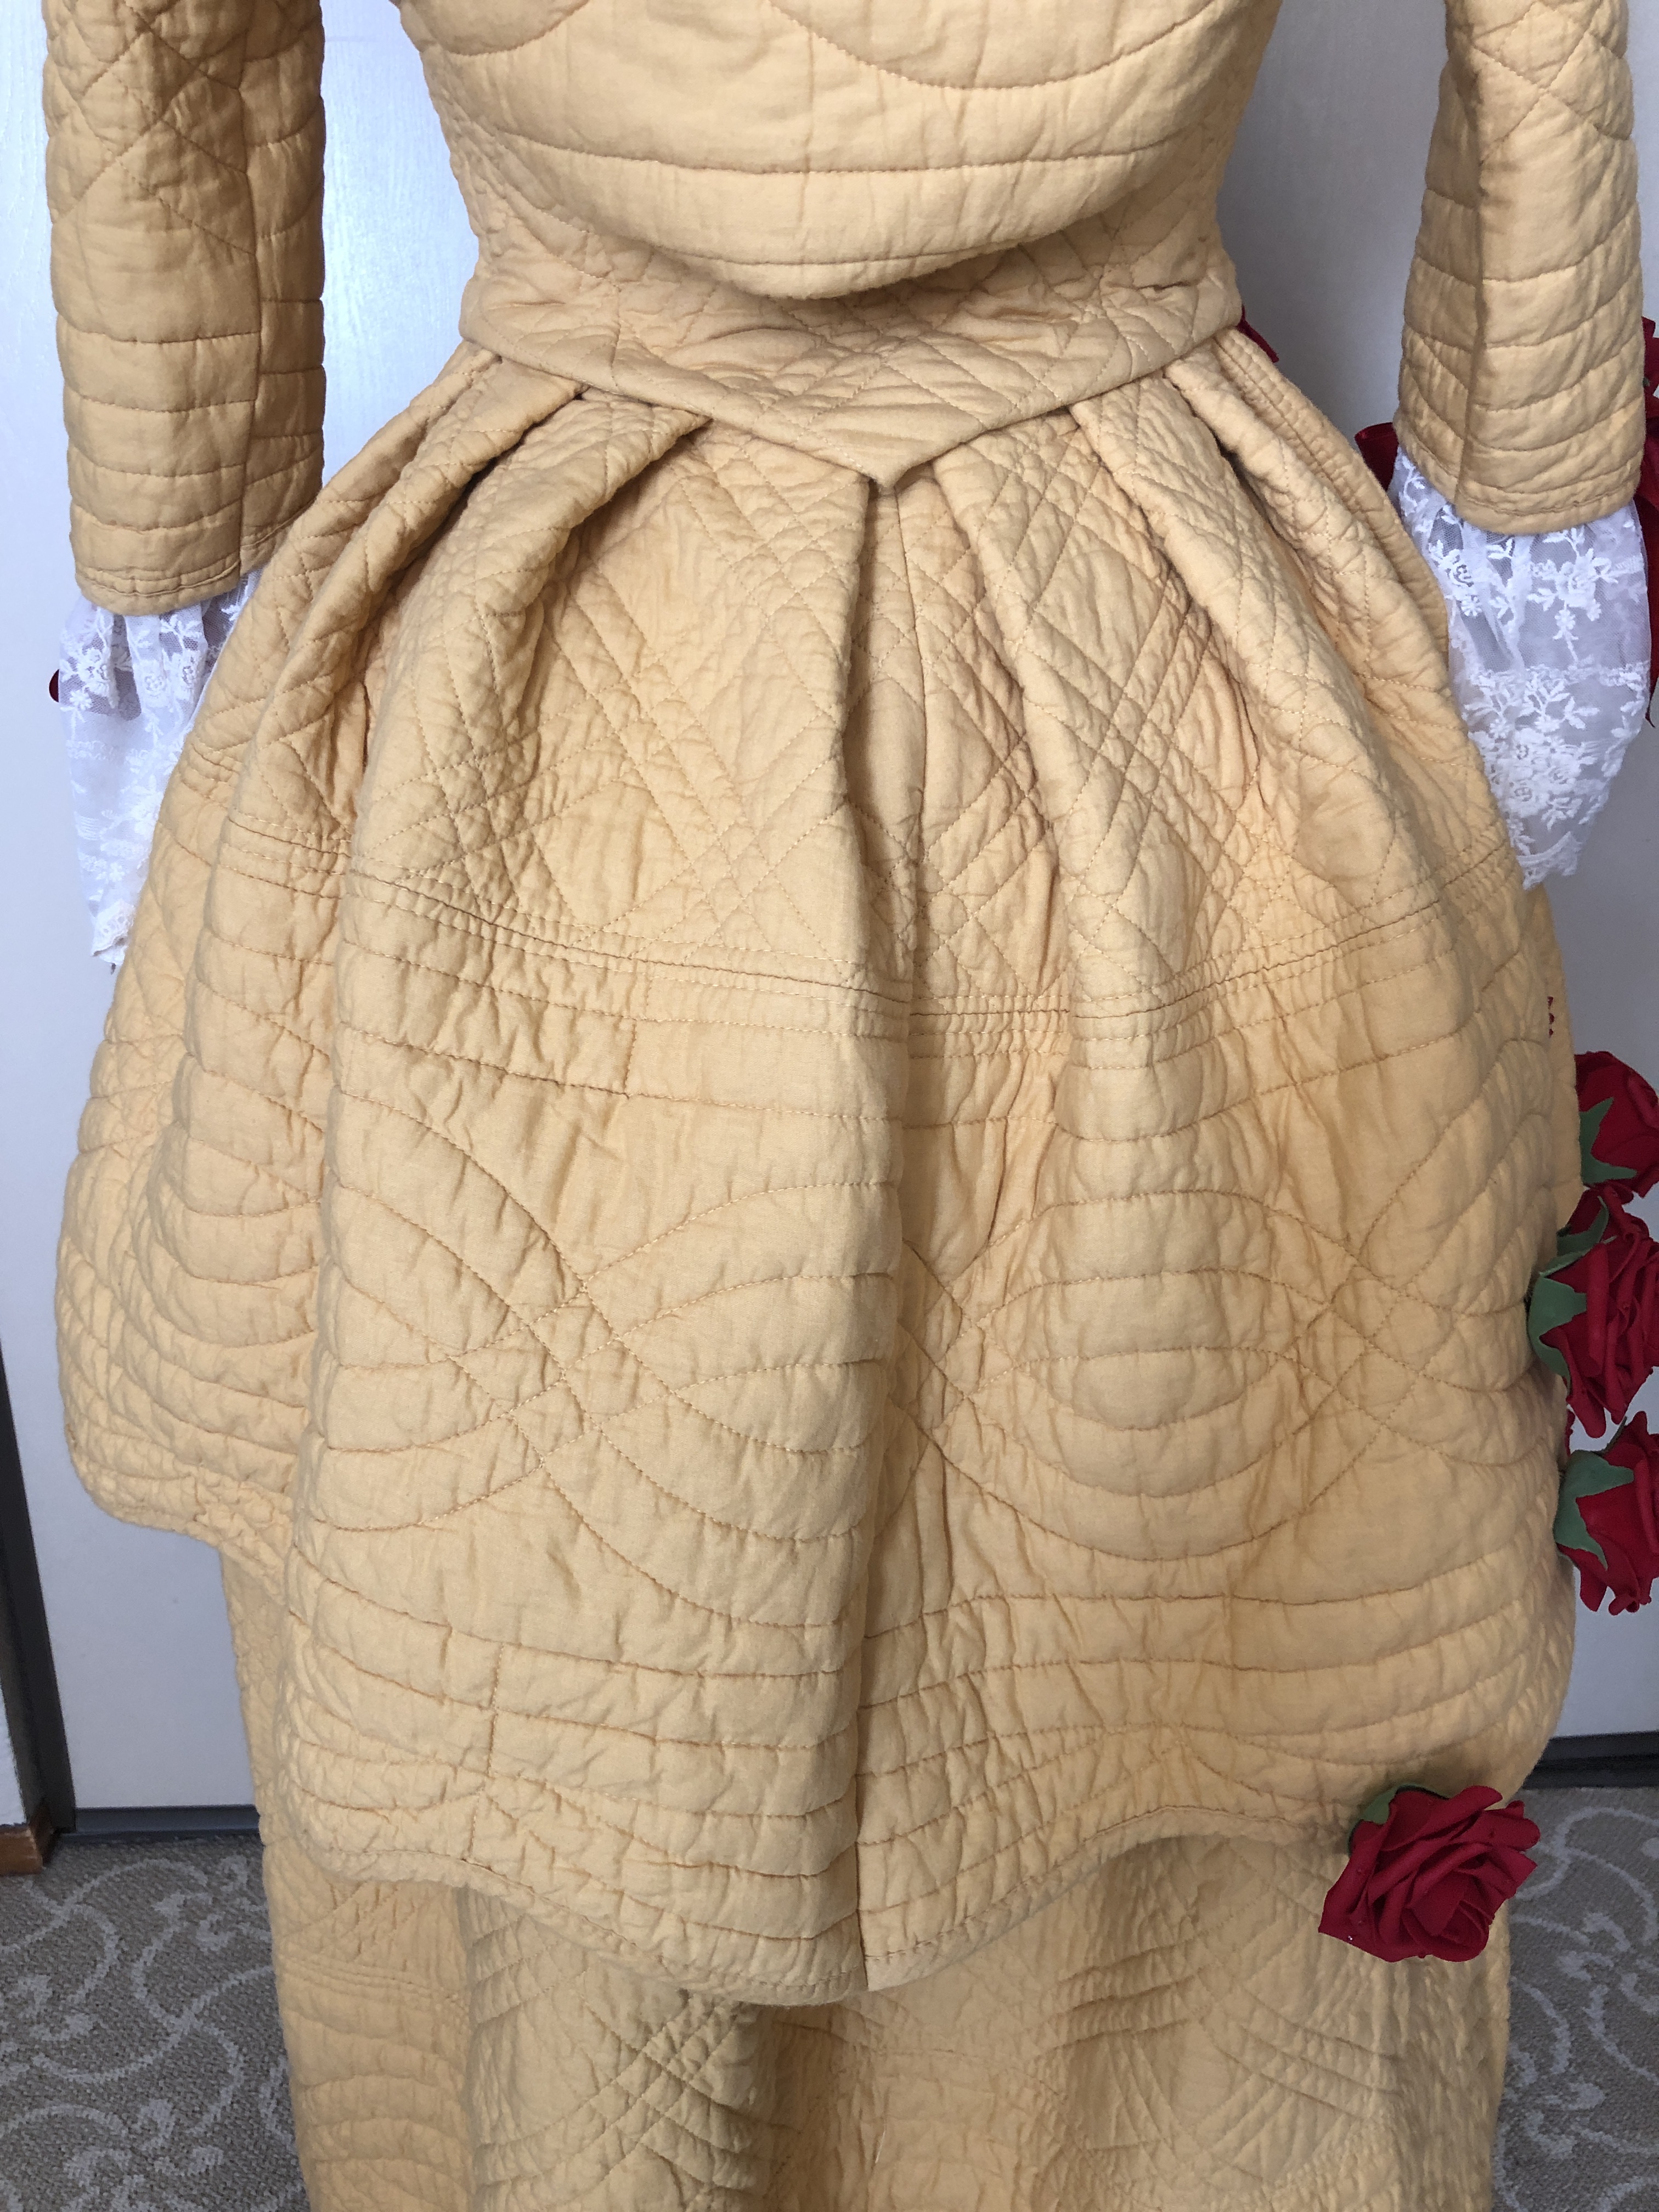
The yellow fabric I used is a quilted cotton harvested from a king-sized bedspread! It saved me a lot of time quilting, but the material created some challenges: I had to employ strategic cutting in order to maintain symmetry in the stitch designs in the final costume, and to keep the finished edges in the skirt, peplums, sleeves, and hood. The winter-appropriate thick cotton batting meant to avoid bulky seams I had to carefully pick out excess batting in the seam allowance of each pattern piece while maintaining (or restitching) the lines of quilting stitches. Raw edges were also serged to prevent fraying and loss of batting. Interior excess seam allowance had to be sewn down by hand since ironing was insufficient to keep seams pressed flat. In addition, the pleated areas were too thick to fit into the sewing machine and had to be stitched by hand.
However, I really like how the thickness of the material gave the garment a lot of structure, especially in the jacket peplum.
The scallops were also a feature I liked.
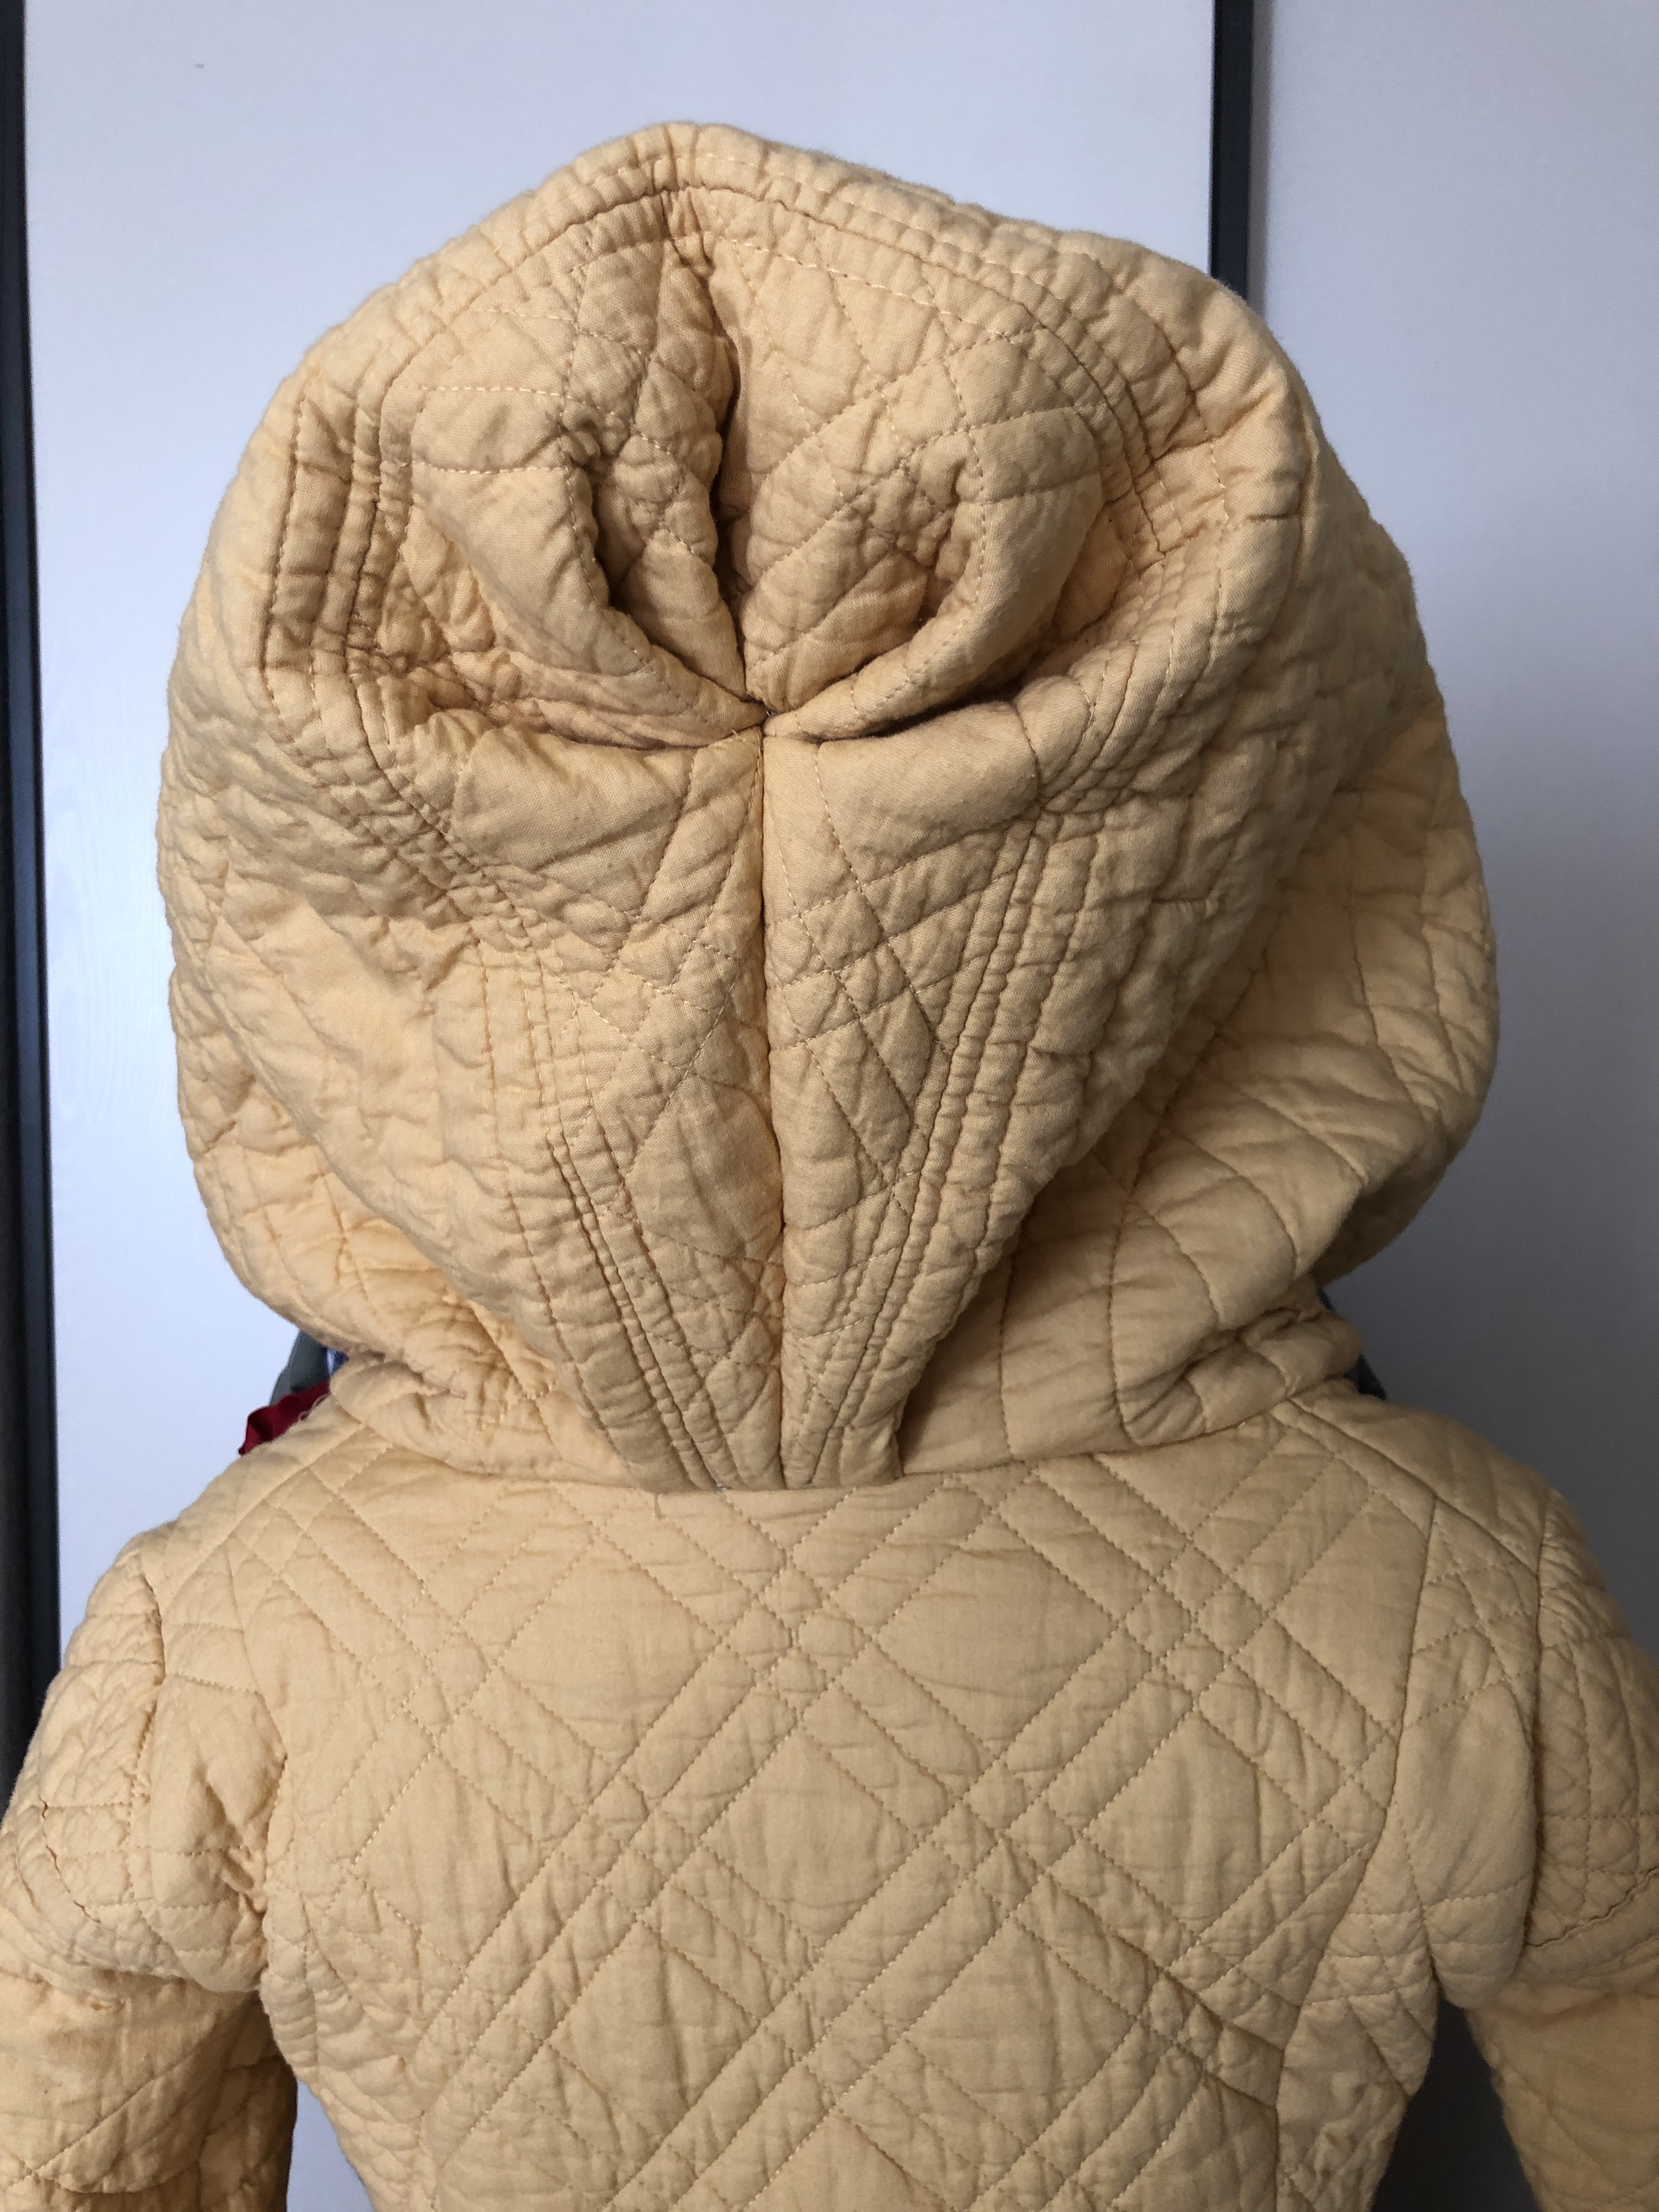
I lined the hood with scraps of white silk dupioni left over from a previous project. It was hand-stitched in so I could keep the scalloping on the hood.
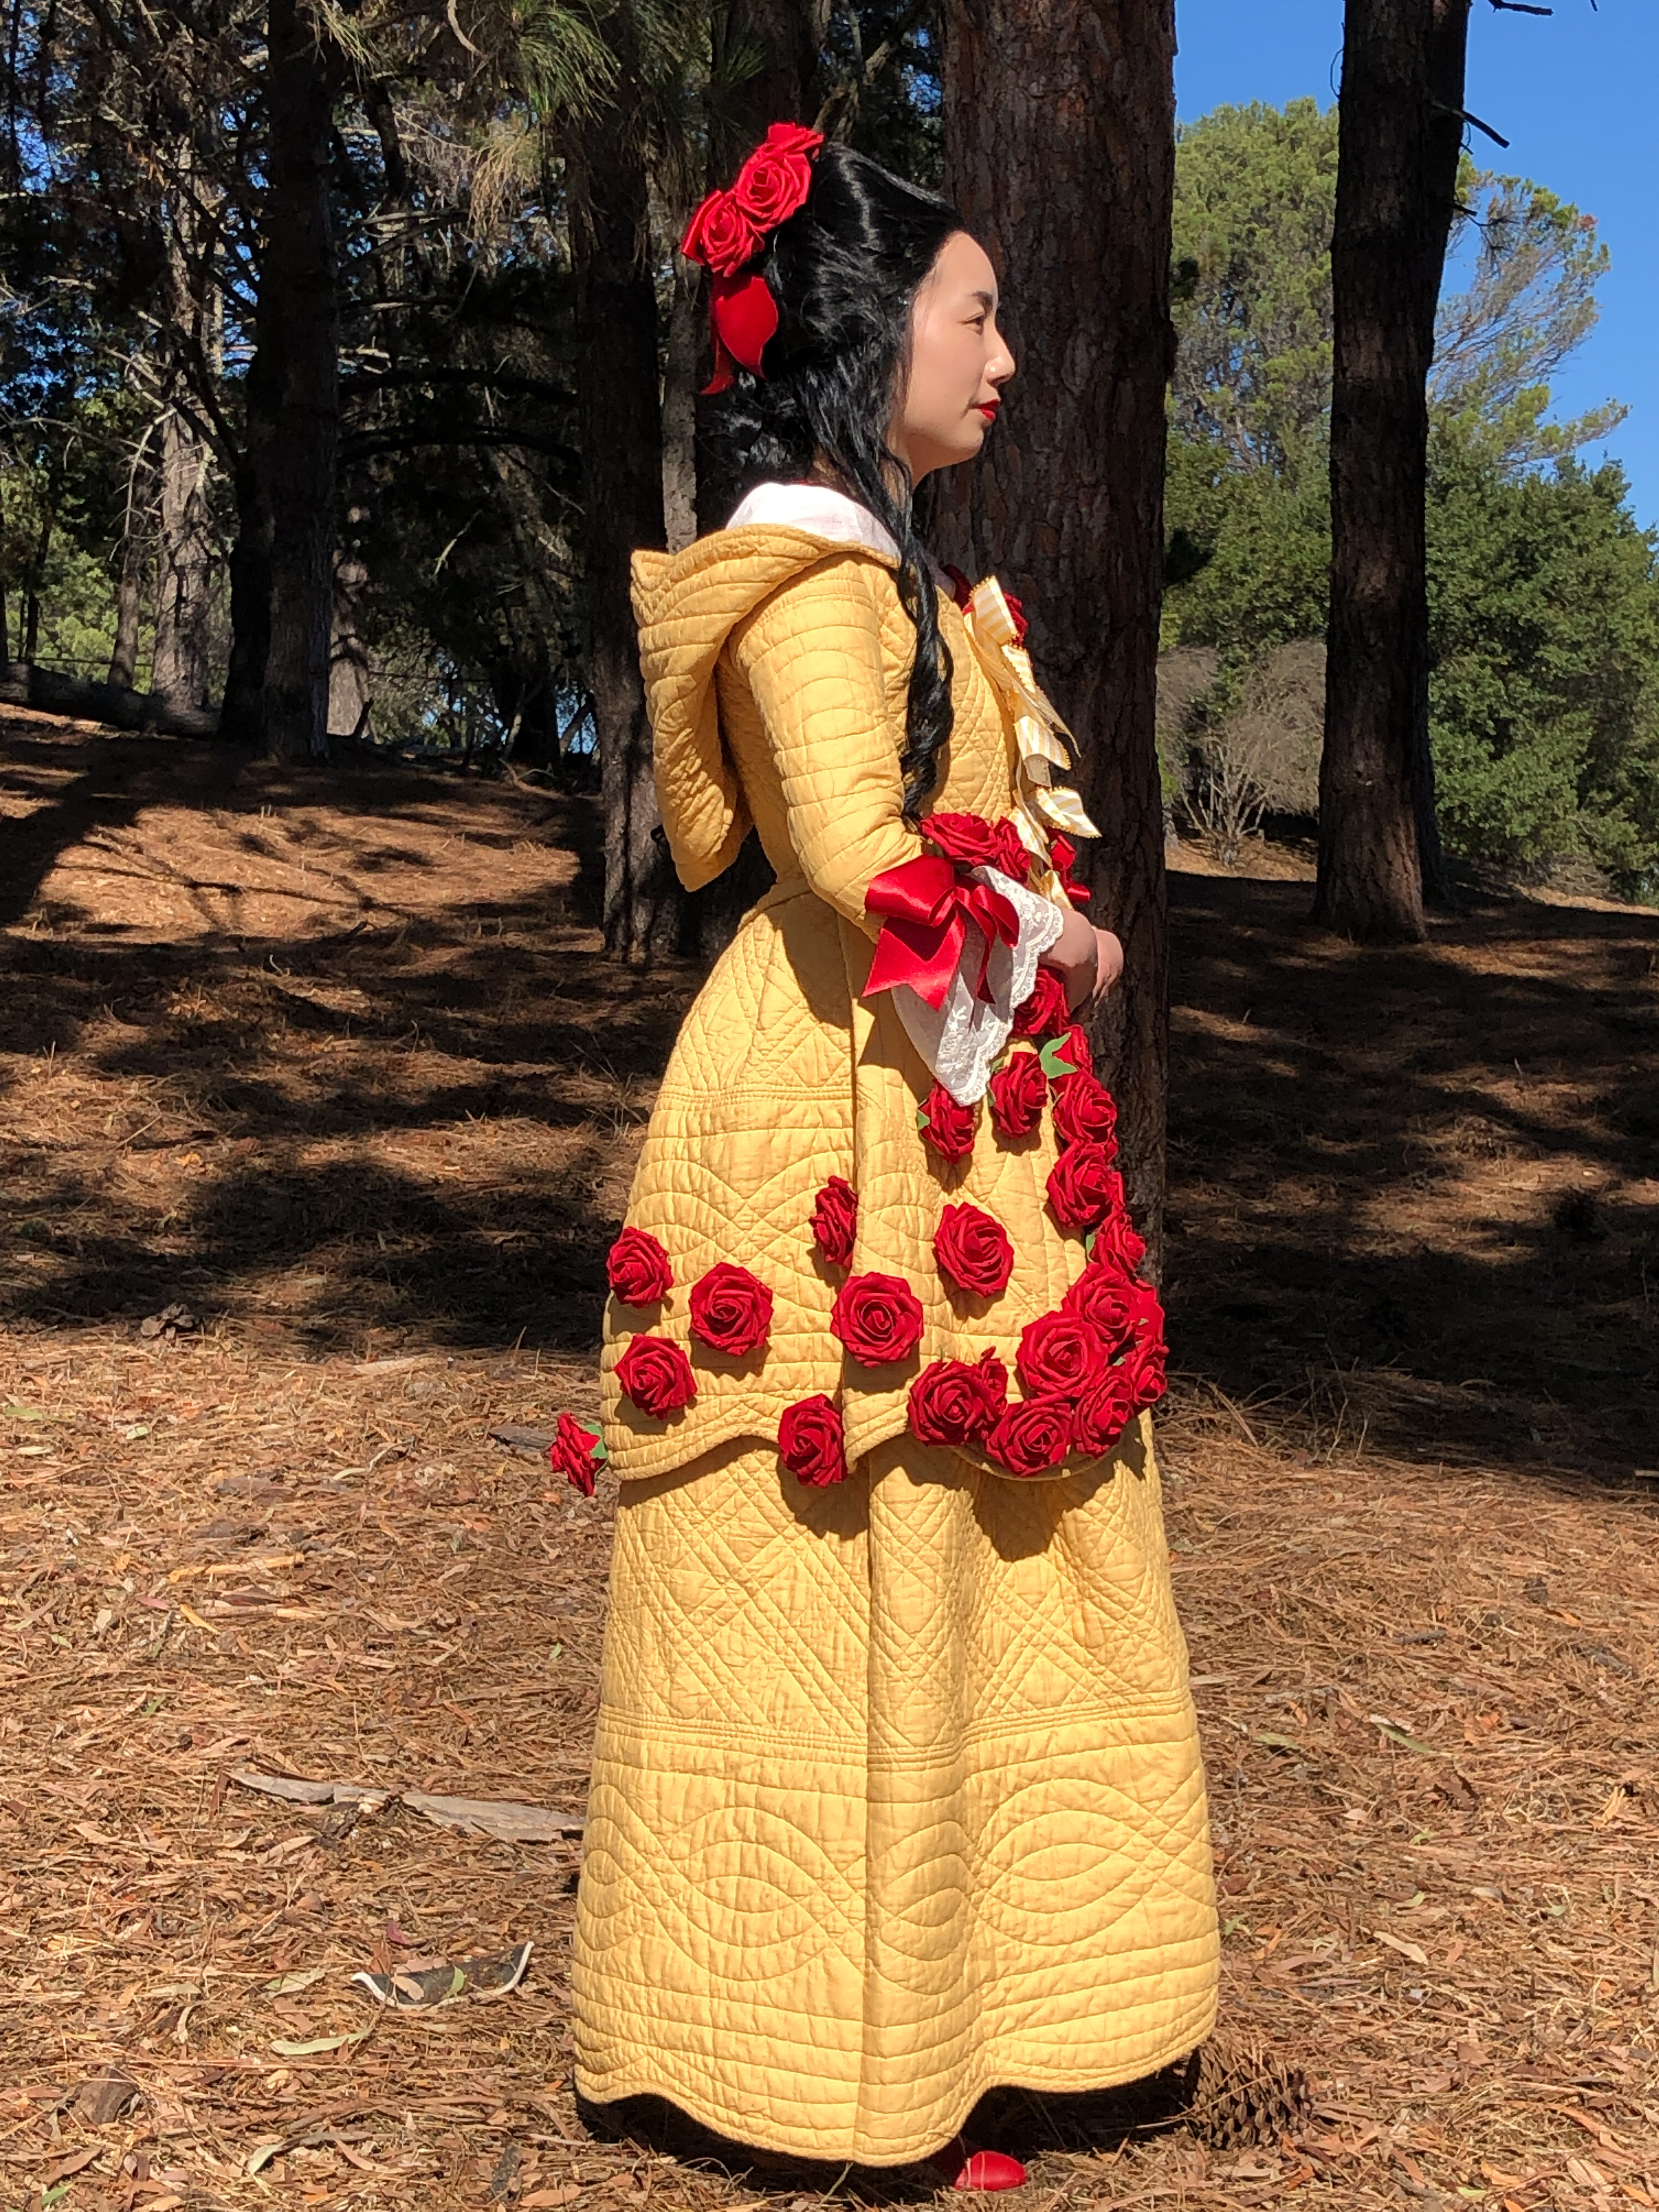
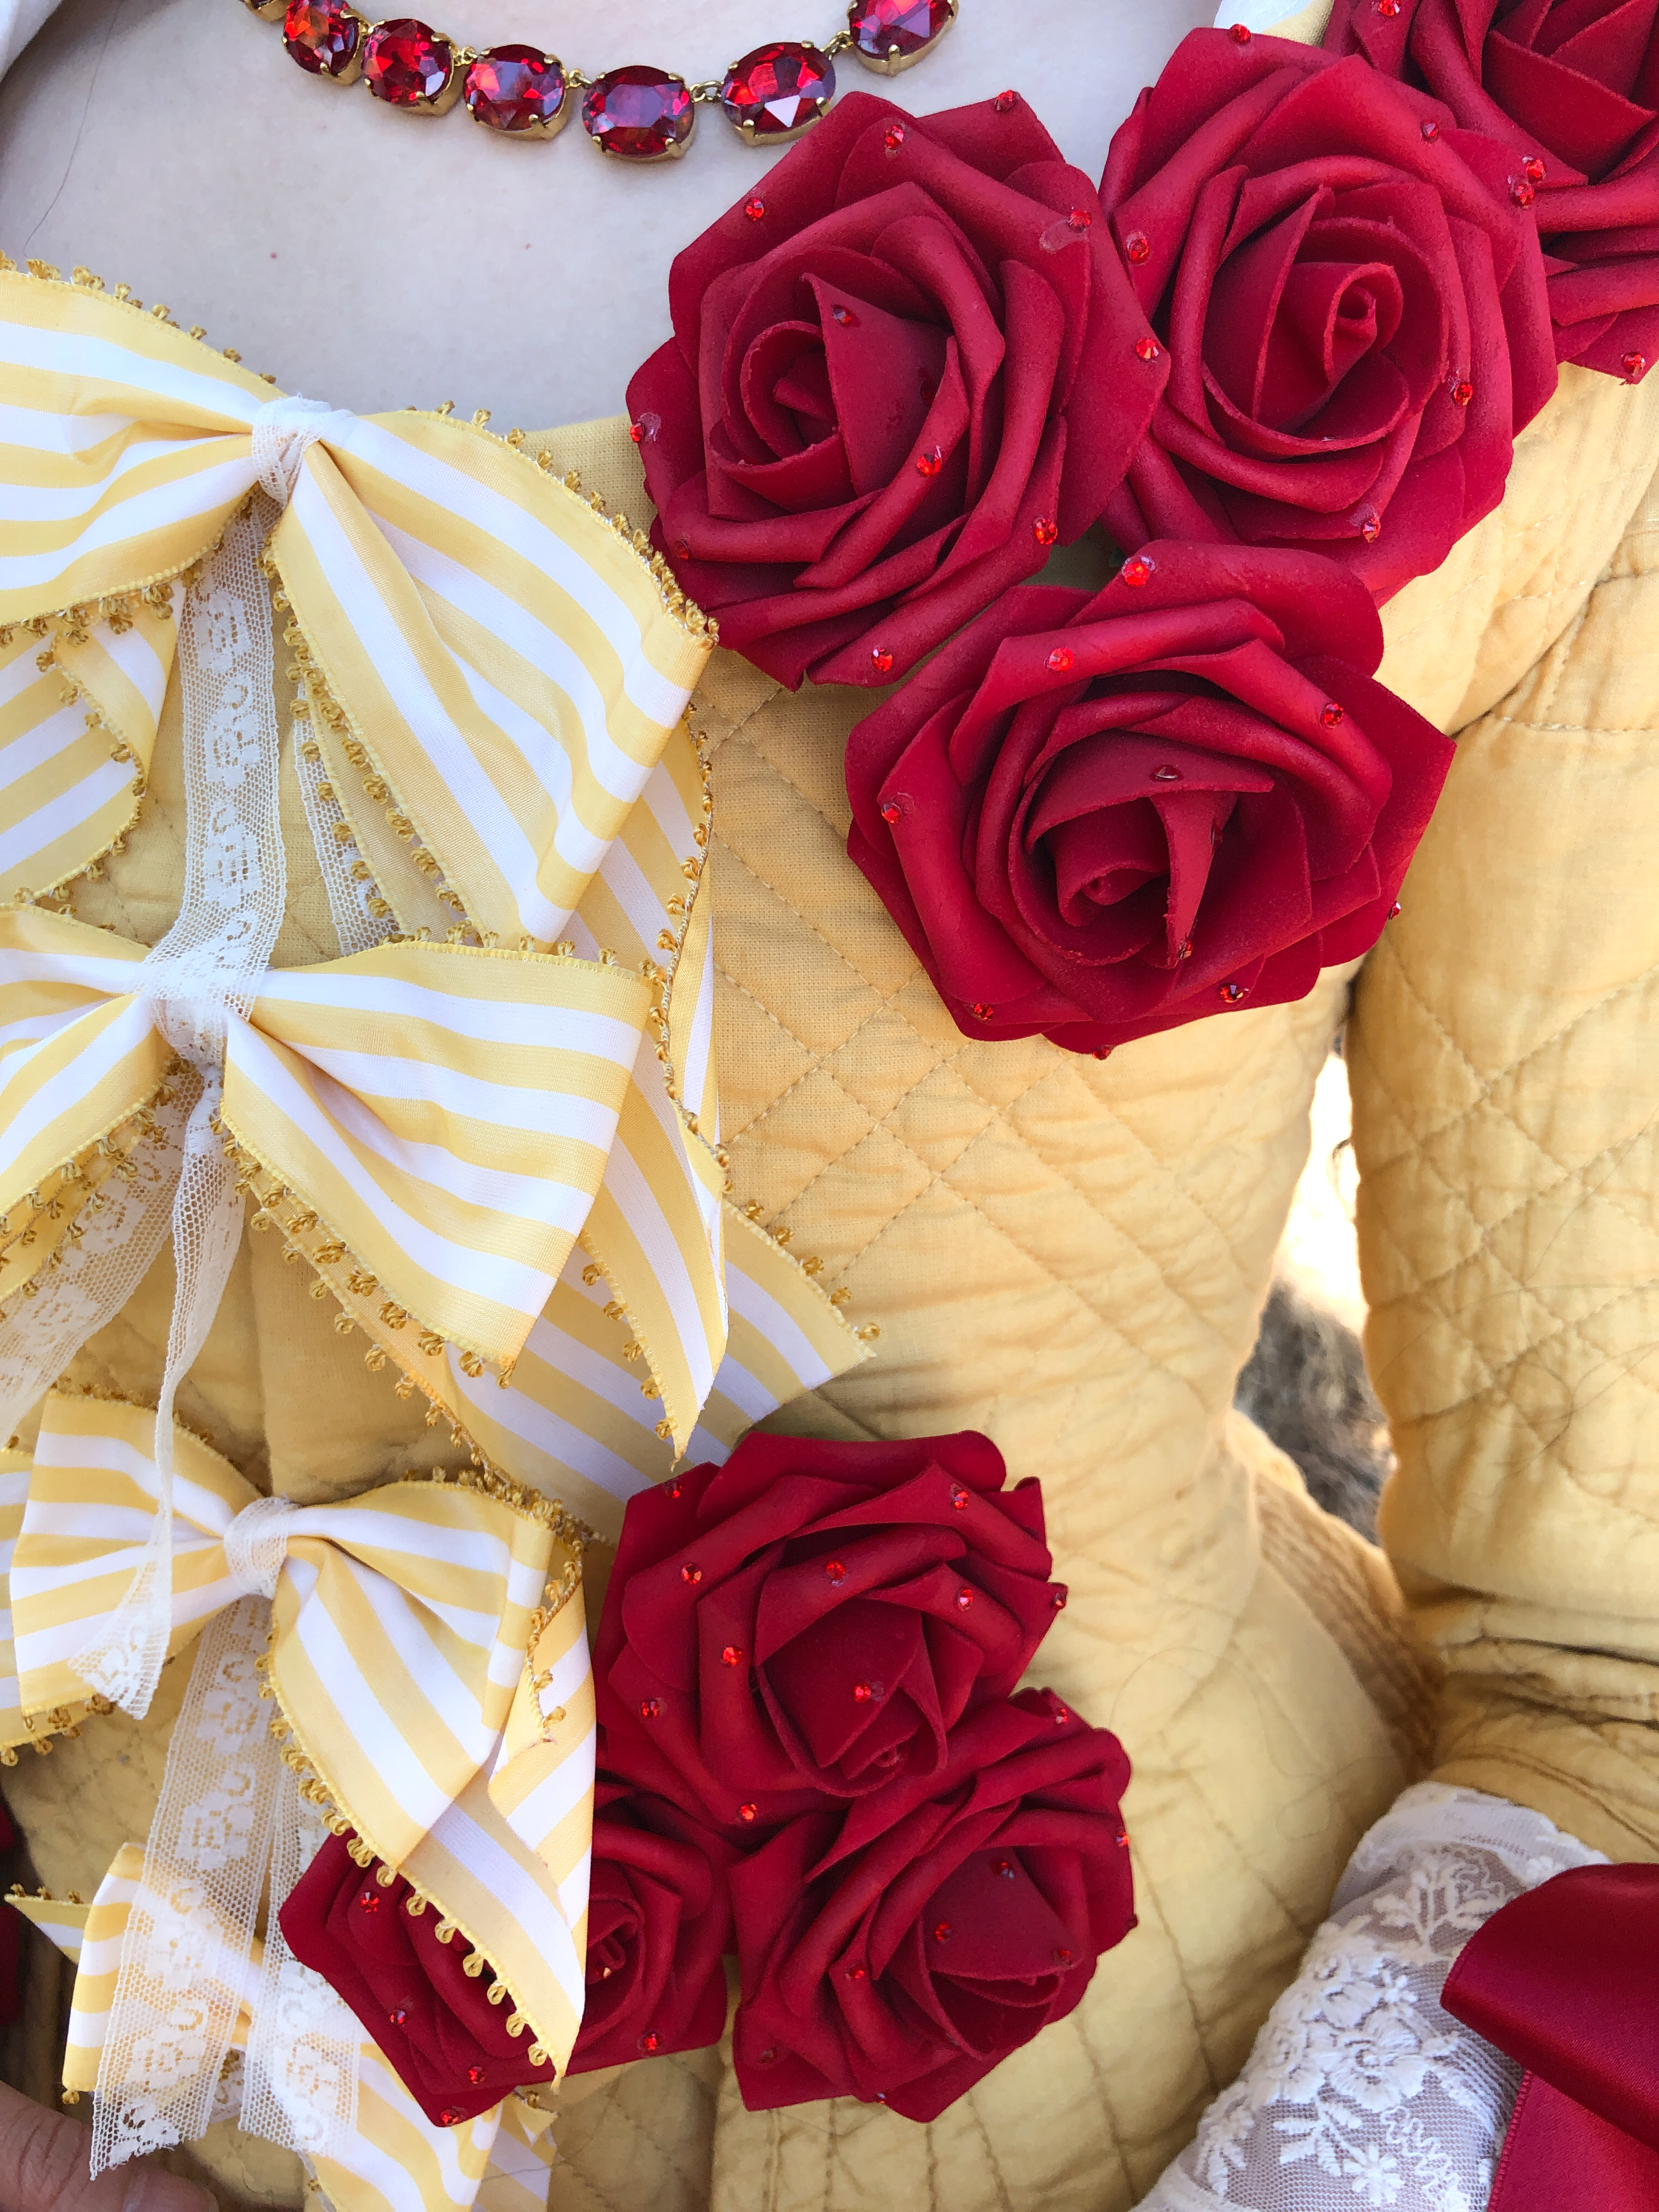
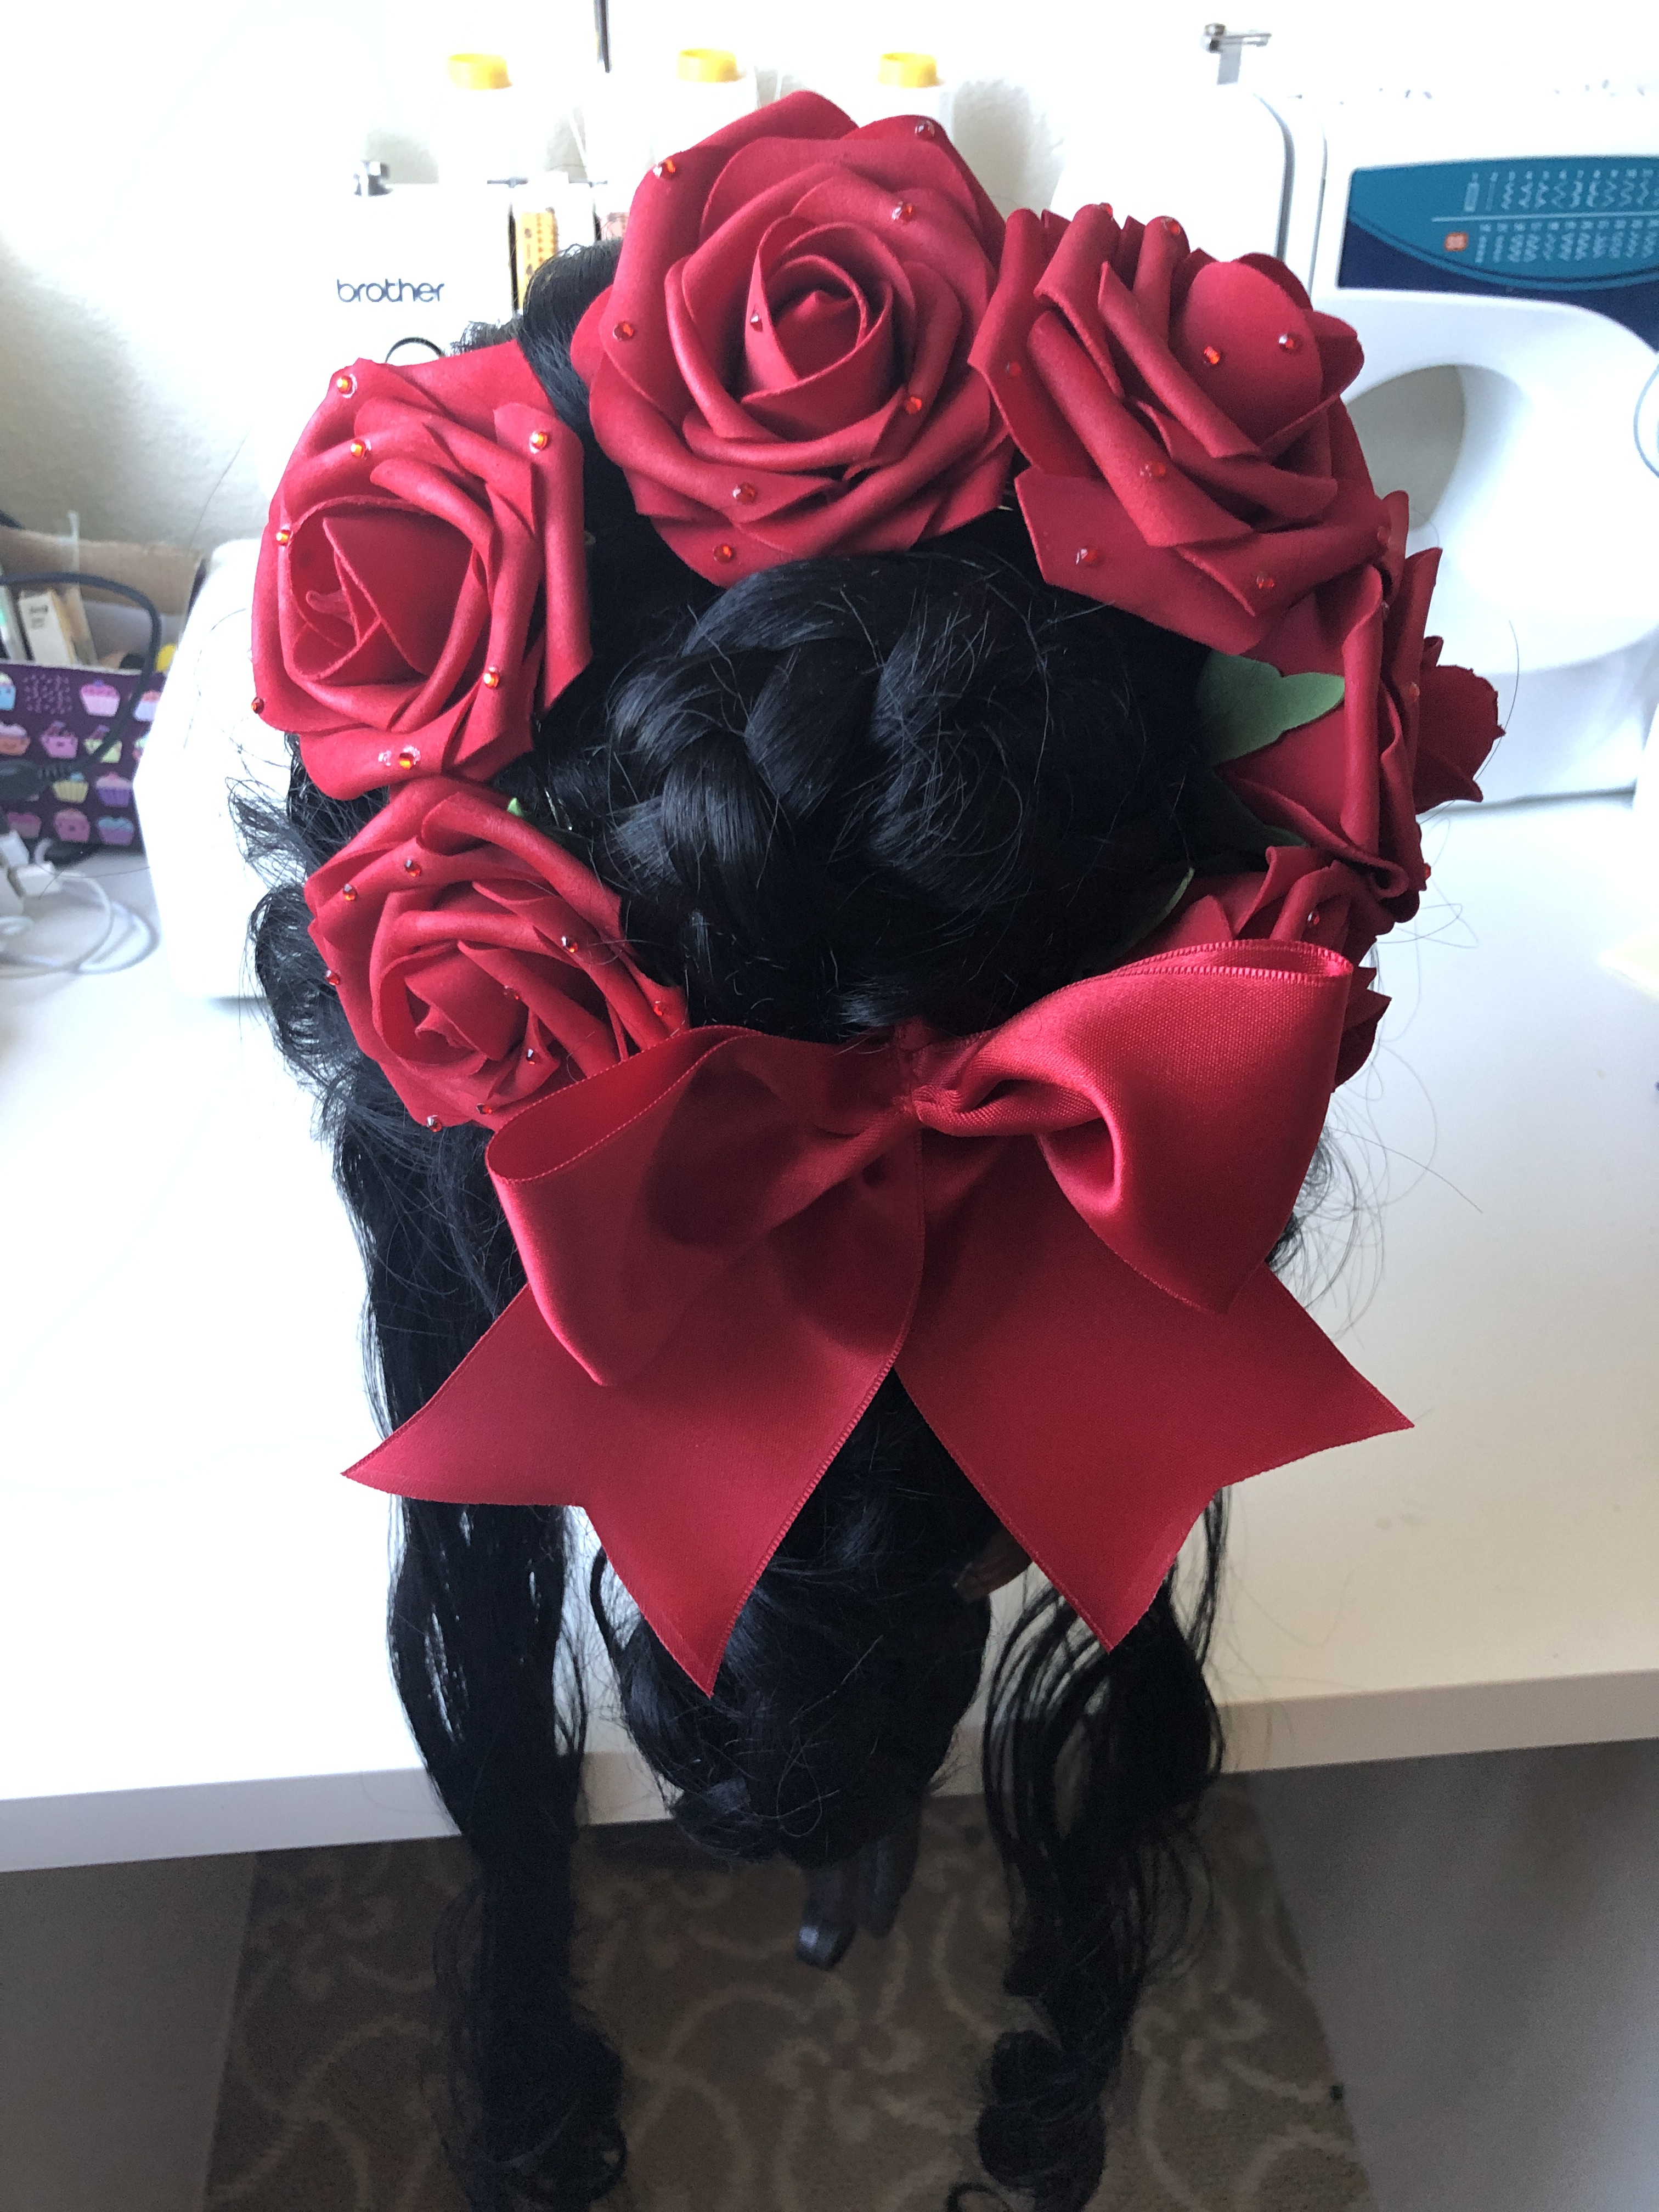
The jacket was decorated with realistic foam roses on wired stems that I trimmed and shaped with pliers to create a base for hand-sewing onto the jacket. Each rose is accented with red crystals I glued on individually using E6000 Fabri-Fuse glue, which I highly recommend. (This is not the regular E6000 glue. Fabri-Fuse is low-odor, dries quickly, and comes in a squeeze bottle with a sharp tip for detail work).
The yellow and white striped bows are made from vintage French ribbon with picot edging, accented with antique lace. Each sleeve has embroidered tulle lace, large red satin bows, and a rose.
The outfit was a combination of self-draping and Frankensteining. The main body of the jacket and sleeves used a heavily modified version of the Period Impressions 1780 Polonaise pattern, which I previously used for my Outlander dinner party dress. However, I took out some back seams and altered the sleeves around the elbow region. The peplum was created by holding and pinning material up to the upper jacket on the dress form until I got the length and fullness I wanted.
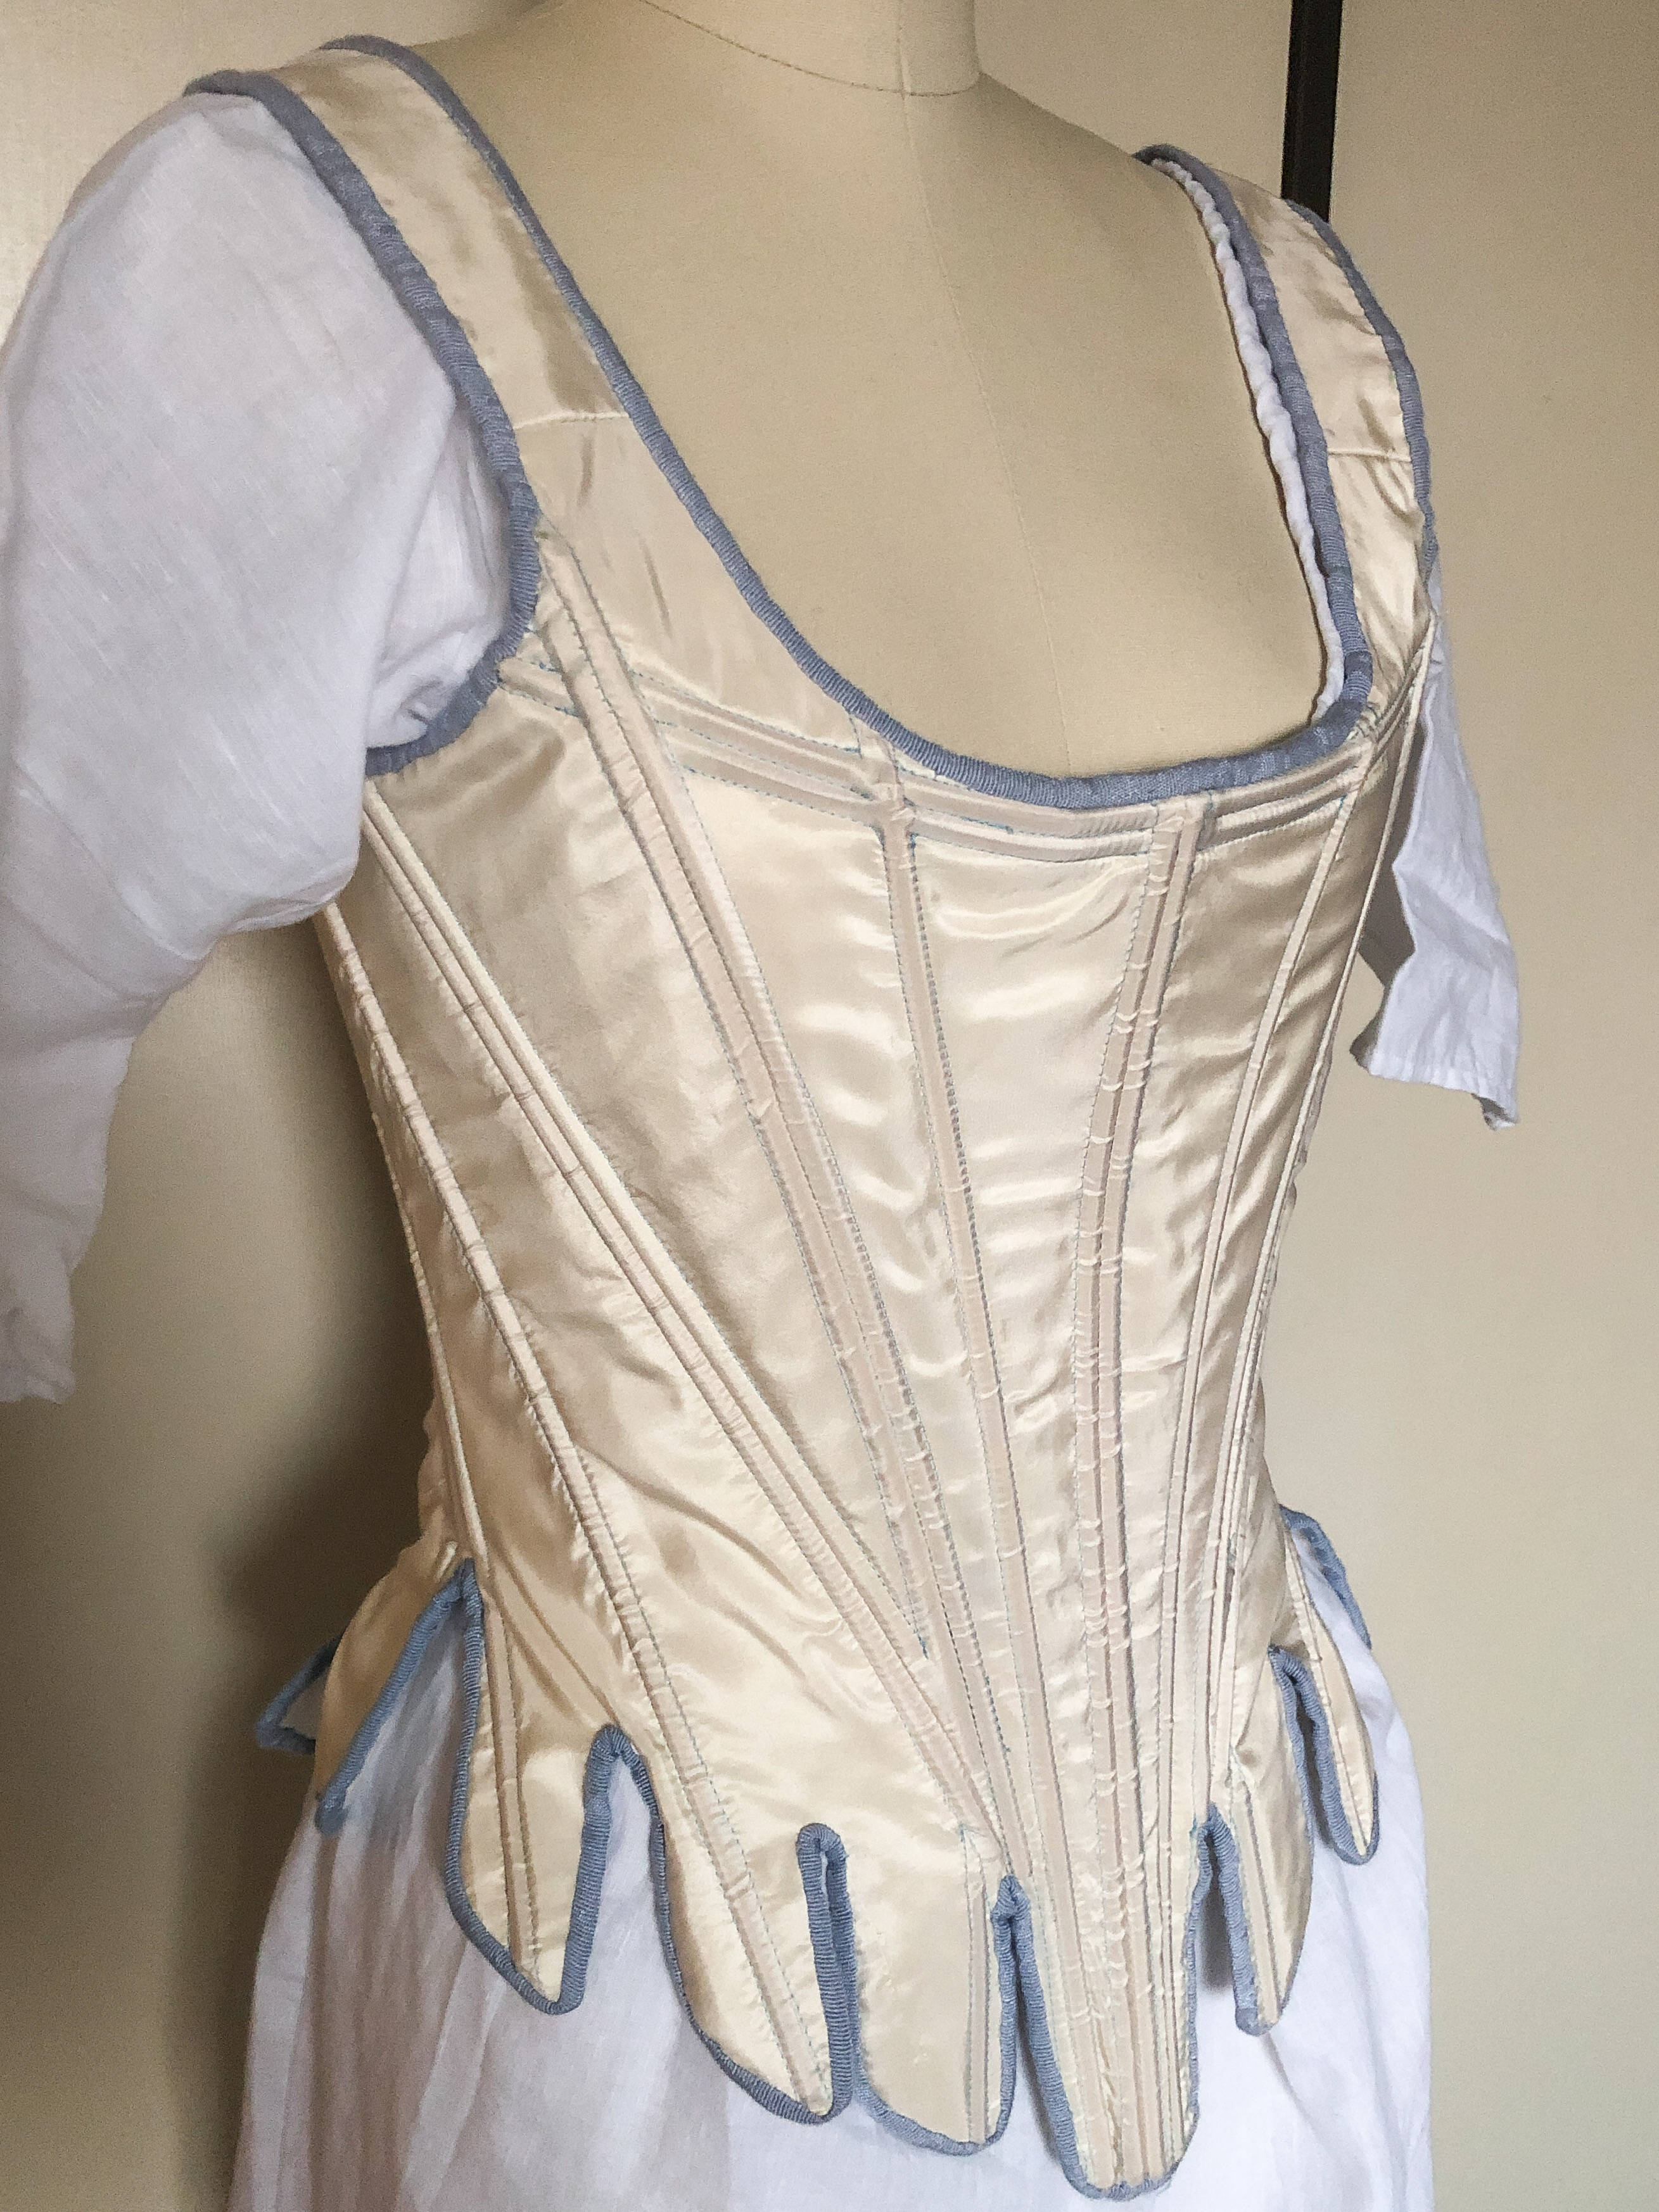
The hood doesn’t stand up by itself, so it’s being held up here by a piece of boning to show you the shape:
No pattern was needed for the quilted petticoat, which was constructed in the same manner as your usual 18th century petticoat with side slits. The front and back panels were pleated into twill tape that served as waistbands and ties. Because of the thickness of the material there were less pleats than usual and I left a large section of the front center unpleated to allow for the jacket to sit flat over the stomach.
Materials used:
BrylaneHome king-sized quilted bedspread (in “aspen gold” color): $49.90 from Amazon (affiliate link).
Total: ~$161.73 (I’m not including the shoes or jewelry because those were items I already owned for other costuming purposes. About $40 of the total is a wig I can reuse, plus I had some left over materials, so I’m calling this project a win for my pocketbook!).
I had a lot of fun making and wearing this costume. I even entered it in my first ever cosplay contest and was delighted to be a finalist in the Cosplay with Singer contest this fall! Here’s a video of the costume in action that I made for the contest:


 12-14-19")
